

Its likely that you’ve seen or heard of the “viper cut” before. This is done to clear bigger tires, get more clearance, or for looks.
In my case, I needed to do this so my tires would stop rubbing. I already used a heat gun to push the fender liner in, but I was still slightly rubbing during full articulation on the front bumper/fender.
The people who do this high clearance cut might want to retain the stock look of their Tacoma while gaining some space and a more aggressive look. This mod is perfect for anyone who doesn’t want to shell out (about) thousand dollars for a new bumper.
You may be apprehensive about cutting into your truck. I was in the same boat – but I decided to give it a go. Here’s what I learned.
Table Of Contents
Materials

Tools & Materials
- Cheap Rotary Tool
- Cheap Rotary Tool Blades
- Upgraded Dremel
- Upgraded cutting blades for plastic
- Rotary Tool Sanding Wheel (cylindrical)
- Masking Tape
- Pen or Marker
- Automotive Edge Trim
- Funnel (optional)
- Utility Knife
Also Necessary (not pictured)
- Safety Goggles (important!)
- Scissors
- Hole Saw (optional)
- Heat Gun (optional)
- 10mm Socket Wrench (optional)
- Utility Knife (to clean up edges)
Step 1. Choose Cut Line

There are a few variations to choose from.
What you do depends on how much material you’re comfortable taking off Also, keep in mind bumper upgrades you may want to do later. For example, if you want to go with something like the SSO Slimline, make sure you don’t trim too much or you will end up with unsightly gaps.
The graphic above illustrates some of the options.
The red line is the most aggressive you can get without interfering with the fog lights. As stated above, this line might be taking off too much.
The dark orange is slightly less aggressive but still high clearance. Even with this option, be careful so you don’t cut too far.
The light orange follows the lower bumper line. This is a pretty standard cut, with a sharp angle turn.
The yellow/green is the one I ended up doing. I was more drawn to the curved look because, in my opinion, it looks the cleanest.
Step 2. Mask Off Area

Once you decide on a cut, it’s time to mask it off with masking tape. Keep in mind the edge trim you’ll be using.
The trim I got covers about 0.4”, so I left about ½” below the bumper line so the trim would fit properly.

Apply your tape as straight as possible over the bumper. It won’t be perfect, but the tape is used more as a guide. For the inner corner, I put an extra couple of pieces so that I could trace out the curve that I wanted. You can skip this step if you want a sharper turn.
Step 3. Mark Curved Portion

Finally, I used the funnel to trace the curve line that I wanted. This is optional because you won’t need it if you want to go with the sharper turn.
Once you have the tape on, take a step back and make sure you like the line you masked off. I had to reapply the tape a few times to get a good line. When you are happy with the line, it’s time to do the first cut.
One last thing to note about masking off the bumper is the bumper bracket on the underside. There are a couple of things you can do here, but you basically either leave it or cut it out. I decided to leave it and see how it looked, and I was fine with the look of it. More on this later.
Step 5. Make First Cuts
Cut your bumper at your own risk.
Be careful, take your time, and you should be fine.
Now it’s time to go in and make the first cut. It is vital that you wear safety glasses. When I went to make the first cut, I tried to use one of the cheap discs that came with my rotary tool. It ended up breaking off and hitting my goggles. This is what prompted me to use the metal blades.
If budget allows, you should opt for a better rotary tool, like a Dremel with upgraded blades.
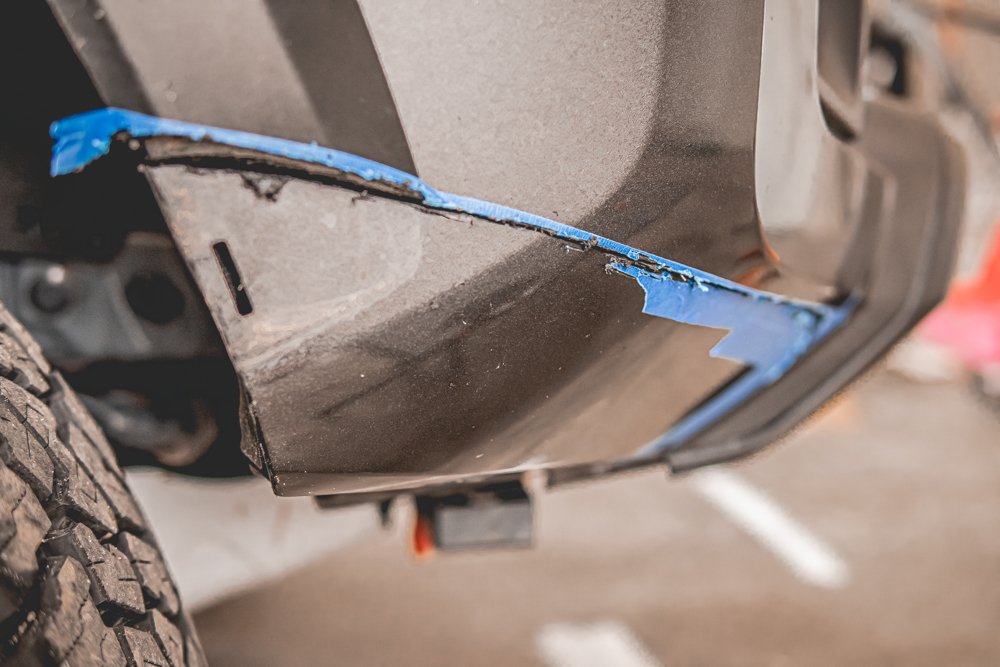
I ended up cutting slightly below my tape line, which was fine because I still used the tape edge as a guide. I started at the edge of the curve and moved outwards towards the fender flare.
Once you get to the fender flare, it can get tricky. The fender flare sticks out more, so you have to cut both the flare and the bumper under it. The blade I was using wasn’t wide enough to cut both at the same time, so I cut the fender first and then cut the bumper from the inside out.
Step 6. Curved Section

For the curve, I ended up switching to the smallest blade I had. The smaller blade helped maneuver the curve better.
On the driver’s side, I got lazy and didn’t switch to the smaller blade and the cut was significantly worse. If I was to do the viper cut again with the curve, I would use a hole saw (listed as optional) because it would provide a near-perfect curve if you line it up.
Step 7. Bumper Bracket

I opted to cut around the bumper bracket mount rather than removing it.
I didn’t mind the look of it and it seemed to provide more stability, so I ended up just keeping it. If you opt to cut this part off, you can either bend the bracket back behind the bumper or cut it out completely.
Step 8. Clean Rough Edges

The line you get after the cut will likely be pretty rough. Don’t worry’ too much, you can go back at the end and clean it up a bit with the sanding wheel or utility knife.
Keep in mind that the cut doesn’t have to be perfect. You will be putting automotive trim over it, which will help hide the rough edges. Just try to cut as straight as you can. Once you are done with the bumper cut and have cleaned it up with the sanding wheel, you have completed the hardest part.

After using the sanding wheel, the edge looked pretty good and I was confident that the trim would go on nicely.
Step 9. Trim Fender Liner
It’s time to take care of the inner fender liner.
You can either… use a heat gun and bend the fender liner back, or cut out the exposed portion.
I decided to go with the latter because some of the people I saw that did this cut mentioned that they didn’t notice any difference in dirt or mud build up. It is worth noting that this may cause extra noise.
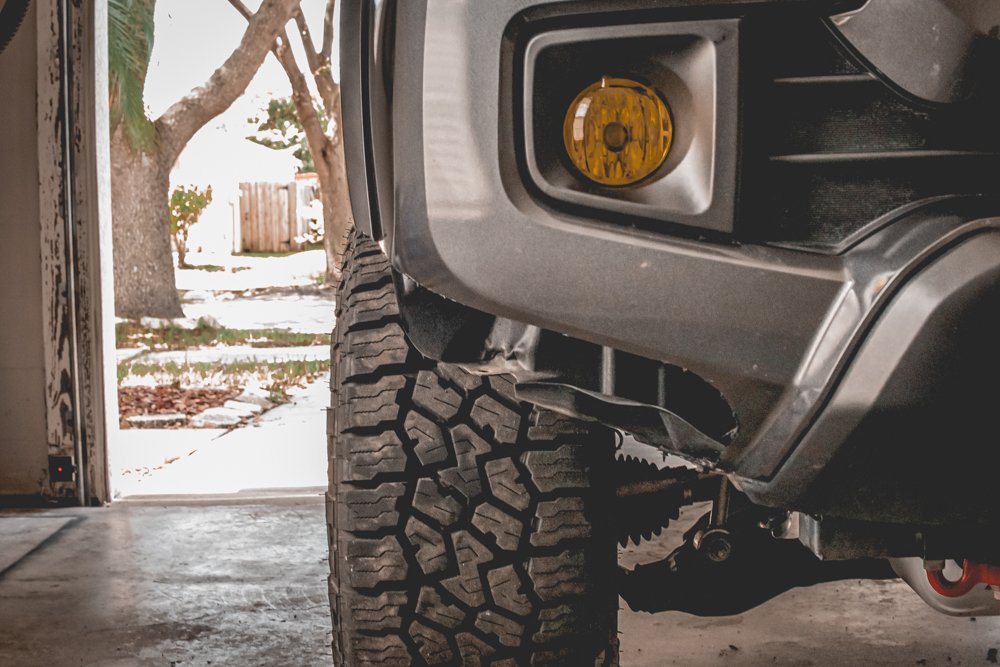
I cut the fender liner horizontally until it was no longer visible from the front of the truck. After doing this, the liner moved quite easily and seemed like it would flap around a bit.
Step 10. Secure Liner

To prevent the liner from moving too much, I drilled a hole through the plastic and zip-tied it to a metal loop on the frame.
This seemed to do the trick as I took the truck on the highway at 80 mph and didn’t notice any new noises.
Since I opted to leave the bumper bracket, I needed to unbolt the bracket to remove the fender liner.
To do this, simply remove the 10mm bolt and then squeeze the orange lip out of the metal bracket. Next, remove the fender liner and then re-bolt the bumper to the bracket.
Step 11. Add Automotive Trim

If you’ve made it to this step, you are essentially done. All you need to do now is put the automotive edge trim on to clean up the cut and make it look a little more OEM.
The edge trim I used has metal loops in it that help pinch the rubber of the trim down onto the bumper and grip it nicely. This makes it kinda tough to put on, but you’ll be able to get it with a bit of determination.
I decided to just put it on straight from the roll of trim and then cut it at the end. This seemed to work pretty well.

The one tough part is where the fender meets the bumper.
There is a gap between the fender plastic and the bumper plastic, so the trim won’t fit completely. I was fine with the curved look that it caused, but you can cut the bumper plastic near the fender so that the trim will fully slide onto the fender plastic.
Final Thoughts
If you think anything looks funky after putting the trim on, you can always go back with the sanding wheel to make some adjustments and straighten out any random curves you have.
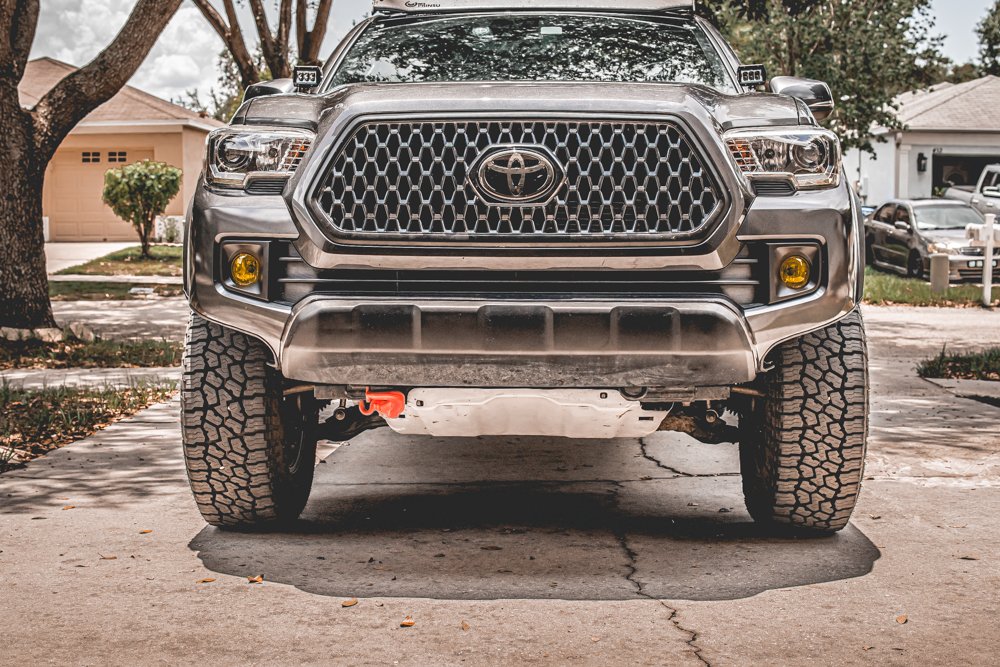
Now that you did the viper cut, your truck looks a bit more aggressive and will clear those bigger tires you’ve been thinking about. This cut will also help to limit trail damage as it gives you a bit more clearance to get your tire up and over those rocks.
What width trim 1/2 in or 3/4
Just finished mine today! I used a Drywall cut-out tool with a metal cutting bit. Worked like a charm!
nope
You think 33s would look OK with the viper cut or do you need 35s to really fill that space? I’m running 33s with 3″ lift up front hoping after I cut doesn’t look like skipped leg day! Awesome articles really appreciate all the tips.
Hey what size hole saw would you have used?, I like that idea… And do you think you could cut the fender up higher to match the difference of the trim and butt the trim up under the fender
Great article & video! I did this to mine & my buddies Tacomas & they came out great. Thanks so much!
Nice! Glad it helped.
Great article! Really easy to follow.
Thanks for reading!
What diameter is the funnel you used?
2″ diameter