

So you’ve just purchased your new steel rock sliders or even a aluminum tube bumper, and you’re considering getting it powder coated… You call up your local shop to get an estimate and find you can expect to pay $300+ for a powder coat job! Yikes.
Don’t worry, there is a much easier (and much cheaper) way to weather seal and protect your new investment. Here’s how to prep and paint your bare steel and aluminum off-road parts in your garage.
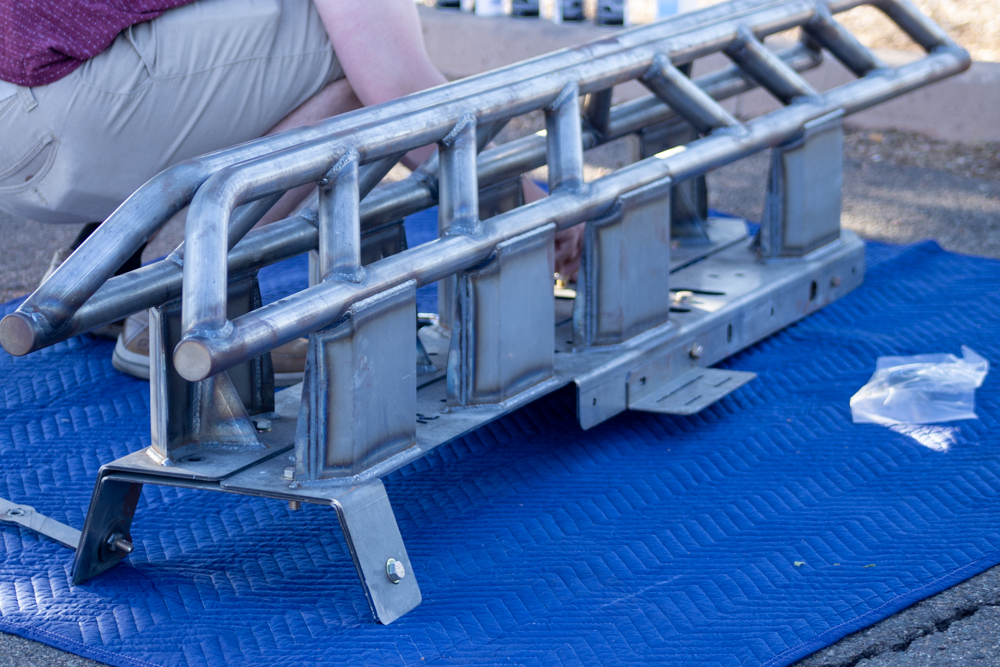
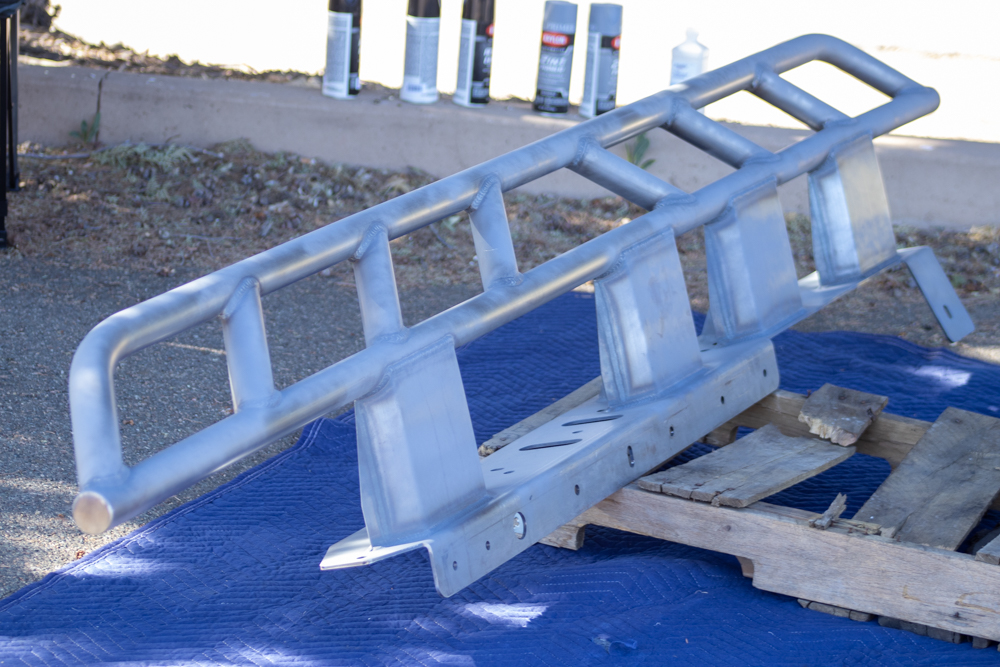
For this particular DIY, I’ll be outlining the process as I prepare, prime and paint my new Rago Fabrication rock sliders. However, the overall process is the same for pretty much any steel or aluminum parts you might encounter.
Table Of Contents
Tools & Materials
- Open, Clean, Well-Ventilated Area To Paint In
- Outside will work, however, no wind is essential to prevent debris build-up
- Krylon
- Rust-oleum
- Microfiber Towels
- Fine-Grit Wet or Dry Sandpaper (3-4 Sheets)
- Abrasive Sponge
- Isopropyl Alcohol
- Bucket of Warm, Soapy Water
- Gloves
- Respirator/Face Mask
Optional
- Materials to Mask Off Your Work Area
- Teflon Tape
Step 1. Choose Finish

Before you can begin any prep work on your part, you need to decide what type of finish you would like.
There are a variety of options when choosing your finish. You can go for a glossy or matte finish, a rougher hammered texture, or you could even use a spray-on bed liner for a more rugged look. For this project, I bought 2 cans of primer and 3 cans of paint. The exact amount you need will vary depending on the parts.
For this project, I chose to go with a glossy black acrylic enamel from Krylon’s automotive line of spray paints. This paint pairs well with Krylon’s 2-in-1 Automotive Primer, as recommended on the back of the enamel paint can. Another comparable option is the Rust-oleum High-Performance Enamel and Primer, as shown above. Some of our other authors swear by it.
Be sure to read the can for exact directions on how to paint and which primer to use, as each product varies. I chose Krylon’s protective enamel because of its superior strength and durability. It is also very easy to touch up the parts with a can of spray paint if you damage them on a trail, which is a much cheaper and easier alternative to getting the powder coat redone. If you choose a different product, research the best primers to use and read the directions to know how to properly paint your part.
Step 2. Prepare Your Work Area
After you decide which finish to use, you can begin preparing your area for the painting process.
It is best to hang the part in the air so you can access all sides and angles, but in my case, they will be propped on a scrap wooden pallet. Protect your garage or work area from overspray by draping plastic over the floor and surfaces you wish to protect. As I worked outside, I covered the area with an old moving blanket and ensured nothing was affected by my overspray.
It is generally best to paint inside a clean, well-ventilated area out of the wind and direct sunlight. This will ensure nothing gets into your wet paint and your overspray is not carried. This ultimately leads to a better, stronger finish.
Step 3. Prepare Your Part
Now that your work area is set up, you can prepare your part for painting. This will be done in 3 steps.
Remove your part from its packaging and completely disassemble the part. You should ensure all bolts and brackets are removed. If there are any threaded holes in the part, Teflon tape can be used to protect the threads from paint buildup and can later be removed.
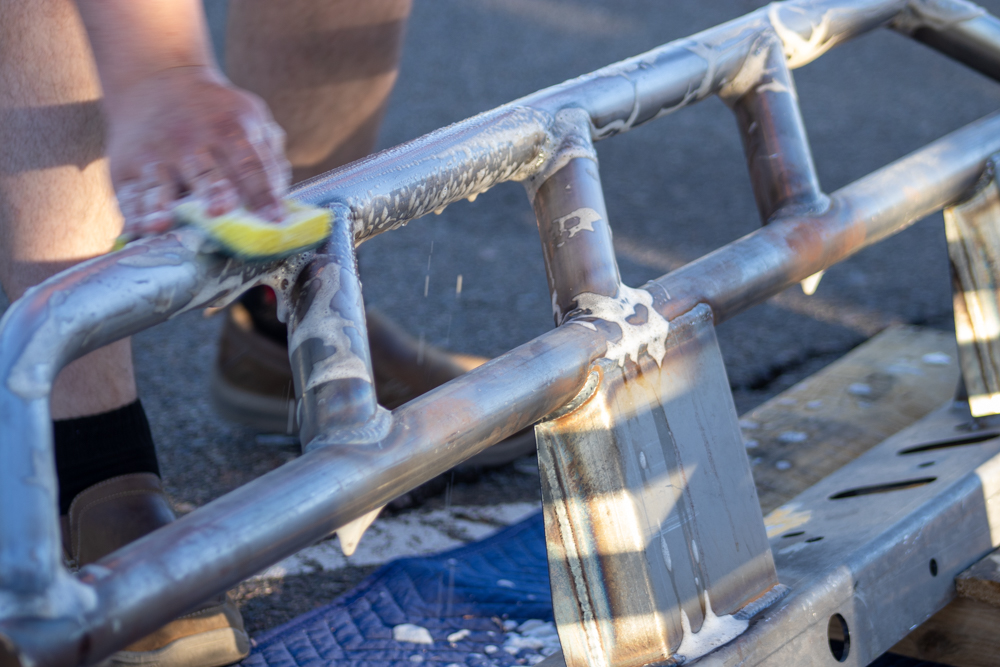
Manufacturers ship bare metal parts coated in oil to protect the surface of the part from rusting. This oil attracts dirt and grime and must be washed off. From this step on, it is recommended to use rubber gloves to protect your hands from chemicals.
I used an abrasive sponge and warm soapy water to scrub the entire surface of the part. In this step, we are only trying to remove the built-up dirt and grime, oil, and any particles leftover from the manufacturing process. The abrasive sponge works great for cleaning the part, but an old rag and elbow grease will work well too.
Once the entire part has been cleaned and most of the loose dirt and oil are gone, you can move on to wet sanding.
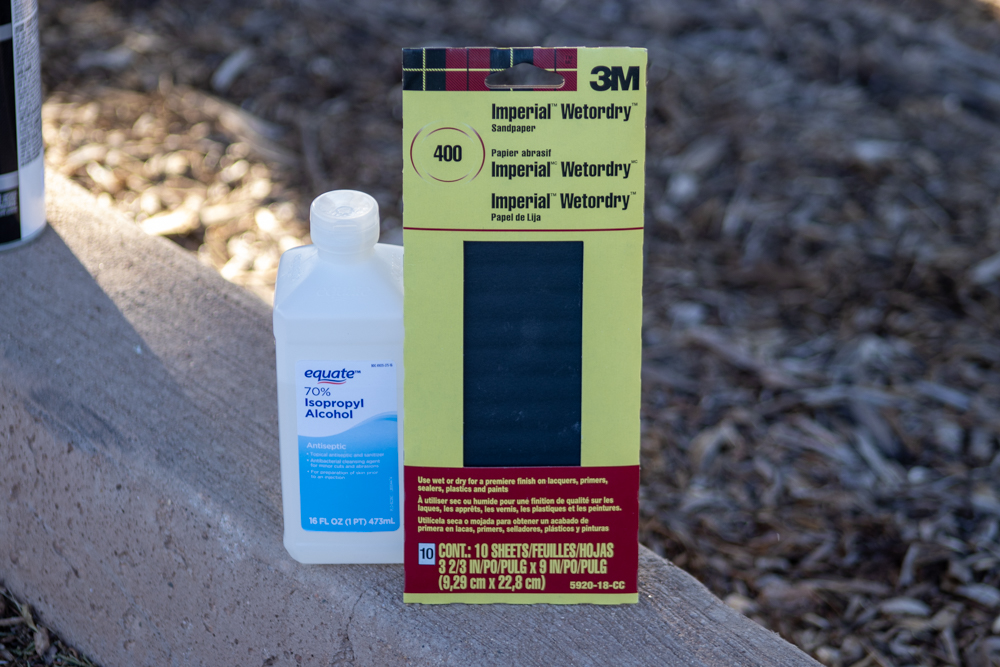
I chose a 400 grit sandpaper that specifically indicates that is can be used for wet or dry sanding. This step will ensure all the oil, dirt, and any rust that has built up is removed. If there are any minor imperfections in the part, this step will help smooth the surface and ensure the primer sticks well.
Wet sand the entire surface of the part using warm soapy water, and be sure to get in all the little crevices. Once finished, wipe off with a wet cloth to remove the dirt and grime.

After the part has been completely sanded and wiped off, we want to make sure the surface is completely bare and ready to paint.
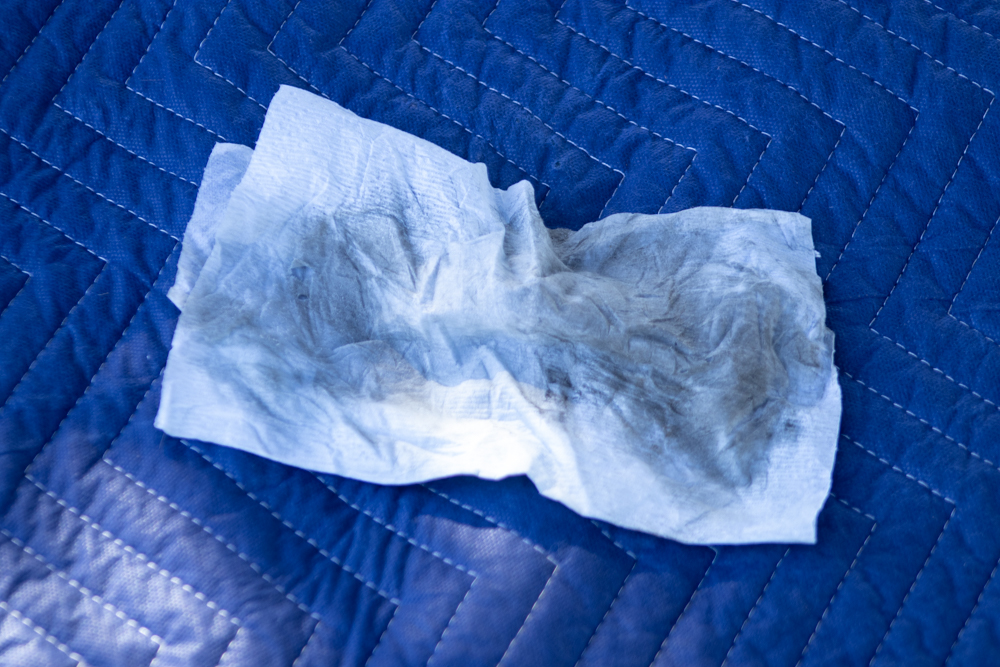
This can be done by wiping the entire part down with isopropyl alcohol. Above, you can see how clean and shiny my sliders looked after I was finished.
In this case, 70% is used, but 91% is preferred. Using a microfiber towel will ensure no particles are left behind on the surface.
You’ll be surprised how dirty your rag/towel will be!
Step 4. Prime Your Parts
It’s finally time to get the spray can out.
Once your part is in place and is completely clean and dry, you can begin to primer your part. Read all instructions before using. Holding the spray can 12-18 inches away, apply one light coat of primer to your part, being sure to keep the can moving to avoid drips and sags. Cover as much of the part as possible and let dry for 10+ minutes.
It is important to note that you may not cover all the parts on the first coat.
Once dry to the touch, apply a second light coat, being sure to cover the entirety of the part, spraying from all angles and keep the can moving. Let this coat dry for 10+ minutes.
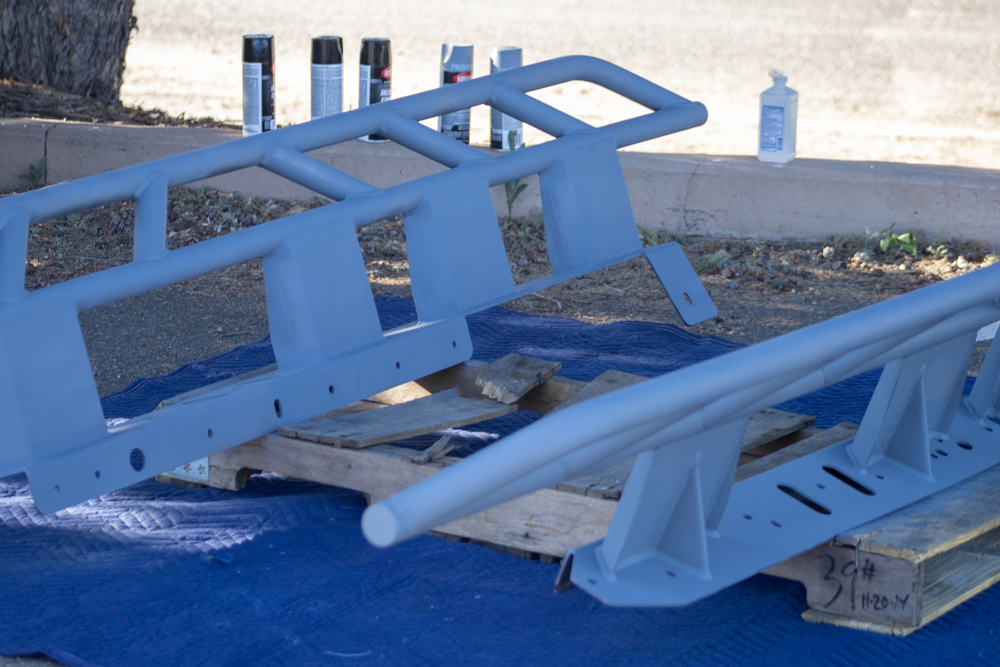
After the second coat is dry to the touch, you can apply the final medium coat to the part.
This is the last chance to inspect every square inch of the part and make sure it’s covered, so take your time. Avoid sags and drips by keeping the can 12-18 inches away and in constant motion. Let this coat dry for 30+ minutes before painting the part.
I chose to go with a gray primer because it will make spots I miss while painting in black gloss enamel more visible and easier to fix.
Step 5. Paint
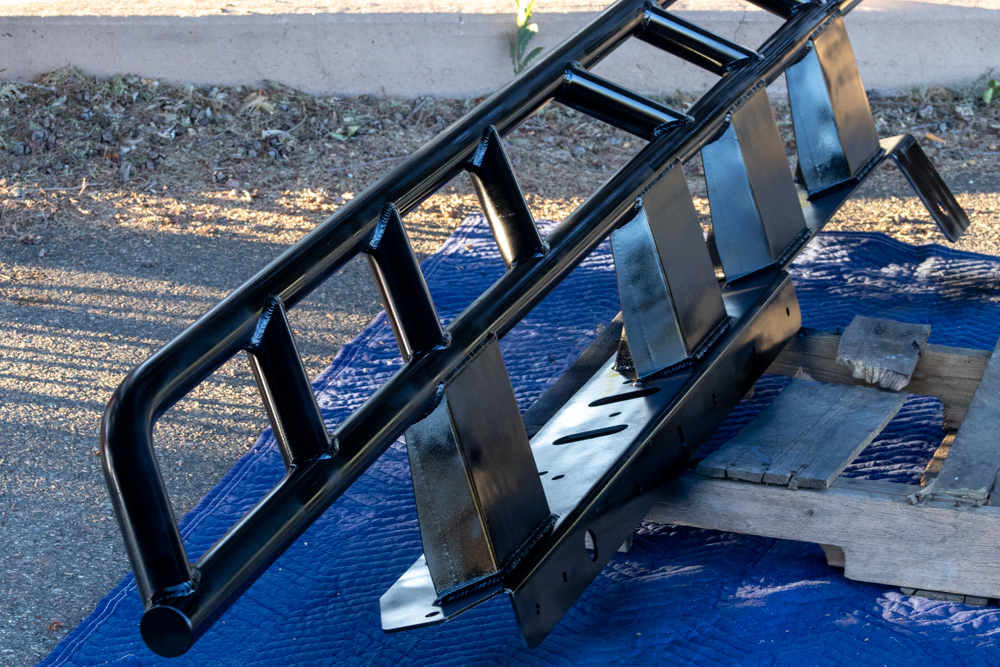
After the primer has had ample time to dry and is completely dry to the touch, you may begin painting.
This process will look exactly the same as the primer process. Again, read all instructions on the can before starting. Begin by applying a light coat of your paint to the part, holding the can 12-18 inches away, and keeping it in constant motion. After the first light coat is applied, let it dry for 10+ minutes.
Once the first coat is dry to the touch, apply a second light coat of paint to the part, spraying from all angles and being sure to cover the entire surface of the part. Avoid drips and sags by keeping the can moving and 12-18 inches away from the part. Let this second coat dry for 10+ minutes.
After the second coat is dry to the touch, apply your final medium coat to the part. Make sure not to miss any areas by taking your time and spraying from all angles. This is the last chance to completely cover the part, so be thorough. Once this last coat is complete, you should wait 30-60 minutes before handling the part whatsoever.
Step 6. Install Parts
After you are finished painting your part, it is best to let it sit and dry in a well-ventilated area out of direct sunlight for 24 hours.
This will ensure the part is completely dry before you handle it so you don’t ruin your hard work! Once completely dry, you may install your part on your vehicle, following the manufacturer’s installation instructions.
Final Thoughts
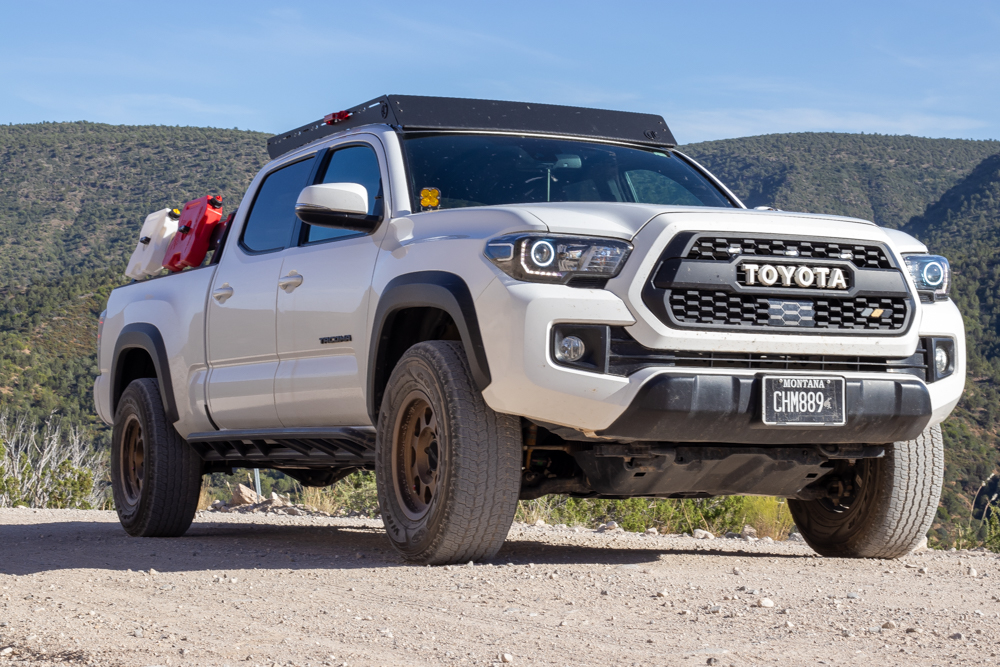
Painting my rock sliders gave me a sense of accomplishment, taught me a new skill, and saved me well over $250. The painting process is tedious, but not difficult, and I love how these sliders came out.
The protective enamel seems to be the real deal thus far. I’ve tested the durability of the paint through a few car washes, a moderately difficult trail, and constant stepping on and off the sliders. They still look freshly painted.
The acrylic paint is much easier to touch up than spray-on bed liner or Plasti-Dip and looks much cleaner as well. Being able to spray paint any blemishes on the sliders is a huge plus, saving countless dollars at a powder coat shop. It allows me to freely use my parts off-road without the fear of damaging the paint job!
Thanks for all this info! I just finished painting my last coat on my set of CaliRaised 0-deg sliders with inserts (put truck bed liner on the inserts but otherwise followed exactly). Installing them later this week if the weather holds up!
How are these holding up since you painted them? Any update on where you step? Has the paint worn off at all? I was considering adding a layer of grip tape where you step at as to not destroy the paint overtime. Also, the 400 grit seems pretty high, I have been reading many other guys use a much lower grit between 80-200 before sanding. Is there a reason why you specifically choose 400 grit??
Jason, They’ve held up surprisingly well considering all I’ve put them through. As for adding grip tape, I’m not sure how well it would stick but it would be very useful. The spots I constantly step on have started showing some signs of wear, I’ll be touching them up soon. There is very little surface rust, but I have noticed some, which means I probably didn’t go heavy enough with the primer. As for the 400 grit sandpaper, I chose this because it’s not too aggressive. The point of the sandpaper was to smooth any minor imperfections while also giving… Read more »
Great information! This will save me a lot of money!
Glad we could help, Wayne!