

Clearing big tires can be very intimidating. There are a couple of different ways to properly clear bigger-sized tires and some are more daunting than others. When you jump up to a bigger tire size, you are going to rub. Even if you don’t rub while daily driving, you may be surprised to find that you’re rubbing pretty bad on certain spots once you hit the trails.
Technically speaking, a suspension lift does not always clear tires. This is because the only thing that is changing is the static height of the vehicle; in other words, the tire size increases but the wheel well size stays the same. Depending on the size, properly clearing tires will require trimming to the front and rear of the inner fender plastics, the fender itself, and the firewall.
Table Of Contents
Rubbing After Lift & Tires
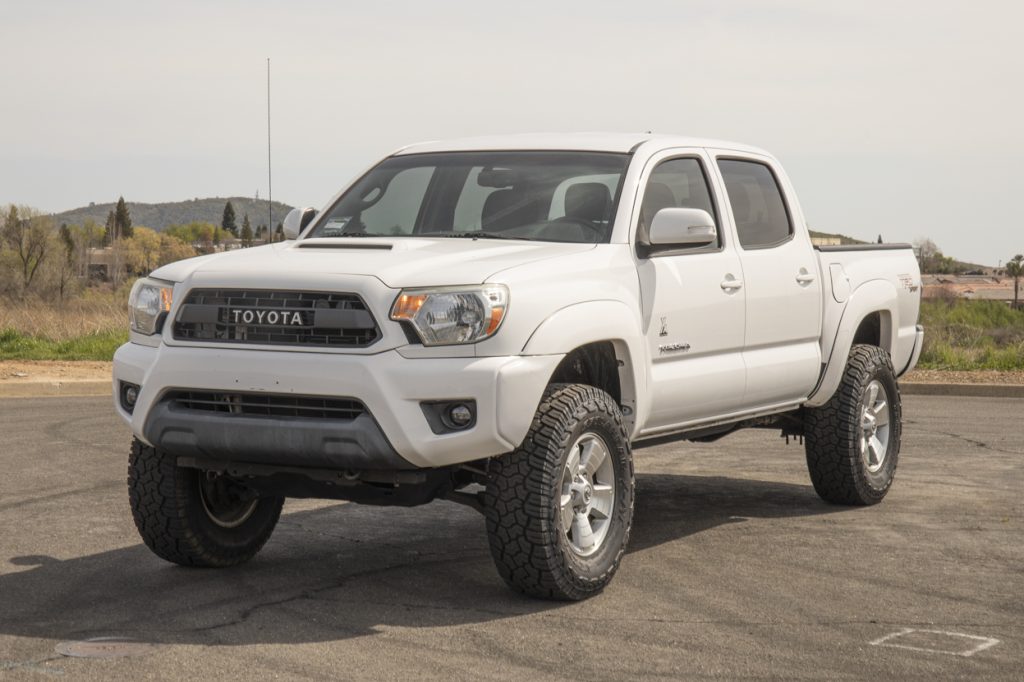
For those that don’t know, Tiffany is our shop build so she goes through changes frequently.
After installing 33-inch Yokohama Geolander tires (285/70R17) on our 2013 Tacoma with a 3″ Bilstein Lift Kit (technically 2.8″ of lift), we were amazed that the only spot the tires rubbed on was on the upper control arm. After adding a 1.25-inch spacer, the rubbing issue was solved. We were able to run 33″ tires with that 3″ lift and not rub on any of the fender plastics. This meant only one thing; time to upgrade to bigger tires.
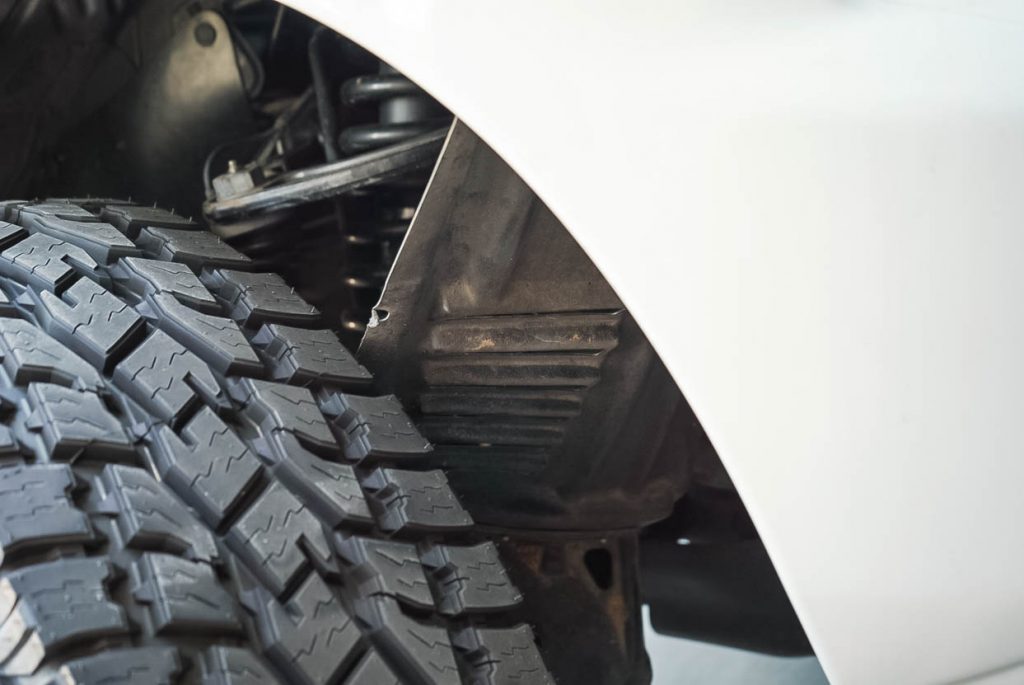
We had a set of 34″ tires Toyo AT2s (285/75R17) installed, and as you could imagine, the rubbing was clear. Our tires were rubbing pretty intensely on the back of the fender liner near the firewall, the cab mounts, and fender flare plastics. And just slighting on the front fender plastics. Although the front didn’t rub that bad while daily driving… if we were to stuff the tire when off-road, it would definitely rub on the front bumper fender plastics and fender flare a lot more. We decided to start clearing the bigger tires by doing a quick, easy mod — the fender liner pushback.
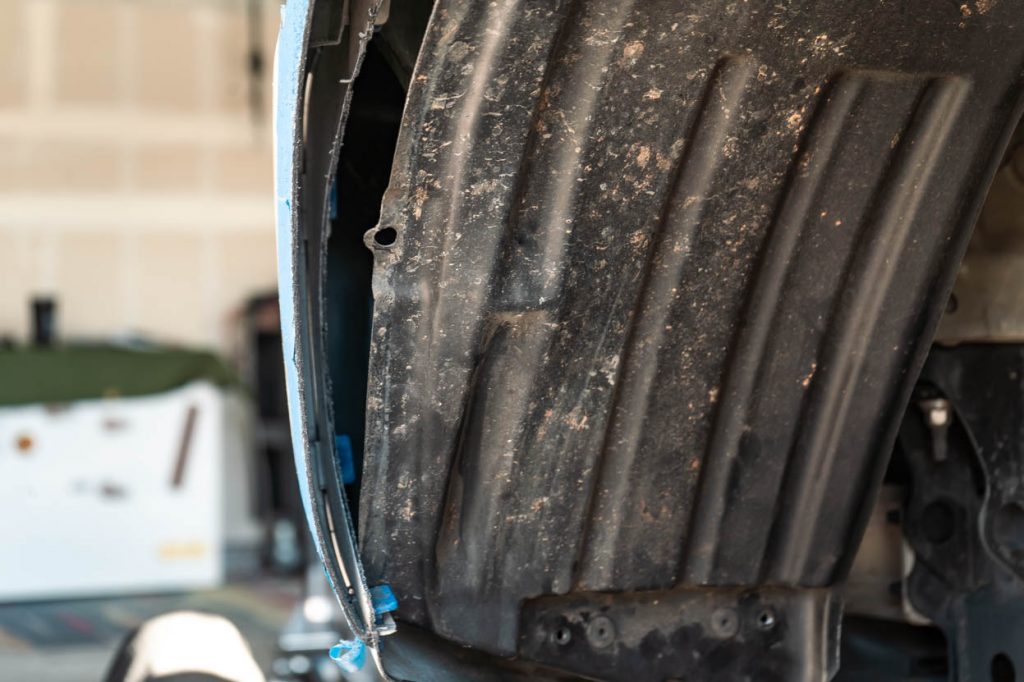
Fender Liner Pushback?

The fender liner pushback is exactly what the name implies. Take the inner fender, unbolt it, push it farther forward, and re-bolt it to the bumper further towards the front of the truck. While this process is relatively simple, it takes some careful measuring and cutting to get it right and make it look good.
Ultimately the goal is to provide more room between the tire, inner fender, and front bumper. You can do this without cutting the front bumper, but we got a headstart on fitting 35s so we cut the front bumper a little bit to give us even more clearance.
Why Push Them Back?

Depending on what lift you have, and the size of your tires, you’re going to rub, especially while turning to full lock. After we added a wheel spacer to clear the upper control arm, we noticed the 33s were barely scraping the back part of the inner fender. When we upgraded yet again to 34s, the rubbing was worse due to the increased scrub radius.
While we weren’t rubbing on the front part of the inner fender with 33s, the 34s made some solid contact while turning.
Before doing anything drastic like cutting everything out or tubing the firewall, we decided to start by moving the front part of the fender liner farther away from the tire. While this mod only solves the issue of rubbing on the front fender and body, it’s a great place to start for clearing bigger tires.
We will have multiple posts coming out on what to cut for clearing bigger tires. Check back soon for the cab mount chop, cab mount relocation, pinch weld cutting, firewall plastics, rocker panel caps, and more.
Procedure Overview
Difficulty
- Easy-Medium
Time & Assitance
- 60-90 minutes
- 1 Person
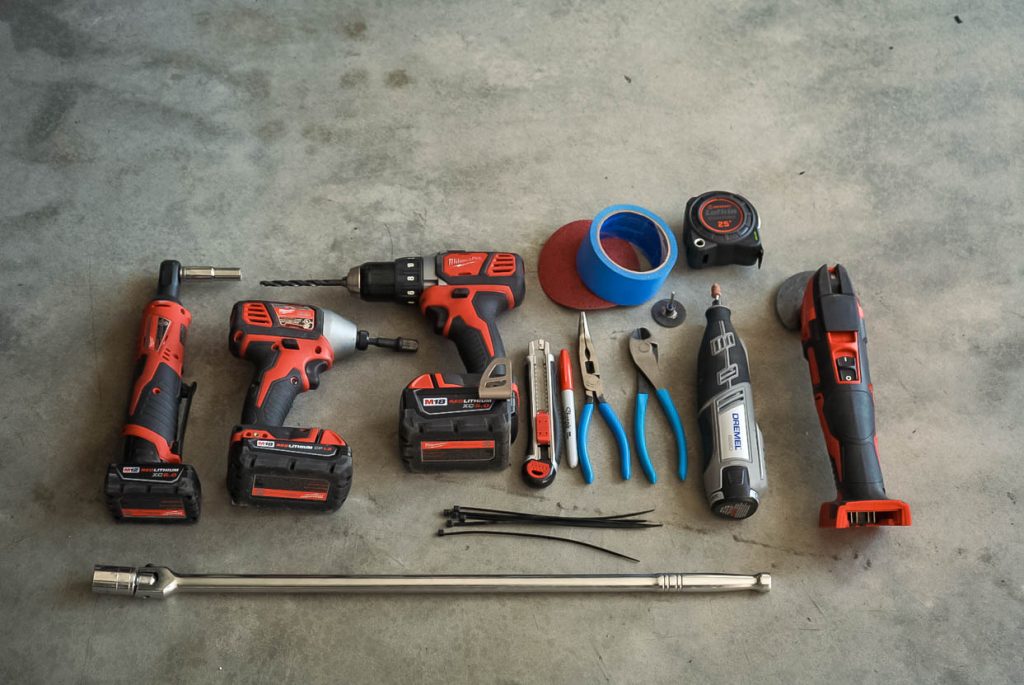
Tools and Materials
- Grinder with a cutoff disc
- Cordless Dremel kit
- Muli-tool with a plastic bit
- Utility Knife/ Exacto Knife
- Drill driver
- Drill bits: 1/4″ bit
- Protective Eyewear
- Electric Ratchet
- Mechanic’s Tool Set
- Breaker Bar
- Cutting Pliers
- Needle Nose Pliers
- Painters Tape
- Sanding paper (80-100 Grit)
- Sharpie or Paint Pen (any color except black)
- Tape Measure
- Zip Ties
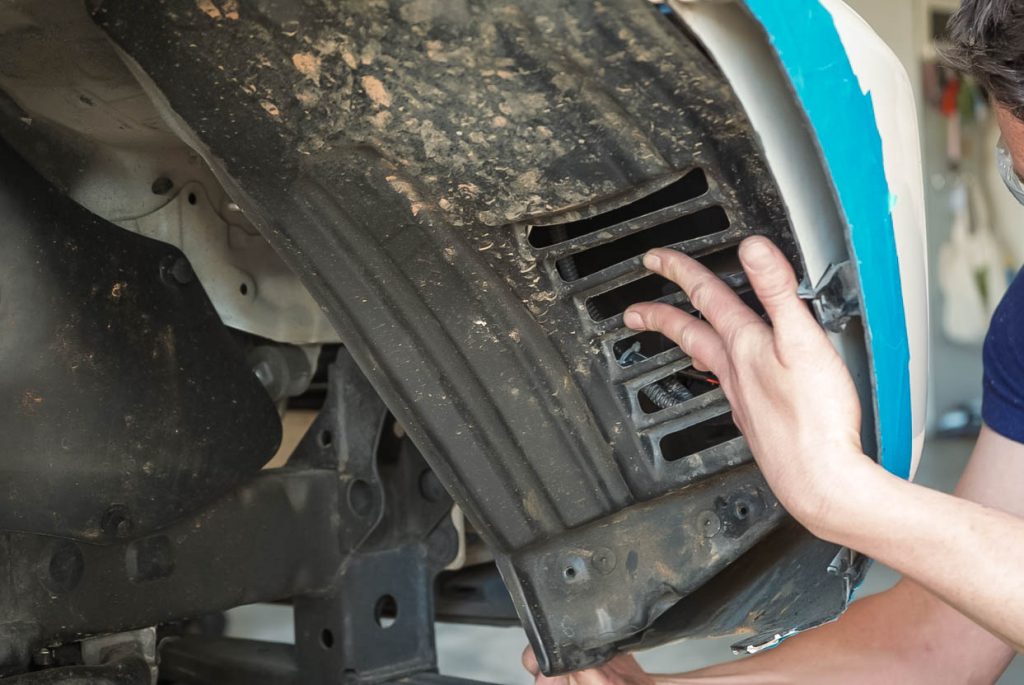
Step 1. (Passenger’s) Remove Hardware

Remove the two 10mm bolts holding the inner fender to the front of the bumper as well as the clips on the side of the bumper and inner fender.
This will allow the front of the inner fender to peel down and away from the bumper.
Step 2. Move Fender Liner
Peel the inner fender liner completely out of the way.
We bent the inner fender liner behind the tire, allowing easy access if we wanted to test fit it.
Step 3. Measure Cut Line

Next, measure how much you want to cut off the bumper. We decided to cut the bottom part of the bumper by 1.25″ and curve the cut line upwards until it met up with the factory line on the fender flare.
Keep in mind, you don’t need to go a full 1.25″ for your cut either. Depending on your tire size, you may need to only cut .5″ of material off the front bumper. Or, you may need to only punch a new hole in the fender liner and push it back (steps 11 and 12). Here is an example of a really mild fender liner push back I recently did on one of my 4Runners. Check that out for another reference point on how to cut and trim a fender liner. Pretty easy stuff.
You can get as aggressive or as conservative as you want with this mod.
Step 4. Place Tape Along Line

Use tape to outline where you’re going to cut the bumper.
This will allow you to cut a smooth, straight line across the whole length of the cut, all while keeping the paint on the other side of the cut safe.
Step 5. Begin Cutting

Begin cutting the outer part of the bumper with some sort of cutting tool.
We used a multi-tool because it allowed us to go slow and have total control while we were cutting up the stock bumper. Follow the tape line as close as you can, but stick to the left side of the tape in case you slip or mess up.
Step 6. Clean Cut With Dremel

After you cut the first part of the bumper, take a Dremel or sandpaper (or both) and clean up the cut line.
If you favored the left side of the tape line, clean up any spots you missed.
Step 7. Cut Internal Bumper Section

Next, cut the inner portion of the bumper off.
There’s no need to tape this part off as there is a bracket sitting in the middle of the two bumper plastics, just cut the back piece so you have more access to inside the wheel well.
Step 8. Test Fit Inner Fender
Test fit the inner fender in its new home. Line up the inner fender and the bumper where you want to drill the new hole into the fender liner.
Step 9. Trim Inner Fender

After we test fit the inner fender, we noticed it was getting hung up on one of the pre-existing bulges in the fender plastic.
The easy fix was taking a razor blade and cutting away the area that was getting hung up.
Step 10. Mark Drill Hole

Next, we test fit the fender once again.
Everything lined up well so we took a sharpie and marked a hole where we would drill through the inner fender. The mark must be done through the hole in the bumper since that’s where the bolt is going to go through.
Step 11. Drill New Hole

Once the inner fender is marked, drill a hole through the inner fender.
Drill a pilot hole first with a small drill bit, then use a 1/4 inch bit to drill the final hole.
Step 12. Check Fitment

Once the hole has been drilled, test fit the inner fender with the hole you just drilled and the hole in the bumper.
Slide the clip over the top of the inner fender and install the bolt (or zip tie).
Step 13. Cut Inner Part

For aesthetic purposes, we decided to cut the inner portion of the bumper out.
Use a Dremel and cut as close as you can to the actual bumper. This allows for only one bumper cut to be shown as opposed to two.
Step 14. Mount Inner Fender

Bolt the inner fender down to the front bumper one final time.
Once that’s done, it’s time to jump over to the driver’s side.
Step 15. (Driver’s) Bend Inner Fender

Note: We’re going to skip right to the fender liner for the driver’s side. The premise for trimming the bumper is exactly the same.
Once you’ve removed the hardware for the inner fender on the passenger side, pull the liner out and bend it on the corner. This inner fender is a little different than the other side, so bending this at this spot allows it to fit a lot better in the front bumper, and there’s no cutting involved.
Step 16. Mark & Drill New Hole

Just like on the driver side, mark where the new hole will go in the inner fender.
Next, drill it out with a pilot hole first, then a 1/4inch bit.
Step 17. Cut Second Bumper Part

Cut out the second portion of the bumper for aesthetic purposes.
Step 18. Clean Up Cut Lines

Clean up any cut lines from the Dremel or multi-tool. We found that a razor blade left the cleanest cuts out of all the tools we used.
Slowly follow the cut line with a razor blade pealing off any access plastic from the Dremel or multi-tool.
Step 19. Push Back Inner Fender
Once everything else is done, the fender liner is ready for install.
The driver side had significantly fewer fitment issues, and all we had to do differently was bend the tab on the corner of the inner fender outwards, rather than cutting up the entire fender liner.
Final Thoughts

Overall the fender pushback was a super simple process. You can be as conservative as you want with the cutting or as aggressive as you want. The more aggressive you cut, the bigger the tire you’ll be able to fit, but the cut will definitely be noticeable. If you’re looking for only a little bit of clearance, you could do this mod with minimal cutting and have it look untouched.
Even though we barely rubbed on the front with 34s (285/75R17), we wanted to make more clearance for when we go off-road and stuff the tire up into the wheel well.
However much you cut/trim depends on a couple of factors, such as:
- How much and how hard you wheel?
- What size tire do you plan on installing?
- How bad does it rub with that size of the tire?
This is the perfect mod for anyone who wants just a little more clearance on the front end of their Tacoma. Both sides took us about 30-45 minutes each and the process was very straightforward.

did mine. and you should give info for the high clearance liners. I did the front and rear on mine. looks so much better and can now fit 37’s.
Scorched fabrication has both in stock. extremely easy to install when cutting.
Hello! Reading this it looks as if you went the same route I plan to go. Have 255/85/16 Yokohama Geolander MTs on my 2011 Tacoma’s stock rims. Also JBA UCAs, 1.25″ spacers, and a 3″ lift. Right now the driver’s side rubs the front of the fender liner at full turn. Going to go to 285/75R17 Toyo Open Country AT III on 17×9 rims (zero offset will have good clearance from the UCAs.) Planning to do the cab mount chop and pound back the pinch weld. After reading this I have questions and asking your recommendation(s). If I stay with… Read more »
Hi I’m from Canada and I own 2018 Tacoma trd pro with stock suspension and tires. I saw you guys on YouTube and wants to buy Tacoma suspension kit but I need to know what is the biggest tire I can run with this pro kit and will I have any rubbing issues and also do I have to regear my truck. I’m thinking of running 33” or maybe 35” but I want to use my fox suspension and don’t want to trim anything. Thanks
Hey Sabtain! Here’s a good article on what to expect with 33s and a 3 inch lift: https://trailtacoma.com/2021/03/25/33-inch-tires-285-70r17-toyota-tacoma-complete-guide/ Technically lift kits do not clear tires since the wheel well of the truck stays the same, and the tire size increase. This means that with a 3-inch lift and 33s, you will be able to daily drive your truck and have very minimal rubbing if any at all. But when you go off-road and tuck your tire into your fender well, you’re definitely going to rub. I promise you are going to rub with 35s while daily driving especially if you… Read more »