

Factory Ride Quality with More Ground Clearance
I recently took my wife on an adventure that I had done numerous times in years past. We took my brand new, completely stock, 2020 Tacoma TRD Offroad on a trail known as, The Backway to Crown King, just north of Phoenix, Arizona. Now, I have ridden this trail multiple times in my old jeep, however, that was over 15 years ago. I have also ridden this trail in a side-by-side and I have mountain biked it. Of course, this was all more than 5 years ago.
Yes, there is a reason behind my continued acknowledgment that it’s been years since I’ve been on this trail. Keep reading.
Never have I thought of this trail anything more than a beautiful drive. The trail begins at the picturesque Lake Pleasant and is just a lovely desert drive that gradually climbs into the pine trees of Crown King, Arizona, an old logging town on top of a mountain.
The moral of this story is: Oh boy, was I wrong about this trail!
A bypass, due to recent mining, took us through a narrow boulder-filled creek where the real action began. It only got worse from there. I dragged, banged and bumped by brand new, less than 800 miles at the time, truck through the carnage to make it to the top of Crown King. My primary issue was ground clearance.
This could have been avoided with a quality suspension lift kit. Fast forward a couple of weeks and I now have a new suspension kit from Eibach.
Table Of Contents
Kit Contents
Find It Online
- YotaMafia.com: Check Price
What’s included:
- Front Shocks (x2)
- Front Coils (x2)
- Front Sway Bar Relocation Blocks (x2)
- Rear Shocks w/ Boots (x2)
- Install Hardware
- Note: Eibach 1” Rear Lift Blocks are purchased separately from the Stage 1 kit
Lift Kit Accessories
- Eibach 1″ Rear Stage 1 Lift Kit Blocks: Check Price
Addition Information
- The Eibach Springs can be retrofit to the Bilstein 5100’s.
What’s Included:
- 1” Rear Blocks (x2)
- Long U Bolts (x4)
- Install Hardware
Installation Guide
Required Tools
- Metric Sockets (Sizes 10-19)
- Metric Deep Sockets (Sizes 10-19)
- Socket Driver (preferably ½)
- Breaker Bar (preferably ½)
- ½ Drive Torque Wrench
- Snap Ring Tool
- Needle Nose Pliers
- Needle Nose Vice Grips
- Good Work Light
- Floor Jack
- Jack Stands (x2)
- Air Tools (not necessary but certainly helpful)
I completely understand if you add up the expense of these tools, especially if you put out for air tools, you can probably get pretty close to paying someone else to do the job. However, there are multiple reasons to invest in tools.
Here are just a few reasons to use air tools:
- Tools in most cases have lifetime warranties that equate to a lifetime investment.
- You will in most cases need tools to fix things that go wrong while utilizing this new amazing lift.
- Paying to have the lift is great until you sell that vehicle and have to pay someone else to do it again.
- Most important for me personally, you know the job was done right and if not, the only person to blame is yourself. Pride in a job well done.
Pro tip: Before beginning, powerwash your undercarriage if available. You will be a cleaner human and will thank me for it.
Step 1. Lift Truck, Remove Tires

First things first, engage your emergency brake inside your truck. If you are not using an impact driver to remove your lug nuts you are going to want to slightly loosen them while your tires are on the ground. If you skip this and try to break them loose while your tires are in the air they will just spin and spin like a merry-go-round.
Place your floor jack under your transmission support cross member and begin lifting the front of your vehicle. Once you have your tires about 3” off the ground, place your jack stands under the frame. Make sure your jack stands are in a secure flat part of the frame. I picked a spot just in front of the transmission mount.

Once you have the jack stands under the frame, slowly lower the floor jack until the frame makes contact with the jack stands. Once you have contact, inspect the frame on jack stands connection and make sure that it is secure. The last thing you want is for your vehicle to slide off and cause damage or injury.
Remove All (x6) Lug Nuts & Take Off Both Front Wheels
Remove all 6 lug nuts from each front wheel and remove your tires from your Tacoma. I always store my tires under my vehicle just behind my jack stand for extra security in case the jack stands were to fail or my truck were to fall.
Step 2. Remove Sway Bar

The Sway Bar is the curved bar that connects the driver and passenger side suspension to control your vehicle’s roll while driving. Without the sway bar, you would feel like you are going to tip over with every turn, at higher speeds. You need to remove the sway bar to make room to drop the coilover out of the vehicle.
Identify where the sway bar meets the steering knuckle.
Use a 17mm socket and loosen the nut from the bolt. Once you have removed the nut you should be able to pull the bolt out of the steering knuckle. If you are not able to pull the bolt out easily, place the nut back into the bolt threads and tap it lightly with a hammer.
Once you have the bolt removed, replace the nut back onto the bolt so you don’t misplace it. Plus, this small step will help protect the threads while you are working.
Now repeat this process on the other side of the vehicle.
Step 3. Remove Skid Plate
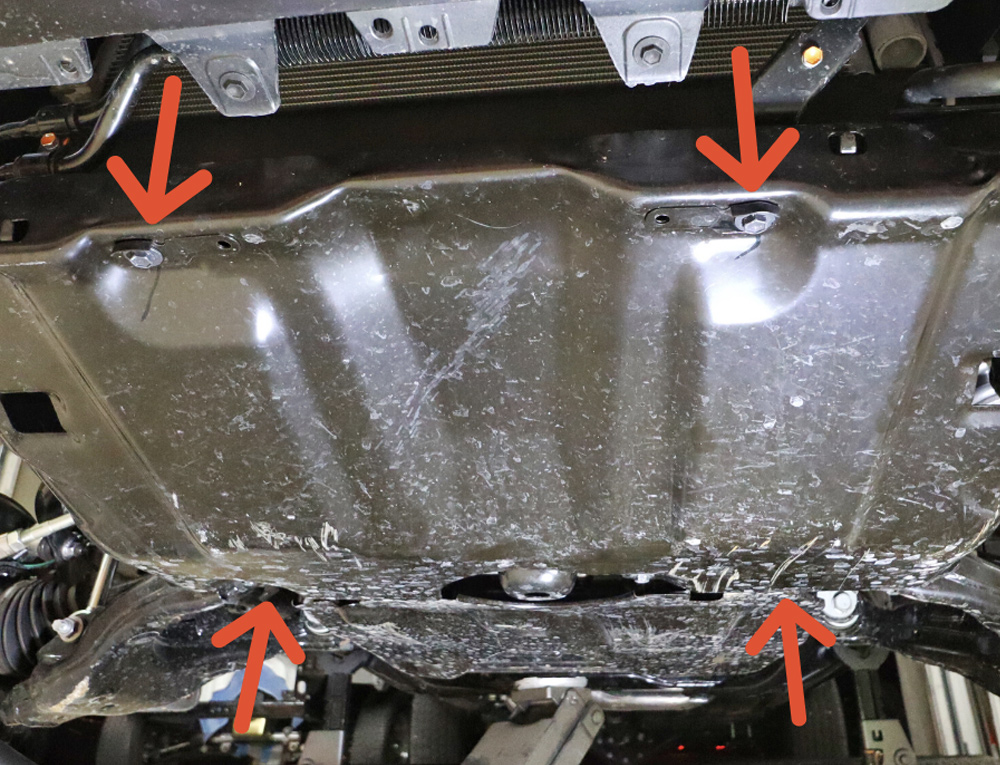
I used to think this step was optional on an install but not with these skid plates. They cover the bolts of the sway bar nicely. Four bolts hold on the skid plate. Remove the two bolts closest to the front of the vehicle, first using a 12mm socket. Then remove the rear two bolts.
The skid plate will swing down and be caught by the two tabs on the front.
These tabs are there to catch the skid plate so that it does not fall on you. From the front, lift up on the skid plate and pull it toward you. Put it to the side with the 4 bolts.
Step 4. Remove Sway Bar From Frame
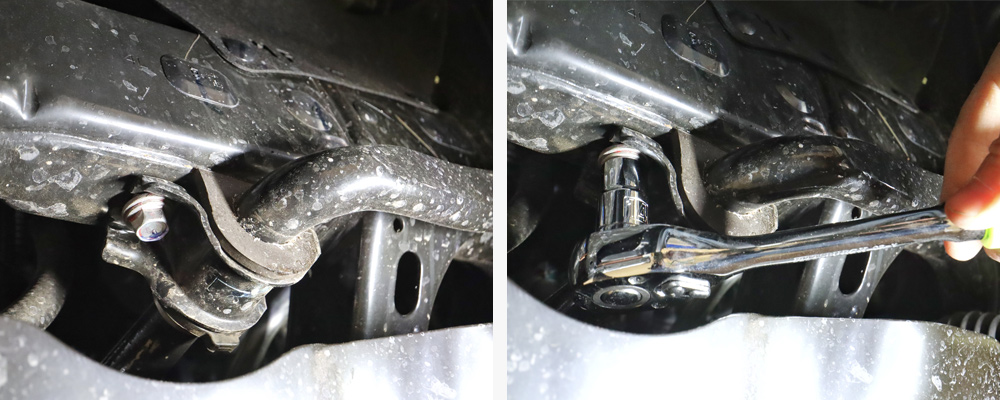
Follow the end of the sway bar toward the frame and you will see where it connects. There is a U shaped bracket and inside that, the sway bar is encapsulated in a rubber bushing. Use a 14mm socket and remove the two bolts on each side of the frame.
This will free the sway bar. Try to orient the ends of the sway bar away from the suspension to give you the most amount of space to work.
Step 5. Remove ABS Line

Locate the ABS line on the side of the Upper Control Arm furthest away from the front of your Tacoma. Use a 10mm socket and remove this bolt. Once it has been removed, move the bracket to the side and replace the bolt in the hole.
Step 6. Remove Brake Line Bracket

The brake line bracket is actually a double bracket and is located in the steering knuckle. The main bracket holds the brake line and another smaller bracket holds the ABS line.
First, locate the smaller bolt that is holding the ABS line. Use a 10mm socket and remove that bolt. Once separated, replace the bolt into the bolt hole.
There is also a small green clip that is hanging onto that ABS line for dear life. Use a pair of needle-nose pliers and pinch the back of the clip connectors and then push it out.
Now, use a 12mm socket and remove the main brake line. You may have to wiggle this bracket out because of an indexing nipple on the bracket.
Step 7. Remove Tie Rod (Optional)

I call this step optional for good reason. The directions call for the removal of the tie rod for clearance, for the removal of the coilover from its habitat. However, I know from doing other suspension kits you don’t always have to remove the tie rod. Looking at the space it looked like it could fit.
In my video, I removed the tie rod and the coilover came out fine. However off-camera, on the passenger side, I did not remove the tie rod and it took a little more wiggling but I was able to get the coilover out just fine.
If I had to do it all over again I would not have removed the tie rod for two reasons. The first reason is, it’s a real pain to remove. I had to hit that thing at least thirty times to get it to release. The second reason is, it will never be as smooth as the factory, once you remove it and put it back on, in my humble opinion.
Now that being said here is the procedure to remove it if you feel the need.
First, take a pair of needle-nose pliers and remove the cotter pin that goes through the castle nut (marked with the red arrow) and threads of the tie rod end. Now, use a 19mm socket and loosen the nut so that the bolt is hanging on by a few threads.
Next, take a large hammer or I like using a ball-peen hammer, strike the flat face on the steel (marked with the blue arrow) below the threads. Keep striking until the ball joint falls free. Do not strike the nut, it is a very soft metal and will strip out. Ask me how I know! If you need more leverage, turn the steering wheel to expose more of the surface of the tie rod.
Step 8. Remove Steering Knuckle

First, remove the very fancy cotter pin off the castle nut with a pair of needle-nose pliers.
Don’t lose this little gem.
I have a small magnetic bowl that I use for small parts like this that I do not want to misplace. Again, don’t lose this piece.

Use a 19mm socket to remove the castle nut from the ball joint.
Easier said than done, trust me. I grabbed the top of the upper control arm for leverage and still couldn’t get it to budge. I transitioned over to the breaker bar and pulled hard.
This worked!
Once I got the castle nut spinning, I ran it down the threads until it was only holding on by a few threads.

Now, this part is important or you run the risk of possibly causing damage to your brakes and/or your CV. Place a floor jack under the lower A-arm and raise it up to support the weight of the lower A-arm and the entire assembly.
The last thing you want is to release that castle nut and have all that shock go into the assembly. Remember, the entire coilover is trying to separate these two pieces.
Now that you have the floor jack supporting the weight, take your large hammer and strike the flat steel face of the steering knuckle just above the castle nut. You should not have to hit it very many times since it is under pressure. It will release and the castle nut will catch the bolt before it completely releases. When you are sure the floor jack is positioned correctly, release the castle nut all the way out. The floor jack will take all the weight and this step is complete.
Now, take a minute and check your brake line and CV boot to make sure the lines are not being strained. The brake line should have some wiggle to it and the CV boot should not be pulled tight.
Step 9. Remove Coilover Bolts

The entire coilover assembly is held in at the top by three nuts as marked by the red arrows above.
Using a 14mm wrench, loosen and remove two of the three nuts. I always start in the back because it is the hardest to reach. Leave one of the front nuts on the bolts by a few threads to catch the assembly from falling out.
Step 10. Remove Bottom Bolt

This step will require one 19mm wrench and one 19mm socket. With one on each side of the bolt and nut, loosen and remove the nut.
Now, release the floor jack to slowly release the tension on the bolt. While lowering, look at the bolt. When you see it move stop and try to push it out. If it is still being stubborn, use a pin and hammer and push the bolt out.
Step 11. Remove Coilover Assembly
Remove the top nut that you left hanging on by a few threads. The coilover has some weight to it and it is an awkward position, so take your time.
Fish the assembly out of its home the best you can. I found that if you pull it out a bit then lower it between the sway bar and lower control arm, you can then angle the top forward.
Step 12. Change Top Hat
Eibach requires that you reuse your factory top hat in the new coilover assembly. For this step you have three options;
- Buy a new factory top hat to avoid disassembling your factory coilover
- Borrow or buy a spring compressor and remove the top hat yourself
- Take both to a local shop and have them switch over the top hat
In my case, I was trying for the second one but ended up with the third. I rented a coil spring compressor from my local O’Reilly Auto Parts however the tool didn’t fit between my factory coils. Unfortunately, I was forced to take it to a local shop and after almost two hours and $60 later I had my new Eibach coilover ready to install.
If you are able to do it yourself, here is the process. Compress the factory coil to take the pressure off the large bolt on top of the coilover. Loosen the nut and remove it slowly and carefully. The coil is under a lot of pressure.
Now, release the pressure on the coil until it is free.
Before assembling the coilover, you must decide what height you would like to set your adjustable suspension to. Holding the front shock with the rod facing up, you can see three rings with a C-Clip seated in one of the rings. My C-Clip came pre-installed into the bottom ring, which will give you 2″ of lift. The middle ring up will give you approximately 2.5″ of lift. Eibach recommends that you reserve the top ring for vehicles that are carrying in excess of 150 pounds of extra weight on the front end, as is my case since I plan on getting a steel bumper very soon.
After you have decided on your purpose built height, utilize a pair of snap ring pliers and work that C-Clip into the position that is right for you.
Assemble the new coilover. Place the new Eibach coil into the bottom tray of the Eibach coilover assembly. Align the coil end with the divot of the base. Compress the Eibach coil until you can see enough of the threads on the bolt to put the nut on. Place the nut on the threads and tighten. Release the coil spring compressor and you have your new Eibach coilover built.
Step 13. Install New Coilover
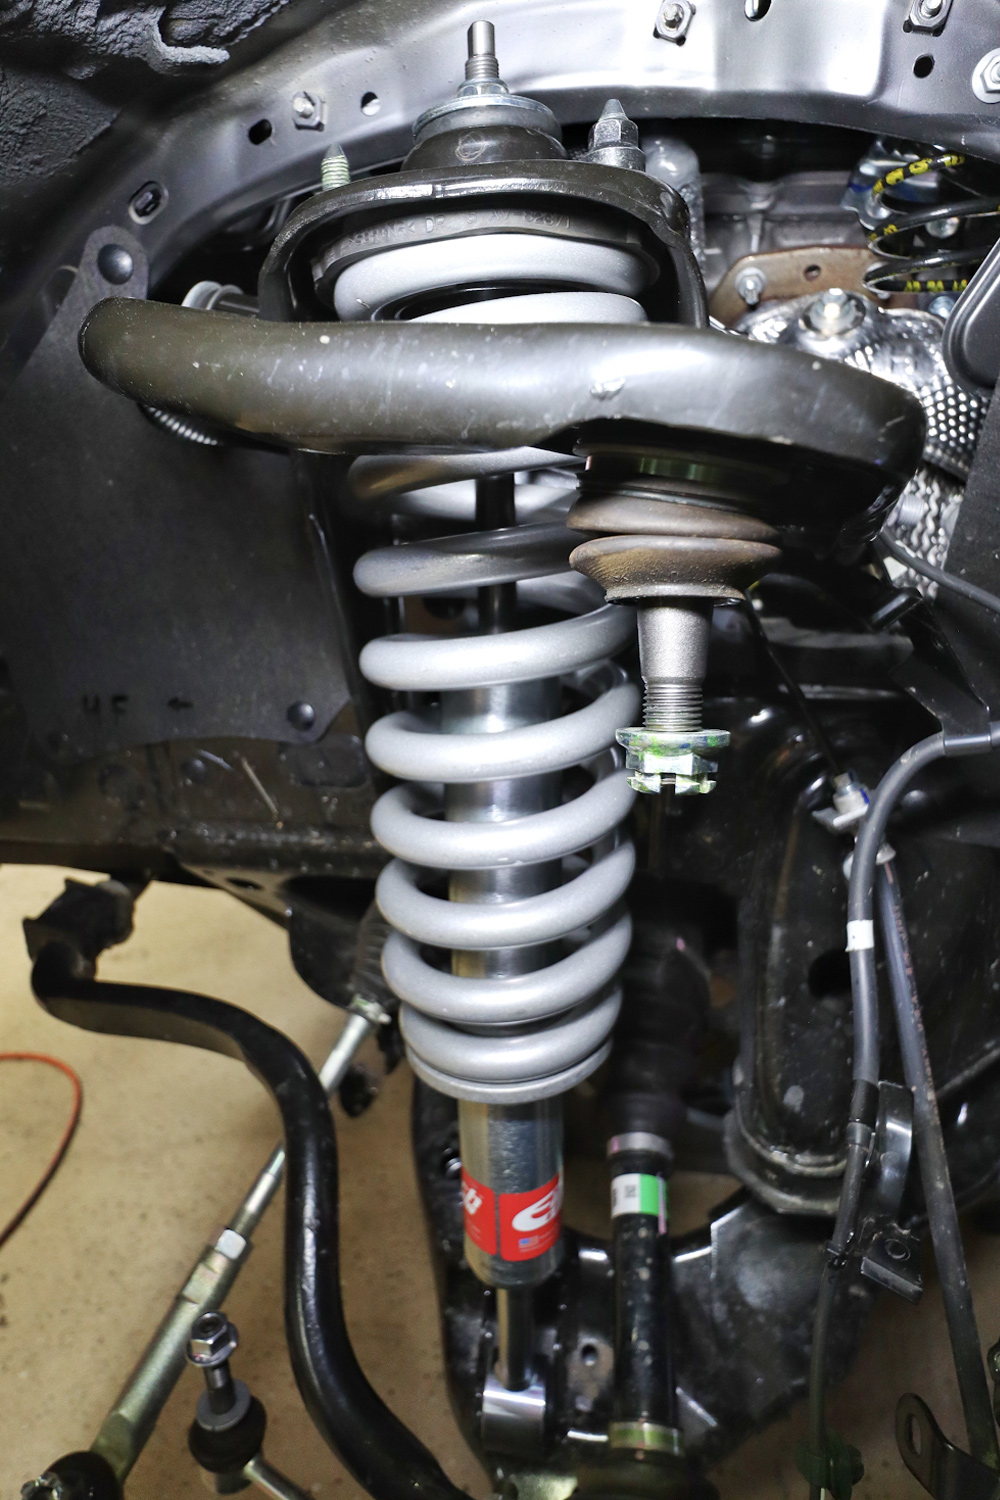
Reverse the coilover removal process, fish the bottom first, then the top.
Have a nut for the top three bolts handy. I hold this nut between my teeth for easy access but do whatever makes you feel comfortable. Index the three nuts so they will align with the holes. Once you have the bolts exposed on top, put a nut on it before you lose it.
Step 14. Install Bottom Bolt

The bolt goes into the hole from the back of the vehicle toward the front.
If you are having difficulty lining up the holes, use a pin from the opposite end and leverage the holes to align. Insert nut and tighten with a 19mm wrench and 19mm socket. Now, go back to the top nuts of the coilover and tighten them with a 14mm wrench.
Step 15. Attach Steering Knuckle

First, pump up your floor jack to make this job a pinch easier. While sitting on a stool or bucket, pinch the brake assembly between your knees to keep it from swinging. Grab the steering knuckle with one hand and the upper control arm with the other.
Now you have to pull these two pieces together although everything in the universe is working against you, or so it seems. It helps if you bounce your weight onto the upper control arm to pull it down. Once you have a few threads exposed, throw your castle nut on quickly. Use a 19mm socket and tighten.
Step 16. Install Tie Rod

Grab the tie rod end and push it into the steering knuckle from the underside. Tighten with a 19mm socket.
Step 17. Install Sway Bar Link

Insert sway bar end link into the steering knuckle. Tighten with a 17mm socket.
Step 18. Install ABS Line
Remove the bolt from the upper control arm, reinstall the ABS line bracket and bolt. Tighten the bolt with a 10mm socket. See Step 5 picture for details.
Step 19. Install Brake Line Bracket

First, remove the 12mm bolt from the steering knuckle and replace the large bracket, remember to align the nub into the hole. Now, replace the bolt and tighten.
Next, remove the smaller 10mm nut off the smaller ABS line bracket that is next to the brake line bracket. Place the smaller bracket back onto the brake line bracket and tighten the bolt with a 10mm socket.
Install the small green clip into the small slot from which it came. You may need to use needle-nose pliers to make this happen.
Step 20. Sway Bar Relocation Blocks

The sway bar relocation blocks mount between the frame and the factory sway bar rubber bushing. The purpose of the block is to relocate the sway down and forward to give the larger coilover more room to breathe.
The block comes with two shorter bolts and washers. The factory bolts go into the recessed holes of the block and inserted into the frame. Now, tighten with a 14mm socket and torque these bolts to 30 lb/ft.
Insert the front bolt into the smaller hole of the bracket about halfway.
Pick up the rounded bracket that caps the sway bar bushing. One hole is slotted and the other is not. Place the bracket over the bushing on the sway bar. Slide the slotted end of the bracket over the bolt you half inserted into the relocation plate. Now, replace the other bolt into the bracket and tighten both bolts. Torque to 30 lb/ft.
Step 21. Repeat On Other Side
If you have not yet done so, catch the other side up. Don’t rush…I’ll wait.
Step 22. Torque Front End
Here are the torque specs for the components. I like to torque one side completely, then move to the other side. When that is done, go back and re-do each side. Yes, it is very redundant. However, if you miss a single bolt, there can be big major consequences. Peace of mind that the job is done right is key!
- Steering knuckle to upper control arm – 81 lb/ft. – 19mm – cotter pin
- Bottom coilover bolt – 61 lb/ft. – 19mm
- Steering Tie Rod – 67 lb/ft. – 19mm – cotter pin
- Brake line bracket to steering knuckle – 9 lb/ft. – 12mm
- ABS line on brake line bracket – 9 lb/ft. – 10mm
- ABS line on upper control arm – 9 lb/ft. – 10mm
- Coilover top bolts (3) – 47 lb/ft. – 14mm
- Sway bar mounts to frame 30 lb/ft. – 14mm
Step 23. Front Complete
Put both front tires on and torque to 85 lb/ft. Lower the front end back on the ground.
Step 24. Raise Rear
Place your floor jack on the center pumpkin of your rear axle and lift up the rear of your Tacoma. The higher you can get your truck the better.
Place the jack stands on the frame as close to the rear as you can get them, without interfering with the leaf springs.
Pull the tires and store them under the vehicle for that extra layer of safety.
Step 25. Remove Rear Shock

Remove the nut from the bolt with a 17mm wrench and a 17mm socket.
With the nut removed, lower the floor jack until the bolt feels loose. Push the bolt out, and if it is sticky, use your handy dandy pin and tap it out.

Now, move to the top nut of the shock.
The easiest way to remove this nut is by using a pair of vice grip-needle nose pliers on the end of the threads of the shock. If you try to loosen the nut without holding the threads of bolts, it will just spin inside the tube of the shock.
With the bolt threads securely locked off, use a 14mm wrench to remove the nut. Pull the bottom of the shock out and then pull down. Now the shock has been removed.
Step 26. Remove U-Bolts

I used a ¾” deep socket because I don’t have metric deep sockets YET (shhh! Don’t tell my wife!). The nuts came off easily with the impact. Once all four nuts are removed, pull off the bottom plate or it will fall off later.
Step 26. Add Rear Lift Block

With the U-bolts removed, lower the floor jack to make space between the axle and the leaf spring pack. Do one side at a time here, otherwise, you run the risk of the axle falling off the floor jack and that would be bad for your brakes!
With enough room, place the spacer block nipple down and logo out, under the leaf pack. Index the nipple into the hole on the axle.
Now, go back to the floor jack and raise the jack so the leaf pack nipple is just barely putting pressure on the lift block.
With some force, align the leaf pack and axle so that the nipple of the leaf pack seats into the hole of the lift block. If needed, persuade compliance with a rubber mallet.
Step 27. Install New Longer U-Bolts
The new u-bolts that came with the kit go in the same way the factory u-bolts came out. To make it easier to get the threads into the bottom plate, squeeze the end of the u-bolt together slightly and insert them into the plate.
Put on the new hardware and tighten it. I used the impact to tighten it all up. Go slow and in a criss-cross pattern to keep the length of thread hanging out from each nut the same. This will ensure that the plate is flush.
Step 28. Rubber Boot

Before you begin, look at the Eibach shock. The rod end of the shock has a groove, see picture above. The small of the boot seats into that groove.
The rubber boot has a large end and a small end. Place the large end of the boot over the rod end of the shock. Pull it down and try to seat that small end into that groove, without it falling down into the rod. May the force be with you.
Place the supplied zip tie on the bottom end of the boot. Make sure the boot is seated on the shock body and make it tight.
Step 29. Insert Rear Shock

Insert the new Eibach shock into its new home, starting at the top.
Remove the nut, washer and bushing and insert it into the bracket. Now, replace the bushing, washer, and then the nut. Snug the nut down.

If you get lucky and the bottom holes line up without any adjustments needed, go buy a lottery ticket!
Or, just realize how lucky you are! If you weren’t quite as lucky, lower or raise your floor jack to get it as close as you can. Place your bolt in from the brake caliper toward the middle of your truck. If the bolt doesn’t go right in, use your pin to align the holes. Tighten the nut with a 17mm wrench and 17mm socket.
Now catch up on the other side.
Step 30. Torque Rear End
Torque the rear suspension components
- Leaf Spring U-Bolts – 52 lb/ft. – ¾” deep socket
- Bottom Shock Bolt – 61 lb/ft. – 17mm
- Top Shock Nut – 47 lb/ft. – 17mm
Put the rear tires back on and torque to 85 lb/ft.
Step 31. Celebrate
Congratulations, you have done it. Get out there and explore with your new Eibach Pro-Truck Stage 1 Lift System.
Final Thoughts
A huge thank you to Ryan at Eibach and Brenan at TrailTacoma, you guys rock! I’m already planning another attempt on, The Backway to Crown King, and I know it’s going to be fantastic!
Do you know if this kit will clear 295/75/r16 on factory wheels, 2020 TRD OR w/o rubbing
Regarding using new top hats with the new coils. How many threads should I see on the on the shock rod before I tighten the nut on the new hat?
Thanks
Running on 2nd clip setting?
Hey Dan, I would absolutely run on the 2nd clip setting. It will give you a good balance of lift and ride comfort.
How high did you go with the front height? What was the purpose of the block for the rear suspension? I want to increase the height of my tacoma, but I’m not sure what height I should go in the front so it will level out with the back?
Hey Ray. I went to the highest height setting mainly because I had plans to install a steel front bumper with a winch. However that didn’t happen for quite a while and it’s a harsh ride on the top setting. I would definitely put in on the second setting and see where your truck is at. I used the blocks in the rear to make sure the truck is leveled out with the height I was increasing on the front end. I would set the front shocks where you want it and then see where your rear is at.
My kit came with a diff. drop kit but no sway bar relocation kit. Do I need it. I plan on using the second notch on the shocks.
Hmmmm that is odd. I did not need a diff drop on my install, but I definitely needed the sway bar drop to make room for shock travel because the Eibach shocks are thicker than stock. Definitely keep an eye on the sway bar touching the shocks when traveling.
Great write up. Followed along and had zero issues with the install. I am curious if you’ve experienced the needle bearing issue that I just learned about. Seems like a common problem shortly after installing a lift. I’d hate to have to take everything apart again.
Thank you very much. Glad the install went well. I have never had any issue with the needle bearings personally and I have done some crazy things with my truck. Not saying that it can’t happen. I would tackle that issue if it pops up personally. Hope this helps.