

It’s no secret that storage and organization are important to any off-road/overland excursion. We also know that many of the solutions on the market can get very expensive, very fast.
So what’s the solution? Instead of spending tons of money on something like a Goose Gear camper system, build your own!
In this article, I will be going over some simple steps and necessary procedures for a do it yourself, cargo/mounting system + fridge platform for your overland camping needs.
When I started with this project, I wanted it to be easy on the wallet and as simple as possible. In total, the cost to build this platform cost me around $280. That price does not include the cost of the refrigerator.
Your price will fluctuate depending on the materials you choose, and if you decide to make your own refrigerator slide or purchase one instead.
Note: This post is not necessarily a step-by-step DIY but does give you a nice overview of the process of building a custom bed storage/mounting solution. This project is very custom and you can alter the dimensions and features based on your needs.
Table Of Contents
Supplies
- A high grade ½” sheet of wood of your choice, stay away from particleboard, as it won’t be sturdy enough.
- L-brackets for securing the corners and the cargo box to your platform.
- Spray-on bed liner, I went with an off-brand I bought from amazon – this will give you a finished look and make it more durable.
- A sliding track for the refrigerator can be built or purchased. I went ahead and sprung for an ICECO Slide Mount, which made the process a little quicker and easier.
- Spring-Loaded Latches: I went with a spring-loaded black draw latch
- Hinges for the lid, you can choose any style you would like, I used some heavy-duty cabinet hinges for the back.
- Wood glue, any brand.
- Hardware, I used a total of 8 nuts, bolts and washers, 6 self tappers and 24 screws.
- Your choice of a refrigerator, I chose the TMB premium fridge which I purchased on amazon.
- An air compressor and a tarp, for the spray-on bed liner portion of the project.
- Saw or something to cut with, I used a jigsaw.
- Hand tools or impact gun.
- Sandpaper for paint preparation.
- PPE (personal protective equipment) such as eye/ear protection, gloves and a respirator/mask.
- Electrical tools/supplies, wire strippers/cutters, shrink wrap, solder/solder gun, zip ties and 20 feet of wire
- 12v output connection/port
- Clamps
Preparation & Fabrication
The first thing I did was cut and prep all of my wood pieces.
Cargo Box Measurements:
- 2 pieces – 12”x15”
- 2 pieces – 12”x26”
- Lid – 26”x16 ¾”
Platform measurement: 56”x18” narrow-area (around the wheel well) and 22 ½” after tapering out from the wheel well.
Depending on if you wanted a larger box and larger platform, you could adjust these measurements to your desired size. I chose my measurements to sit more flush with the size of the refrigerator I am using.
After I finished making all of my cuts, I went over all the wood pieces with fine sandpaper to smooth out everything. Once they were properly prepped for fabrication, I went ahead and started to piece together the box.
I assembled the 4 sides of the box using screws and nuts. I placed screws on the top and bottom of each long panel to secure them to the side panels. I also lined each piece with wood glue before fastening them together for added stability. After the sides are assembled, you will then secure the box to the platform with L-brackets and attach the lid using hinges and screws.
This is one place where you can really use your imagination and make a customized system.
Spraying Bed Liner
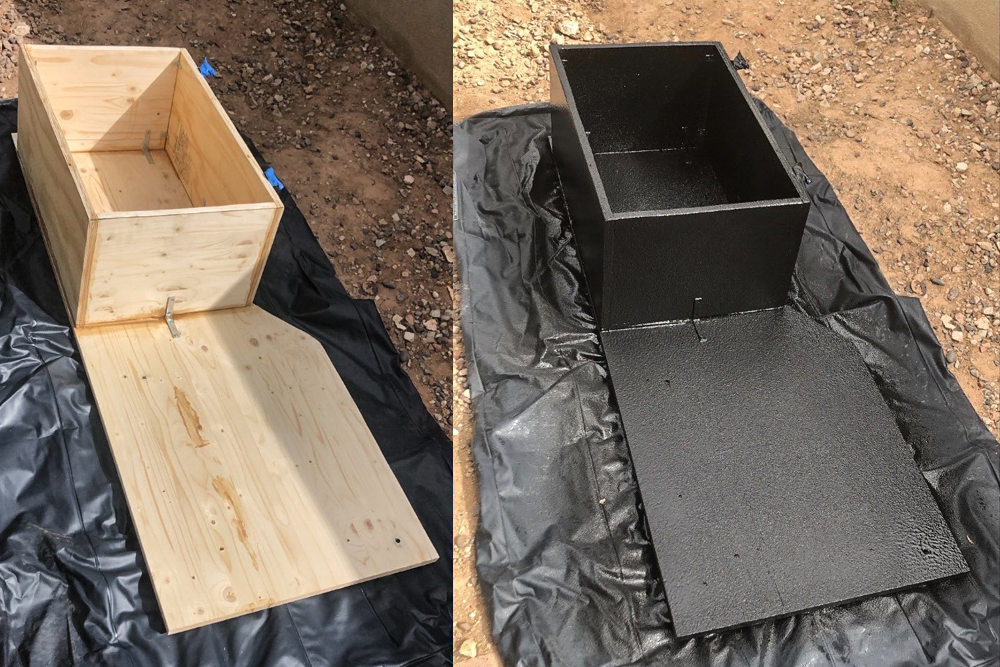
After everything is assembled and dry, lay out a 4’ x 8’ tarp. You are now ready to spray your platform and box. Make sure you properly mix whatever liner you choose to purchase, according to the manufacturer’s directions.
You’ll need a minimum of 7 CFM capacity and 25 psi at the gun. You do not want to exceed 55 psi at the gun. This will generate too much overspray. You can achieve virtually any texture from 25 to 55 psi range when using an air compressor with a spray-on liner.
Please make sure you are wearing proper PPE in this process! These chemicals are not good for you or your brain cells, so please make sure you cover your face holes.
This is not the only option for painting your new system. There are several options out there for rattle can or roll on bed liner.
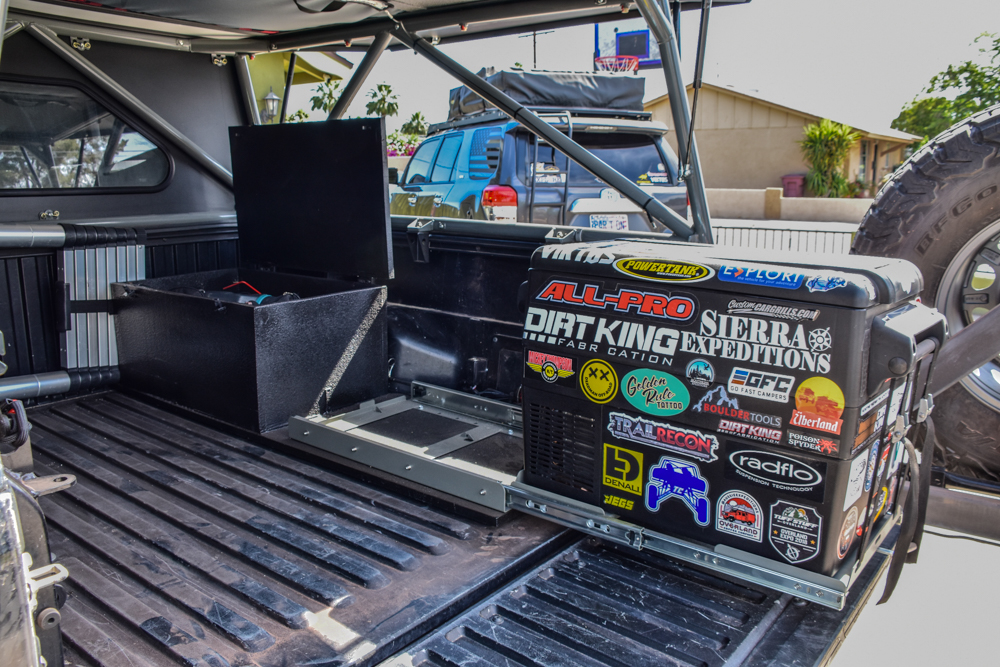
Mounting
Before you begin this process you want to make sure that the bed of your truck has been cleaned out thoroughly. You do not want to install the platform on top of dirt or debris. After you have finished cleaning the bed, go ahead and set your platform inside where you plan to mount it.
You will first need to drill through the platform and the bed of your truck where you are planning to put the bolts. I secured mine in each corner and through the center of my platform. Using a through bolt and nut, finish securing the platform in place. Once the platform is secure to the bed, go ahead and install the fridge track onto the platform using the self-tapping fasteners. At this point, you should have a pretty good looking setup.
Fridge Electrical/Outlet
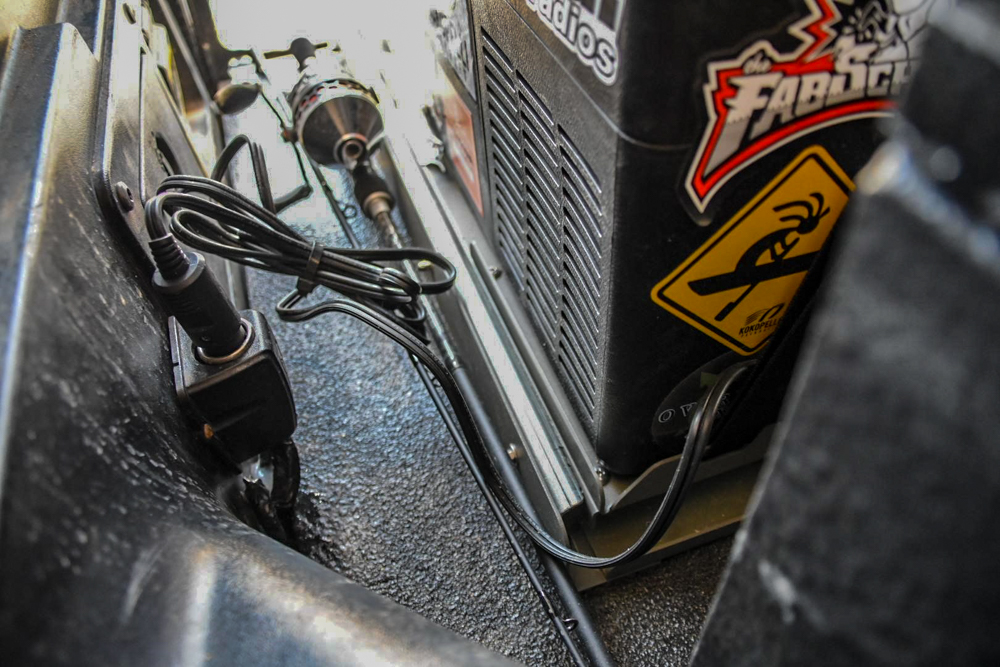
I originally purchased an ARB fridge harness that ended up not being compatible with the type of plug that came with the fridge.
Instead, I ended up buying a different outlet style for the refrigerator from Ace Hardware. Then I soldered the connections to the harness that I purchased (this step will vary from person to person, depending on the refrigerator and connections you get).

I ran the harness directly from my battery source, along with the frame, to the back passenger side where I mounted the fridge outlet.
At several points along the way from the bed to the engine bay, I zip-tied the wires along the same route and my ARB airline, to ensure it was out of harm’s way.
Final Thoughts
Overall, I’m very satisfied with the function and durability of this simple setup.
I hope this helps anyone looking to build a less expensive, simple system for storage and mounting for your overland refrigerator. I have taken my truck on the trail a few times since the completion of this project, and it has held up beautifully.
I’d be more than happy to answer any questions anyone has.
Awesome write up! Thinking about something like this for my passenger side! Then maybe a double drawer for the driver.