
Among the many items recently released by 4 Wheel Parts (4WP) for the 3rd Gen Toyota Tacoma was a factory replacement,100% bolt-on rear bumper. This bumper directly replaces the OEM rear bumper and doesn’t require any cutting for installation! The trade-off is that it isn’t classified as a high-clearance bumper, but if you’re solely looking for added protection, this is the option for you.
- Check out the low-profile 4WP front bumper here.
- Read more about the 4WP rock sliders here.
- See the 4WP bed stiffeners here.
Like the front bumper, the rear bumper is loaded with features and customization to help dial it into your needs.
The ability to customize the bumper the way you’ve always dreamed of is a huge plus. Additionally, being able to remove it and re-install the OEM bumper means that nothing is permanent if you change your mind down the road.

Below, we’ll provide detailed installation steps and look at the bumper’s features! To preface, I got the bumper installed professionally at 4WP by one of their certified technicians. This is always an option for purchasing through 4WP and is something to keep in mind!
Find It Online
- 4WP Factory Base Rear Bumper for 3rd Gen (2016+) Toyota Tacoma: Check Price
Table Of Contents
Features & Specifications

The 4WP rear bumper has a major standout feature in that it retains the factory blind spot monitors (BSM).
If your truck isn’t equipped with BSM, then there are factory plugs to cover the sensor cut-outs. There is also a small storage cubby behind the license plate, which is definitely something that I haven’t seen before. This is a great hiding spot for small items like keys.
This bumper also has the option to add either a single or dual swingout. The swingouts have options to add accessories like a spare tire mount, hi-lift mount, jerry can mount, and much more. Included with the swingouts is a flip-down table for an added work surface.
The optional swingouts are not compatible with the BSM system, so that is a consideration to make before adding them.
General Specifications
- D-Ring mounts
- Matte black powder coat
- Two 6″ light bar cutouts
- Rock light mounts and cutouts
- Integrated bottle openers
- Flip up license plate storage
- Blind spot monitor compatible (bumper only)
Installation

The 4WP bumper came in a massive box packaged super well with bubble wrap and Styrofoam to keep it safe during shipping. Be sure not to throw out the hardware box that says hardware all over it!
The bumper does weigh roughly 90 lbs., so a second set of hands may be helpful. The hardware box includes two frame mounts, one wire harness extension, two shackle support mounts, and all the needed hardware.
Tools & Materials

You will need a decent set of tools to complete the install. Required items are listed below.
- Mechanic’s Toolset
- Trim Removal Tool or Flat Head Screwdriver
- Needle Nose Pliers
- Wire Cutters
- Zip Ties
- Impact Wrench (optional)
Step 1. Remove License Plate Lights + Trailer Plug

Reaching behind and under the bumper, you will find the wire harness plugged into the license plate lights. Remove the plug and the clips that hold the lights into the bumper. For the trailer plug, the same process applies by unplugging and then removing the plug by pushing on the clips that hold it to the bumper.
Each corner has a clip on the bottom side of the black trim, which can be removed and set aside.
Note: None of the push clips will be re-used, so breaking them won’t matter.
Step 2. Remove BSM Sensors

This step can be skipped if your vehicle isn’t equipped with BSM sensors.
The sensors are stubborn, and the wire harness is extremely tight. Reaching around the backside of the bumper, try your best to push all four sides of the clip in to remove the sensor. Removing the sensor first allows for better access to remove the harness.
These sensors must be reinstalled back into the same spot they came from. If not, they will not function correctly, and you will likely need to have a Toyota dealer re-program them.
Step 3. Remove License Plate

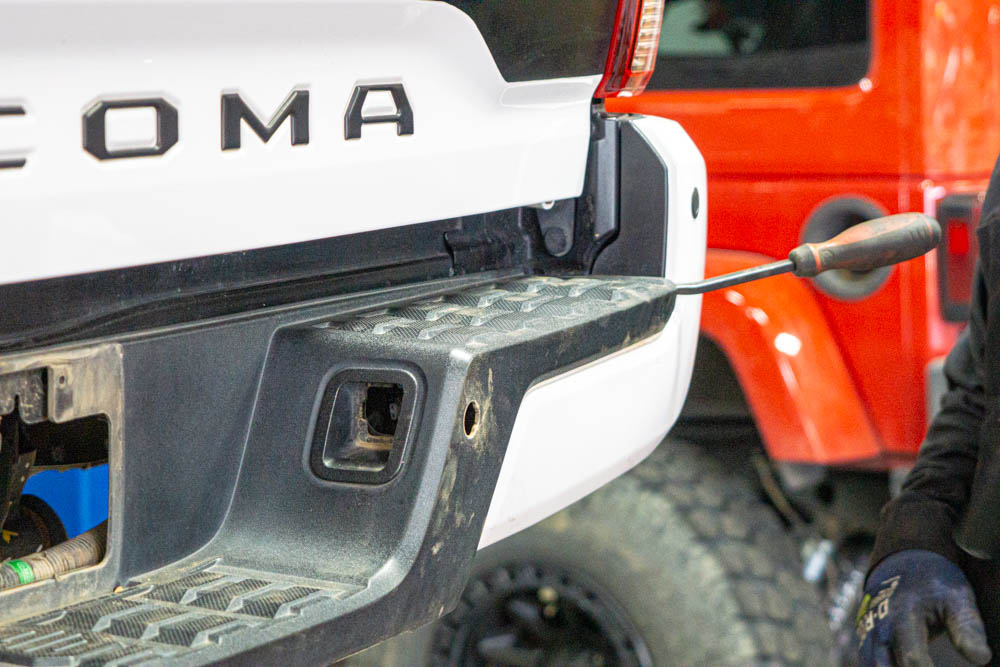
Remove your license plate and its mounting screws. Once the license plate is off, a clip is exposed behind the plate in the center. Remove that using either a trim removal tool or a flathead screwdriver.
Step 4. Remove Plastic Trim
Like most plastic pieces on the Tacoma, the rear bumper trim is stubborn and feels like it will break when you put pressure on it. Don’t worry; it won’t.
Starting from the corner with a pry tool or something similar, lift the trim enough to get your fingers behind it and start pulling up and away from the truck.
Step 5. Remove Internal Bracing
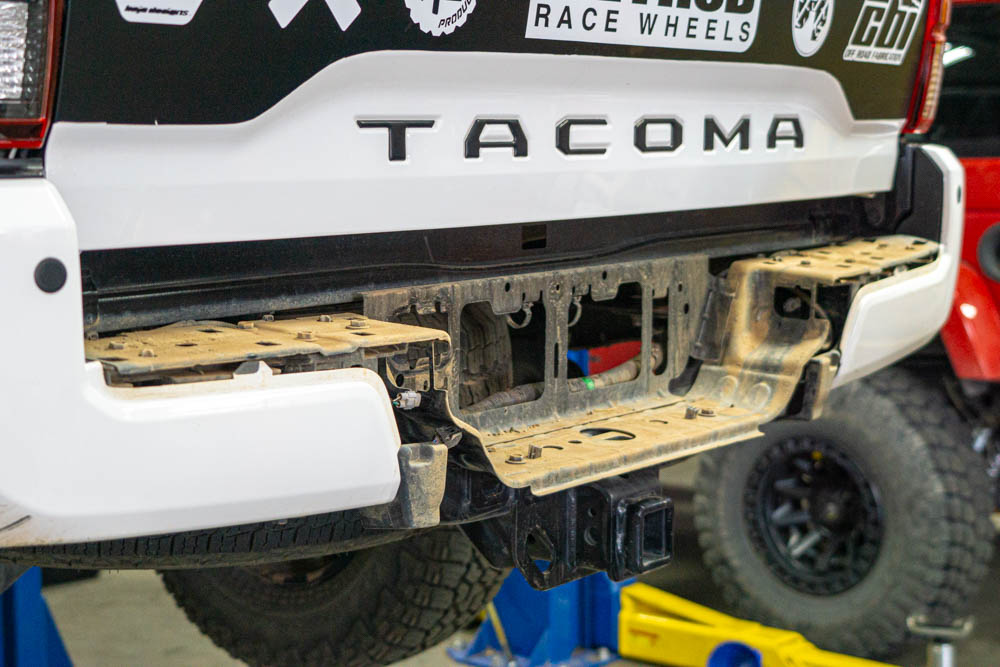
Once the main trim is removed, a large support piece must come out. There are four 12mm bolts on the top sections and two in the center that can be removed with a socket.
With this trim piece removed, you now have two end caps left to take off.
Step 6. Remove Bumper Caps
There are three clips on the underside of the bumper caps and two 12mm bolts behind that need to be removed.
Note: This is what holds the bumper on, so be ready for it to shift once the last bolt is removed.
Step 7. Remove Harnesses & BSM Sensor Box

The corner sensors are hidden behind the bumper cap. There are two sensors as well as the sensor boxes.

The black boxes mounted in the corners are the modules for the BSM sensors. There are two on each corner, requiring a 10mm socket for removal.
At this point, the stock bumper parts are all off and can be set aside. Completely unplugging the factory wiring harnesses will help with the installation of the new 4WP bumper later.
Note: If you are running the swingouts, the module must be relocated since it’ll be in the way. We will cover that down below.
Step 8. Install License Plate Lights & Trailer Plug

Both the license plate light and trailer plug only have one orientation to install into the new 4WP bumper. Install them using a small flathead screwdriver and pry their plugs outward to help secure them.
Step 9. Install BSM Modules

This step can be skipped if you don’t have BSM.
Each corner of the bumper has a plastic cap that covers the swingout assembly or BSM box location in our case. Remove the caps using a 4mm Allen wrench.
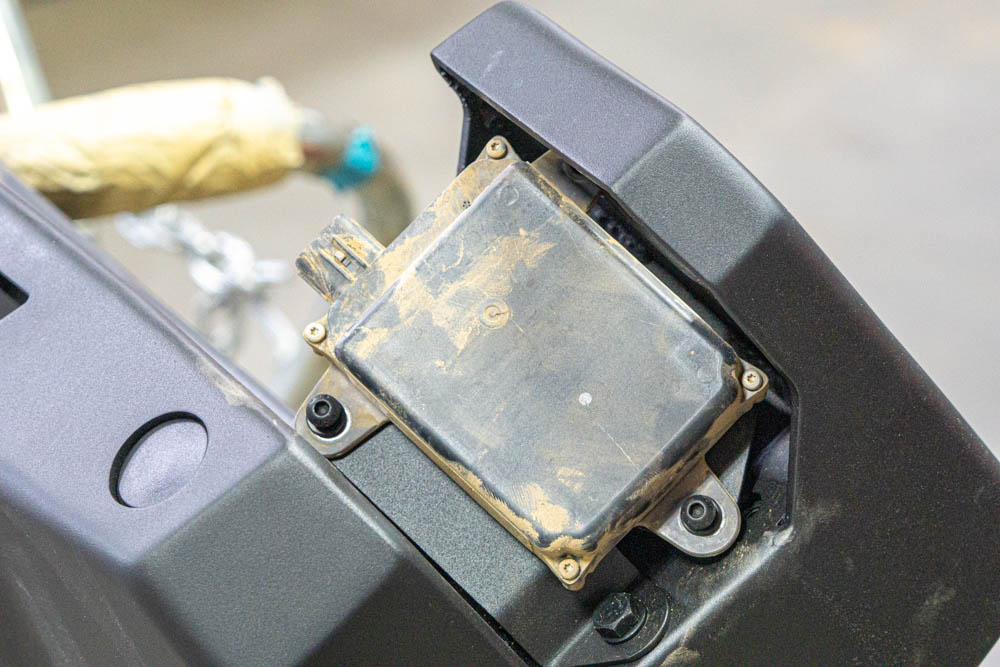
The BSM sensor boxes will keep their same orientation and are attached to the bumper with a 4mm Allen wrench. The bumper’s passenger side requires installing the provided harness extension. It can be directly connected to the sensor box and is only required on the passenger side.
Step 10. Install BSM Sensors

Reinstalling the BSM sensors is as simple as removing the protective caps and inserting the sensor into its proper spot and orientation. Repeat on all four sensors.
Step 11. Route & Plug Wiring Harness Together

4WP has specific cutouts in the bumper supports to route the wire harness through. This provides a cleaner look and means less use of zip ties!
Plug all the BSM sensor harnesses into their specific sensors and the harnesses into the BSM sensor boxes. The license plate lights can also be plugged in, but the trailer plug harness won’t be reinstalled until the bumper is on the truck.
If you plan on adding light bars and/or rock lights, now is the time to install them, as you have unimpeded access.
Step 12. Install Frame Mounts

Locate the two side-specific brackets and install their associated M10 hardware, plate, washer, and nut. Hand tighten only, for now. This is what the bumper studs will attach to, ultimately drawing everything together.
Step 13. Install Bumper Onto Truck

This step requires a second set of hands to help lift the bumper in place and hand tighten.
Having a stand or an extra set of hands lifting while you loosely install the M12 bolts is the most efficient method of installation. Line the bumper studs up to the brackets installed in the step above and install the 19mm bolts. The bumper should still be loosely installed, so be careful when working around it.

Start tightening down – the frame bolts first, then move on to the bolts that bolt the bumper to the mounts. Once you are close to snug, stand back and center the bumper as needed before tightening everything down completely.
Step 14. Install Shackle Supports
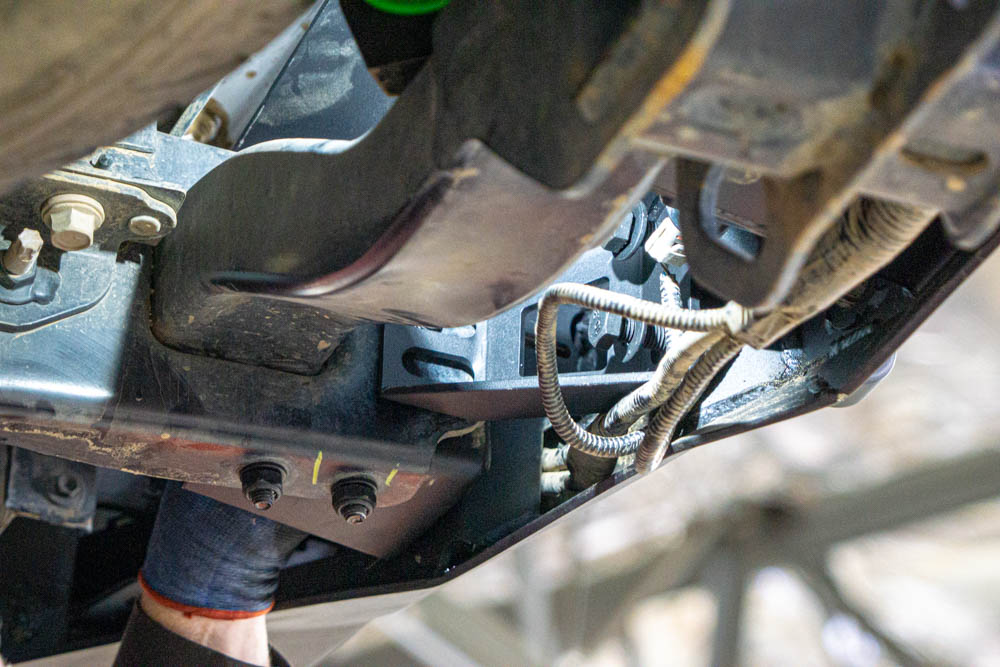
The triangular brackets are the shackle support mounts. They’re also attached by using the M12 bolts. Once everything is where you like it, tighten down all of the bolts.
Step 15. Reinstall Factory Harnesses

The factory harness is very tight on some connections. On top of the driver’s side frame, just below the bedside, are two plugs that hold the harness to the frame. Removing those will give you enough slack to ensure a proper harness connection.
Now is when you can reinstall the trailer plug and any other connections as well. The best place for the wiring harnesses to sit is below the storage box and zip tied to the backup camera mount. This isn’t a permanent solution, as I plan to relocate the backup camera, but it does the job for now.
Step 16. Replace Bumper Caps

The corner bumper caps can be installed using the three provided 4mm Allen bolts.
Step 17. Install License Plate

Install your license plate and frame with the provided hardware on the bumper.
Step 18. Storage Cubby
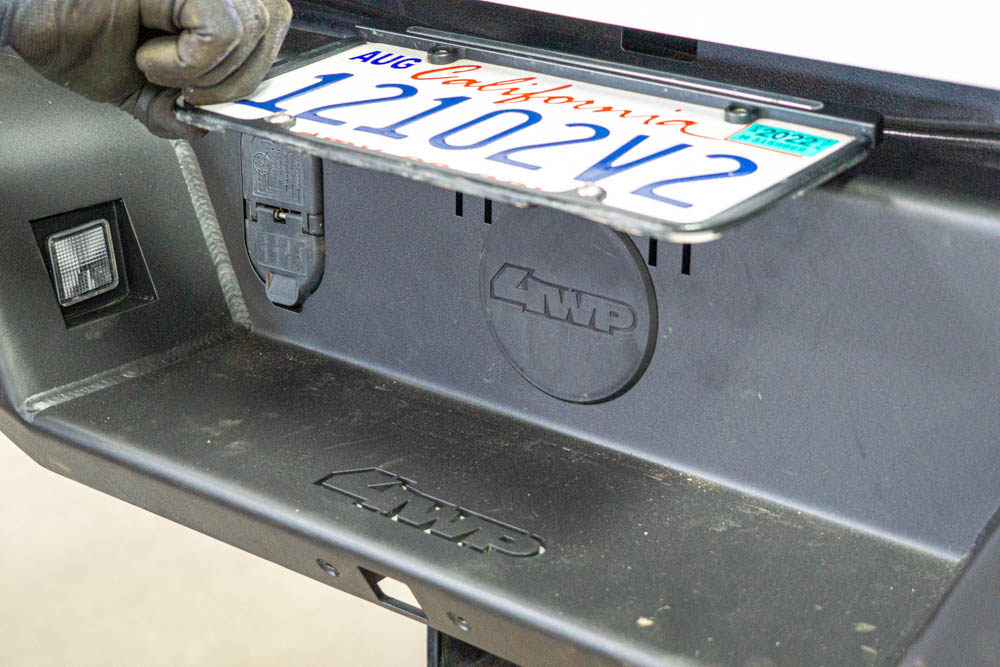
My favorite feature by far is the hidden storage behind the flip-up license plate. The license plate is held to the bumper by magnets, and folding it up reveals the cap to access the storage cubby. This is the perfect place to leave keys and items when surfing or adventuring!
Note: The storage cubby is hidden but is not lockable in any way.
Congrats, you’ve successfully installed the new 4WP Factory Tacoma Rear Bumper; stand back and admire your work!
Product Highlights

This bumper is rad, to say the least. I’m a sucker for functional or clever features, and this bumper is jammed-packed with them!
Not only does it have some excellent features, but it also adds a ton of protection over the stock bumper. Let’s take a look at some of these features up close!
Flush Tow Plug + License Plate Lights

Shackle Mounting Points

Backup Camera Relocation Mount

Integrated Bottle Openers + Rock Light Mounts

Final Thoughts

I am super impressed with the 4WP Factory Rear Bumper. Customer service may vary from store to store, but all of my interactions were awesome, and everyone was very knowledgeable.
This bumper’s features and customization seal the deal for me. I really like that I can start with a simple bumper and add the extras later. That also gives me time to upgrade the rear suspension if needed.

Just like anything, there are some downsides, and I have a couple of minor concerns. The first is how tight the harnesses are. Providing an extension of even a couple of inches would make a night and day difference with installation. Also, if you decide not to run any lights on the bumpers, holes, and cutouts are exposed, adding another place for mud to catch. While these are by no means deal breakers, they are worth pointing out!
Overall, the bumper is excellent and provides the aftermarket protection and aesthetic I was looking for. I’m anxious to get my hands on the swingouts and will share my post on those soon!




I have this bumper with both swing outs but I’m waiting on installing it until I can find out how to install both the swing outs with the bsm monitors as well any info or instructions on how to accomplish this would be greatly appreciated
Where can I purchase it, link doesn’t show any website for purchase
I believe this bumper was discontinued…
From looking at your website it appears that you are showing a steel rear bumper on a Tacoma that accomodates the BSM electronics. Am I just being hopeful?
Correct, all the BSM electronics are accommodated on this bumper. I’ve had no issues with them not working.
How tough is this bumper? Can this be dragged on rocks?
Thank you for posting the pics. Your photos helped me during installation on my Tacoma..