

Baja Designs, who like to refer to themselves as – “the scientists of light” – are one of the leaders in off-road lighting with 25 years of experience engineering and manufacturing American-made products.
Their lights have been found on most Baja 1000 winning vehicles for over 15 years. They were the first company to develop a forward projecting LED light bar. In the following years, these evolved into a line of some of the market’s highest-performing LED lights. Starting out with a simple dual sport motorcycle lighting kit over two decades ago, Baja Designs now offers a complete line of industry-leading products for all types of lighting applications.
Find It Online
- Baja Designs S8 LED Light Bar: Check Price
- Cali Raised LED Lower Grille Light Bar Brackets: Check Price
- Aubeam 8 Gang LED Switch Panel Kit: Check Price
Table Of Contents
Light Bar Mounting

I’ll be installing the 30” inch option of the S8 light bar with driving/combo amber lenses.
The lower grille opening of the 3rd Gen Tacoma happens to be exactly the same size as the light bar. I chose the driving/combo amber lenses as the amber color increases visibility in dust and snow. The driving/combo lens pattern combines spot and wide beam patterns.
I plan on experimenting in the future with a clear center lens to add a little more white to the center area since I already run Baja Designs’ amber fog and ditch lights.

The Baja Designs S8 light bar features a low 20 amp draw, aluminum frame, amber backlight, and 31,750 lumens of light.
It is fully waterproof, temporarily submersible, and available in amber or clear colored lenses with the choice of four different light patterns and ranges in sizes from 10” to 50” inches. Each lens is interchangeable, allowing you to run all kinds of lens patterns and color combos. Along with being backed by a limited lifetime warranty, the S8’s LEDs are rated for 50,000 hours of run time!

A wire harness for the S8 is sold separately. There are a couple of different choices to control your light. You can choose to control the light bar with one switch or control the backlight feature and main light beam independently with a dual switch harness like the one linked below.
Cali Raised Grille Light Bar Bracket

There are a few lower grille brackets available for the 3rd Gen Tacoma. I chose to use the Cali Raised LED lower grille light bar brackets. In my opinion, they are the best in the market and the only kind I’ve seen with two different mounting positions, making them versatile.
These brackets are CNC cut and bent to fit in the tight space behind the grill. They are compatible with almost every kind of 30-32” light bar and position the light right behind the lower grille with no trimming required.

Tools & Materials
- 10mm socket/wrench
- 14mm socket/wrench
- 7/16” socket/wrench
- 3/16” Allen wrench
- Flathead screwdriver
- Baja Designs dual switch wire harness or equivalent
Note: You can likely follow these instructions regardless of what bracket or light bar you have.
Step 1. Remove Grille

The grille is only secured by two plastic push pins and two screws. They are found on the top inside corners of the headlights and radiator core support, respectively. The rest of the grille has plastic guides that line up and insert into the lower grille and valance area.
Pop the hood and remove the plastic push pins on each headlight with a flat head screwdriver.

Use a 10mm socket or Phillips head screwdriver to remove the screws that attach the grille tabs to the radiator support.

Lift the tabs up and off the plastic nuts holding the tabs in place (including the painted border around the grille). Pull the entire grille up slightly to unhook it. Then, pull the grille straight back and away.
Step 2. Remove Air Deflectors
If this is your first time modifying the front grill area, there are two air deflectors to the right and left side that channel air to the radiator. The light bar brackets will need to use the same mounting holes that the deflectors use. Before writing this, I had an older cheap light bar, so mine have already been removed.
Remove the single pin in the center of each deflector (no tools needed). Next, gently pull out the tabs on top and bottom connecting to the radiator core support. Then, rotate the deflector a little to the center to free it from getting caught on anything while it’s being removed.
Note: The plastics could be trimmed and reinstalled later to help accommodate airflow to the radiator. So far, I haven’t noticed a difference with engine temps. This is still something I plan to try in the future.
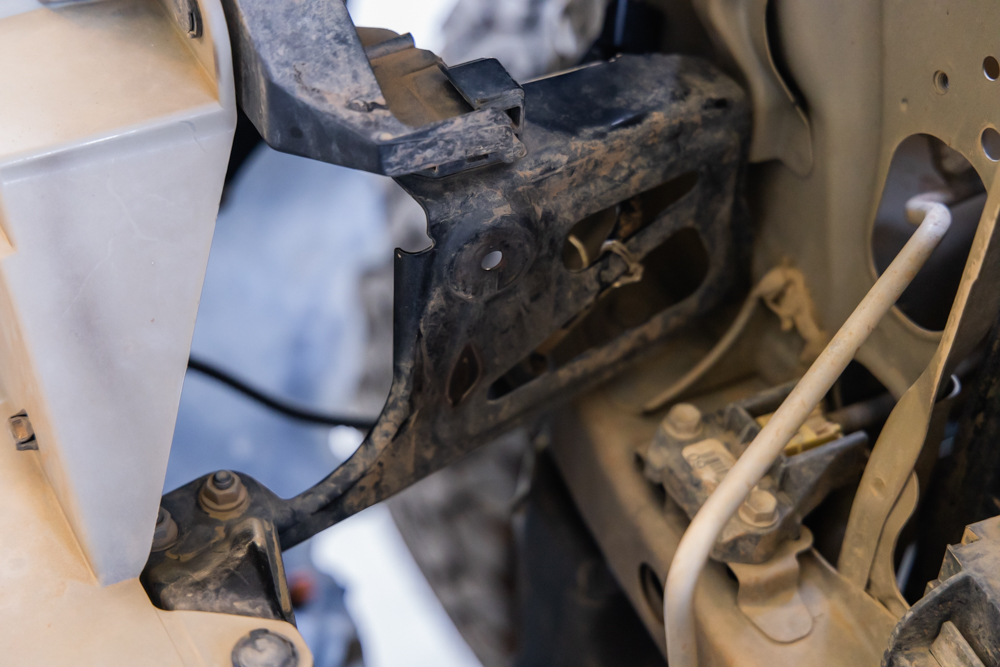
Step 3. Install Passenger’s Side Bracket

Next, remove the inner nut on the crash bar with a 14mm socket on the passenger and driver sides. These nuts will be re-used to mount the lower half of each bracket.

Starting on the passenger side, angle the bracket as pictured below. Hold the bracket, so the light bar mounting area is pointing out towards the passenger side and lower it below the top of the lower grille.

Next, rotate it 90* so that the light bar mounting area fits between the lower grille opening.

Line up the lower part of the bracket over the crash bar bolt and loosely mount the upper and lower hardware. Make sure to use the washers supplied with the kit on either side of the top mounting screw.

Leave the driver’s side bracket uninstalled for now. This will allow extra space to help position the light bar in the lower grille area.
Step 4. Install Light Bar

Getting the light bar in position is a little tricky. There are a few things in the way preventing the bar from simply dropping into place between the brackets. Some say to temporarily move the trans cooler out of the way to fit the bar.
That may or may not be necessary, depending on which light bar you’re installing. Personally, I haven’t had to do that with either of the light bars I’ve installed in the lower grille. I don’t think you’ll have that problem either, even with a different bar.
There are empty spaces behind the headlights and fog lights in front of the radiator support, allowing the light bar to be maneuvered into position. For the S8, ensure the light is oriented with the lenses pointed out the front of the truck with the wire connection on the passenger side.

About half of the light bar can fit in the open space just below the driver-side headlight between the back of the light and the front of the radiator support.
Insert the right-hand end of the bar at a slight downward angle. Slide it in as far as it’ll go into that opening until it’s touching the inside of the lower driver-side fender. Or until it clears the hood latch support (as pictured above just below my hand gripping the light bar).
Level out the angle of the light and move the left-hand side of the bar below the hood latch support. Then, move the bar towards the center in front of the trans cooler and in the lower grille opening.
With the light centered, you can rest it on top of the crash bar while we install the other bracket.
Step 5. Install Driver’s Side Bracket & Mount Light Bar

Install the driver-side light bar bracket by mirroring the same technique as the passenger side and loosely install the bracket mounting hardware.
Note: Mounting the light bar onto the brackets is probably the most challenging part of the installation. Especially if you still have wheel well liners. You will need to angle your arm through the same opening the light bar went through with your other hand holding the light bar up. That same open space is also on the passenger side.
If you don’t have your wheel well liners anymore or the front end of the liner is trimmed off behind the fog lights, you can also reach the lightbar hardware from that side.
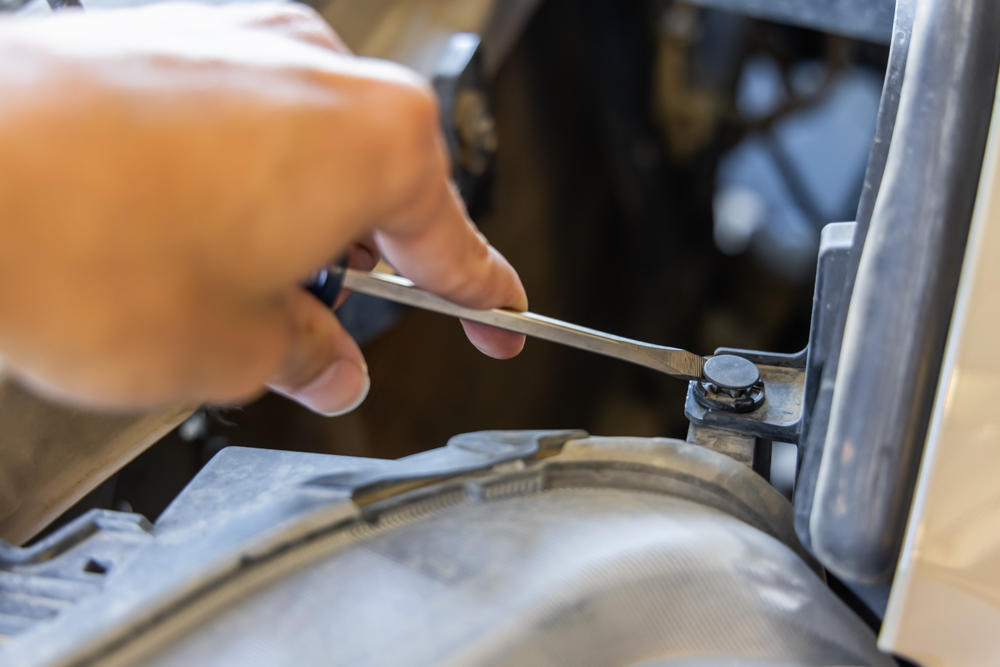
Start by hand tightening first, and Install the light bar mounting screws and washers with a 7/16 wrench or socket wrench. Put your arm through the opening down and behind the headlights on the outside of the bracket while holding the light bar with your other hand.
Do not fully tighten these screws yet, just enough so the screw heads almost touch the brackets. This will make final adjustments easier.
Step 6: Final Light Bar Adjustment

Semi-tighten the other bracket hardware. Leave a little wiggle room for final adjustment before fully tightening everything down.
Make sure to mount the light bar as far forward as possible without rubbing the inside of the lower grille. Tighten the light bar mounting screws just enough so that the lens stays facing forward.

Be sure that the light bar is straight and centered in the middle of the grille opening. The angle of the light should be pointing straight ahead. The position of the brackets may take some tweaking by adjusting the crash bar bolt position on the lower brackets up or down.
Once you’re happy with the position, fully tighten all mounting hardware on the brackets and the light bar.
Step 7. Connect Wire Harness

There is a pre-made wire harness made specifically for the S8 sold separately by Baja Designs. This is the harness that I used in this install. You can also build your own or buy a generic light bar wire harness from Amazon.
Make sure to get a dual switch harness for the S8 if you want to control the backlight separately from the main beam. Ensure that any wire harness you buy or make comes with a relay, or the connection could short out.

Connect the light bar to the harness and run the cable to the side and up towards the battery and firewall area. Use zip ties to hold the cable down.
Step 8. Wire Up Light Bar

If you are using a system like a Switch-Pros or RLB Pro8, the fuses and relays are all solid state and built into their own switch panel system. With one of these systems, just insert the positive and negative wire into your switch panel. I removed the relay, fuse, and on/off switches on my wire harness to connect to my Auxbeam unit.
Before I got the Auxbeam, I cut off just the on/off switches and wired it to my own OEM-style dual switch. That fit in one of the empty slots on the left side of the steering wheel. If you’re not using a switch panel system, find a place to tuck the relay or use a relay mount and then run the switch wires through the firewall.
For TRD Pro and Off-Road model Tacomas, there is an easy-to-access plug on the firewall that you can run the switch wire through. For Sport models, the plug is harder to reach. However, you can still run the wire through another firewall hole to the right of that plug next to existing wires running through the firewall.

After pulling the firewall plug, poke a hole through the rug to run the wires to the dash. Wire up the OEM-style switches or find a place to mount the switches included on the harness.
If you’re wiring an illuminated OEM style switch, the yellow dimmer wire will need to be T-spliced from the wire harness going to the third brake cargo light button into the dimmer wire on the new switch.
Find a blank switch to mount your OEM-style switch. You can usually find one under the cubby on the left side of the steering wheel. Remove the blank cover and push in the new switch.
I mounted my Auxbeam buttons over the cubby area on the stock panel with two screws and a bracket that came with the kit. Some Dremel work was needed on the front and back sides of the cubby to fit the bracket to the back of the buttons.
Final Thoughts

The S8 light bar is super bright and reaches far out ahead of the truck. It’s the perfect size for the lower grille area on my Tacoma. More importantly, the S8 will fit many popular aftermarket bumpers. So, I won’t need to get another light bar if I upgrade.
The amber backlight is a cool little feature to run as a stand-alone accent light. I love the way the light bar looks on the truck, along with the rest of my Baja Designs lights.

When I first researched off-road lighting, I quickly noticed Baja Designs stood out above the rest. Their history with desert racing and the unique design style of their products really drew me to the brand. Once I looked into the technology and build quality involved, I knew that you get what you pay for.
Looking for some led lights like these