
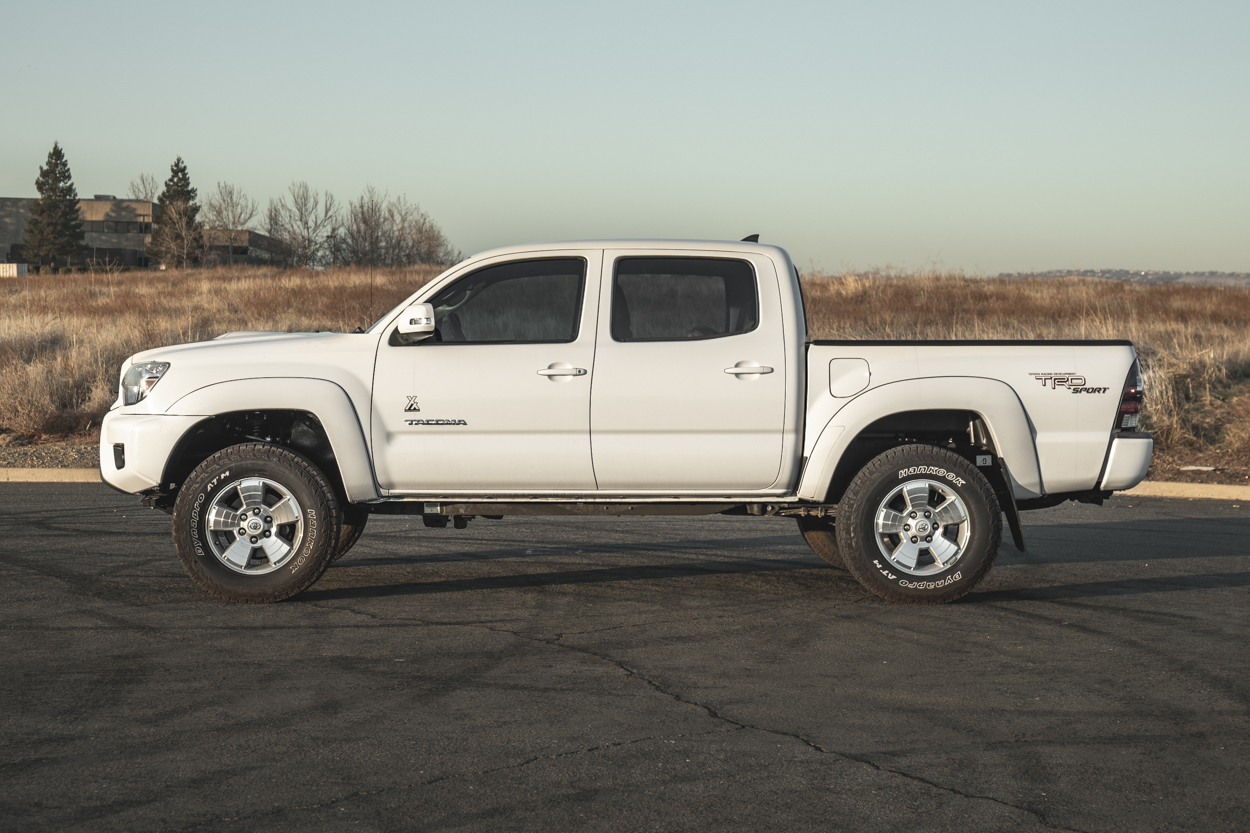
The classic, budget-friendly, most bang-for-your-buck suspension system in the industry: the Bilstein 5100.
If you are looking for one of the most budget-friendly ways to lift your 2nd Gen Tacoma, the Bilstein 5100 lift kit is absolutely for you. The Bilstein 5100 shock absorber has been tried and tested by hundreds of automotive enthusiasts for years. When it comes to the off-road industry, the Bilstein 5100 and the Bilstein 6112 are some of the most well-known and well-trusted shock absorbers on the market. They are also well known for being one of the most budget-friendly options. If you are looking for the most affordable, most economical way to lift your 2nd Gen or even 3rd Gen Tacoma, the 5100 is the first choice among many.
When paired with the right coil spring option in the front, the shock will provide added lift and added ride comfort, along with additional flex on the trail. This isn’t going to be the shock that you will put through hundreds of miles of Baja whoops. This is the type of lift kit that will be great for a daily driver and occasional off-road use. This is an awesome lift kit for the daily driver who takes their Tacoma down fire roads and also great for the Overlander who likes to explore random dirt roads in order to set up camp on the weekends.
Find It Online
- Bilstein 3″ 5100 Lift Kit with SPCs and Icon Add-A-Leaf: Check Price
Table Of Contents
Ordering YotaMafia
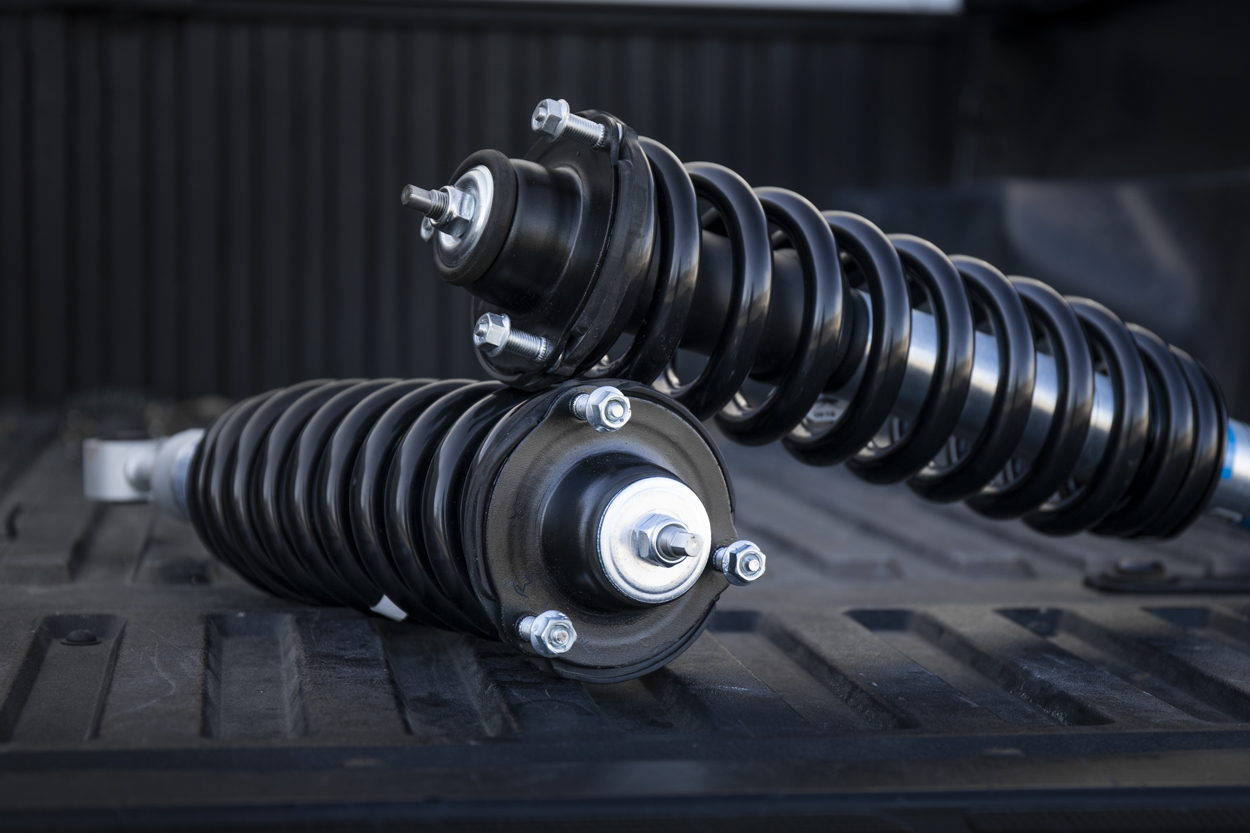
They offer the ability to add and assemble your front springs with new KYB top hats. This is nice if you don’t want to assemble your coilovers. If you have ever used cheap coil spring compressors, you know how dangerous it can be to compress springs (those things can be sketch).
If you by chance have a floor-mounted 3-ton coil spring compressor, then by all means order your lift kit without assembly. If on the other hand, you don’t have a floor-mounted spring compressor, then I would highly recommend having YotaMafia pre-assembled your coilovers for you using new top hats. Your coilovers will come assembled ready to go in which makes everything super easy.
5100s Vs. 6112s
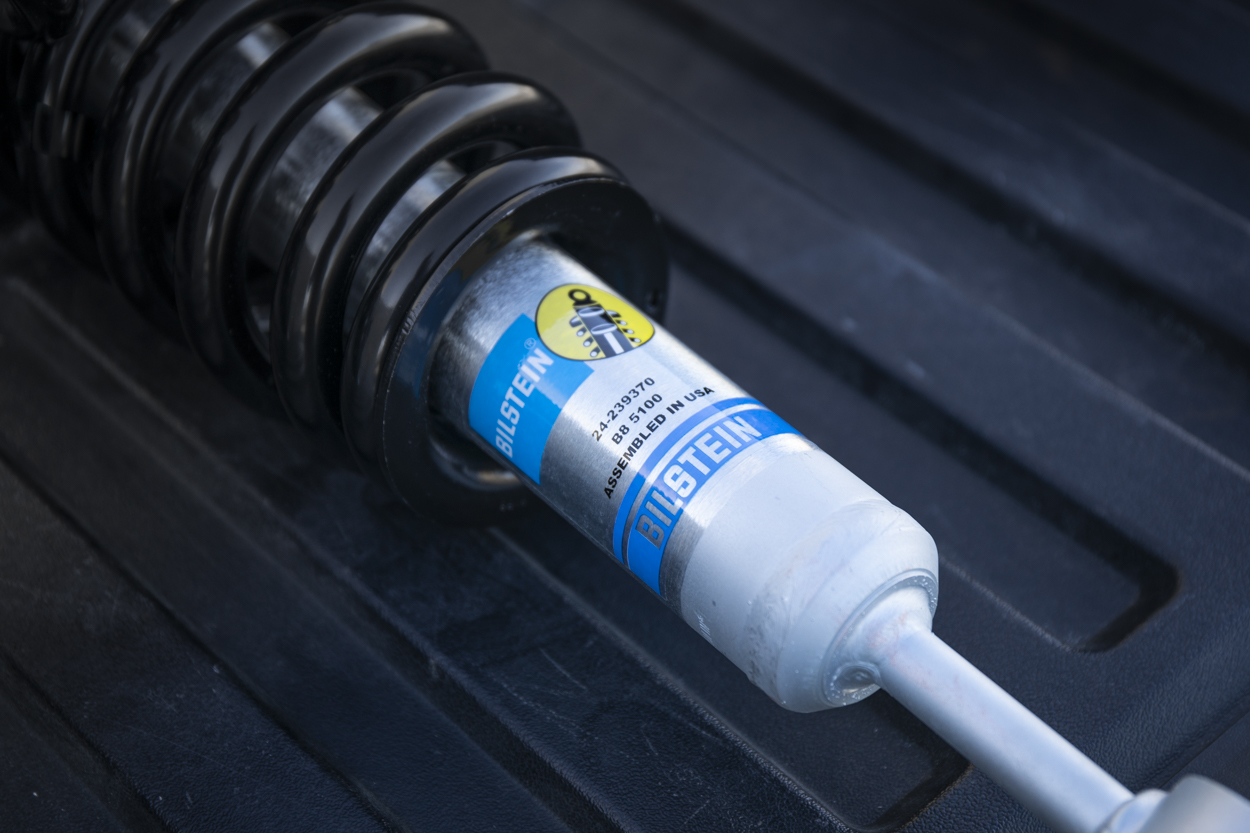
If you are debating between the 5100 shocks or the 6112 shocks for your 2nd gen Tacoma, it really comes down to budget and your intentional use. For a real-world explanation on which one would be for you, the daily on-road driver with occasional off-road use would be fine with 5100 series shocks, and the 6112 would be more for your mild to a moderate off-roader.
The biggest technical difference is that the Bilstein 5100s are smaller than the Bilstein 6112, however, both are digressive shocks; contrary to what you will read from newbs on Tacoma World.
Bilstein 5100 Vs 6112 Size:
- BILSTEIN (digressive) 6112: 2.65” or 60mm
- BILSTEIN (digressive) 5100: 1.95” or 46mm
If you are looking for a lift kit for your everyday driver, and you occasionally go off-road, then the 5100 series shocks will be fine. If however, you want to push your Tacoma to the next level and go on mild to moderate off-road trails, then definitely look at the 6112 series shock. The larger shock body will offer better heat dissipation which will allow you to push your suspension harder, faster, and further than a 5100 series shock. To say it simply, the 5100 will get hot fast if you push them hard, and the 6112 can perform better for longer under extreme compression and rebound when offroad.
For the money, the Bilstein 6112 is probably a better option as it’s very closely priced to the 5100.
Why didn’t we go with 6112? YotaMafia was out of stock and we needed something ASAP to get this Tacoma off the ground. When YotaMafia has these shocks back in stock, we will buy a set and likely sell our 5100s.
For the rear shocks, you can go with the Bilstein 5100 again or opt for the 5160s. The 5160s are simply a 5100 with a remote reservoir. The 5160s (much like the 6112s) are going to be great for someone who is off-roading often or wants to push their suspensions compression/rebound.
Bilstein 5100 Vs 6112 Real World Comparison
- For the daily driver who sees little to mild off-roading, the 5100 front and 5100 rear is a great option.
- For the daily driver who sees moderate to advanced off-roading, the 6112 front and 5160 rear is a great option.
And there you have it, now you know the difference between the 5100 series, 6112 series, and the 5160 series shock absorbers from Bilstein.
Spring Options
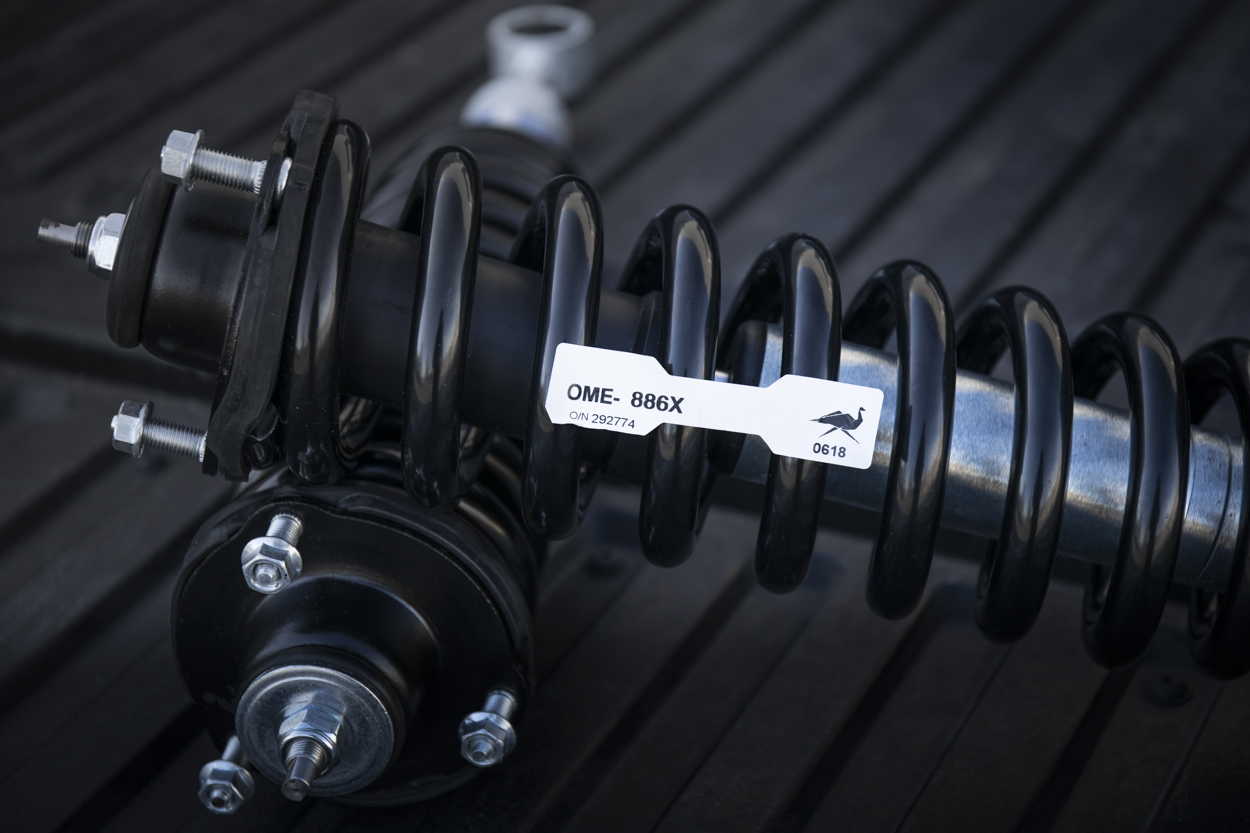
884 vs .885 vs 886 OME Spring Coils for Coilovers:
You can choose between three different coil options to better dial in your ride quality. You can choose from the old man emu 884 (1.5″ lift), 885 (2.5″ lift), and 886 (2.8″ lift) springs in the front. If you plan on adding any additional weight in the front (bumper, winch, etc.), then you want to go with the heavy-duty 886 spring. If you don’t plan on adding any weight in the front but you still want to maintain a 2.5″ lift, then go with the 885 spring. If you are looking to simply level out the front of your Tacoma or add just a .5″ of lift, go with the 884 spring.
For this kit, we decided to go with the 886 spring, however, we may eventually take our front coilovers off and replace the whole setup with 886s over the 6112. For now, the 886 spring will provide a much stiffer ride with the 5100 along with preventing sag if we do end up adding weight in the front.
SPC UCAs
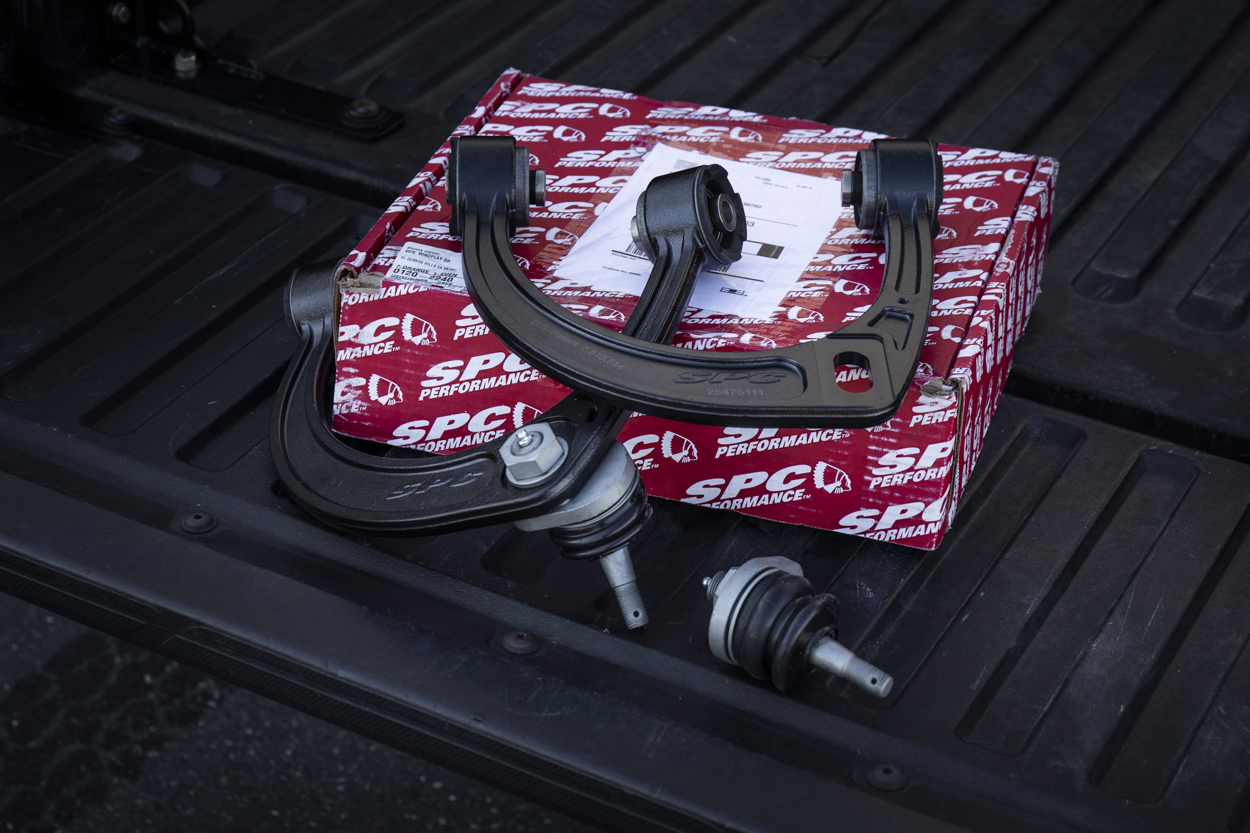
We added a set of SPC upper control arms for the 2nd Gen Tacoma in order to dial in our caster for alignment. SPC upper control arms are going to allow for a wide variety of caster and camber adjustments which helps when fitting larger tires under the Tacoma.
Check out this reference guide if you are unfamiliar with the difference between caster, camber, and toe adjustments. When it comes to fitting larger tires, the caster adjustment is important because it can push your tire away from the firewall, rocker panel caps, pinch welds, pinch seem, and fender plastics. These are all typically the main spots where we would see the most tire rubbing on the 2nd Gen Tacoma.
Upper control arms are an essential part of your suspension system and I highly recommend adding a set of aftermarket UCAs to any upgraded suspension kit you have going on your truck. Unlike uni-ball upper control arms, the SPC uppers are ball joints that don’t require consistent maintenance and they also don’t squeak like Uniballs. SPC upper control arms are great for the everyday driver who also goes off-road.
Icon Add-A-Leaf
![]()
The Icon add-a-leaf set is going to give you 1.5″ of lift in the rear. This add-a-leaf kit is designed to add a progressive response to your existing factory leaf pack and will offer a moderately stiffer ride. However, don’t plan on that same moderately stiff suspension feeling if you add additional weight (rear bumper, tire carrier, camper, bed racks, rooftop tent, etc). If you do plan on adding additional weight to the rear of your Tacoma, just expect the suspension to sag a little. How much it sags will obviously depending on how much weight you add.
If you plan on eventually adding a rear bumper, camper, or anything over a 100lbs to the back end of your Tacoma, then I would skip the add-a-leaf and go straight for a full upgraded ARB Dakar Leaf pack or Deavers. The upgraded to Dakar leaf pack will support much more weight than an add-a-leaf and allow you to still maintain your ride height.
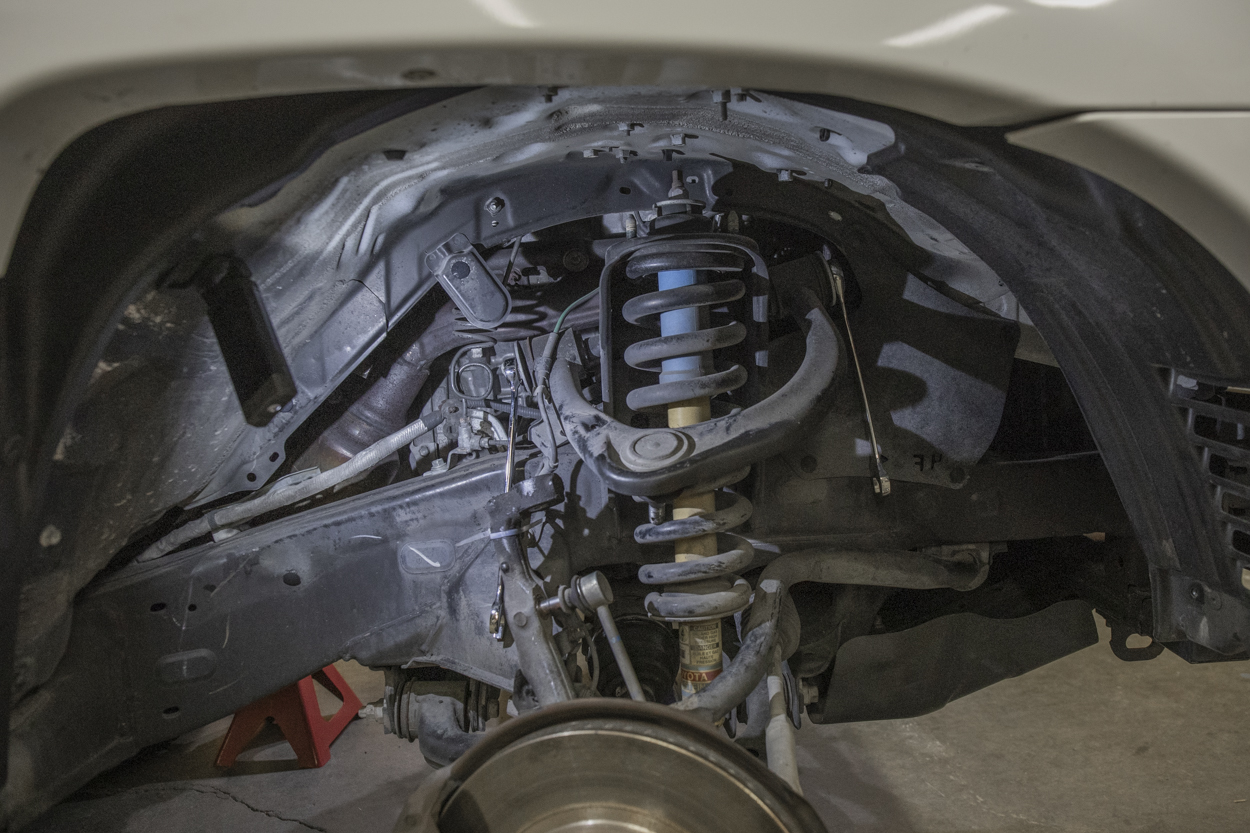
Installation Overview
![]()
This is a pretty straightforward installation.
This can be done with one person, although having a friend or helping hand will not hurt, especially when installing the upper control arms and the leaf springs. The upper control arms have a long bolt on the backside of the coil tower that can make it difficult to install from the wheel well if you are by yourself (also, the sheet metal on the 2nd Gen Tacoma sits directly in the path of the bolt).
Having all the right tools will make a suspension installation much easier. If you do not have the tools or if you are not familiar with working on your Tacoma, then take your truck to an installation shop or specialist.
Working with suspension components can be dangerous if you don’t know what you’re doing. With that said, it’s also important to understand how your truck works so that you can maintain and repair your truck down the road. You want to familiarize yourself with your suspension components so that when the time comes for an unexpected trail repair, you are knowledgeable enough to get the job done.
Tools and Materials
- Metric Wrench Set
- 10mm-22mm+
- Metric Deep/Shallow socket set
- 10mm-22mm+
- Torque Wrench (minimum 120 ft/lbs of torque)
- Angle Grinder with a cutoff wheel and sanding disc
- Bent Needle Nose Pliers
- Needle Nose Vice Grips
- Universal Screwdriver
- 6mm Allen Wrench
- C-Clamps
- Large Pry Bar or 2×4 wood
- 3 Ton Floor Jack or the Pro Eagle
- Jack Stands
- Rubber Mallet
- 3lb Sledge Hammer
- Bungee Cords (perfect bungee)
- Nitrile Gloves
- Suspension Grease
- Grease gun
- Zip-ties
Video Installation
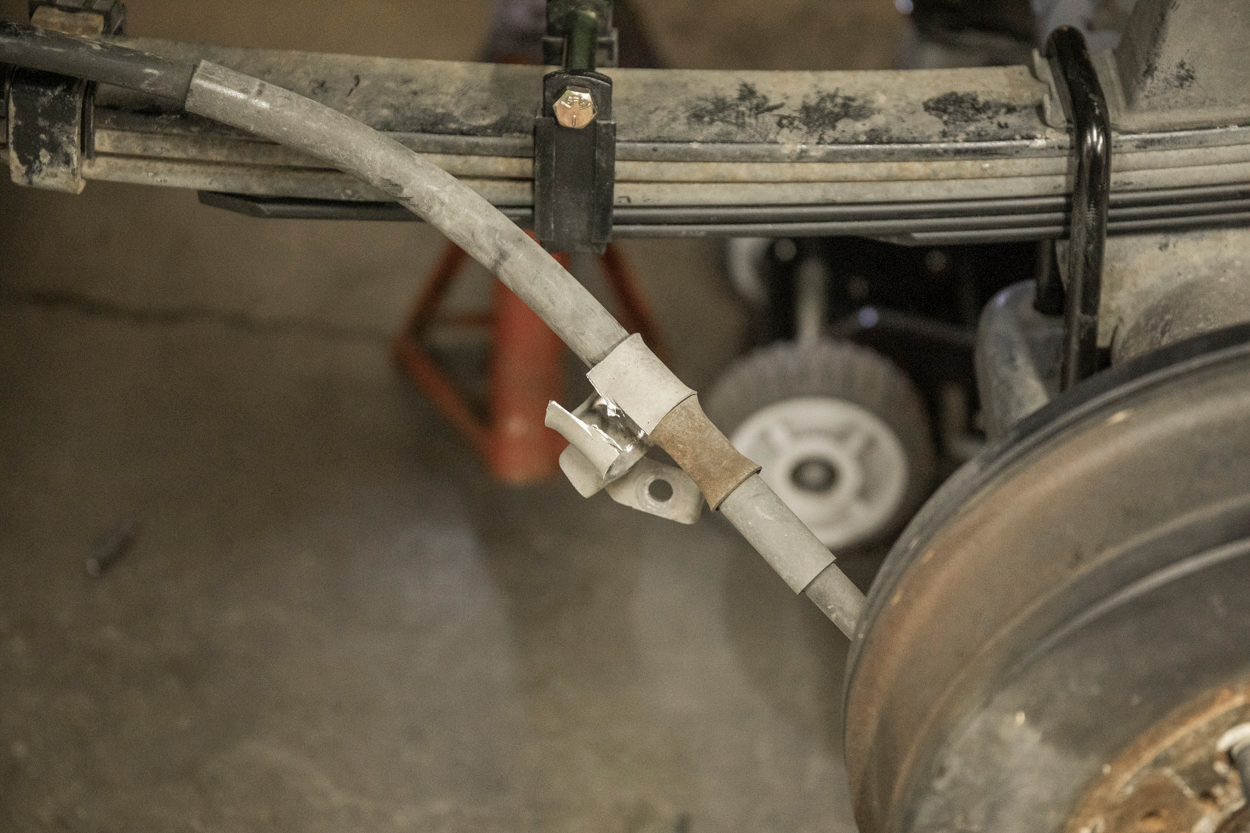
Step 1. Disconnect Brake Lines
Remove the brake line bracket (12mm) on your spindle and the other bracket (10mm) on the factory upper control arm.
Step 2. Castle Nut & Clip

Locate the castle nut on the upper control arm ball joint bolt running through the spindle eyelet. Using a pair of pliers, pull the clip that is running through the castle nut and ball joint bolt.
Step 3. Zip-Tie Spindle
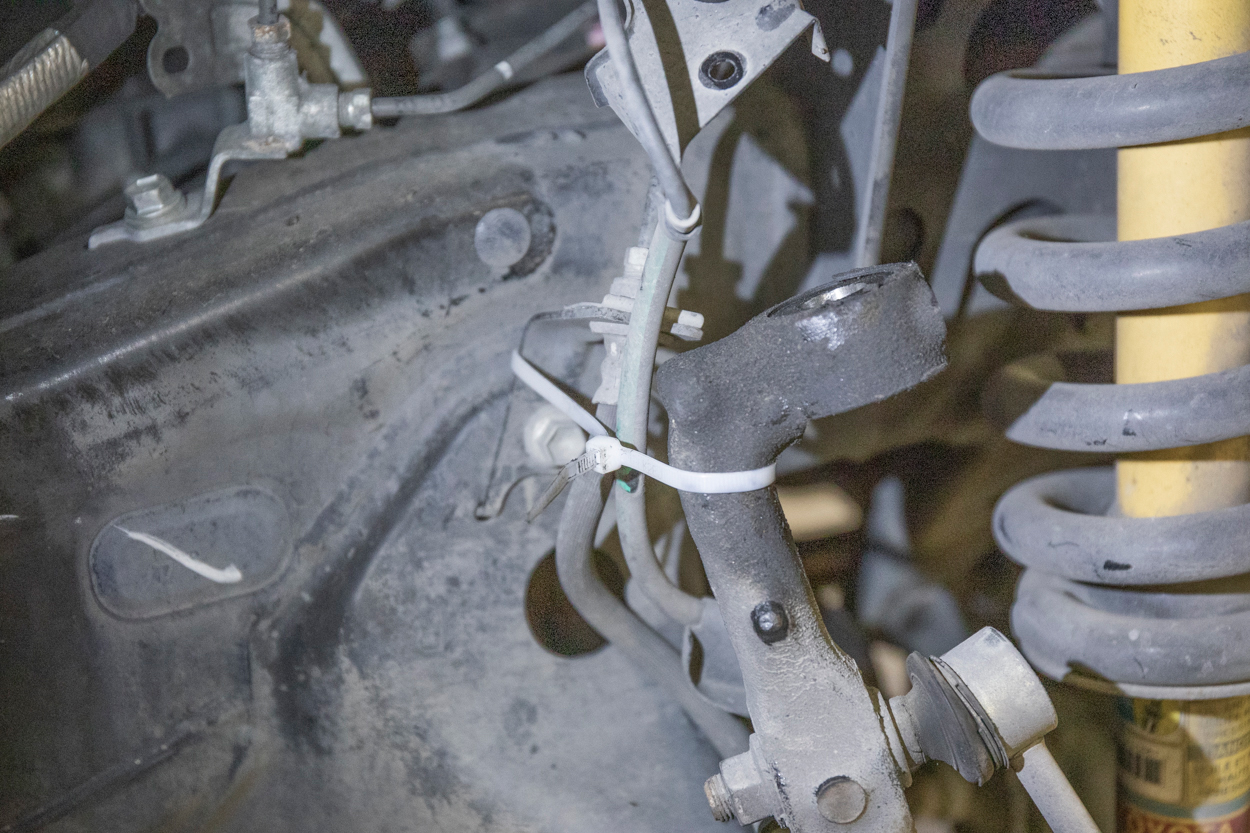
Once the spindle is free, grab an extra-large zip tie and zip tie the spindle to the brake line bracket connected to the frame. This will prevent your hub assembly from moving around while you are working on the rest of the suspension components.
Step 4. Remove Lower Shock Bolt

In order to remove the lower coilover shock bolts on the lower control arm, you will need two (19mm) sockets. Using one 6″ extension with a deep/standard socket and another standard socket, you can loosen the bolt. In order to remove the bolt from the lower control arm, you may need to grab a punch and punch the bolt through. As you are punching the bolt through, you may need to press down on the lower control arm to release the bolt’s pressure on shock.
Step 5. Remove Top Coilover Bolts
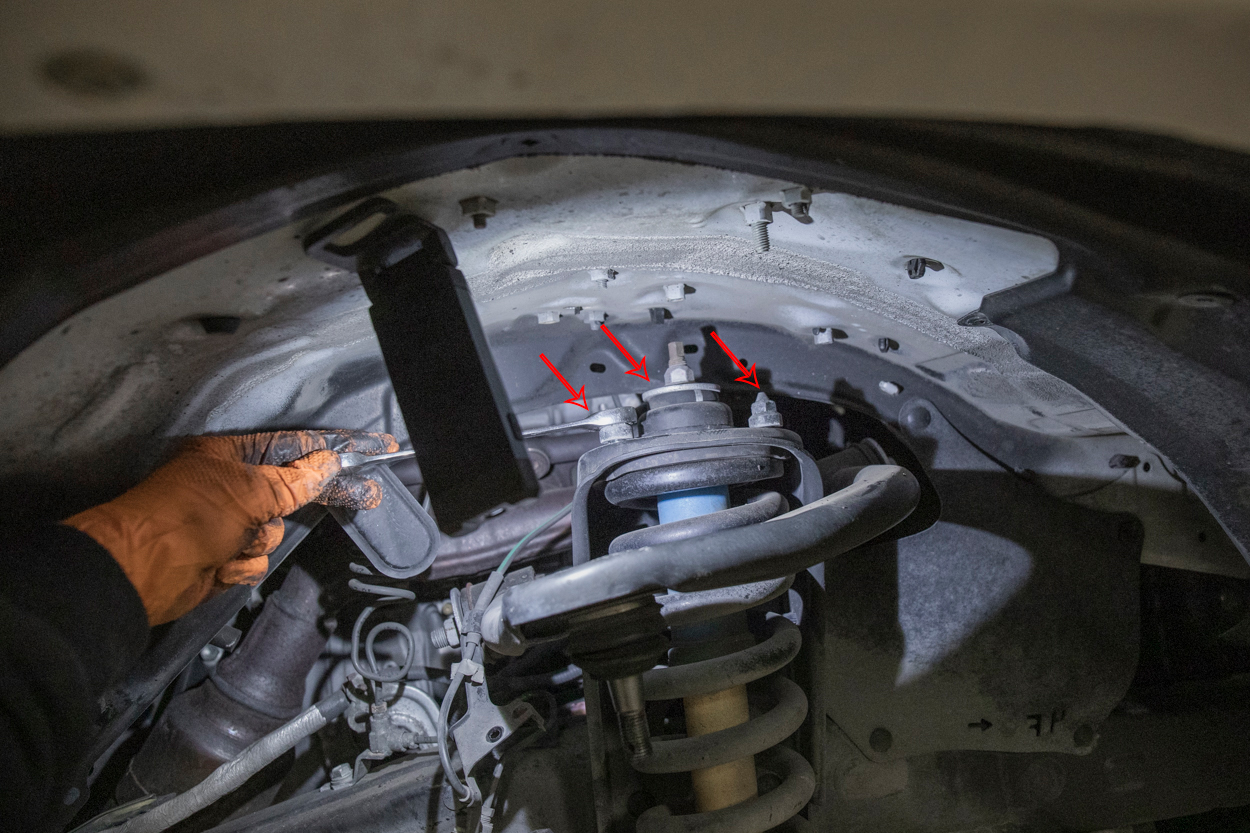
On top of the coilover, you have three (14mm) bolts. Using a box end ratcheting wrench, you can remove all three 14 mm bolts.
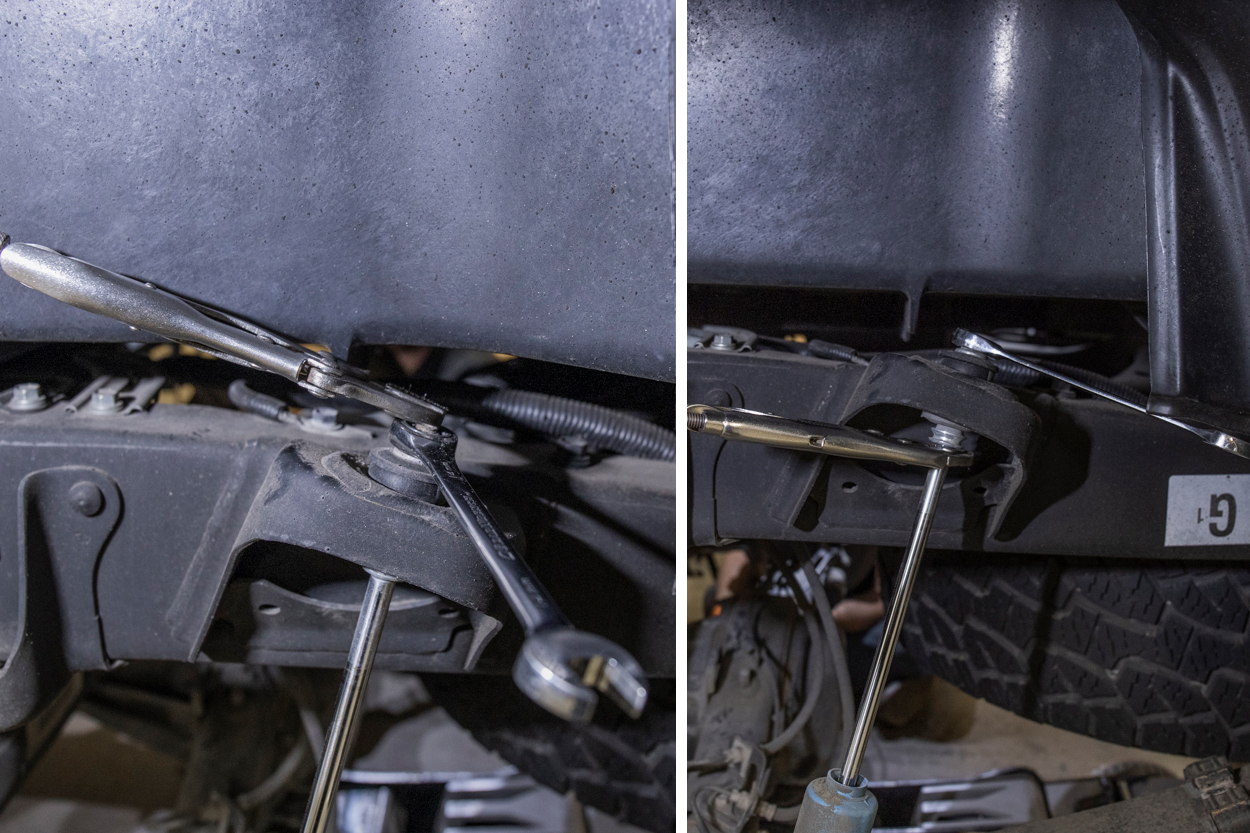
Step 6. Remove Upper Control Arms
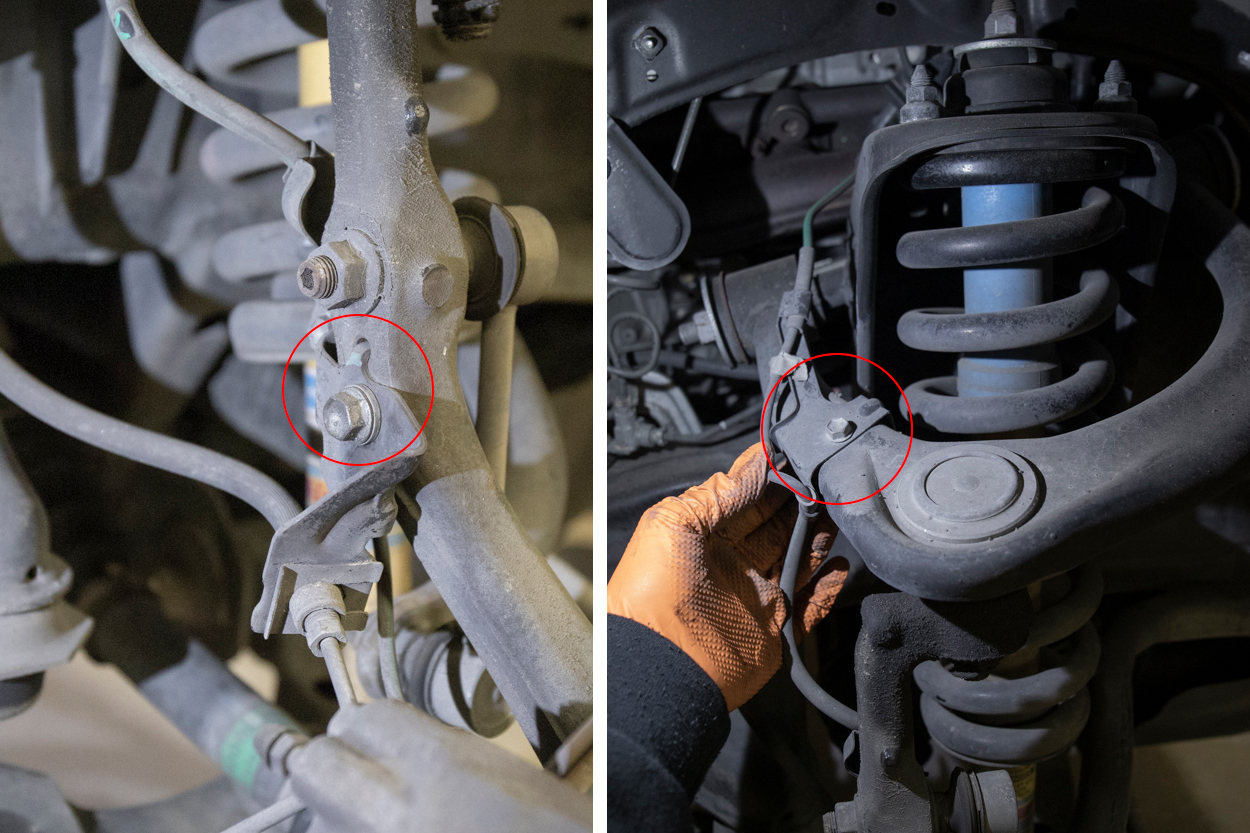
Time to remove the upper control arms. Using two box end ratcheting wrenches, you can loosen the upper control arm shock tower bolt. Before you proceed with removing the long upper control arm bolt, remove the electrical wiring brackets connected to the backside of the sheet metal.
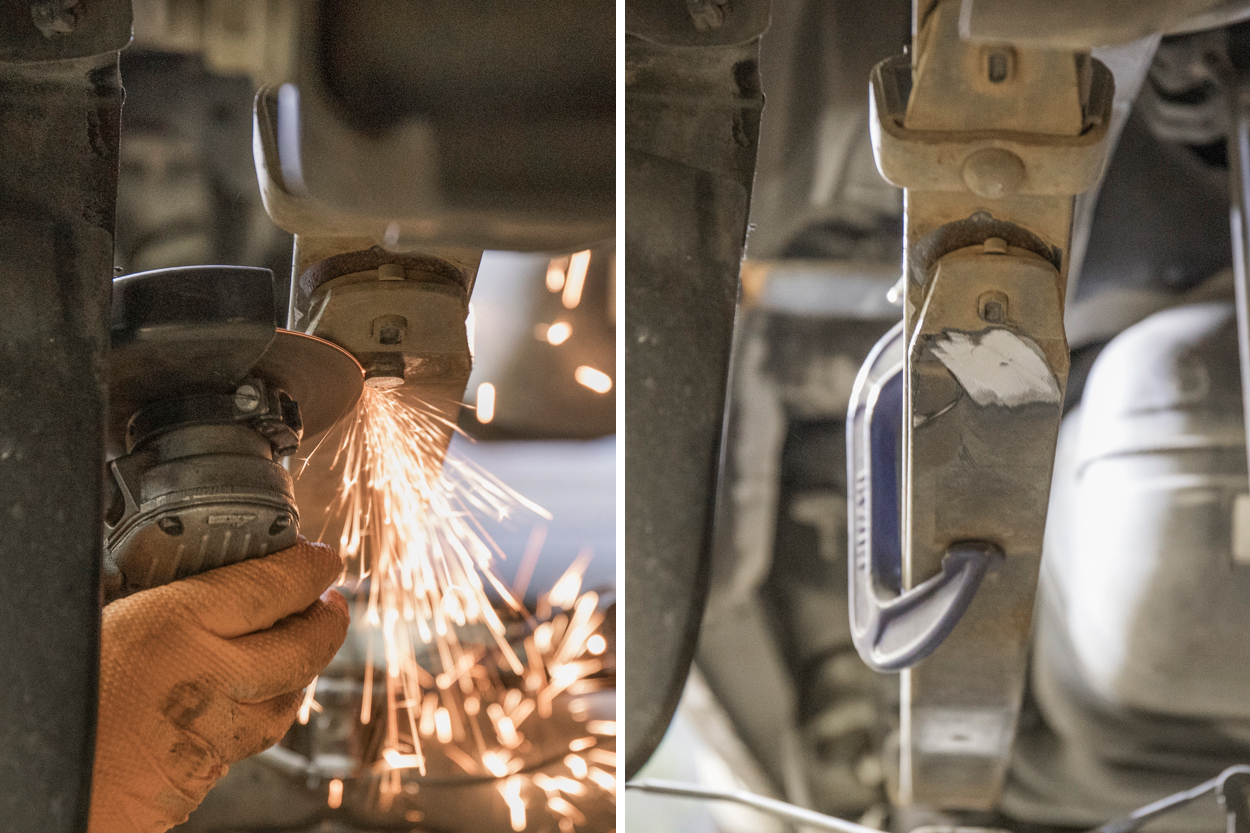
Step 7. Remove UCA Long Bolt

The upper control arm shock tower bolt runs directly into the sheet metal when you try to remove it. In order to remove the bolt, simply been the sheet metal out of the way. Grab a set of pliers or channel locks and slowly start bending. Also circled here on the left side of the image are electrical clips on the backside of the sheet metal. You may need to remove these in order to slide the UCA Bolt out.
Step 8. Sheet Metal
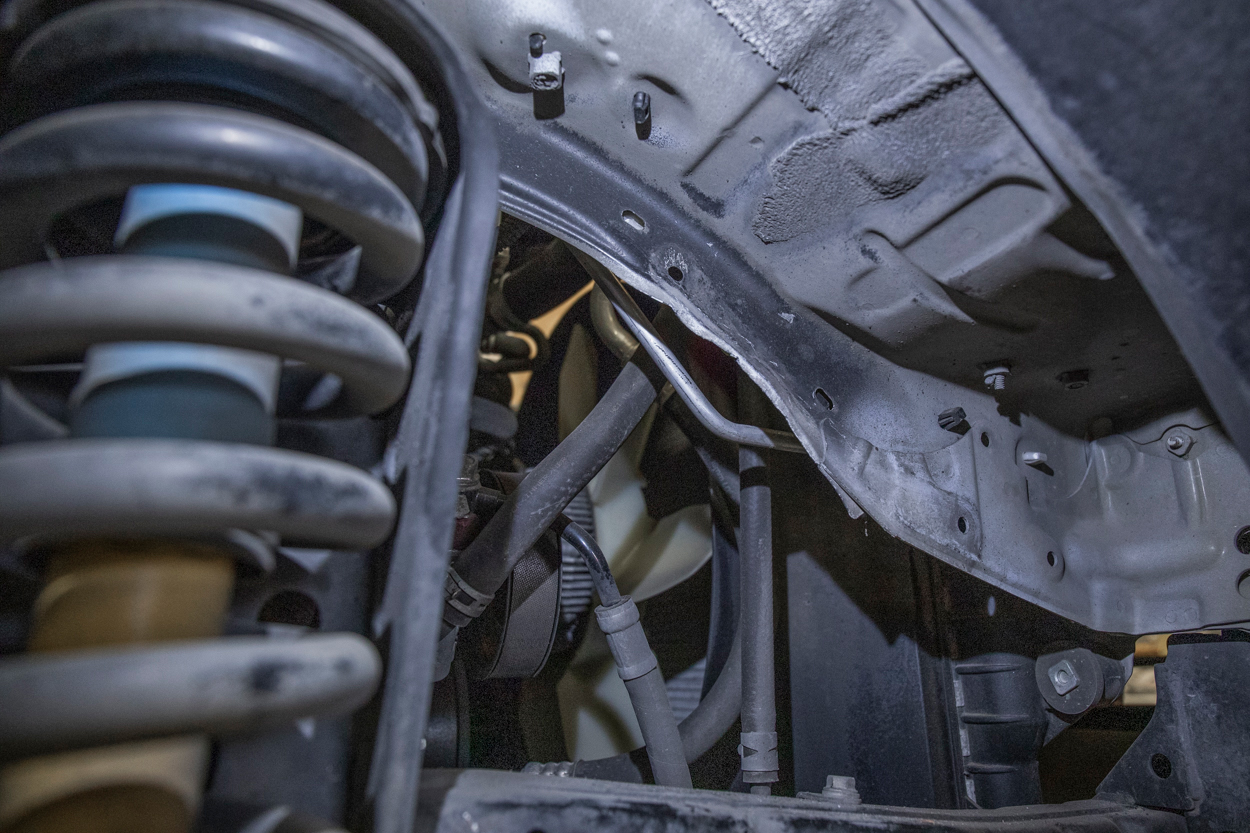
You don’t need to bend too much of the sheet metal back. Here is a look from below directly up at the sheet metal. Once you have installed the new upper control arms, and the upper control arm bolt is back in place, you can proceed to bend the sheet metal back to where it was.
Step 9. Remove Sway Bar
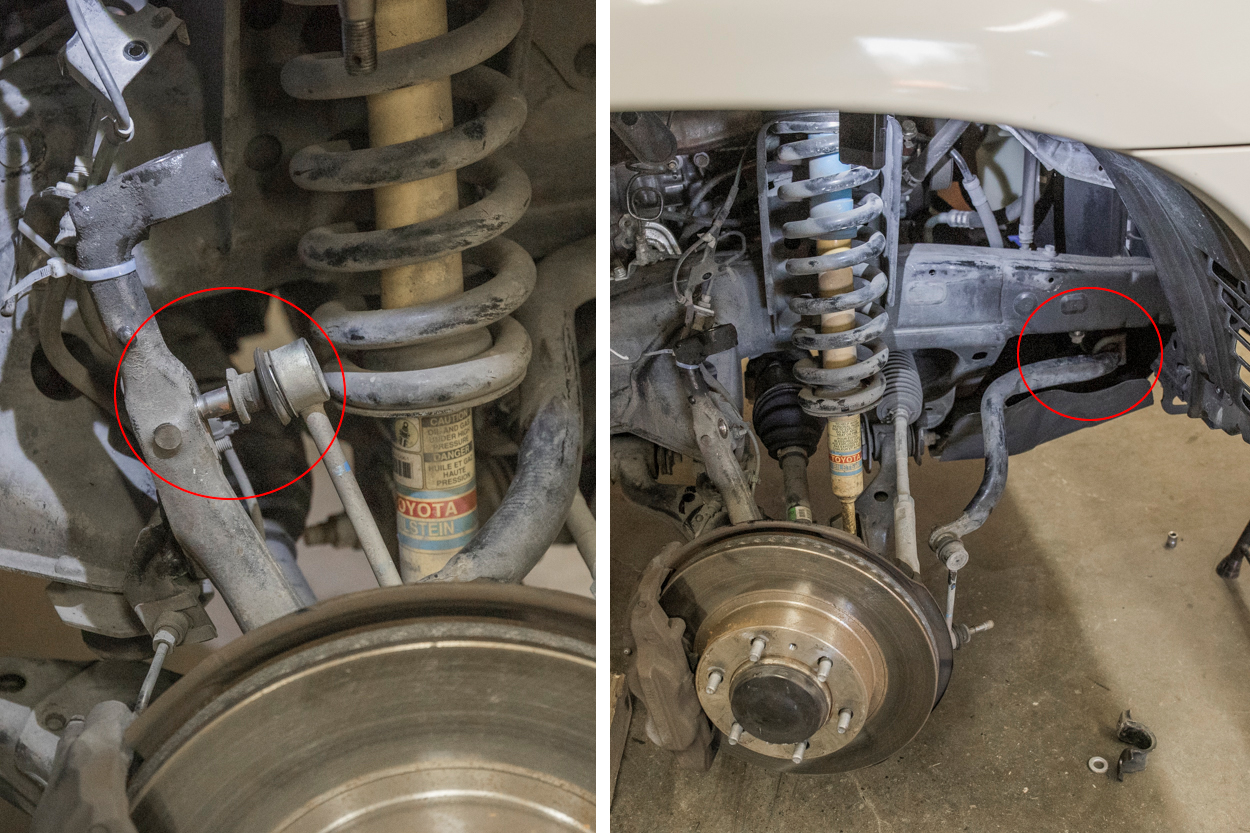
If you can droop your lower control arms down far enough to remove the coilover, you may not need to disconnect the sway bar. If your LCA won’t droop that far, go ahead and unbolt the sway bar from the frame and the spindle. This will help us pull the coilover out.
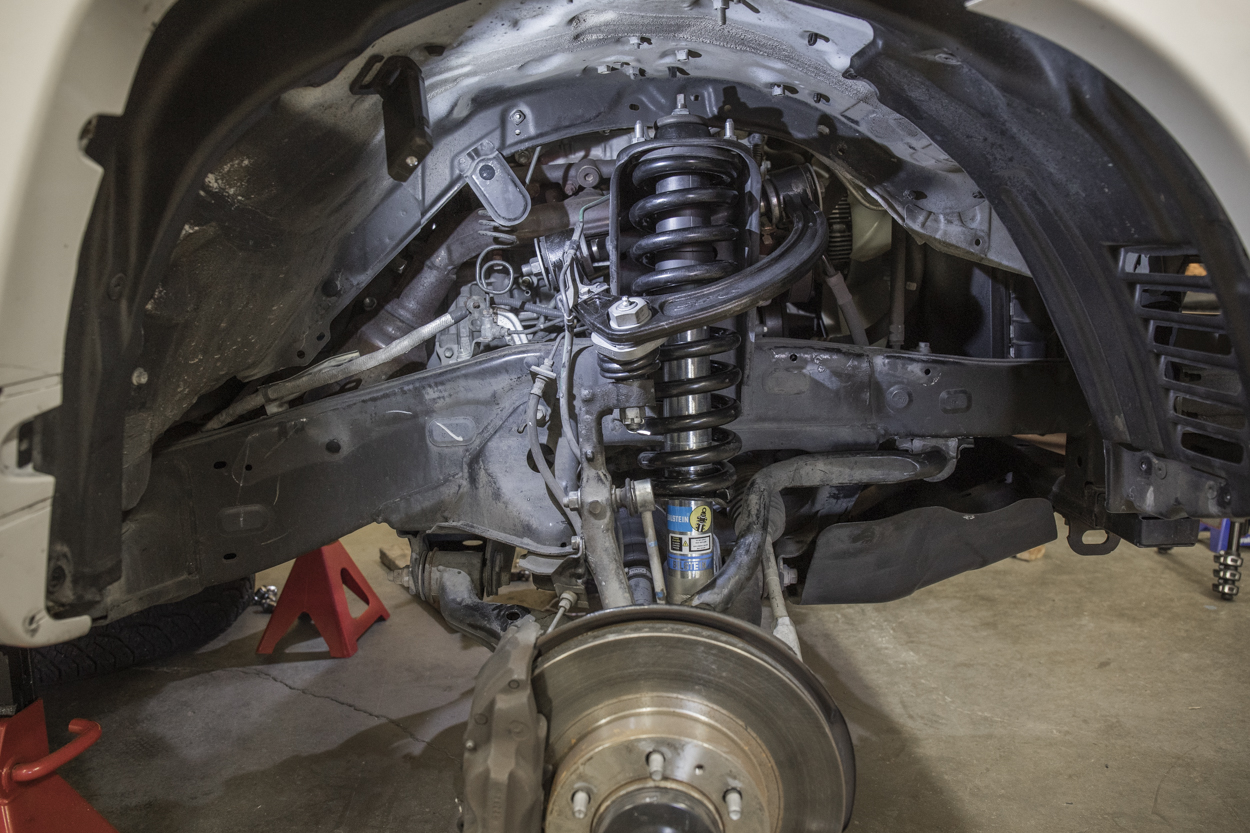
Step 10. Install Coilovers
To drop the coilover out of the shock tower, grab a piece of wood and place it in between the lower control arm and bump stop. Then step on that piece of wood and press the lower control arm down. The coilover should drop out of the shock tower and you can pull it out.
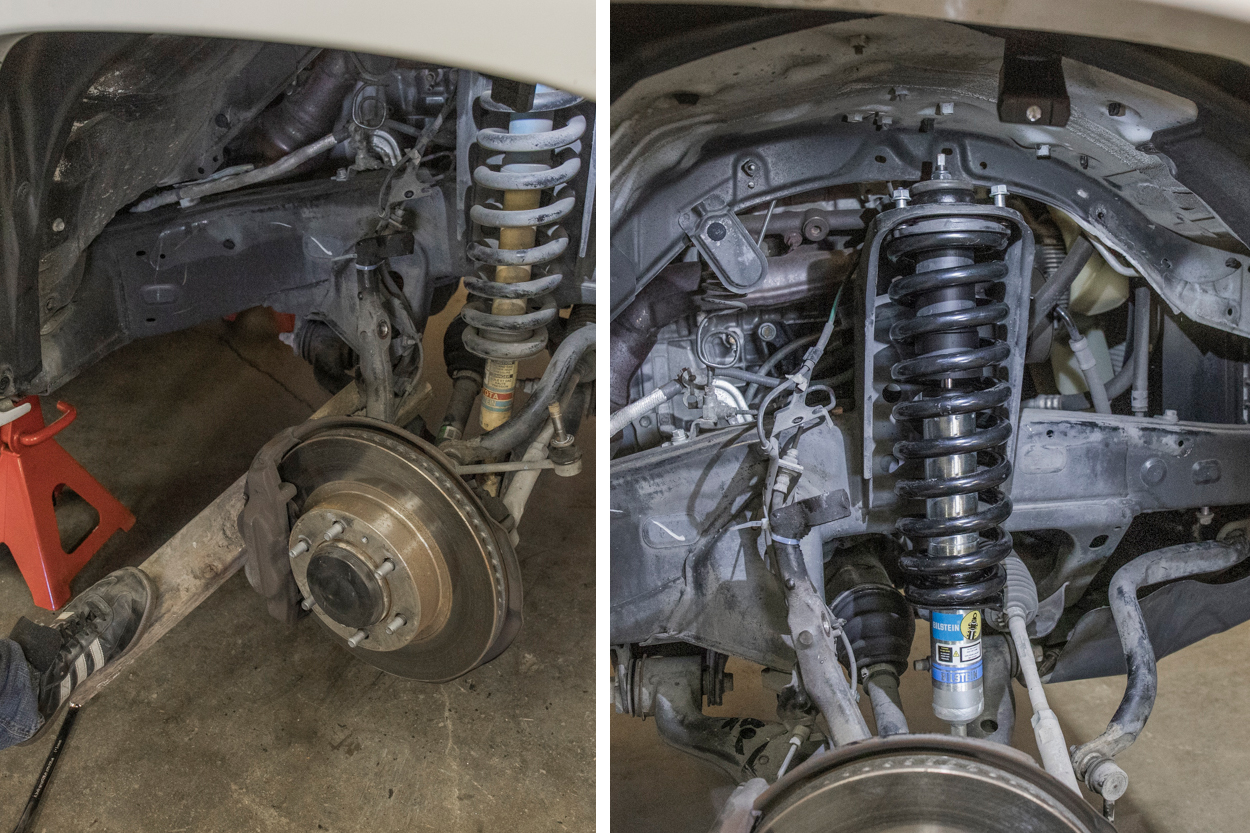
Step 11. Factory (1″) Vs. Bilstein (2″)
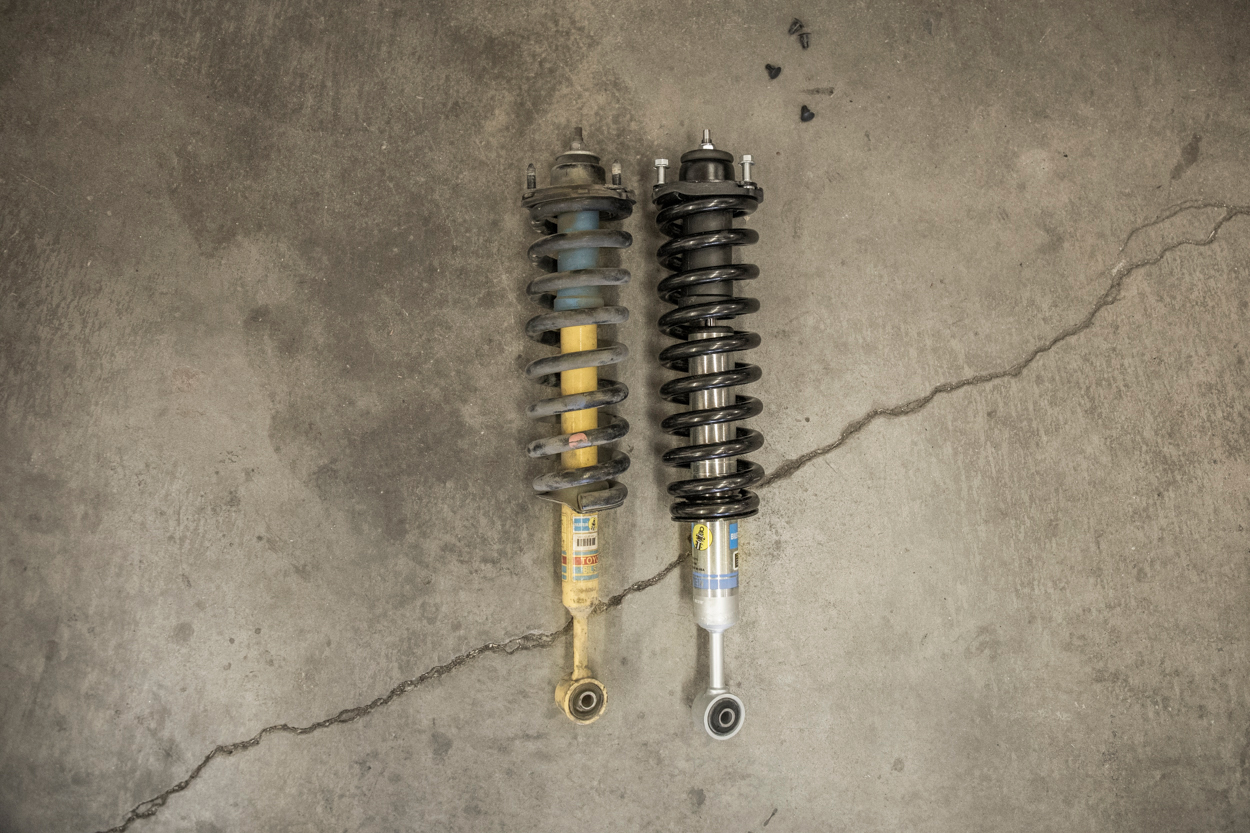
Here’s a look at the factory coilovers against the Bilstein 5100 with OME 886 HD Springs.
Step 12. SPC Alignment Spec
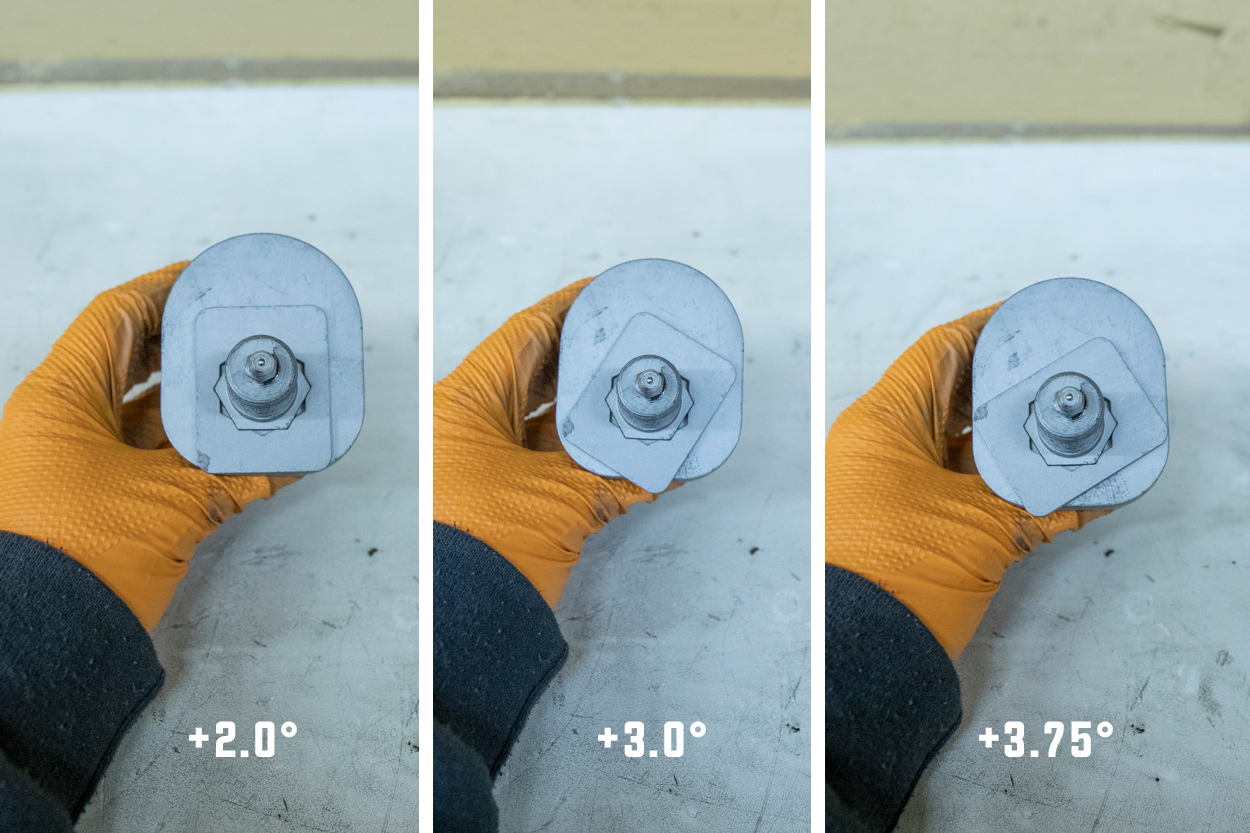
Here is a look at a few common settings for the SPC upper control arms. We decided to set our alignment at a total of 3° which is setting “C”. For most trucks with 2″ – 3″ of lift setting D should return Caster to OE specifications but it may be necessary to use different positions on each side. Since we are going to eventually run much larger tires (34″) we want our tires caster as far away from the fender wall as possible. 3° of total arm + ball joint caster change should be perfect for the 34″ tires we have going on.
You can reference this article for more information on how to set the alignment and install SPC upper control arms
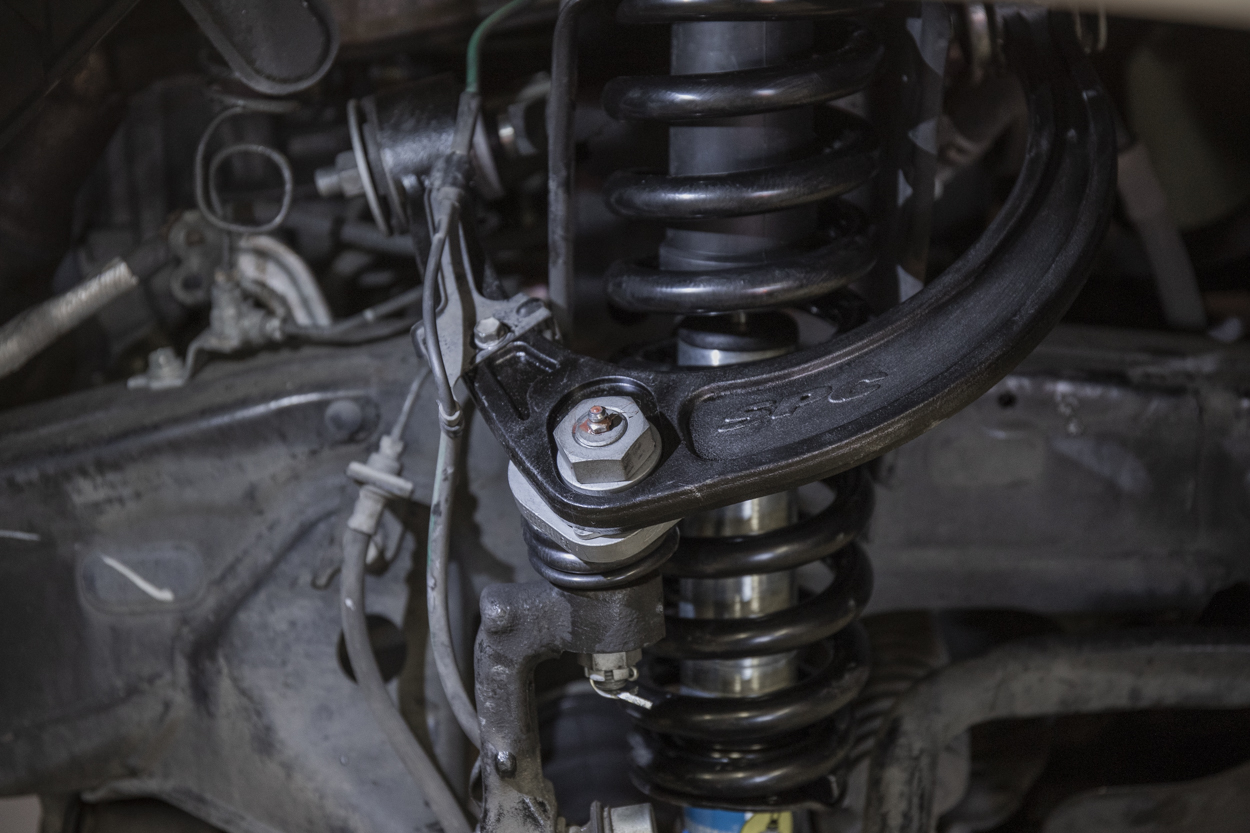
Step 13. Install Ball Joint
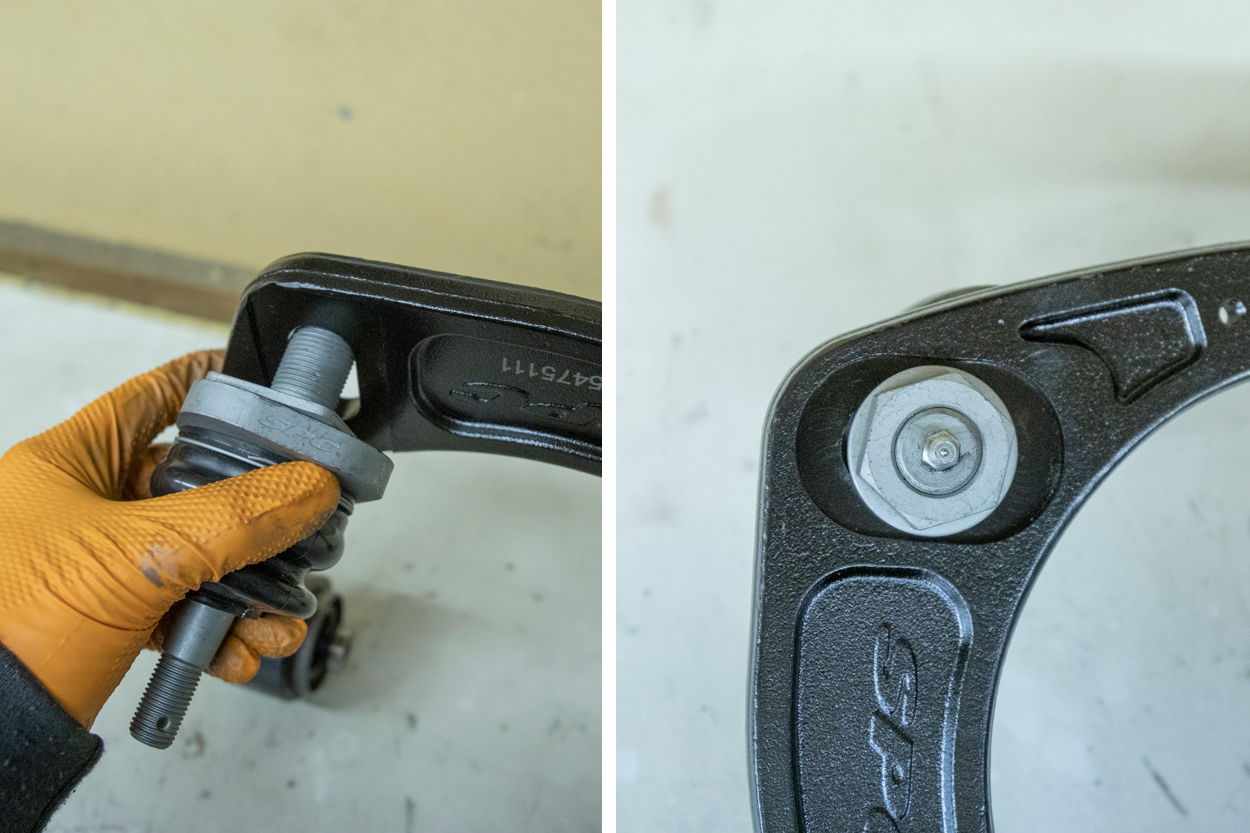
Once you have found your desired alignment setting on the SPC upper control arms, bolt the top washer and nut directly in the center of the adjustment range.
Step 14. Install New UCAs

To install your upper control arms, it helps to have two people. One guy should be hovering over the engine bay with the long upper control arm bolt while another is down below guiding the bolt through the upper control arm eyelets.
Step 15. Connect Ball Joint
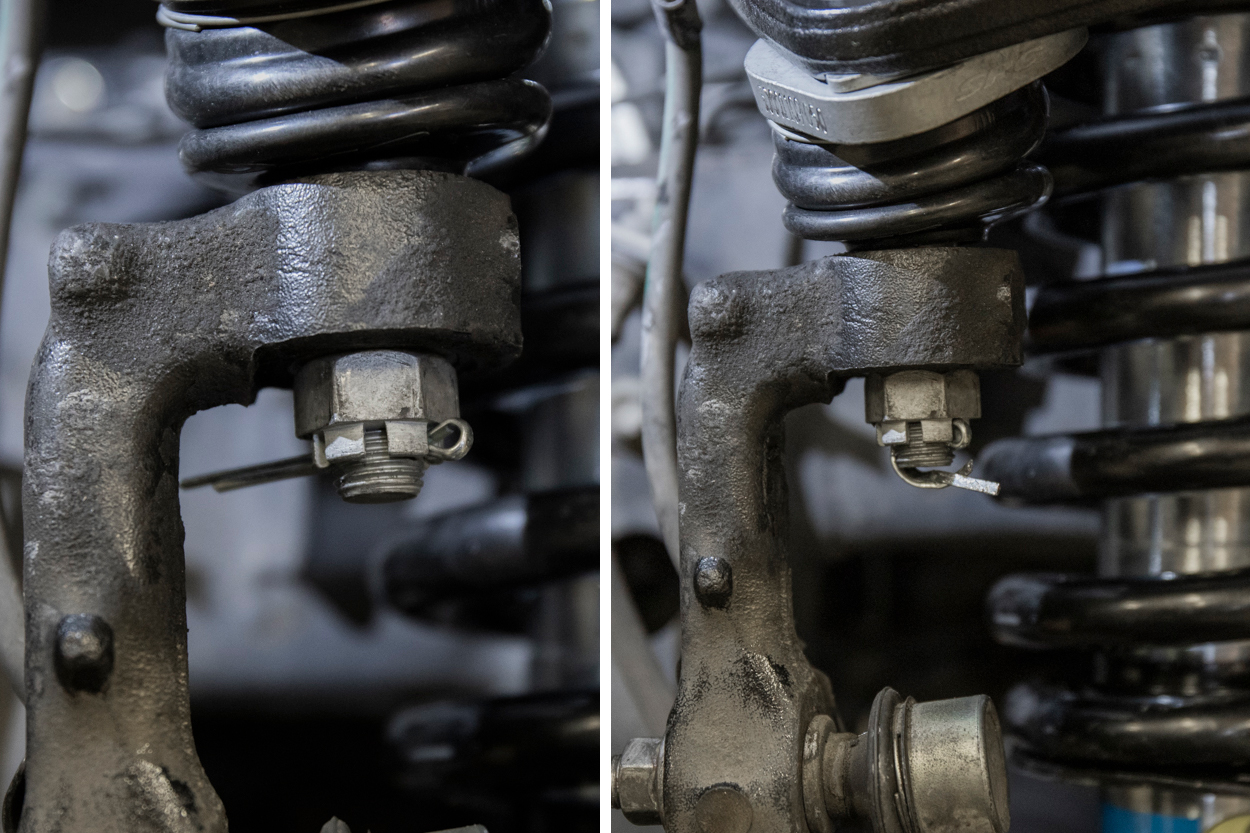
Slide the upper control arm ball joint bolt through the eyelet on the spindle and thread the castle nut into place. Then torque the castle nut to 45 ft-lbs or until a groove on the castle nut lines up with the hole in the ball joint bolt. Then slide the clip through the bolt and castle nut and bend it over with a set of pliers.
Step 16. Torque UCA Bolts
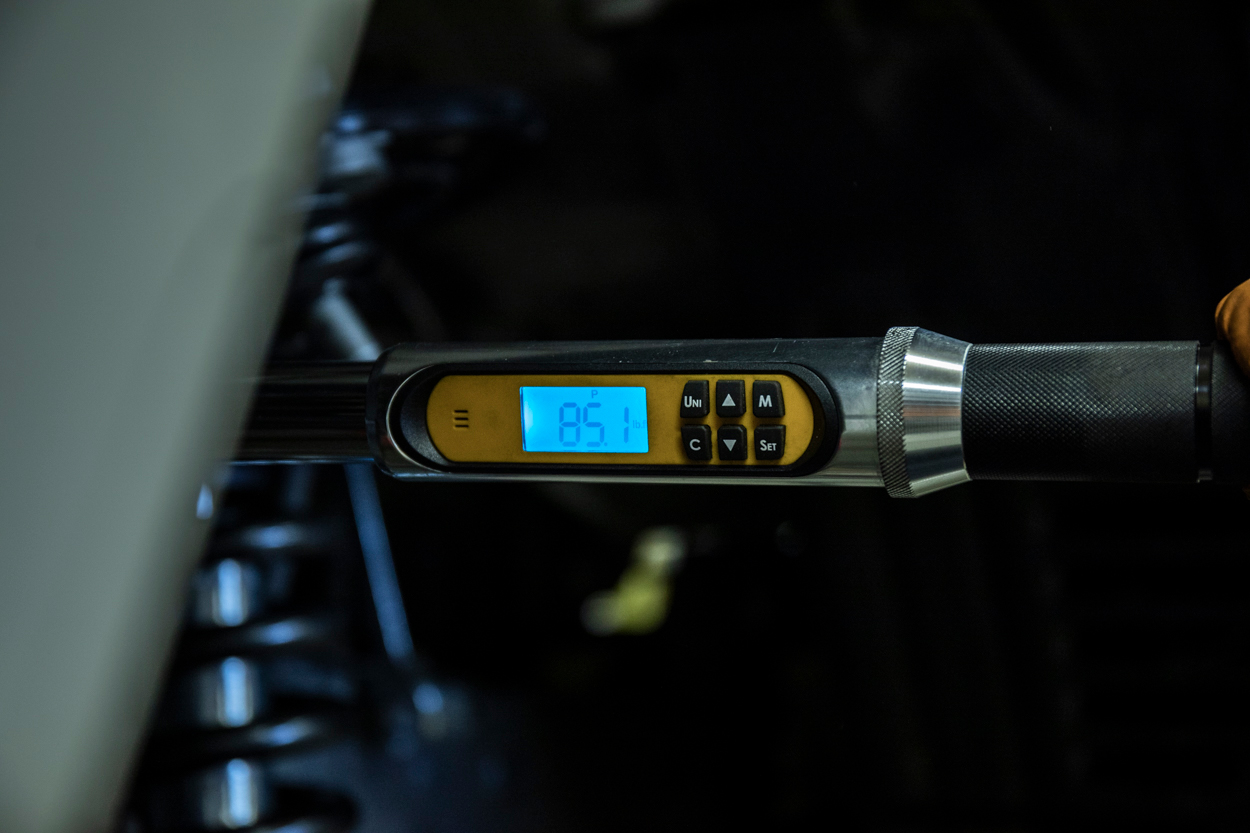
Torque your upper control arms to 85-foot lbs.
Step 17. Reinstall Sway Bar
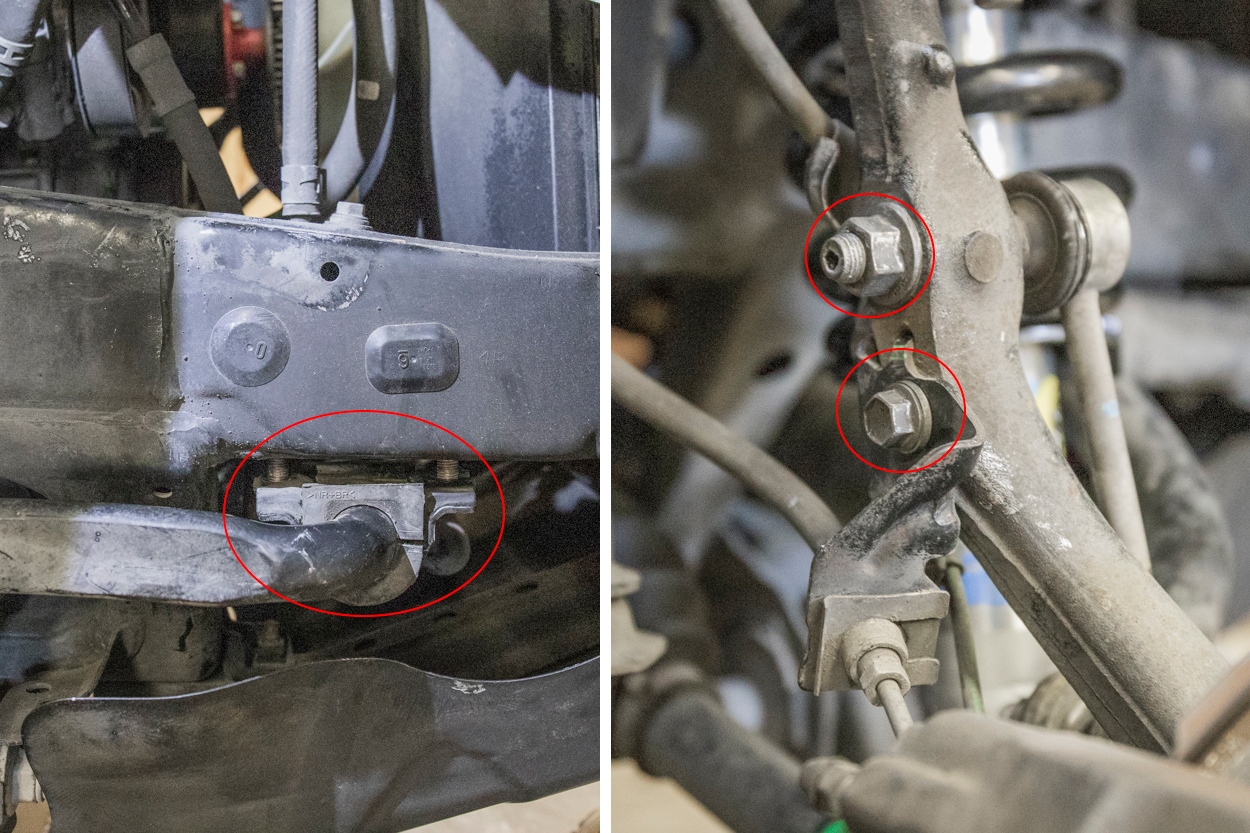
Reinstall your sway bar to the frame and spindle.
Step 18. Reinstall Shock Bolts
Step 19. Grease Zerk
Once your shock has been reinstalled, and your upper control arms are torqued down, proceed to add grease in the supply the zerk fitting on the ball joints. SPC calls for 5 to 10 pumps of a grease gun. We added 10 – nothing came out.
Step 20. Torque Ball Joint
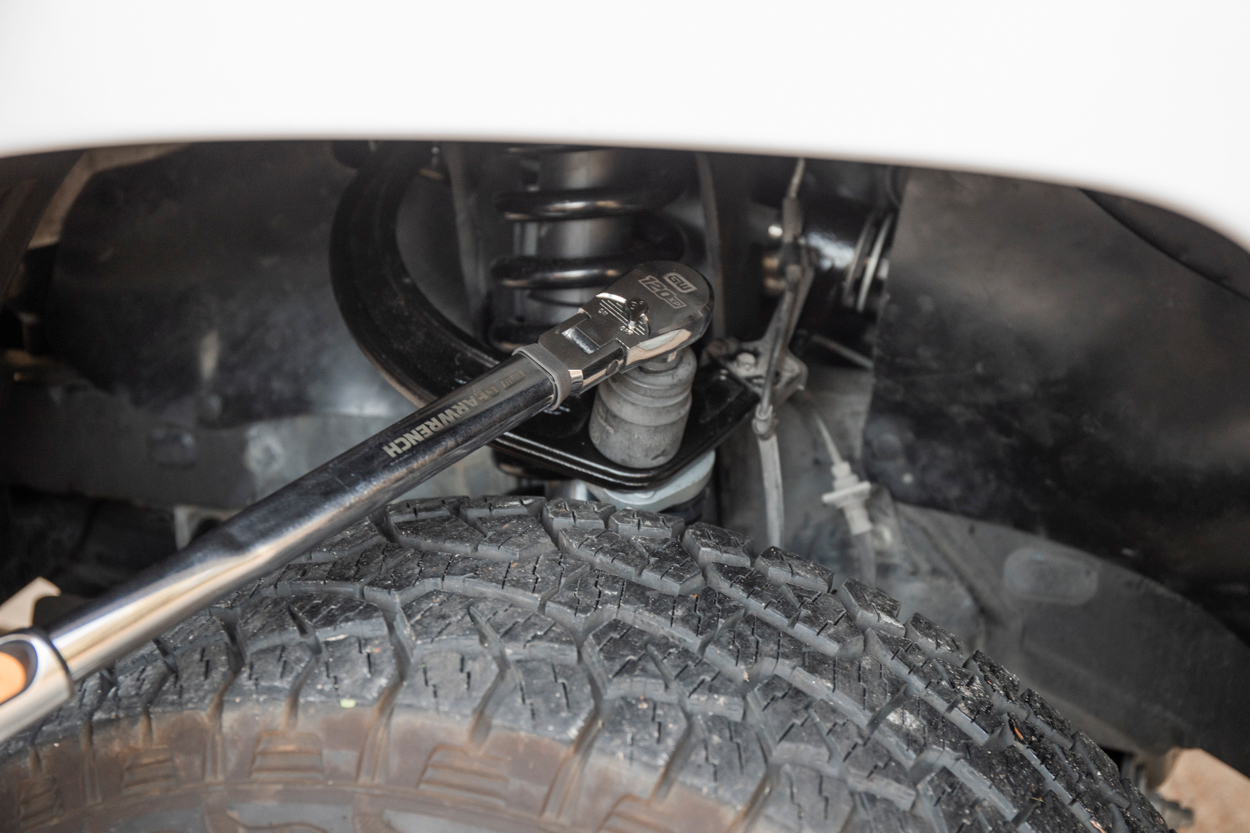
If you have a big enough socket, you can’t torque the top ball joint nut to 150 ft-lbs.
Step 21. Prepare Rear Suspension
Remove the rear tire and start jacking up your axle to relieve tension on the brake lines.
Step 22. Remove Brake Brackets
Unbolt both brake line brackets.
Step 23. Remove U-Bolt Nuts
Remove all 4 u-bolt nuts underneath the frame.
Step 24. Remove Shock Bolt
Because the body of the shock spins when you turn the top nut, you need a pair of vice grips to hold on to the top. Slide a 14mm box end ratcheting wrench over the nut on the shock and then clamp your vise grips to the top of the shock.
Start turning the nut until you run out of room or it collides with the vice grips. Move your vise grips down to the top of the shock underneath the shock tower in order to unthread the nut the rest of the way.
Step 25. Remove Lower Bolt

Step 26. Unbolt Leaf Springs
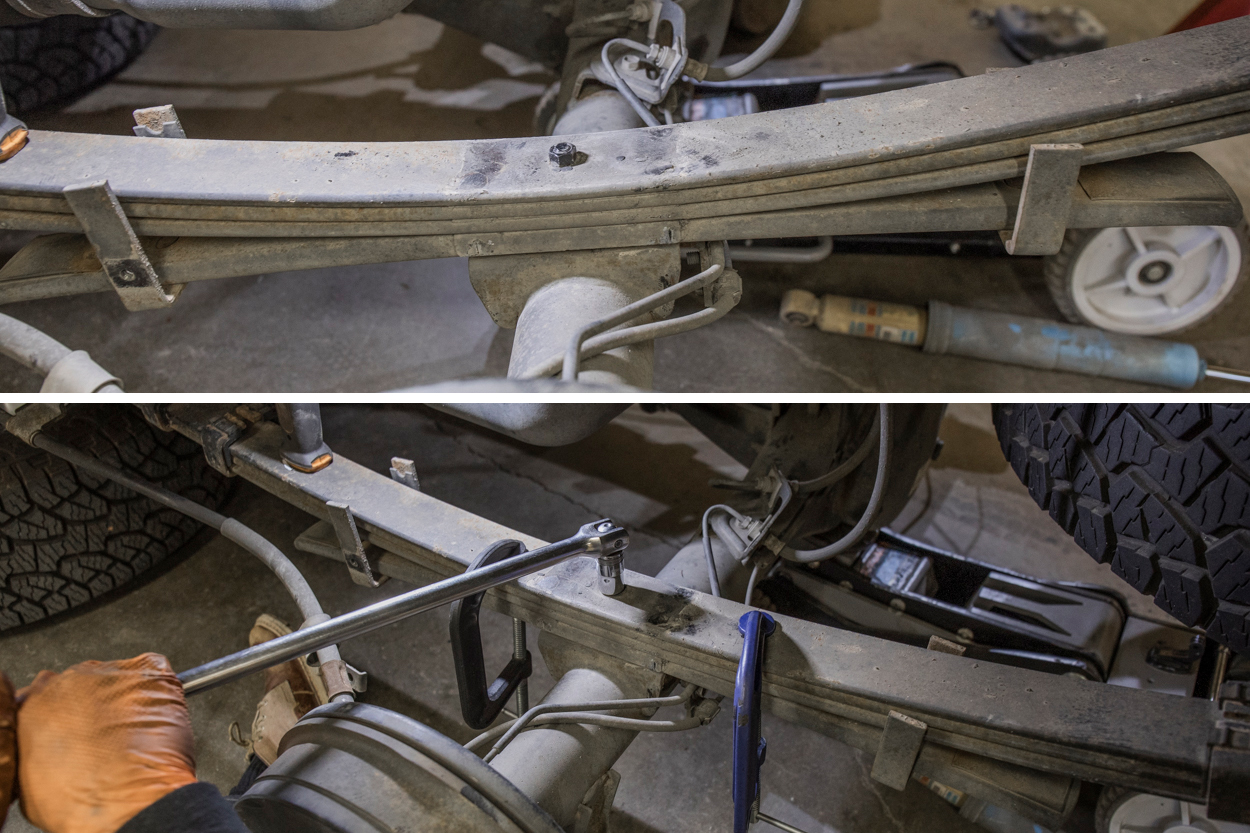
The nut that sits on top of the leaf springs it’s pretty tight. You may want to grab a breaker bar in order to bust the nut loose. Before unbolting the nut, grab a set of C clamps and clampdown the leaf springs so that they don’t consistently put pressure against each other while you are unthreading the nut.
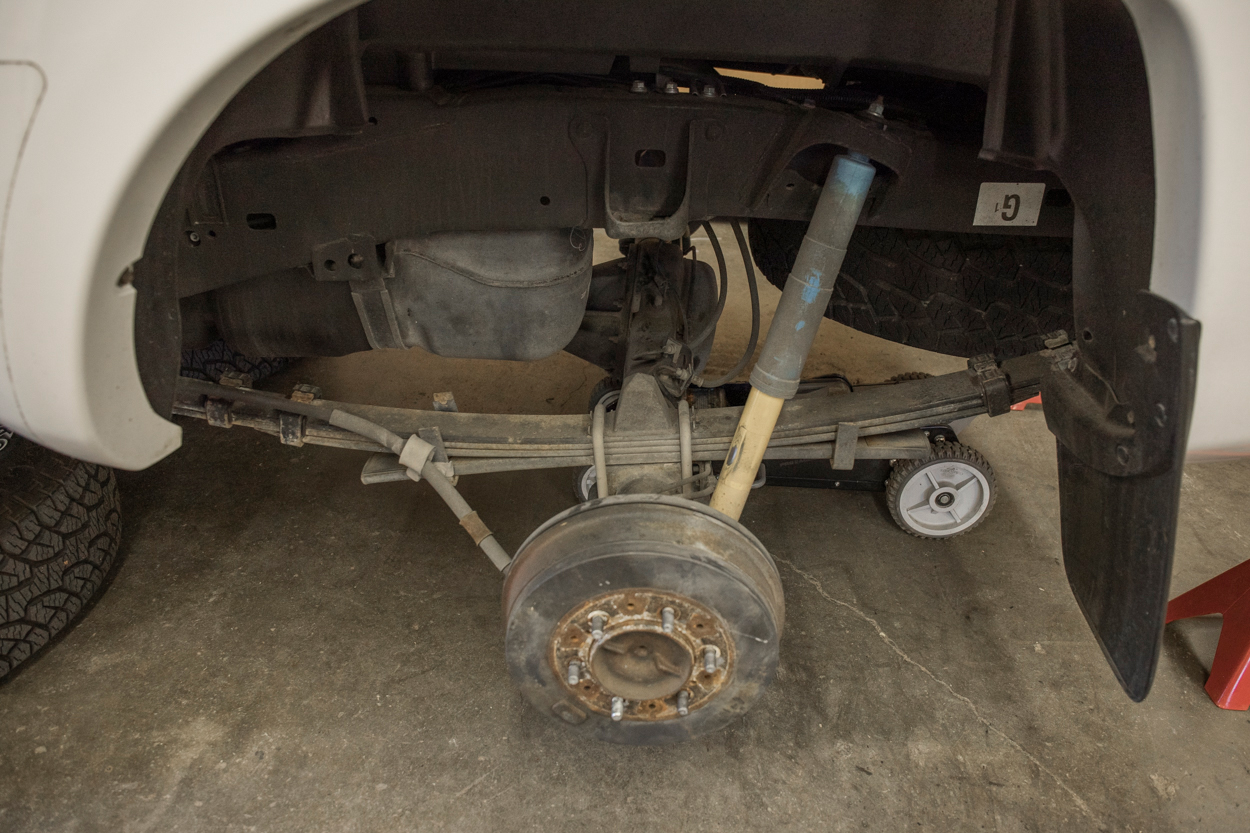
Step 27. Drop & Support Axle
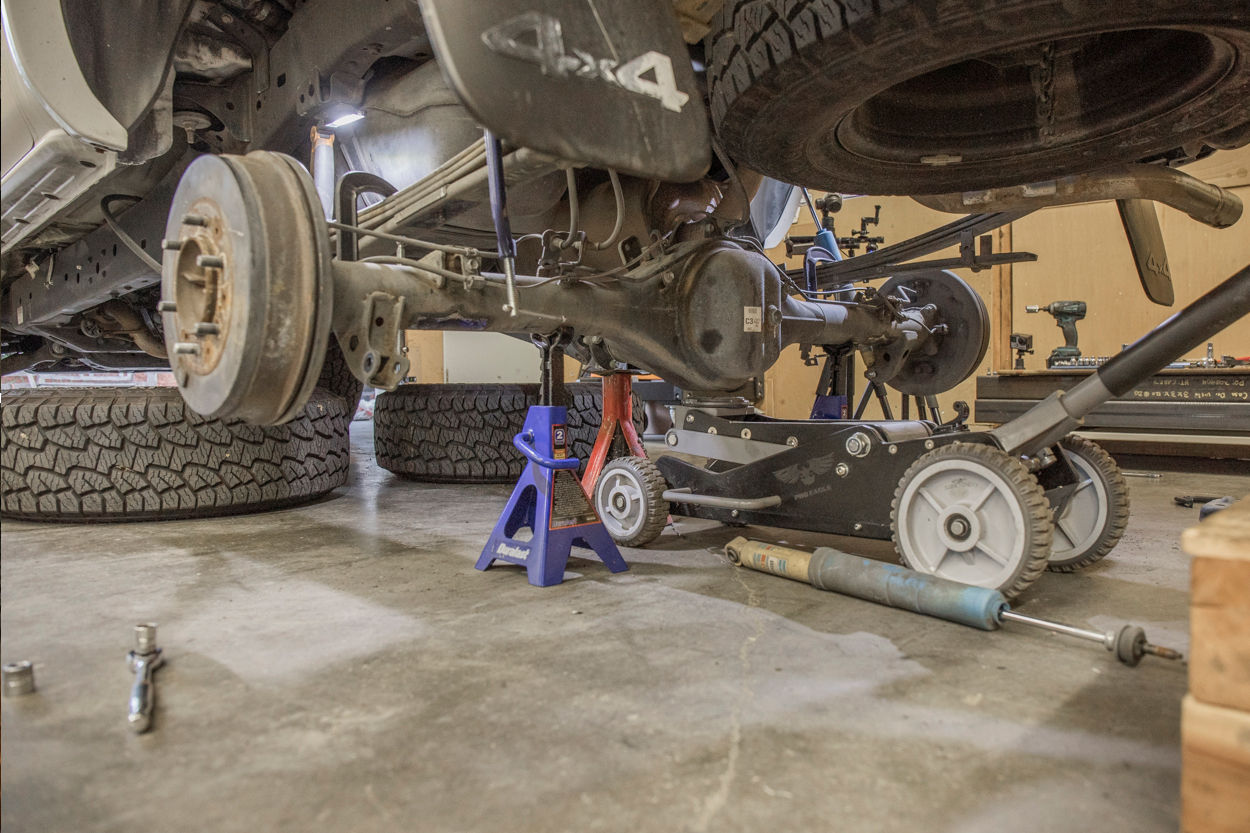
Grab a floor jack and drop the axle down on a set of jack stands. They should sit about 6″ below your leaf pack and maybe further depending on how much room you need to remove the overload spring. You don’t want to drop your axle too far as that will put stress on the brake lines.
Step 28. Support Diff

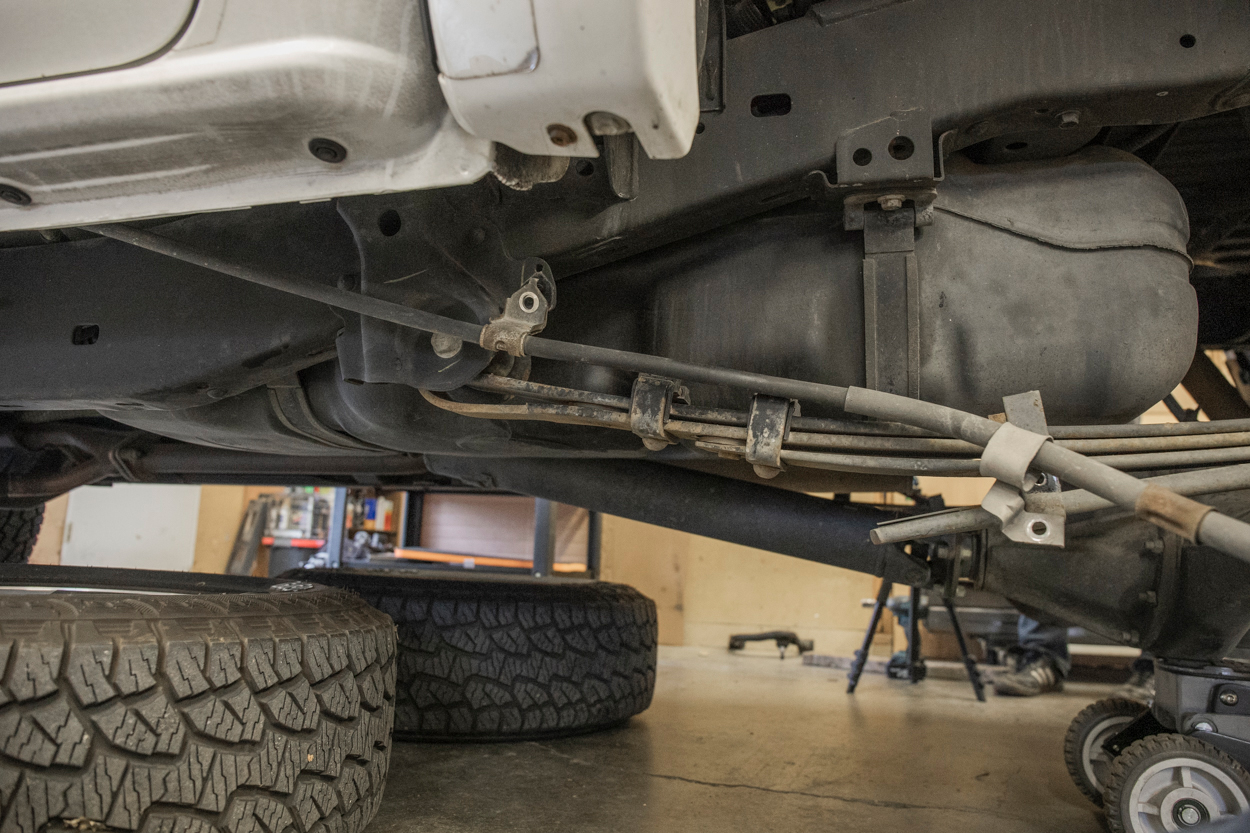
If you have an extra set of jack stands, it may be a good idea to support your driveshaft, pinion gear, or the third member itself.
Step 29. Release Pressure
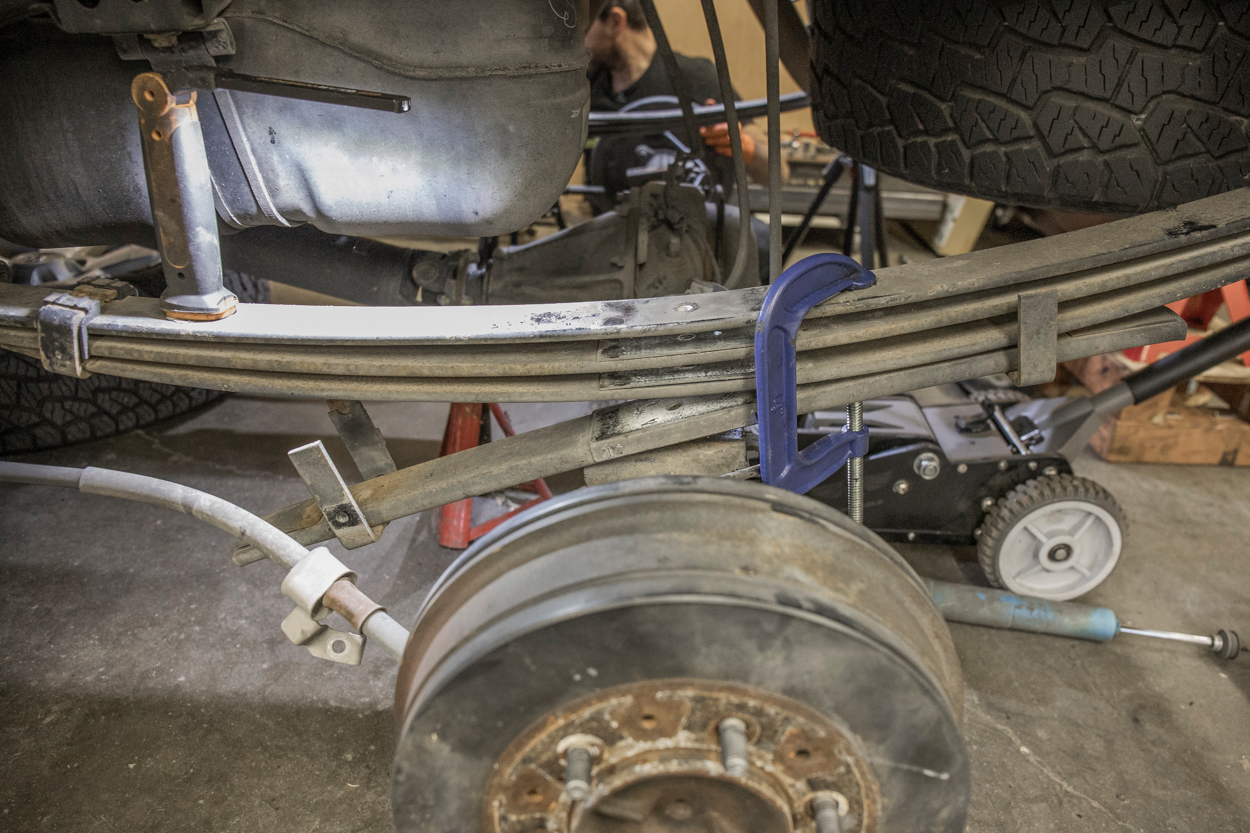
Release the pressure on your c-clamps in order to separate the leaf springs.
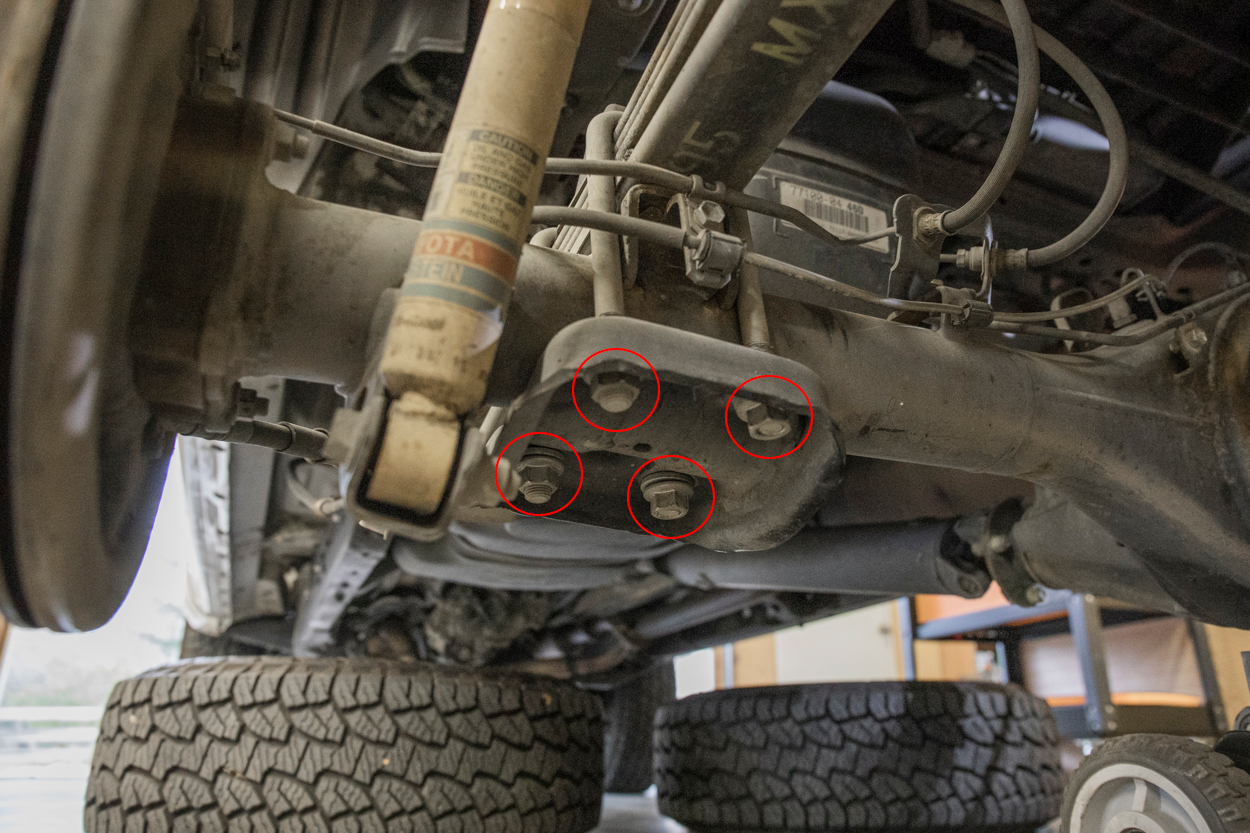
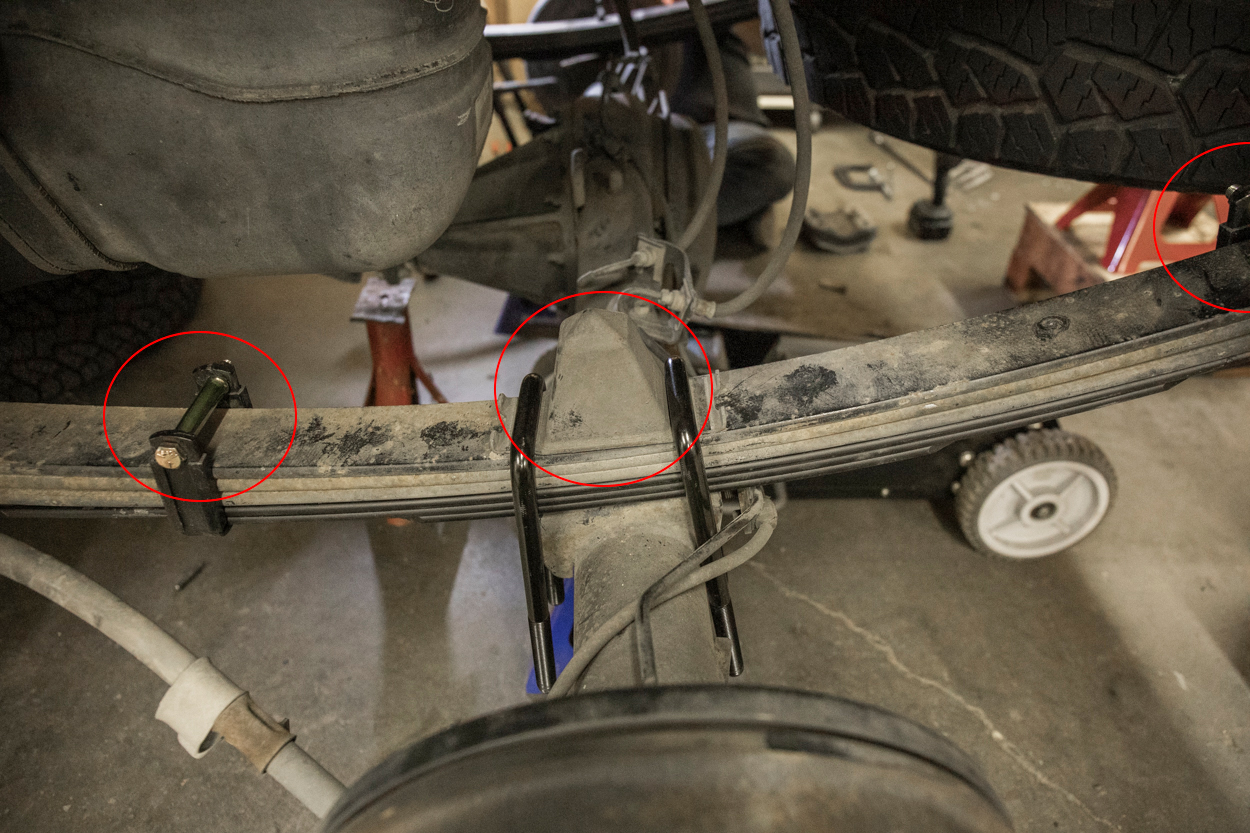
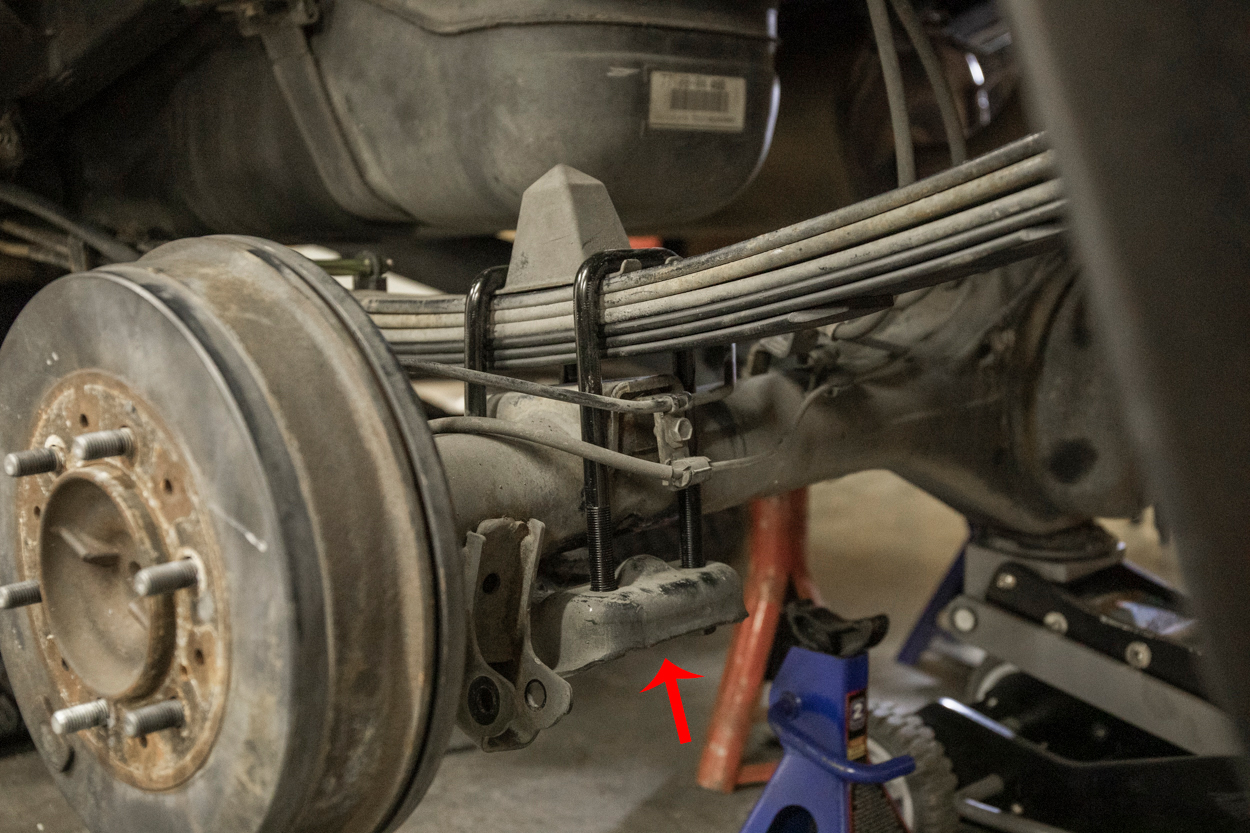
Step 30. Remove Rear Bracket

Cut the leaf spring rivet and bracket from the leaf pack. This is the bracket that is now closest to the axle pictured above.
Step 31. Remove Rivet
Cut the rest of the brackets rivet off and sand it down clean. Now would be a good time to spray this area with some rust inhibitor or some type of flat black spray paint with a rust inhibitor.
Step 32. Position Add-A-Leaf
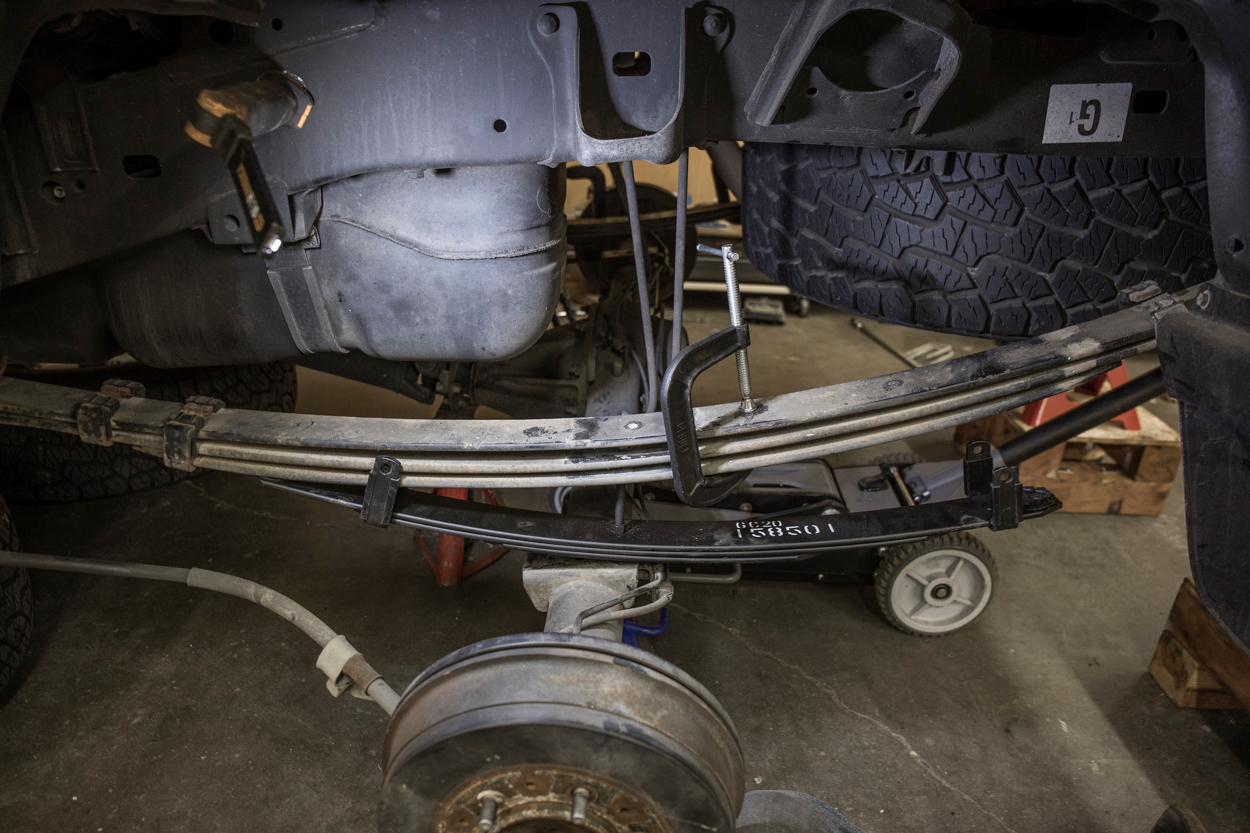
Add a c-clamp around your leaf pack in order to compress a few of the leafs. Before installing the add-a-leaf, remove the nut that is on the add-a-leaf bolt. Then position the new Icon add-a-leaf directly under the leaf pack and line up the bolt with the rest of the holes in the leaf pack.
Step 33. Install Add-A-Le
![]()
Once your add-a-leaf is through the rest of your leaf pack, you can then torque the bolt on top of the add a leaf nut. In order to fit your factory bump stops back on top of your leaf pack, you will need to cut off the majority of the add a leaf Bolt
Step 34. Reinstall Components
On the home stretch! Now you can add your bump stop on top, install your add-a-leaf bolts, and throw your u-bolts over the leaf pack.
Step 35. Thread U-Bolt Nuts
Now install all of the new nuts provided with your u-bolts. Thread these down in the star pattern so that you have equal pressure from the plate to the axle.
Step 36. Cut Brake Line Bracket
Since we have additional travel in our new kit, we are not going to reuse this brake line bracket. Plus we threw the old one away as it was attached to the overload springs. If you really wanted to figure something out, you could likely attach this brake line bracket to one of the add-a-leaf supports, but we’re not going to.
Step 37. Install Rear Shocks

Last but not least, throw on your new Bilstein 5100 shocks.
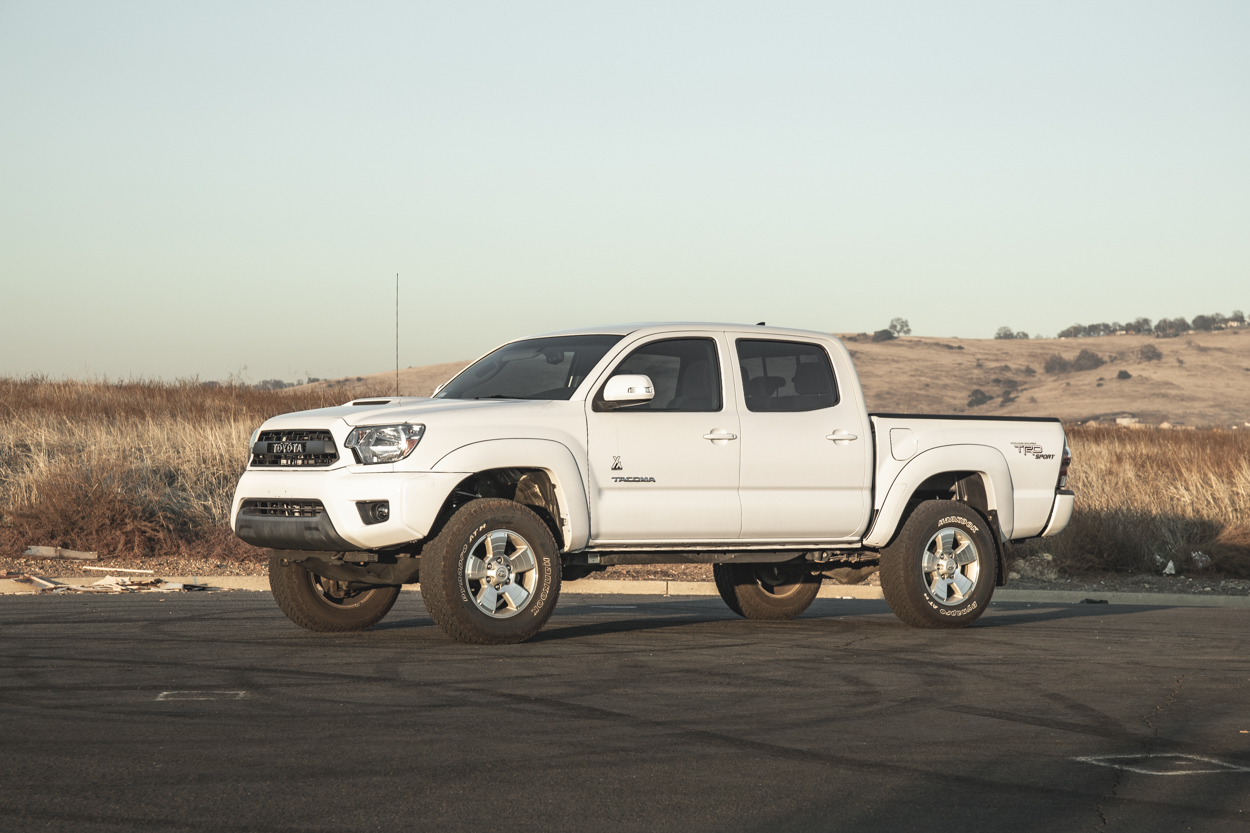
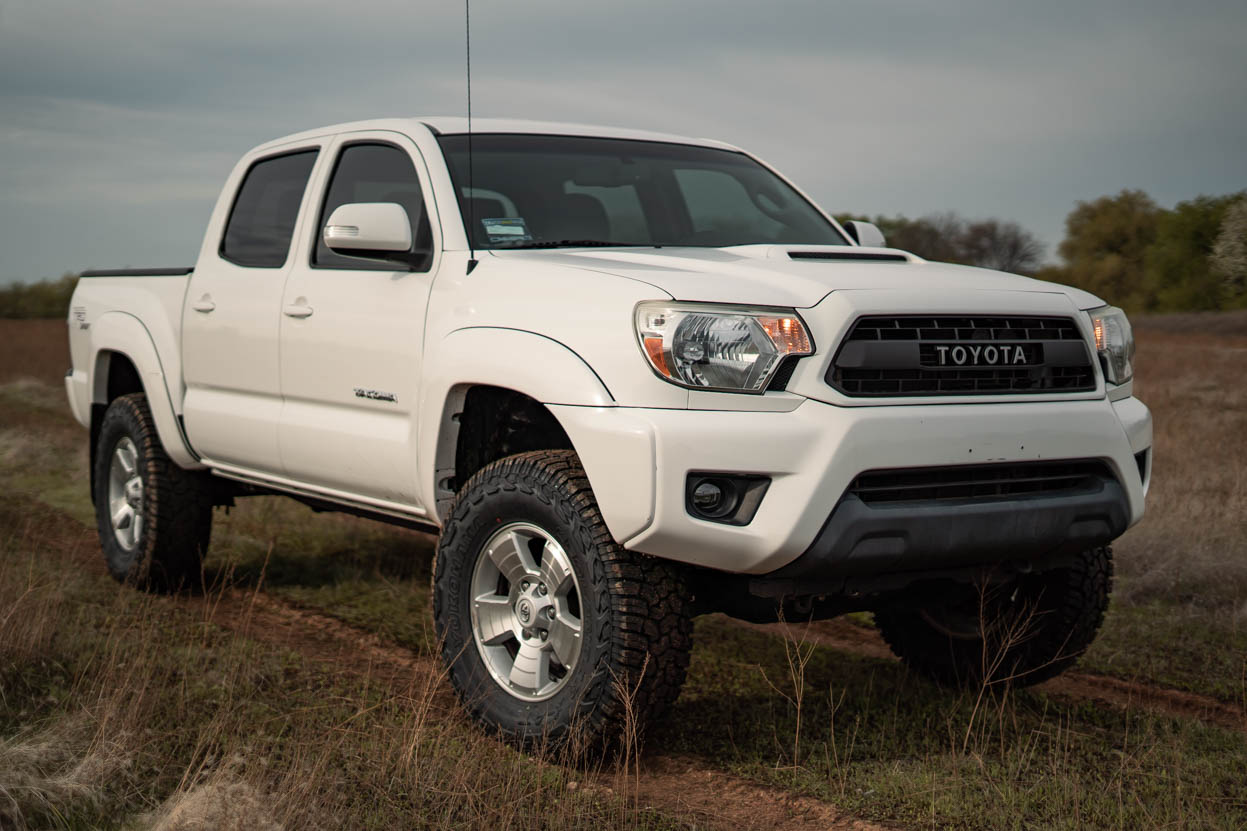
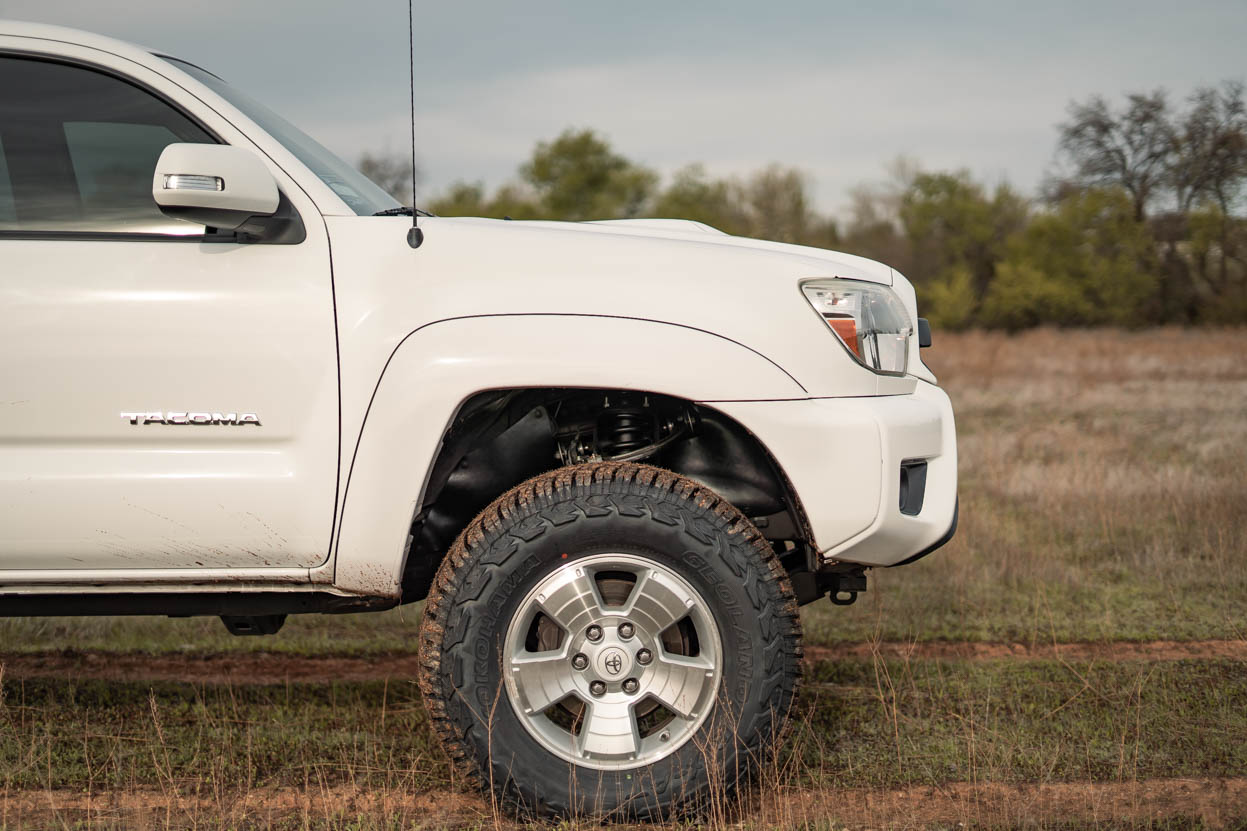
Before & After

Final Thoughts
Man, this is a great kit for the money. I have installed and run 6112s, Icons, BP-51s, leveling kits, spacer kits, and more. I have seen quite a few lift kit solutions over the years. For the money, I don’t think there is another option you will find that will beat this kit.
YotaMafia.com has paired a pretty good kit here for these 5100s. The OME springs, 5100 shocks, Icon Add-A-Leaf, and the SPC Upper Control Arms all come together to create one seriously impressive little budget lift.
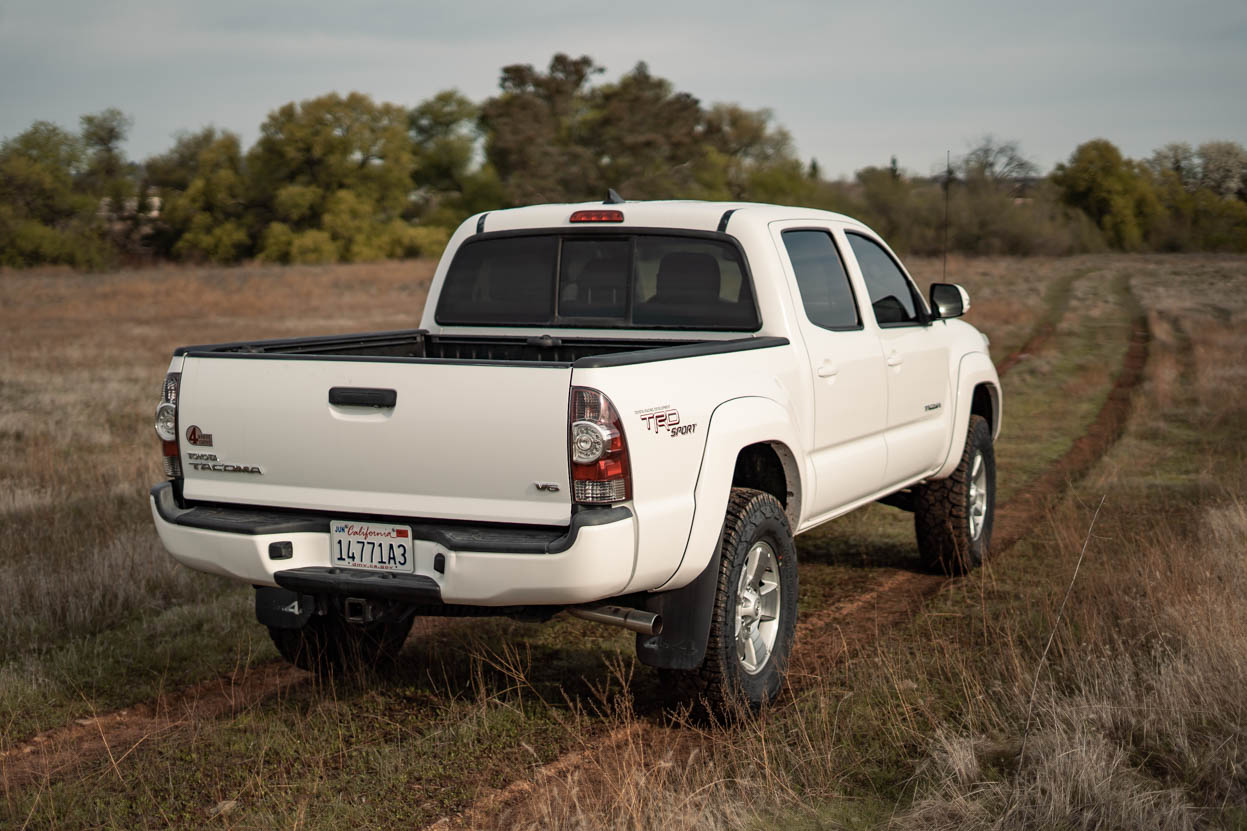
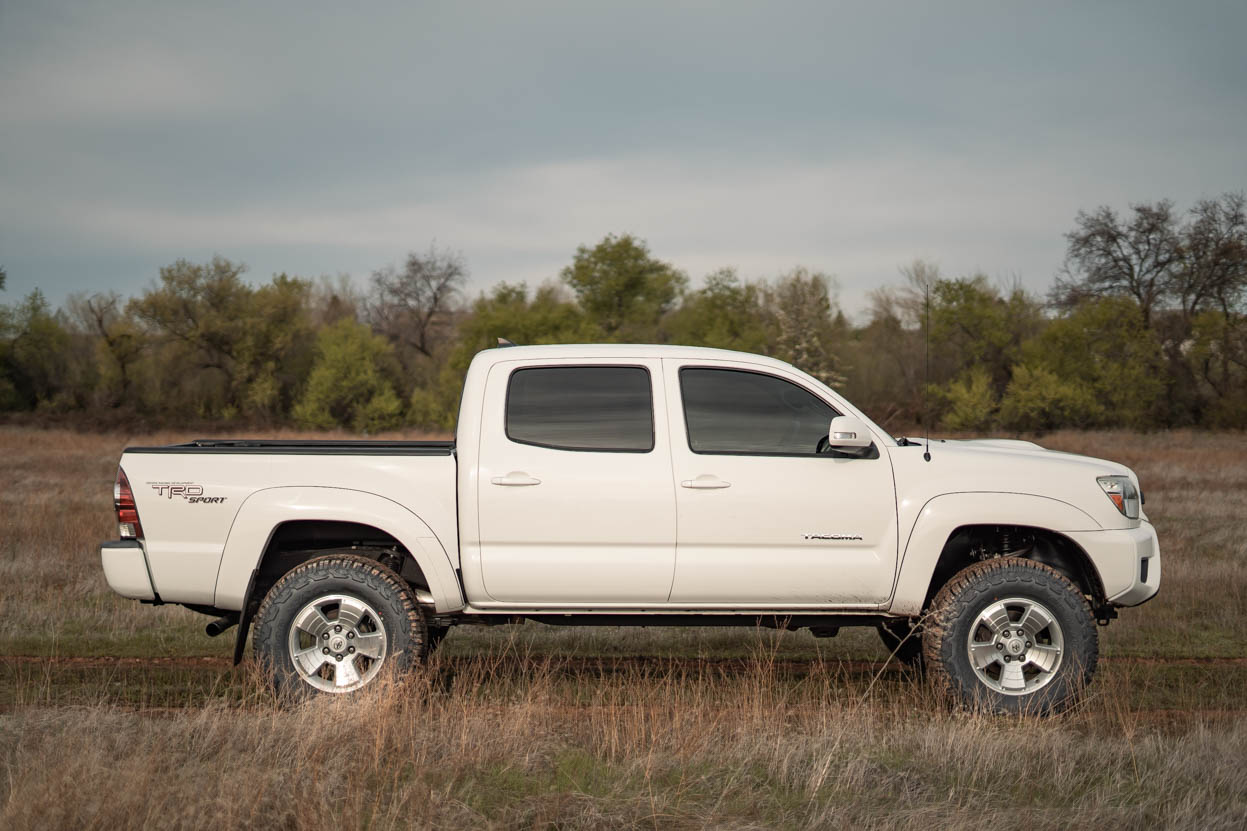
Bilstein 5100s 2.8″ Front w/ Icon Add a Leaf Rear: Factory Wheels +30 offset on Yokohama Geolander 285/70R17 (33.1″)
Passenger Front
Driver Front

Front

Side Close
Passenger Rear
Full Side Profile
I have a 2017 Tacoma. Will this kit fit?
What notch did you use on front strut for bottom spring plate?
Is the control arm upgrade absolutely necessary when going up 2.8”?
No reply
Necessary? No. Highly Recommended? Yes. But, that all depends on your tire size. What tire size are you going up to? Are you going up to a 32.5″, true 33″, maybe something around a 33.7″? With the factory UCAs, you’re not gaining the full articulation or firewall clearance that you’re able to gain with a set of SPCs or any other aftermarket UCAs. At 2″ of lift, you can get away without rubbing too much at all with a set of 33″ tires (BFG KO2 32.7″) which are small 33″ tires. Once you jump up to 2.5″ and into the… Read more »
Great info. Thanks for the response. Sounds like it’s cheap insurance and while you’re in there a smart play. Dumb question and I probably know the answer but does your average tire shop know how to use these upper control arm adjustment or do you make your setting when installing them and then it’s just a run of the mill alignment after that? For the record all I’m trying to accomplish is making my truck look a little better. Some new wheels and tires prob the new Falken Wildpeak all terrain 285/70 on a 17” wheel. Thanks again for the… Read more »
Yeah, a tire shop is going to know how to adjust them. The SPCs come with instructions on how to adjust for any tire size and lift spec. It’s pretty straightforward. The 285/70R17 is a good size (close to true 33″ depending on the brand) for the Tacoma and many would recommend that with that size, go with an aftermarket UCA. There are a ton of options when it comes to UCAs, though. Check out the guide to upper control arms for the Tacoma here if you want to check out all the options.
Figured I’d ask a question now thst it’s been a couple of months and I was about to order and had two other questions.
Do you need new brake lines? My 2012 2nd Gen has 26K miles. That’s not a typo and has been garage kept the last 9 years.
Taco Lean. My truck is stock and doesn’t exhibit it. Is it smart to go ahead and order the top hat spacer suggested by Yota Mafia?
Thanks again for all the great help!
Hi,
How did you manage to fit tires that size?
I am running a Bilstein 3″ lift and SPC uca’s and my tires are like 1/2″ away from my UCA’s.
Frank, we stuffed them in there and then started cutting. There actually wasn’t too much cutting for the 33″ tires on this lift kit. We have another post on fitting 33″ tires on the Tacoma. Check that one out for all the details.
Wow, this is an impressive write-up. Nice documentation for the 2nd gen guys and much better than anything I have seen on TW and even on YT. Thanks for uploading the SPC upper control arm specs doc as well. That helps big time.
Henry, yeah no problem man. Glad we could help.