

Roof racks come in all kinds of shapes and sizes. Every brand has its own unique design to set them apart from the rest of the pack. Some utilize flat aluminum extrusion bars, and some use round bars. They are also some designs that are fully customizable with regard to where the load bars are placed and others where their bars are fixed in place. Suffice it to say; there are so many things to consider when choosing a roof rack!
The Cali Raised LED premium roof rack brings its “A” game to the market. Optioned out, this thing is a beast and adds so much utility and capability to your rig – it’s insane!
Find It Online
- Cali Raised LED Premium Roof Rack: Check Price
- Dual Function Light Bar: Check Price
- 360-Degree Scene Light Kit: Check Price
Table Of Contents
Installation

The Cali Raised LED premium roof rack is low profile and adds just about five inches of height to your rig. It’s primarily made out of aluminum, with the exception of the hardware, so the overall weight is light. The rack is really well-designed and doesn’t create nearly as much wind noise as any of the roof racks I’ve ever run before.
There are seven aluminum extrusion bars, each one rated up to 200 lbs. That’s more than enough weight capacity for your average overland box or rooftop tent. I’ve stood on top of these bars and can confirm they’re strong (I weigh 180 lbs.).
The premium roof rack comes with a ton of different lighting options. The rack boasts a universal hideaway front fairing and will accommodate most light bars up to 42”. There’s also an available 360-degree lighting option. This option adds cutouts on the side panels for four scene lights and cutouts in the rear fairing for two chase/bed lights.
Required Tools
- Standard toolbox
- Hex bits, or wrenches
- Wire cutters
- Wire crimpers
- Silicone sealant (optional)
- 21mm circle punch (optional)
Step 1. Gather Parts For Front Fairing

You will need to grab the following parts and hardware from the box…
- Rubber weather strip
- Front valence, valence support, and light bar cover
- Front mount x2
- Small aluminum spacer x2
- Large aluminum spacer x4
- Bronze washer x4
- 3/8” washer x2
- 3/8” bolt x2
- 3/8” nut x2
- 5/8” long 1/4” bolt x7
- 1/4” washer x11
- 3/4” long 1/4” bolt x2
- 1/4” lock nut x2
- M6 bolt x4
- M6 washer x4
Step 2. Assemble Front Valence

Start by taking the front light bar cover and sliding a small aluminum washer on one of the stud bolts.

Next, take a 3/8” bolt, 3/8” washer, and one bronze washer and combine the mount and led bar cover. Then, take another bronze washer with a 3/8″ locking nut.
Tighten down the hardware but leave it loose enough for adjustments. Repeat on the opposite side. Later, we will completely tighten down these nuts and bolts to adjust the amount of tension.

Lay the front valence support over the front of the mounts and match the holes shown. The support will be sandwiched between the mounts and the front valence.

Next, take a 5/8” length 1/4” bolt and washer and bolt to the front valence sandwiching the valence support. Repeat for the other side and leave them only hand tight for now.

Take the three 5/8” length 1/4” bolts and 1/4” washers and bolt them in the remaining three bolt positions on the front of the front fairing. Leave these only hand tight as well.

Use a 3/4” long 1/4” bolt with two washers and nut to join the front fairing with the front mount as shown. Repeat for the other side.
At this point make, sure everything is lined up and tighten down all of the nuts and bolts left loose.

We can now tighten the nut and bolt that adjusts the tension of the front light bar cover.

Finally, tighten the nut and bolt down enough so that you’re able to easily open and close the cover. It shouldn’t fall down by itself.

Now, take the weather strip, soft side down, and push it into the front fairing as shown. There will be some overhang – all you have to do is take a wire cutter or a really good pair of scissors and snip the excess off.
(Optional) Hole Punch Roof Weather Stripping

This step is completely optional. You can completely remove the weather stripping on the roof and toss it if you don’t want to go through the hassle.

I decided to mark the mounting hole positions on the weather stripping and punch them out with a hole punch. In my opinion, this looks cleaner than just taking the weather stripping off completely.
Step 3. Mount Front Valence

Whether you keep your weather stripping or not, there are two holes on the roof in the front where you can lay two of the large aluminum spacers over.

Take your front valence assembly and lay them over the spacers.
Before you throw the bolt in, you can drop a glob of 3M sealant into the hole to help seal the roof from water intrusion.
Next, bolt in the mounts to the roof using the supplied M6 bolts and washers as shown above. Do not completely tighten them down yet. We’ll need to leave them loose enough to adjust the fully assembled roof rack later. Do the same on the other side.

The valence should look like the above picture after mounting. You don’t need to put the knob on yet; I just put it there so I wouldn’t lose it. You’ll need to take it off later to mount the side panels.
Step 4. Gather Parts For Center Load Bar

You will need to grab the following parts and hardware from the box…
- Extrusion bar
- Middle mount x2
- 1/2” long 1/4” bolts x4
- 1/4” t-slot nut x4
- 1/4” washer x4
- M6 bolt x2
- M6 washer x2
- Large aluminum spacer x2
Step 5. Assemble Center Load Bar

Take two of the t-slot nuts and slide them into the extrusion bar.
Use two 1/2” long 1/4” bolts and two 1/4” washers to secure the middle mount. Note the positioning of the mount and make sure to match it on the other side. Leave them loose enough for adjustment later.
Step 6. Mount Center Load Bar

This is the same process as the front mount, lay a large spacer over the mounting hole in the enter.

You can drop some 3M sealant just like for the front mounts as well if you want. Attach the load bar on the spacer as shown above with the supplied hardware but leave everything loose enough for adjustments later.
Make sure the pointed side of the mount is facing the front of the rig. Repeat for the other side.
Step 7. Gather Parts For Rear Load Bar

You will need to grab the following parts and hardware from the box…
- Extrusion bar
- Rear mount x2
- 1/2” long 1/4” bolt x4
- 1/4” washers x4
- 1/4” t-slot nut x4
- Large aluminum spacer x4
- M6 bolt x4
- M6 washer x4
Step 8. Assemble Rear Load Bar

Start by sliding two of the t-slot nuts into the extrusion bar.

Take your rear mount and position it, as shown above, and secure it with two 1/4” washers and two 1/2” long 1/4” bolts. Again, tighten down but leave it loose enough to adjust later. Do the same for the opposite side.
Step 9. Mount Rear Load Bar

Place two large spacers over the rear mounting holes, just as you did for the front and middle mounts.

Place the rear mount assembly over the spacers. Just as before, you can drop some 3M sealant into the holes to help seal your roof from water.
Note the direction the mount is facing – you want the point faced to the front of the rig. Bolt down the assembly with an M6 washer and bolt. Leave loose for adjustments later. Do the same for the other side.
Step 10. Gather Parts For Side Panels

You will need to grab the following parts and hardware from the box…
- Side panel x2
- 1/4” washer x12
- 5/8” long 1/4” bolts
Step 11. Mount Side Panels

Begin by lining up the holes of the side panel and attaching the two bolts shown above. Make sure not to force anything. All these parts are aluminum and will strip fairly easily if you try to force a bolt in.

Follow up by bolting the middle load bar to the side panel.
Finally, bolt in the rear mount.
Step 12. Gather Parts For Mounting Light Bar

You will need to grab the following parts and hardware from the box…
- Extrusion bar
- Light bar mount x2
- Light bar
- 1/4” t-slot nut x4
- 1/2” long 1/4” bolt x4
- 1/4” washer x4
- 5/8” long 1/4” bolts x4
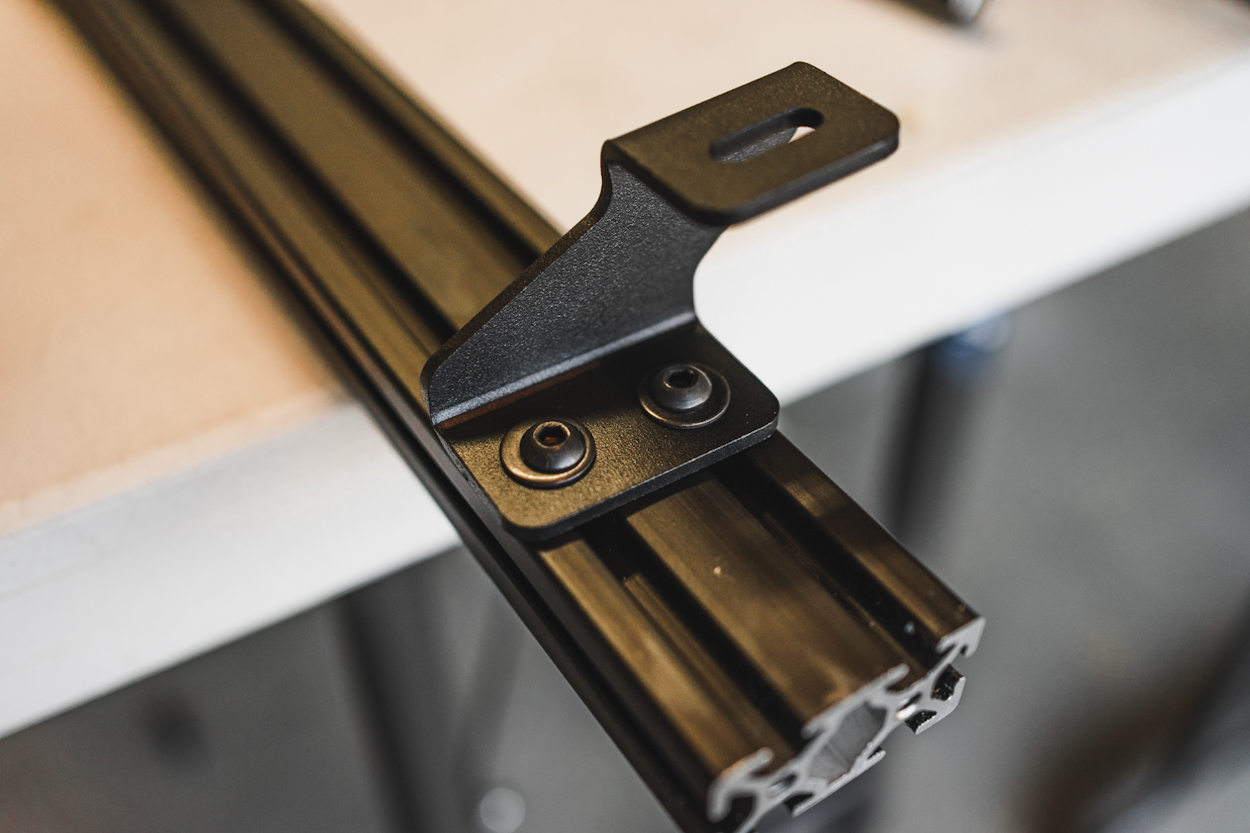
Step 13. Assembling & Mounting Light Bar

The mount that you use and the way it’s mounted are dictated by what light bar you are using, so your installation may vary from mine. I’m going to show the steps I took to mount Cali Raised LED’s dual-function light bar.

Start by placing the mount onto the extrusion bar. Slide t-slot nuts to match the bolting points of the mount. Use the 1/4” washers, and 1/2” long 1/4” bolts to attach the mount, but leave it loose for adjustments.

Mount your light bar by using the provided hardware with your light bar.
Measure the distance of the mount to the edge of the extrusion bar on both sides. Adjust as needed to make your light bar completely centered.

Install the light bar to the side panel using two 1/4” washers and two 5/8” long 1/4” bolts.
Step 14. Gather Parts For Rear Valance & Lights

You will need to grab the following parts and hardware from the box…
- Extrusion bar
- Scene light x2
- Rear valence
- Rear valence mounts x2
- 1/4” t-slot nut x4
- 1/2” long 1/4” bolt x4
- 1/4” washer x12
- 3/4” long 1/4” bolt x2
- 5/8” long 1/4” bolt x6
- 1/4” locking nut x2
Step 15. Install Rear Lights

Start by sliding four t-slot nuts into the side of the extrusion bar and use four 1/4” washers and four 1/2” long 1/4” bolts to secure the rear valence down to the extrusion bar.

There are two different types of mounts that come on the scene lights. The bottom flush mount lights are the ones were going to use.

Insert one of the scene lights into the rear valance. The innermost hole should have a threaded hole. Use a 5/8” long 1/4” bolt to secure the light.

For the outer hole, slide in a 3/4” long 1/4” bolt x2. Then, take your mounting bracket and slide that onto the bolt. Secure this down with a 1/4” washer and a 1/4” nut. Make sure to match it like the image above. Repeat for the other side.
Step 16. Mount Rear Valence

Bring the assembly over to your rack and use 1/4” washers and 5/8” long 1/4” bolts to secure it to the side panel.
Step 17. Gather Parts For Scene Light & Load Bar

You will need to grab the following parts and hardware from the box…
- Extrusion bar x2
- Scene light left side mounts x2
- Scene light right side mounts x2
- 5/8” long 1/4” bolt x8
- 1/2” long 1/4” bolt x8
- 1/4” t-slot nut x8
- 1/4” washer x16
Step 18. Mount Scene Light Mounts To Extrusion Bar

Place your mounts on the extrusion bar and slide t-slot nuts to match the mounts. Note the positioning of the mount.

Use two 1/4” washers and two 1/2” long 1/4” bolts to secure the mount down, leaving it loose enough for adjustment.
Measure the end of the mount to the edge of the extrusion bar to 1 7/8″ of an inch. Then, tighten the bolts completely down.
Do the same for the final three mounts.
Step 19. Mount Scene Light Bar To Side Panel

The mount should look like this on both sides once you bring it to your rack.

Bolt down the extrusion bar to the side panel using 1/4” washers and 5/8” long 1/4” bolts.
Step 20. Mount Scene Lights

Using the hardware included with the scene lights, install them into the mounts as shown.
Step 21. Adjust The Rack

At this point, you’re done assembling the rack and its accessory lighting – all you have to do is do some measurements to get your rack centered properly.
Measure out the distances on both sides horizontally and adjust accordingly.
Once your rack is centered horizontally, tighten down the upper bolts that connect to the extrusion bars on all of the mounts. Remeasure and if it’s centered, move on.

Next, we will pull the rack rearward as far as you can then tighten down all of the mount bolts. Go through all of the nuts and bolts and make sure all of them are tightened down.
Step 22. Attach Knobs To Light Bar Cover

Screw in the knobs to the front light bar cover and finally, you’re done!
Wiring Light Bar & Scene Lights

Wiring will vary case by case and is fully dependent on what switch you’re using as well as how you want your lights to function. If you don’t know how to wire, I would suggest handing it off to someone who does know how.
In my case, I wired them all to my Garmin switch. I wanted all of my side scene lights to turn on at the same time with one button and the bed/chase lights to turn on with another.
Cali Raised LED does not have a dedicated harness kit for the scene lights due to the nature of how customizable the lighting setup can be, so I took to Amazon and bought the following connectors:
- 4-to-1 Connector Used For The Scene Lights: Check Price
- 2-to-1 Connector Used For The Chase Lights: Check Price
- 1-to-1 Connector Used To Connect Everything To The Switch: Check Price
I cut one end of the 1-to-1 connector and extended the wires to my switch.
Light Bar + Scene Light Output Shots

Now, and very importantly, let’s take a look at how all of these lights perform.
Side Scene Lights

Light Bar (Amber Flood Only)

Amber Light Bar Alternate Angle

Light Bar (White Spot Only)
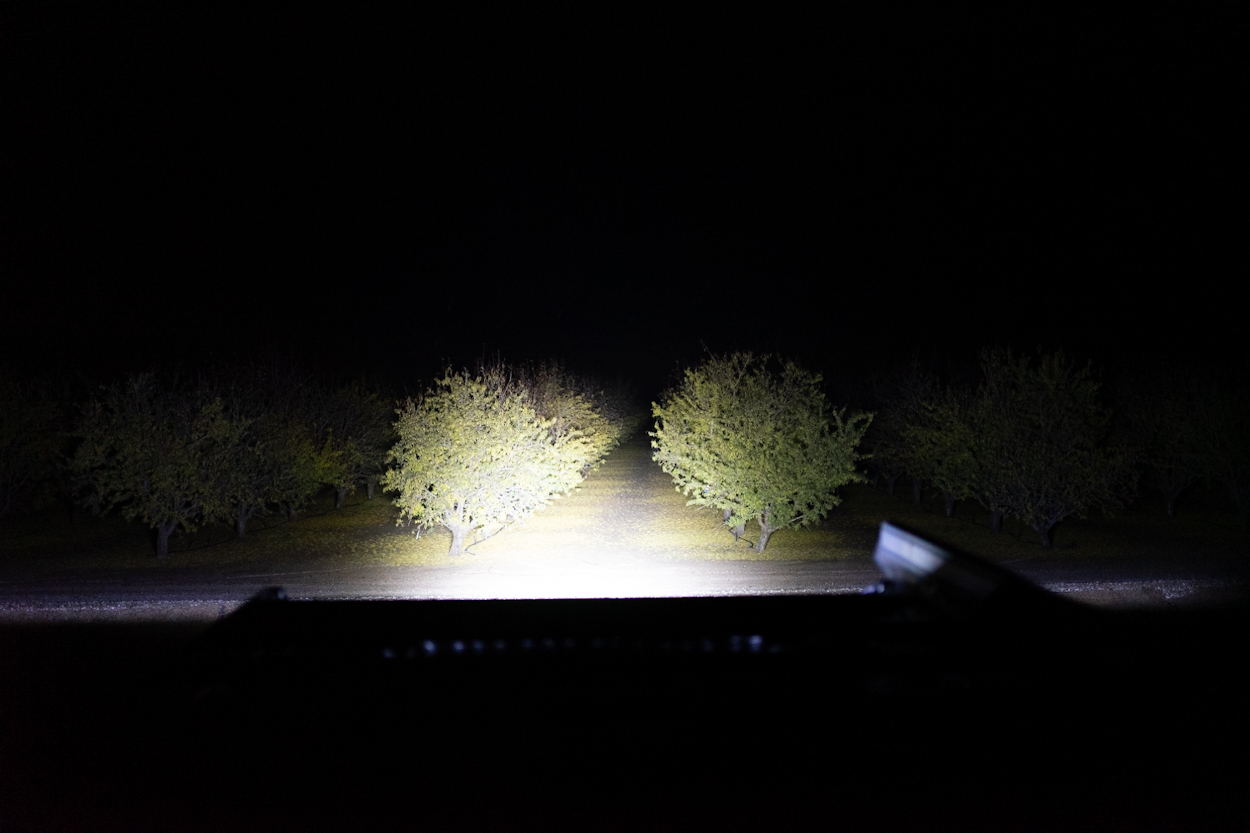
White Light Bar Alternate Angle

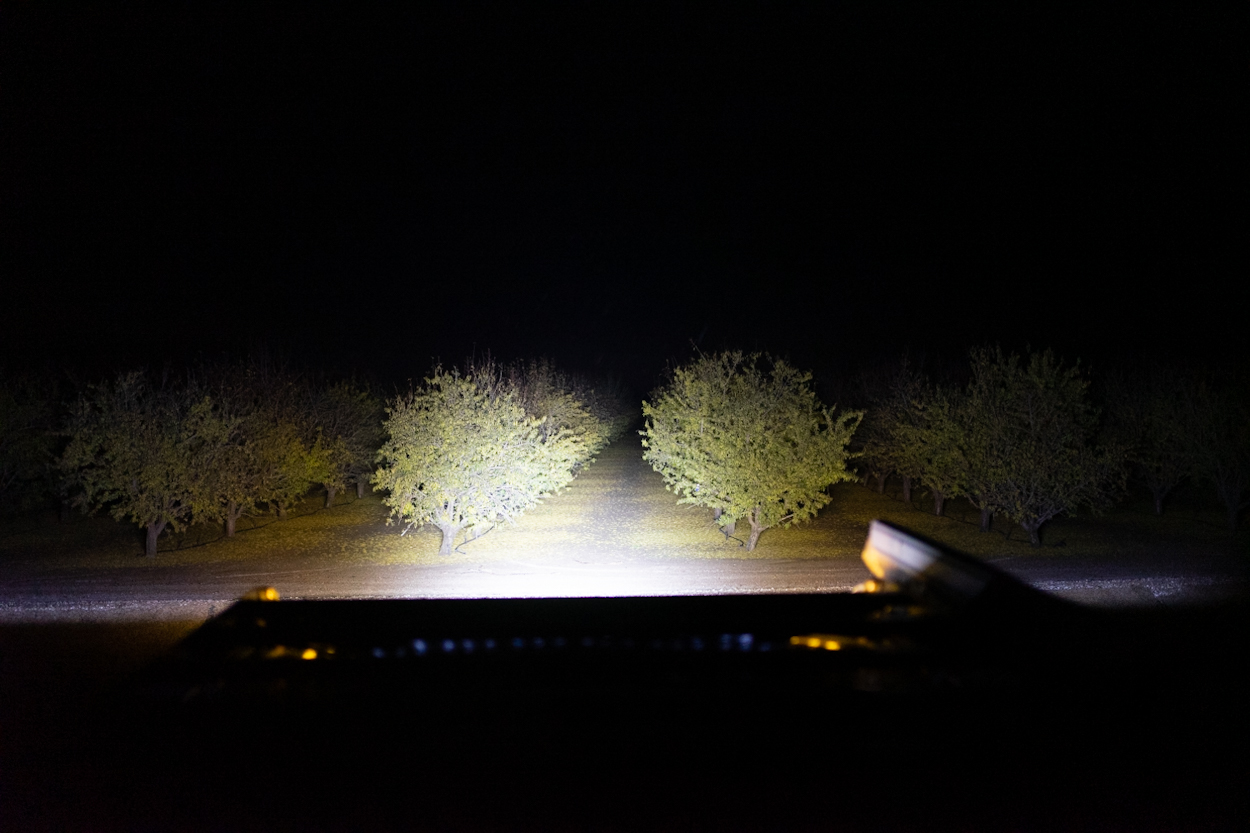
Light Bar (Amber/White)
Chase/Bed Lights

Chase/Bed Light Alternate Angle

It can be extremely hard to really show you how bright these lights really are in photos. So, take these shots with a grain of salt. The lights are bright here, but much, much brighter in person!
Final Thoughts

The Cali Raised LED premium roof rack with 360-degree scene lighting is one of the most comprehensive roof racks on the market. The overall design is sleek and low profile, which equals better gas mileage and less wind noise while traveling at highway speeds. The rack actually made me realize how loud my KO2s really are!
The light bar cover is really innovative and serves multiple purposes. When it’s up, it reduces wind noise, gives you better gas mileage, and keeps you within compliance in locations that want you to cover up your light bars when on public roads. When it’s down, it pushes the light bar back enough to reduce hood glare. With my old rack, I would get a ton of hood glare.
The Cali Raised LED dual-function light bar is also a great addition. The center spot beam lights way down the trail and the amber flood lights light up the sides and serve as a great indicator light for rigs either in front of you or coming in your direction without blinding anyone.
The side scene and the rear-facing bed/chase lights also put out a ton of light. Rigs following me love being able to see everything on those night runs. As a result, it takes away a lot of the guesswork about what could be in the darkness. It also gives you a ton of light when you’re working out of your bed or organizing it at night.
Overall, this rack has continued to impress me over the past few months. I’ve taken it on multiple trips now, and have utilized every feature it has to offer. I’d be hard-pressed to tell you there’s a better all-in-one roof rack on the market.
If you’re interested in it and want to see it in action, check out my YouTube down below. If you need specifics, visit Cali Raised LED’s website.
So what amp fuse would you use in the switch panel for connecting 2 side lights if they are drawing 2 amps each? Caliraised’s ditch lights draw 2 amps each and in the diagram included for their switch panel for their premium roof rack with 360 lighting shows their placement at a 10 amp fuse. The harness that was included in the box, which is eliminated by using the switch panel, has a 30 amp fuse in it. Obviously I am confused here but the last thing I want to do is damage any electrical components.
For only two 20w pods, if the draw is at around 2 amps each I personally would be comfortable using a 10a fuse.
If you want to make 100% sure I would contact Cali Raised LED directly either through their messaging system on their website, on Instagram DM, or email. They should be able to give you specifics.
With an Auxbeam switch panel the light bar and the ditch lights will connect to spots 1 & 2 with 30 amp fuses. The ditch lights are rated at 27 amps apiece. My question is when combining your scene lights (4 at 20 amps apiece) to the switch panel you are attaching to one spot that has a 20 amp fuse? Wouldn’t this be to high an amperage for one circuit or would I need to wire it differently. Since the ditch lights are running two 27 amp lights on one 30 amp circuit maybe running 2-4 20 amp lights… Read more »
I think you’re confusing watts with amps. The Cali Raised LED scene light pods for the rack are 20 “watt” lights. I’m not 100% sure what the amperage is after doing calculations but with the 4 side scenes lights on it’s only drawing about 2 amps. My whole lighting system with all of my auxiliary lights on, only draws about 35 amps.
So what amp fuse are you using for your 4 side scene lights? What size fuse would be used for connecting 2 side lights? Cali’s ditch lights have a 2 amp draw but on the switch panel diagram included in it’s premium roof rack with 360 lighting, it shows them connected to a 10 amp fuse. The harness included for the ditch lights had a 30 amp fuse installed in it which is eliminated by using the switch panel. Obviously I am very confused on this.