
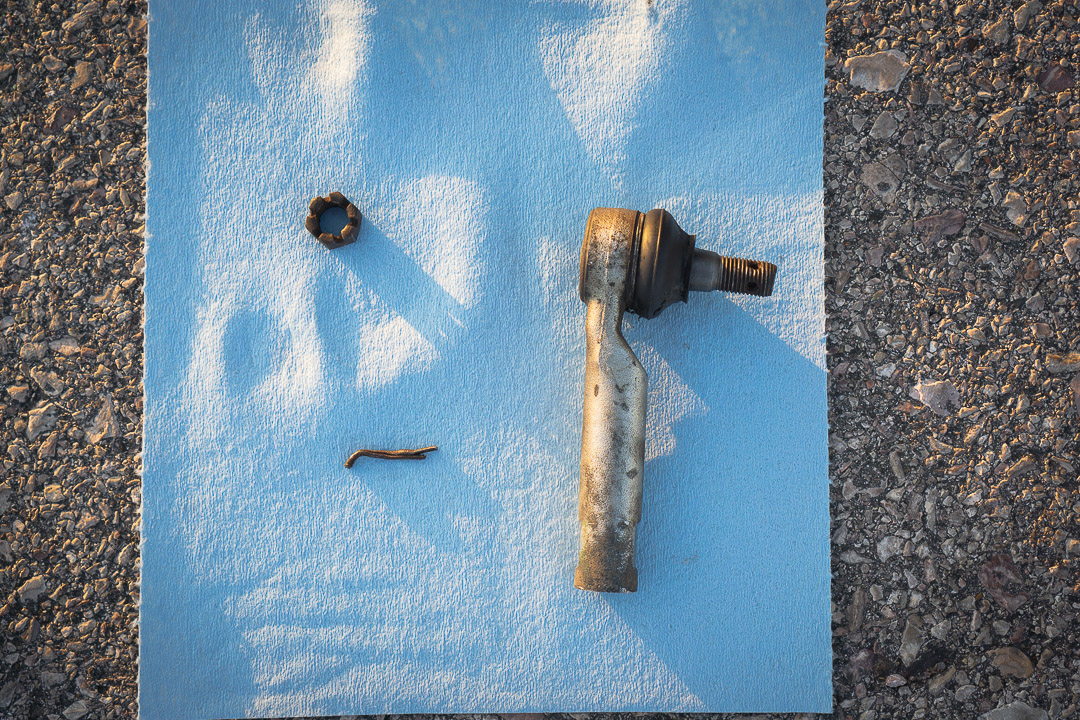
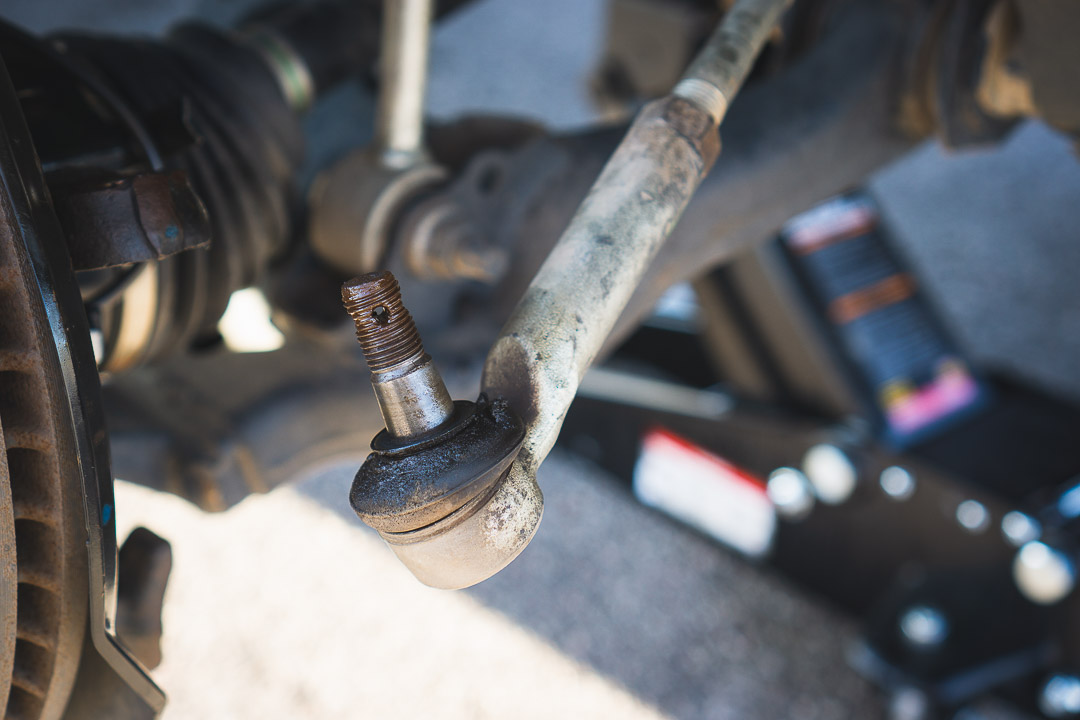
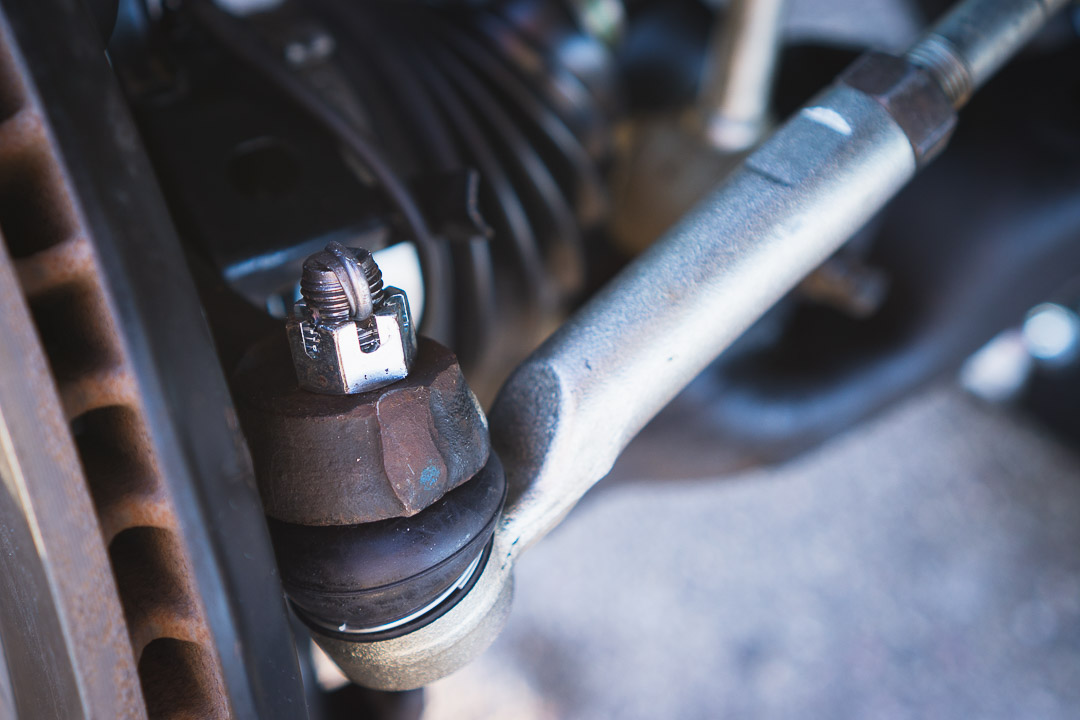
Tie rod ends are meant to last several years and tens of thousands of miles, but sadly, that wasn’t the case for me. In the image above, you can see how nasty and dirty my OEM end looked.
The old end was filled with dirt, gunk and who knows what else. What resulted in this mess? More than likely it was several wheeling trips, and due to lack of attention to detail, it took me a while to notice the issue.
A Shaky Steering Wheel
In my case, it took me a couple of months to figure out that something was wrong. It all started when my steering wheel starting to shake. I took the truck to get an alignment, got the tires balanced and I also retorqued the lug-nuts on the wheels, but that still didn’t fix the steering wheel wobble.
After inspecting the truck, I concluded that the reason for the steering wheel shake was because of the end boots being busted and losing the lubrication they needed. This created excessive friction and wore out the end faster than normal.
Tie Rods Causing Alignment Problems
If you have play in your tie rods, the bushings are bad, or they are bent then they are likely going to affect your toe alignment. If you have problems getting your toe alignment into spec, the possibilities of it being a tie rod issue or likely pretty high. Tie rods are designed to bend at some points and to absorb impacts so they can bend easily. But, excessive play is not normal and if you do have play, then that’s likely your alignment is off. If you hear a slight knocking during braking or acceleration, then also the possibilities of it being a tie rod issue or likely pretty high.
Inspection is Key
After noticing this, I found out how important it is to frequently inspect my Tacoma, especially the suspension components. Many of us love to take our trucks on trails and in the process of doing so, we abuse the suspension components.
I don’t know about you, but I plan on keeping my Tacoma for the long term, so being aware of anything that doesn’t look right is one step in achieving my goal of keeping my truck running as good as possible.
Check out your boots often as the biggest reason for failed tie rods is damage to the boots. Once the boots are damaged, debris will enter and damage the joints. Dirt and debris can have severe wear and tear on the ball and socket.
Do yourself a favor and check your boots often.
Quick & Easy DIY
That being said, if you’re someone who likes to save money on labor, to spend on other mods (haha), or would like to get more involved working on your Tacoma, then this article is for you.
This procedure was performed on a 3rd Gen Tacoma but is essentially identical on a 2nd Gen.
Looking For An Upgrade?
- Check out the Apex Chassis Tie Rod Kit
Table Of Contents
Tools Needed
Before starting this project, you will need some basic tools.
Take note that changing out your end will not take a long time, it’s a simple task and only took me roughly an hour or so to complete. So, if you’re someone that has never worked on their truck, then follow my step-by-step process on how I got it done.
Be aware that if you proceed, you will need to get an alignment afterward. Any time that you work on your suspension or steering, the alignment will need to be recalibrated.
For reference, you can use the picture above to look at some of the main tools we will be using on this project. You will be needing the following.
- Breaker Bar
- Mechanic’s Tool Set
- 19mm socket
- Open/Closed End Wrench Set or Adjustable Wrench
- 22mm Wrench
- Torque Wrench
- Floor Jack
- Jack Stands
- Needle Nose Pliers
- Bent Needle Nose Pliers
- Shop Towels (optional)
- PB Blaster (optional)
- Latex Gloves (optional)
Once you have all the tools mentioned above, you should be clear to proceed with this installation.
Let’s get started!
Testing Tie Rods
Outside of loose steering, poor tire wear, and difficulty with alignments, there is a way to diagnose a bad set of rods, inner or outer.
The process is simple. Jack the front wheels off of the ground, grip the wheel at 9 and 3 o’clock, and alternate pulling each side of the tire towards and away from yourself. A bad tie rod will have an excessive and fairly noticeable amount of play.
Step 1. Jack Up Truck
First things first, you will need to raise the Tacoma using the floor jack.
Once you’ve got your Tacoma off the ground, utilize the jack stands by placing them at any reinforced spot of choice alongside the frame for extra support. Additionally, you should place a tire under the truck, just in case.
With that done, you will then remove all six lug nuts and remove the entire wheel from the axle. It is not recommended that you try and swap the tie rod with an excess load on the steering components.
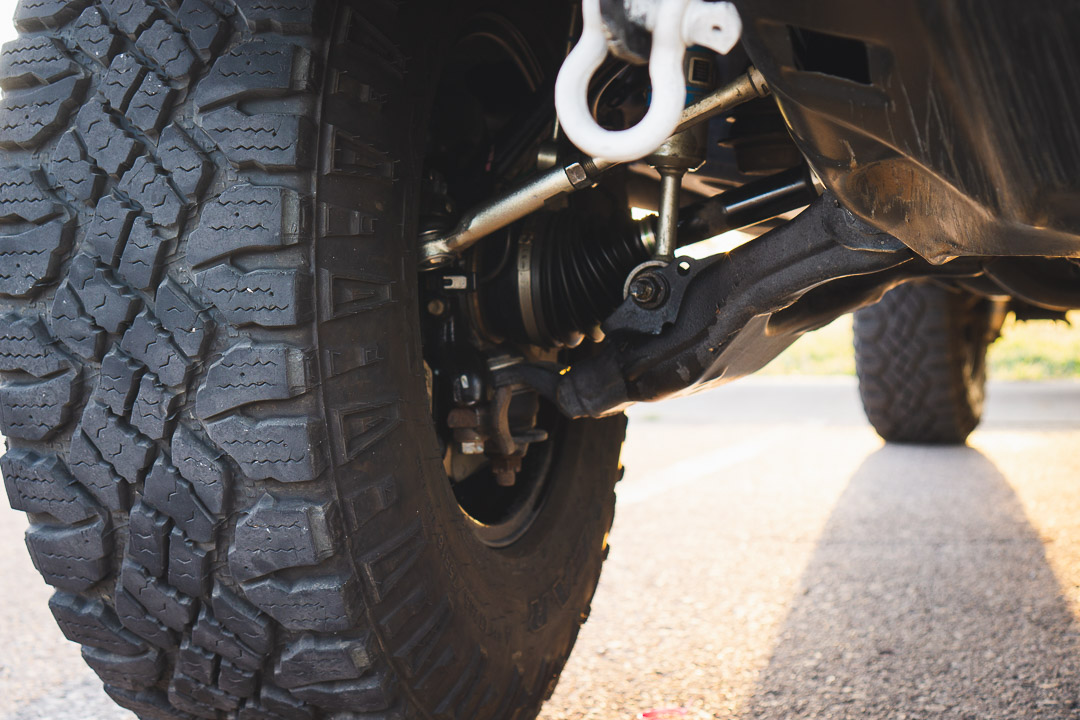
Step 2. Locate End
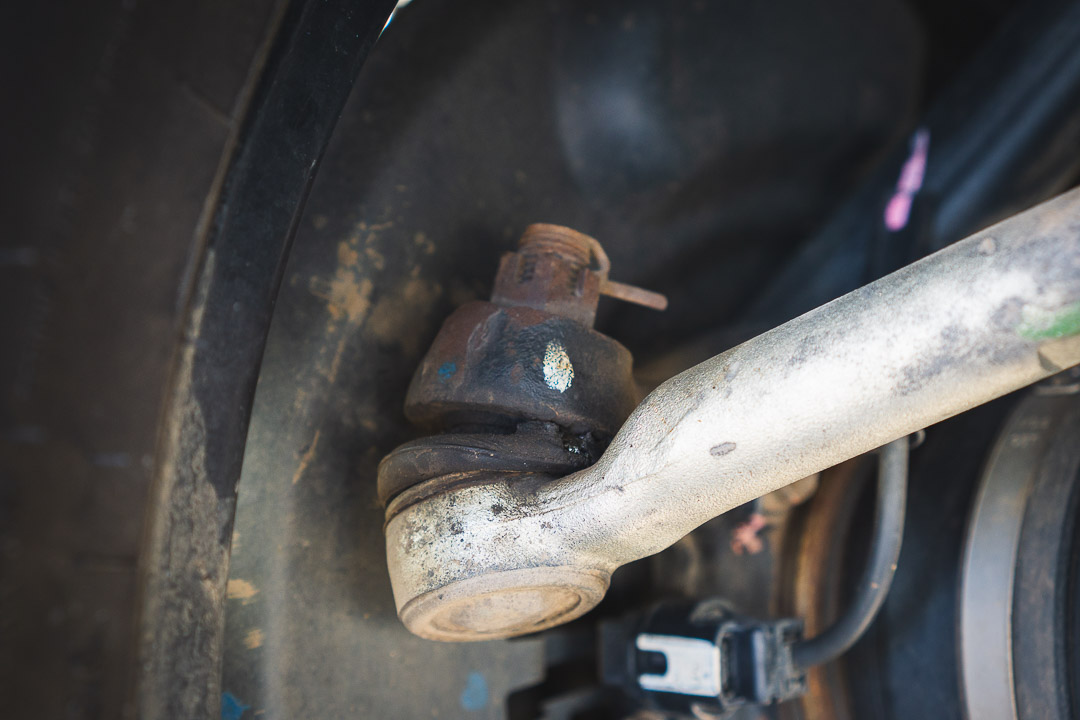
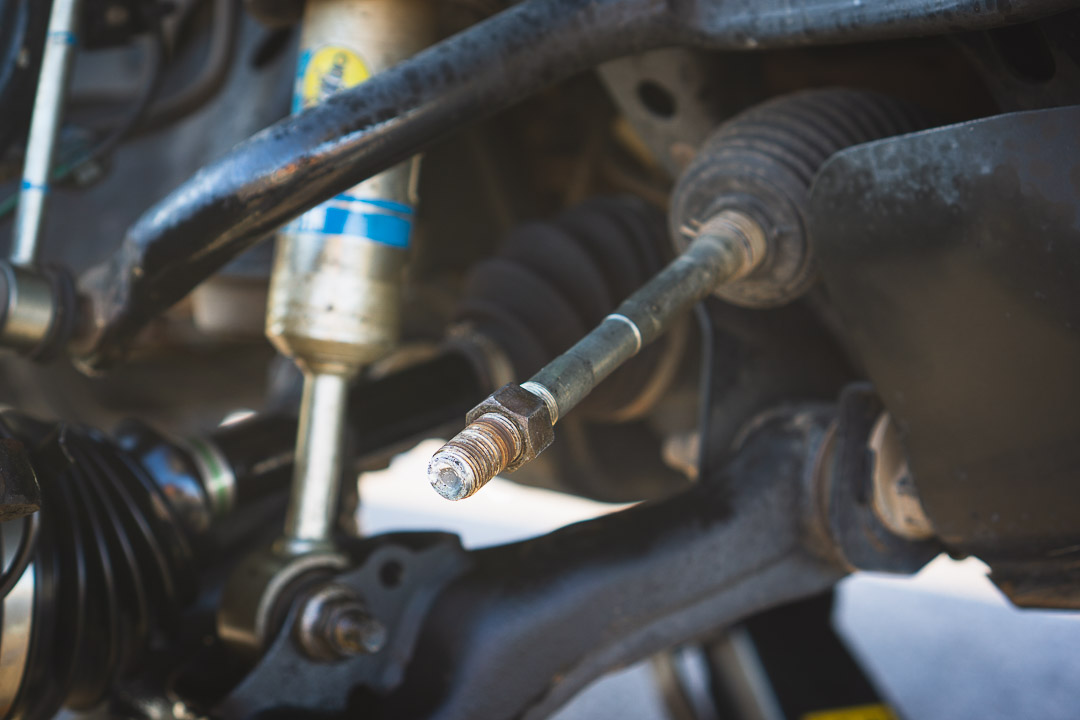
Once you’ve got the Tacoma raised and the wheel/tire off, you will then proceed to locate the tie rod end, as seen in the picture above. The tie rod is located towards the front of the hub assembly, behind the brake dust shield.
At this point, you can see that the end boot is punctured and filled with dirty leftover grease. Depending on how long you’ve driven around with it, it might look better or worse than this.
Step 3. Locate Nuts
After locating the end, if needed you will then spray some PB blaster to break loose the jam nut and castle nut.
In my situation, there was really no need to spray PB blaster because the jam nut and castle nut weren’t that corroded and filled with rust, making it easy to remove them.
Step 4. Loosen Nuts
After spraying those two areas with PB blaster, pull the castle nut retaining pin out with your pliers. You can see the castle nut in the image in Step 2. Using your 19mm socket, once the retaining pin is removed, remove the castle nut.
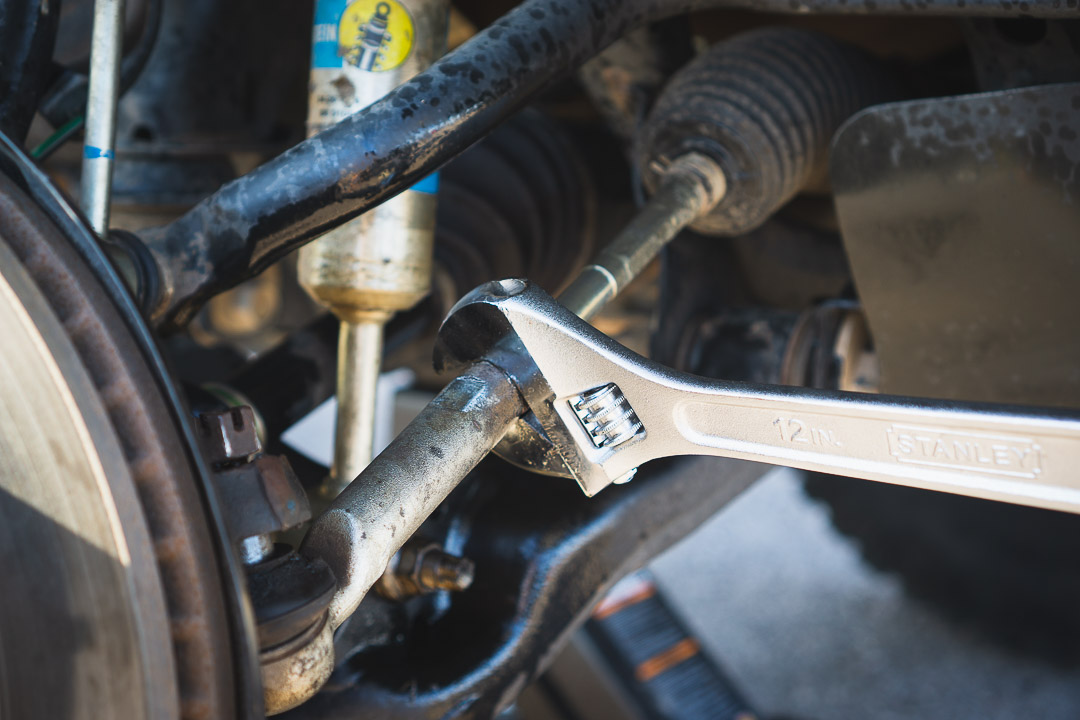
Next, you will go ahead and grab your adjustable wrench or 22mm fixed wrench and twist the jam nut enough to break it loose. I recommend twisting the jam nut through at least two revolutions to give you enough wiggle room to later remove the end.
Step 5. Free Tie Rod
Once the castle nut is removed it might still be a challenge to remove the tie rod end by hand from the knuckle.
So if you cannot break it free by hand, you can screw on the castle nut upside down and then hammer it down until it breaks loose from the knuckle. A few solid hits should free even the most corroded connection.
Step 6. Remove Outer End
By now, you’ve got the outer tie rod end out of the knuckle. Now it’s time to remove the old one completely.
You can begin spinning the tie rod end off, but take note, that as you spin the end you will be counting how many revolutions that took for it to come off. In my case, I counted 13 revolutions. I did this to get the alignment as close as possible for the drive to the shop.
Bad tie rods will allow the wheels to come out of alignment. Bad alignment can make your steering wheel shake, can make your car “pull” to one side and force you to make minute corrections to your steering constantly — leading to a fatiguing drive.
Step 7. Install New End
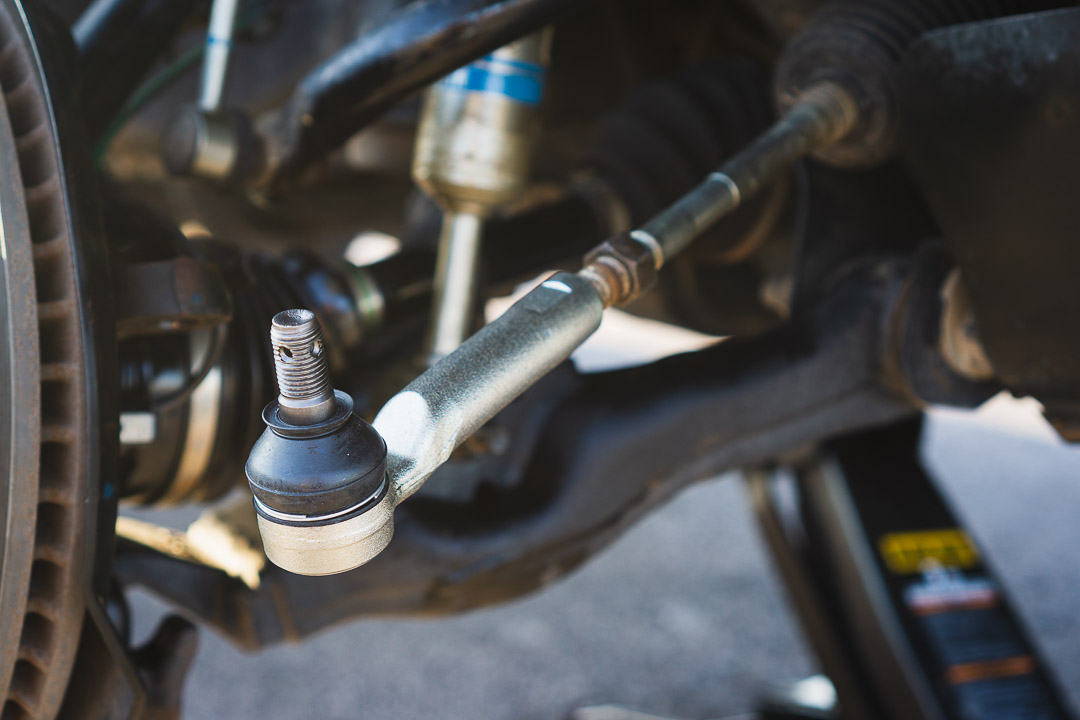
Now that you got the old crusty tie rod end out, you can bring your flashy new one in.
You will then repeat the process, in reverse, of spinning the new end inward in the number of revolutions you counted previously. I spun it 13 times inwards, this correlated to the number of revolutions it took to remove the end.
Step 8. Attach To Knuckle
After getting the new tie rod end all the way inside, you can begin tightening the jam nut by hand and putting the end through the knuckle.
Before putting the tie rod end back inside the knuckle it is important to use your shop towels to clean off any old grease and debris from the previous one.
Step 10. Add Nut & Pin
Put the new castle nut in and tighten it to 67 ft-lb, and insert the new cotter pin to match the hole through the stud in the tie rod end.
Note that if the hole doesn’t match on the slotted nut then you will have to tighten the castle nut more until they match. Do not loosen the castle nut to align the slots with the new pin.
After you have torqued the new castle nut in and inserted the cotter pin, you can now fully tighten your jam nut.
Final Thoughts
Now that you have replaced your tie rod end, the only thing left to do is take the Tacoma to get an alignment.
On a final note, don’t be afraid to drive if your steering wheel is not straight when you first start driving. This is completely normal, any sort of work done to the tie rods, or really any suspension component tends to jack up your alignment specs.
Once you get the alignment, this will be easily remedied. I hope that this article was very helpful and that it can be of use to you. Cheers!
Quick & Easy DIY
Unless your outer tie rod is stuck to the inner tie rod 🙂