
Lights. Every rig needs lights. Not only do these look rad at night, but there’s pretty much always room for auxiliary lighting, especially if you spent a lot of time on or off the road.
LED lights have gotten more and more popular over the years, and are pretty much the standard when it comes to lighting. However, HID lighting might need to make a comeback. With these flagship lights, it already has!
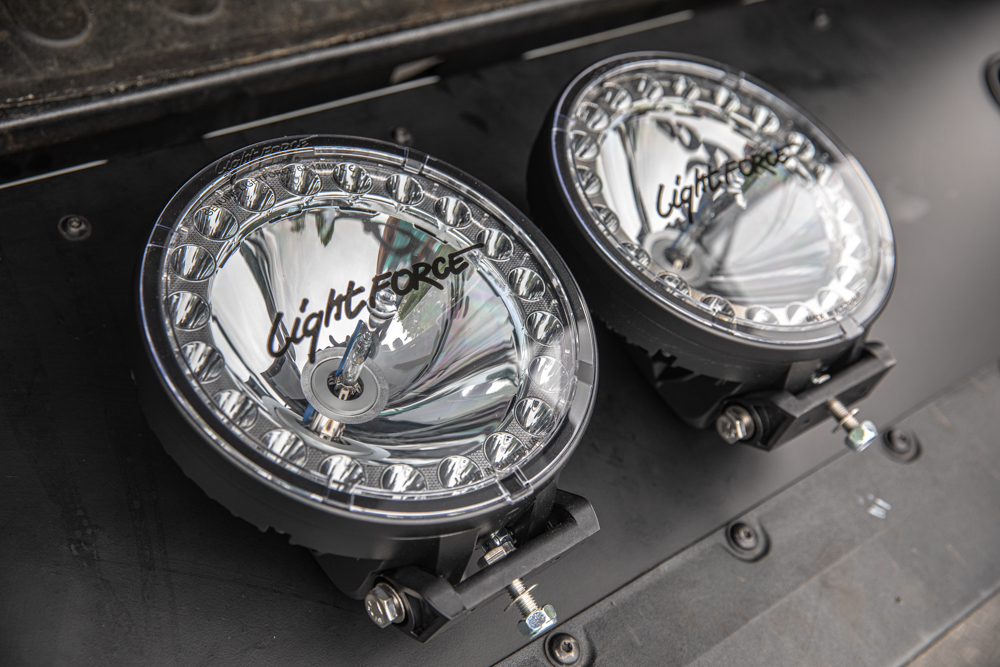
These Lightforce HTX2 combination HID/LED driving lights set a new standard for auxiliary lighting – highlighting what seems to be the pinnacle of Australian ingenuity. The amount of light they put out is simply ridiculous! From the moment I first saw these, until the time I first held them in my hands, I knew I was in for a treat.
In this post, I’ll break down the HTX2s in detail, cover how I installed them on my truck, and then dive into my long-term review of them. I’ve also been testing several other lights, so be on the lookout for more from Lightforce.
Find It Online
- Lightforce HTX 2 (LED/HID) Twin Pack: Check Price
Table Of Contents
HID & LED Lights
You might be wondering why I’ve got the lights mounted upside down, more on that later. First, let’s quickly talk about HID and LED lights, and how they compare. This will help you to better understand this particular setup.
LED Lights
LED-powered lights use electricity with a semiconductor or diode to create quality light output. LED lights are typically much smaller than their counterparts.
LED lights have the greatest lifespan, and while they don’t burn out (as much), they definitely dim over the long haul. That’s not as prominent with auxiliary lights, since we don’t tend to use them anywhere near as much as say, the headlights. LED lights also have low power draw and they create less heat. LED lights produce immediate light, with almost no delay from the time you turn them on.
HID Lights
HID-powered lights create light without any sort of filament. They work relatively similarly when compared to a neon light, or a mercury vapor light. Simply put, xenon gas, under high pressure, is charged to the point of illumination using powerful electrodes.
HID lights don’t have insane lifespans, but they’re certainly going to last longer than your standard halogen bulb. Their power draw is relatively low as well. HID lights do emit a moderate amount of heat though, but with higher efficiency. These lights may take up to a minute or so to reach operating temperature, as you may have noticed with certain headlights.
HID VS. LED

If we are comparing them to each other, the results are essentially the same. The main difference is in longevity, where LEDs tend to last about three times longer than HIDs. In terms of power draw, LEDs, of course, outperform HIDs – but not by a huge margin. The same can be said for energy efficiency. LEDs also warm up faster, but ultimately, the difference is not anything that actually affects the user.
While both lights have their benefits, the idea to combine them into one package, each with a different application and with its own benefits, is something that I haven’t seen executed before. At least not at this level. The engineering and thought that went into putting two powerful types of lights, while maintaining the traditional Lightforce roots is certainly worth noting.
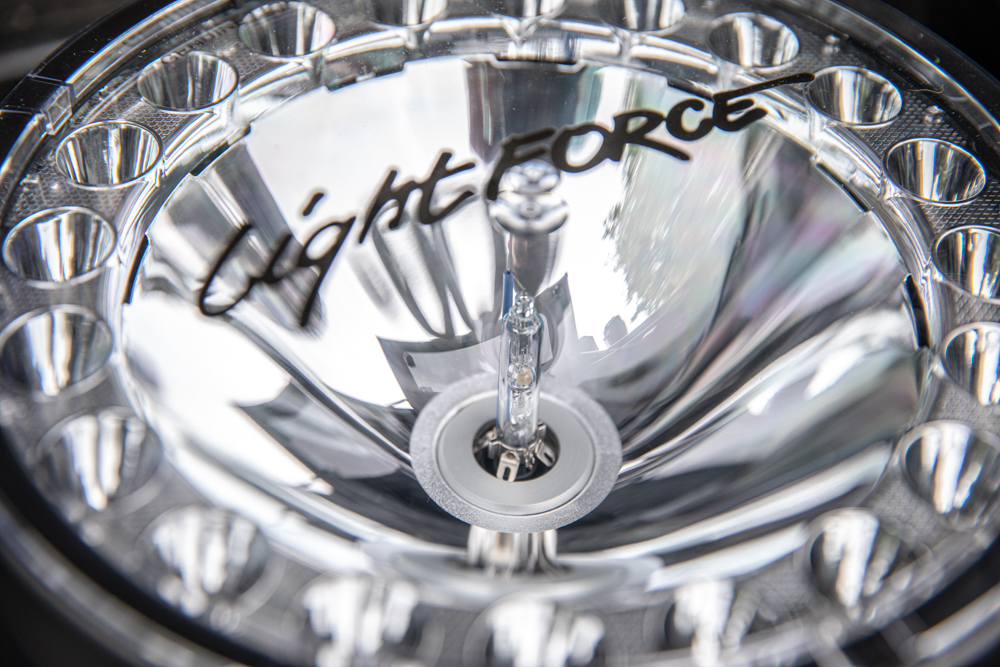
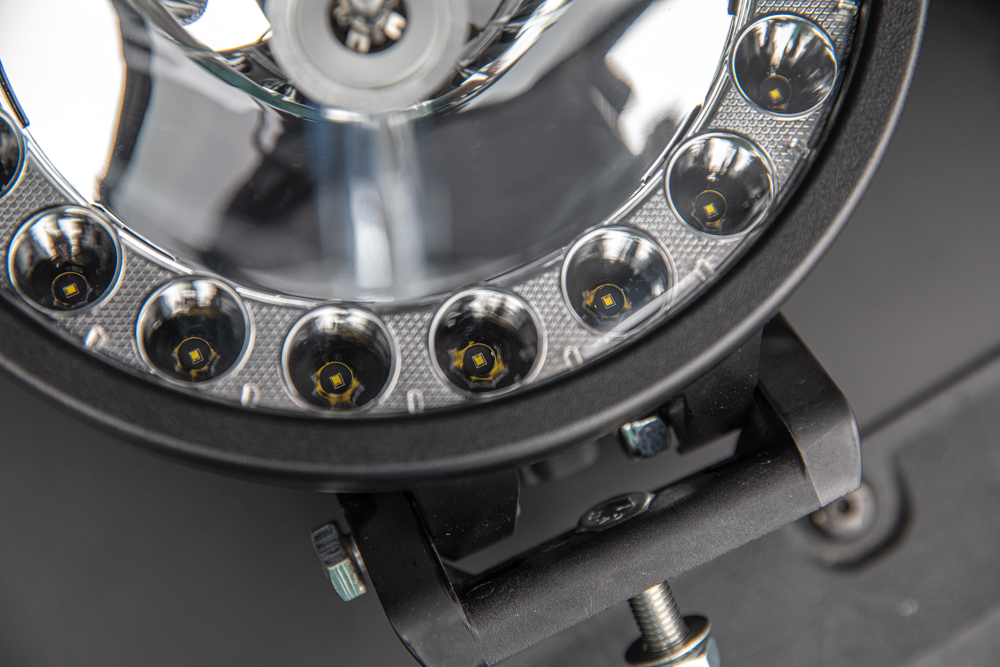
HID Portion
LED Portion
Specifications & Features
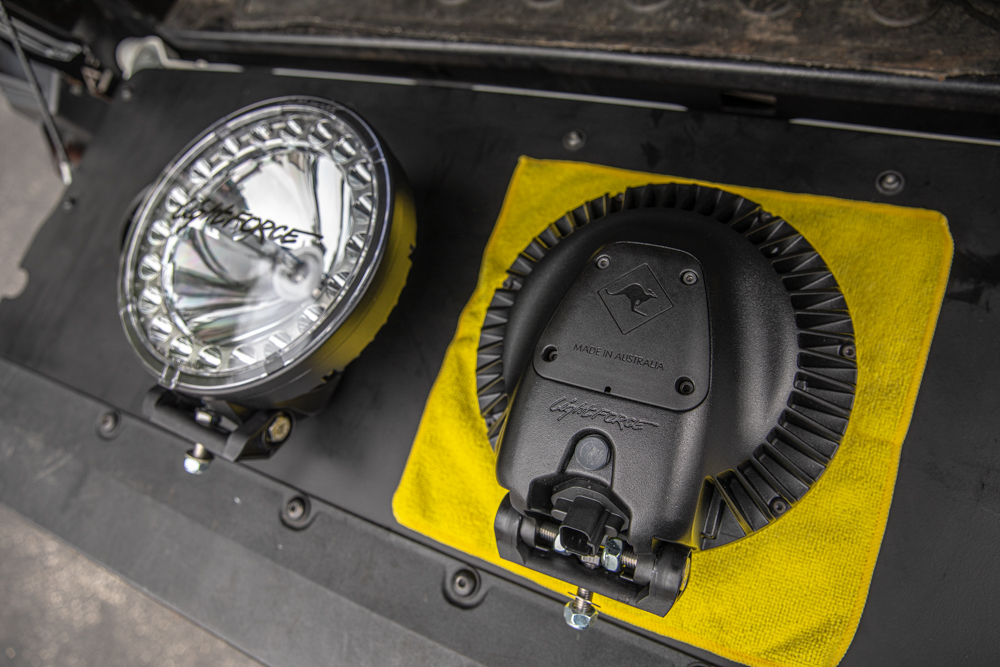
These lights are packed, and I mean PACKED with features. Let’s run through the most important ones. Before we begin, I think one of the coolest parts about these lights is that they are entirely Australian designed AND manufactured. These lights mean business – point-blank.
Epic Amounts of Usable Light Output
The HTX2s offer 1 Lux at just over a mile and .25 Lux at just over 2 miles. Simply put, 1 Lux is effectively the brightness you would experience with a 1 Lumen candle, that sits about 3 feet away from a wall. I’ve heard this referenced as enough light to read a book with. In effect, you can still read a book a mile away with the farthest-reaching light output these two lights have to offer.
I don’t know about you, but I’ve never heard of such a wild statistic.
Easy on the Eyes
Both lights emit a pure white beam at 5000K, which is a great color for optimal clarity. The HTX2s also offer a CRI (Color Rendering Index) of 70, so the colors that you see in the dark of night are true to daytime color. These two features make it easy to identify the road, and its obstacles, with much less eye fatigue.
Leading Features
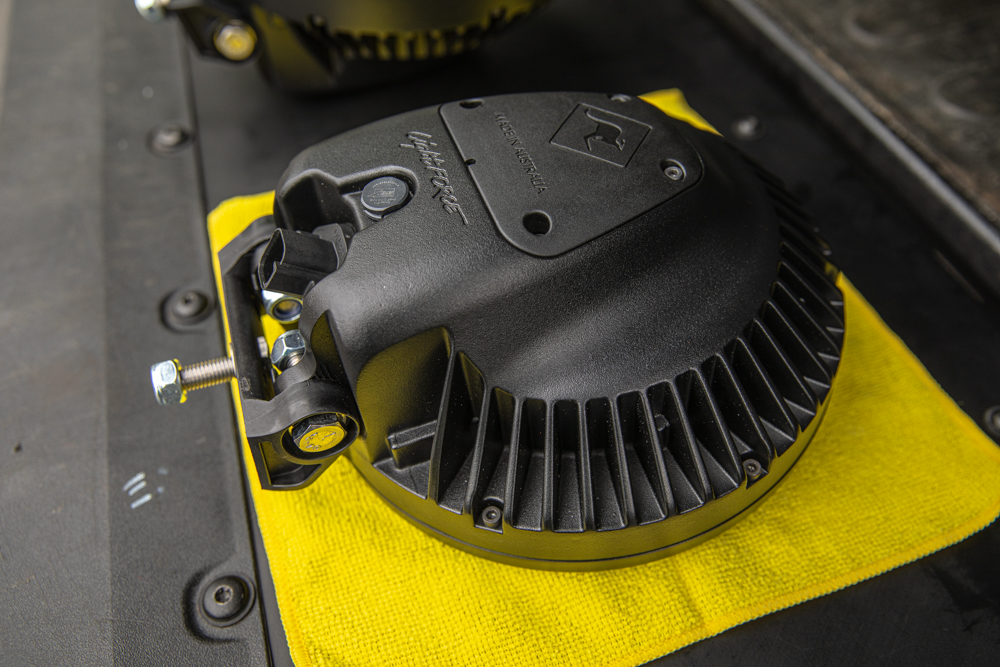
With a brand new seal design, the lights are better than ever. The HTX2s also feature a completely integrated waterproof plug. Pair that with the Genuine Gore membrane and seal, the HTX2s exceed IP68 and IP60K requirements. This means this set of lights is totally dustproof, can be completely submerged and they don’t flinch under high pressures.
The technical details…
- Sturdy one-piece aluminum housing
- More surface area for heat dissipation
- Thin design
- Light profile is compatible with crash detection/avoidance systems
- Different filter options
- True 5000K OEM spec Phillips D1S HID Bulbs
- German OEM spec Osram ballast
- Shielded cables
- All-new seals and waterproof plug
Technical details continued…
- Water protection surpassing IP68 and IP69K
- Updated pre-treatment and UV stable finish
- Solid, reversible mounting points
- Simple HID bulb replacement
- (20) Domeless 5000K Lumileds Luxeon ZES LEDs
- Reduced glare
- 1 Lux @ over one mile, .25 Lux @ over two miles
- Excellent CRI (70)
- Voltage and thermal protection
- Detailed installation instructions
Installation

The installation will vary depending on how you decide to wire and mount your lights. If you do choose to use what Lightforce provides, you’ll have everything you need to get your lights working.
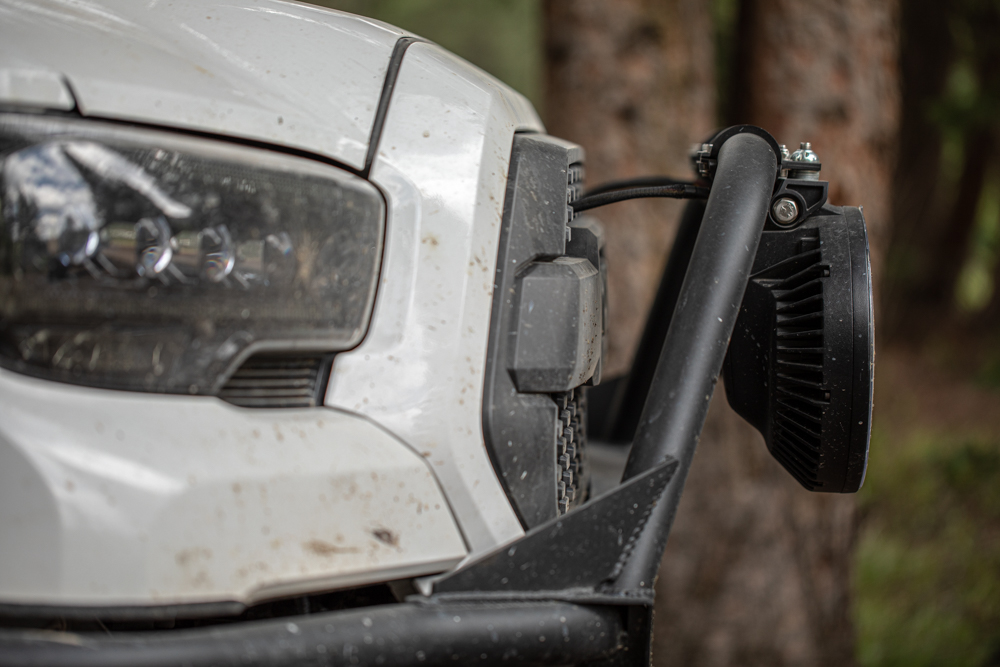
I have a Trigger Controller Six Shoot Accessory Control Switch System. It’s basically like a Switch Pros controller, just a budget-friendly version. It makes it super simple to add lights, etc. to your rig. I also decided to mount them somewhat unconventionally, since the RRW front bumper I have didn’t have enough room to mount them on the body of the bumper towards the bottom of the grille.
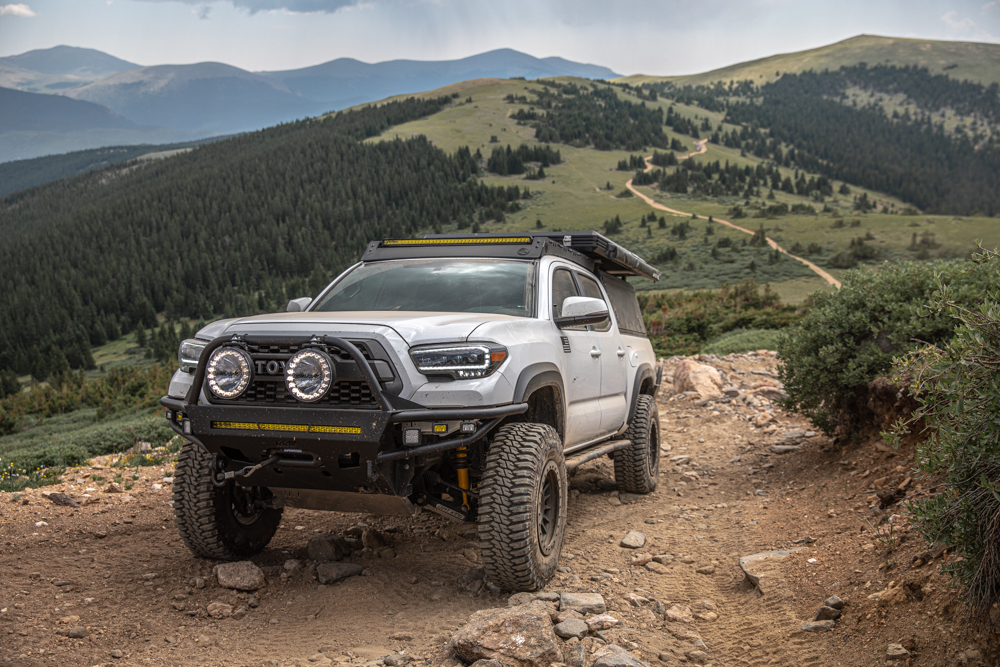
There were two options for mounting. Either weld a set of tabs to the bumper to accommodate these lights, or make a somewhat custom bracket using a tube clamp. I went the tube clamp route. One, I didn’t want to deal with welding and painting the bumper, and two, I’ve never seen anyone else run a set of light this way on a Tacoma. The Tacoma has a huge front grille, so I knew the HTX2s would be right at home. I have the high hoop version of my bumper too, so the tubing was a perfect spot to mount the lights.
Let’s dive into the installation process, and then I’ll touch on my experiences and review.
OD Tube Clamp
First things first. I needed to mount these to my bumper.
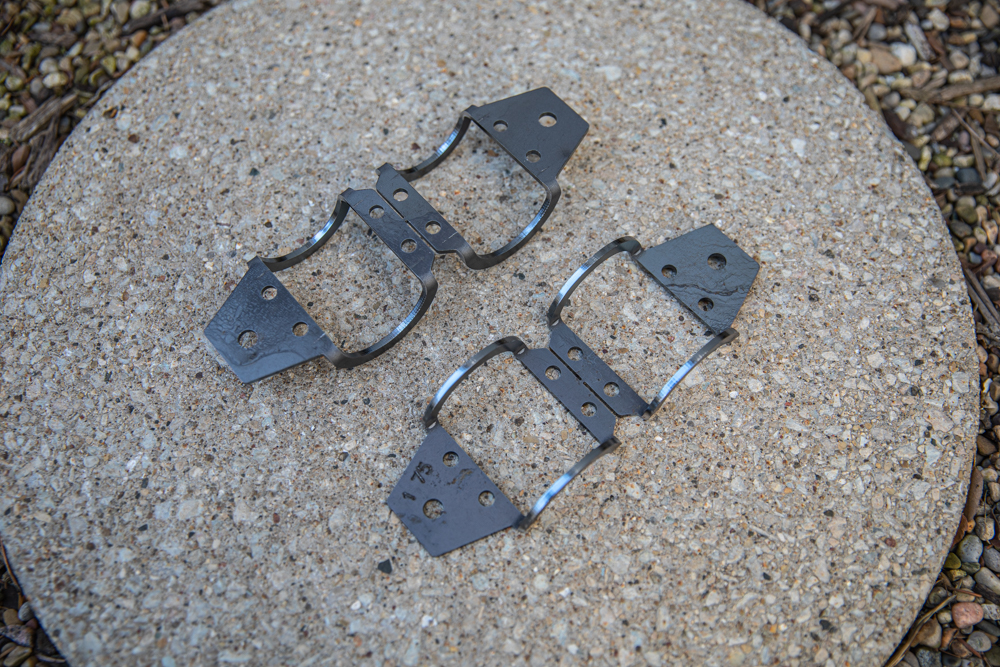
I spent quite a bit of time looking for a solid set of tube clamps. There is a lot of junk out there. I would have thought a quality set of tube clamps would be easy to find, but most of them were junk from China. I finally found these clamps from Ballistic Fab and I immediately knew this was what I was looking for.
These were the 1.75 OD, the same size as the DOM tubing on my front bumper. Ballistic Fabrication sells several other sizes for other applications.
Step 1. Prepping & Painting Tube Clamps
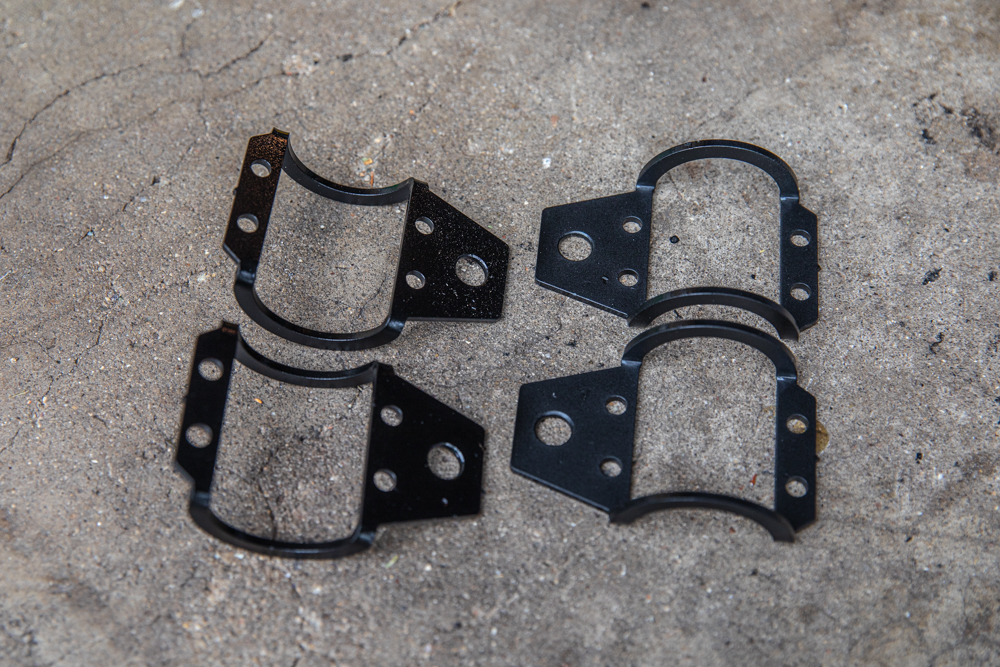
I was going to use some Steel-It to paint these, but I ran out of time before our Colorado trip.
I properly prepped them as best I could, and hit them with a semi-gloss rattle can. I think they came out great. Before I forget, I also had to slightly drill out the holes where the lights would mount, since the bolts used to mount the lights were fairly large. No big deal, it was a simple fix.
Find It Online
Step 2. Mounting Tube Clamps to Front Bumper
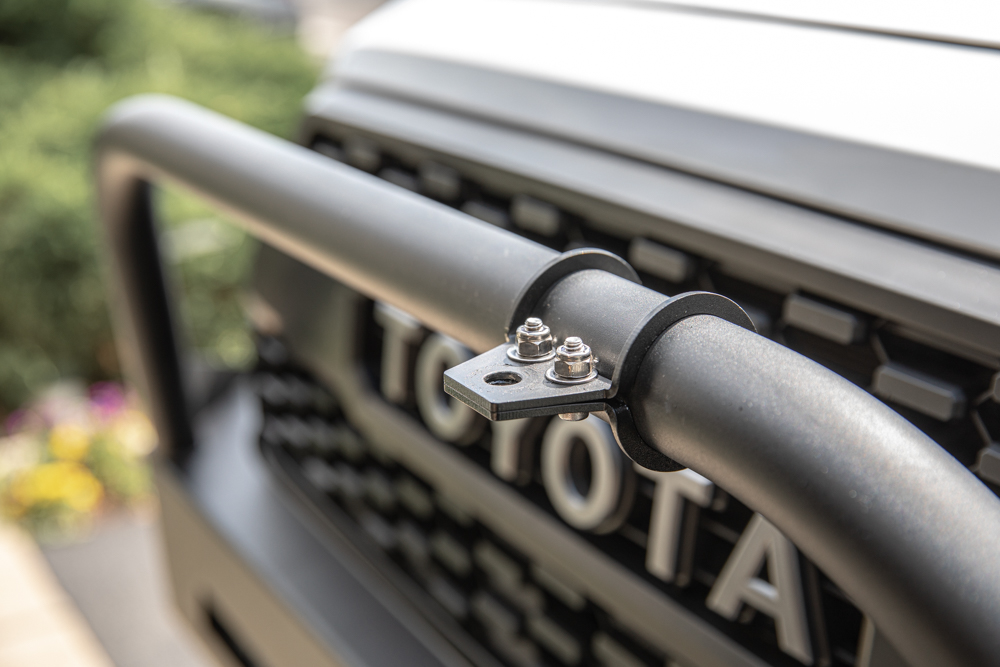
Pretty simple step. I just had to measure out the exact distance for the mounts, so that the lights were properly spaced.
If you decide to use these clamps, know that you’ll need to buy the hardware to mount them as well. Each clamp will need 4 bolts, plus the nuts and washers. Once I tightened these down, I knew they weren’t going anywhere.
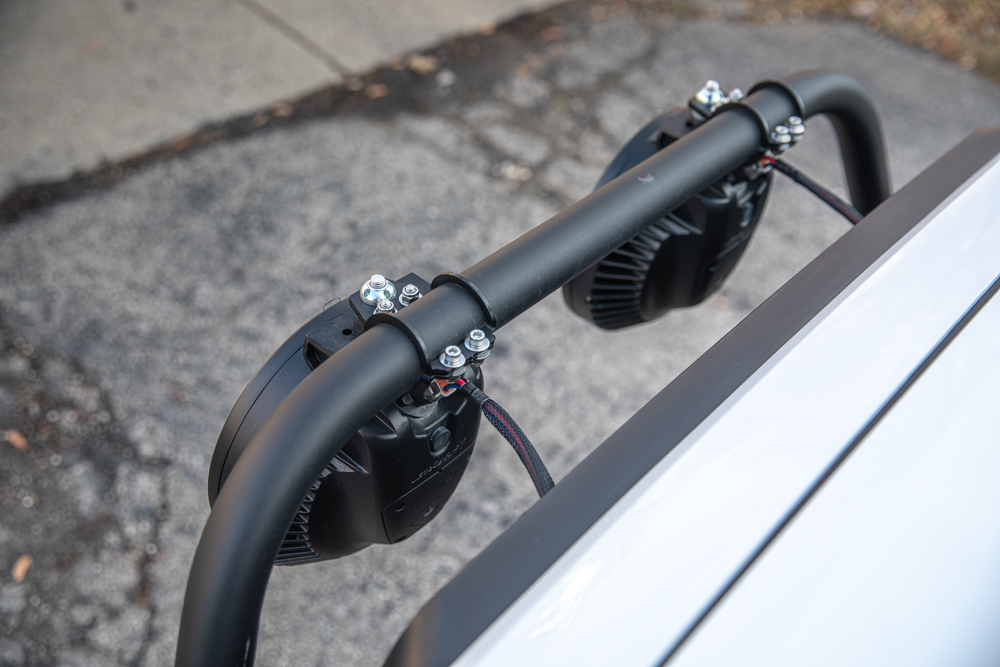
Step 3. Mount HTX2s to Tube Clamps
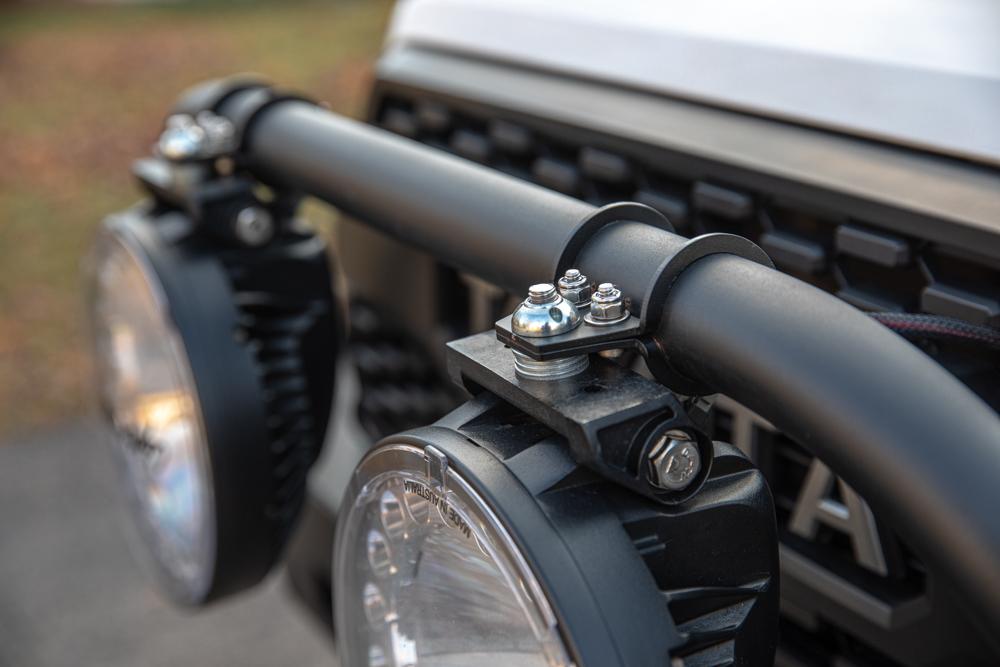
Another easy step. This time, I had to think quickly because it turned out the mount for the lights is so big, I couldn’t get the lights to sit flush against the tube clamp.
After another quick run to the hardware store, I stacked a few washers until I got the clearance I needed. Not the prettiest, I know, but the lights are so eye-catching I would bet no one ever looks at the way they are mounted, haha.
Before I move on, I wanted to quickly mention that this setup is not ideal. The lever arm created by the washers made the lights move around a decent amount, and eventually induced some stress fractures. My buddy and I decided to just weld it all together, straight to the bumper, to make sure I didn’t lose a light. I don’t fault the design of the clamps, these lights are just big, heavy and caused the mounts to flex excessively the way I mounted them.

As you can see in the previous image, I used the above Anti-Theft Security Nuts from Lightforce to mount the lights. I didn’t use all the components, since the HTX2s come with bolts.
Just a little extra peace of mind and protection from thieves. I will say though, with my fancy mounting system, it would probably take someone an hour just to tear these off the truck. Lol.
Step 4. Running Wires into Engine Bay

Once I had the lights mounted, it was time to run the wiring. The wiring harness for these lights is very clean, and well put together.
My wiring was relatively simple because I was running these lights to my switch controller – a Trigger Controller Six Shooter. This little gadget makes wiring a literal breeze. More on that in a second.
I first ran the wires through my TRD Pro Grille, from the back so I didn’t have to feed an excessive amount of wire, and out to the front towards the light. I plugged the harness in and added some zip ties to keep everything organized.
Step 5. Wiring Lights to Trigger Controller

The wiring harness is designed to work with relays, fuses, and a switch (all of which are provided). Since I wasn’t going to go the conventional route, I needed to cut the harness open. Basically, I cut the harness where the wires from each light were combined into one, for wiring purposes. Doing so reveals 4 different wires coming from each light.
Two of the wires are for the positive and negative from the LED portion, and two of the wires are for the positive and negative from the HID portion. Now is a good time to mention, the HID and LED portions run on separate circuits and are independently controlled. If you wire them traditionally, with the harness provided, you will need to also run two switches.

Since I wanted to connect each set of lights to one switch, I had to recombine them to work with the Trigger Controller system.
You can see above how I took the positive and negative leads and crimped them together with some butt splices. I then heated up the heat shrink at the exposed ends, followed by another larger piece of heat shrink where the four wires converged into one. As a final measure, I tossed a zip tie on each end of the connections.
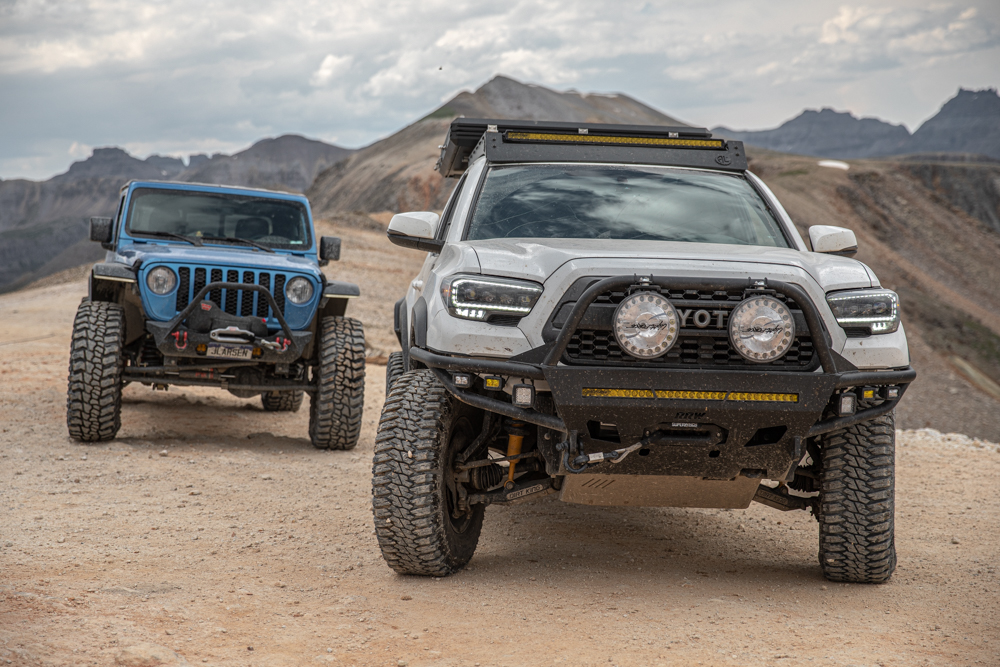
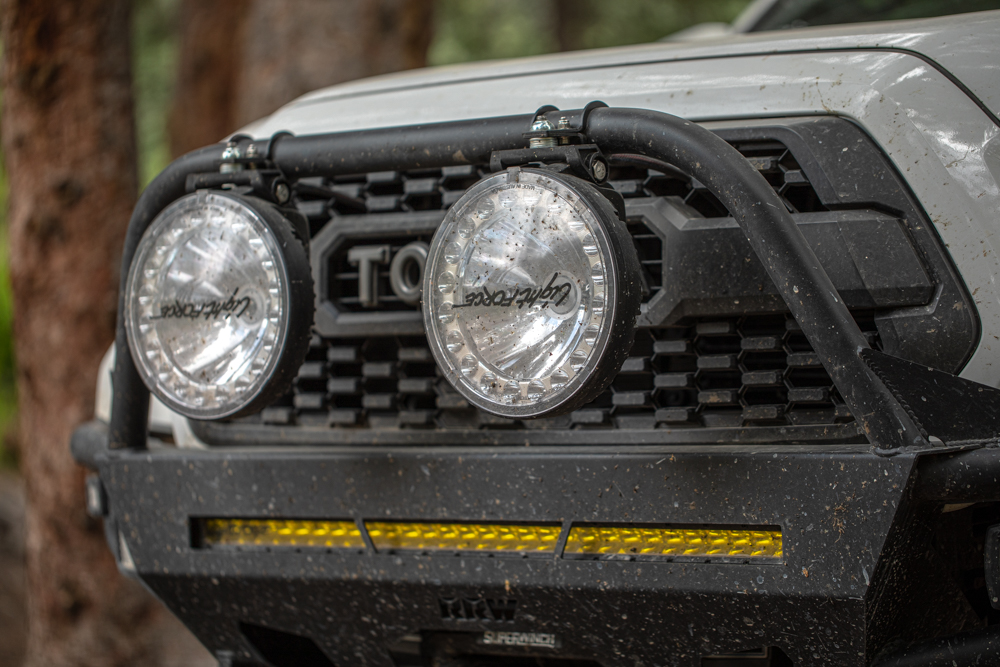
Installed HTX2 Lights – Front View
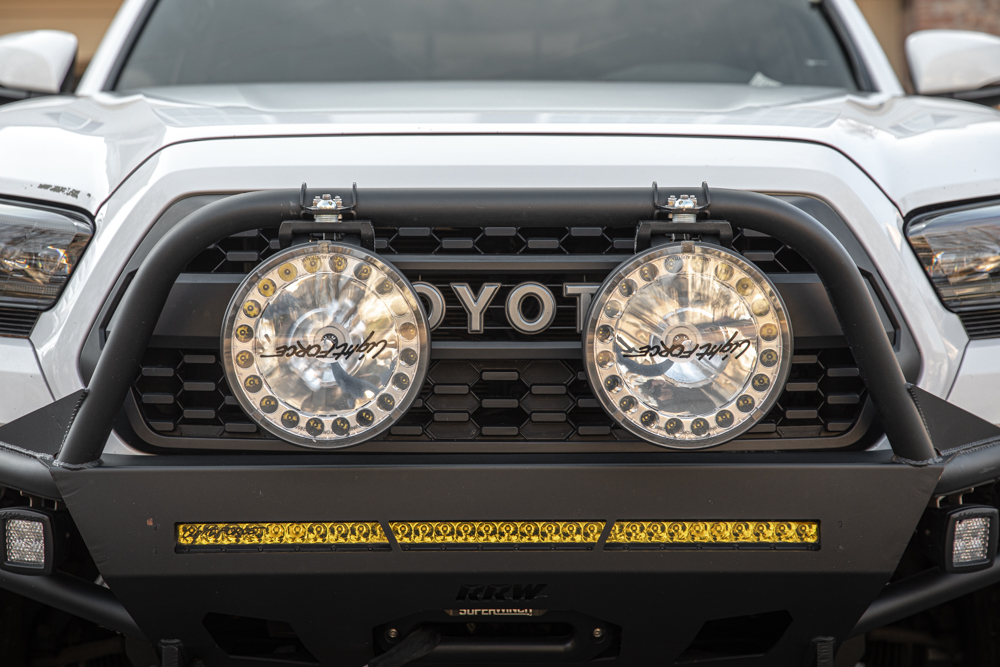
You’re probably wondering again, why are the filters upside down?
The filter is designed in such a way that the lights are really only meant to be mounted right side up. Now, I don’t think many people mount lights upside down, especially not ones that are this big. At least none that I know of. Point is, the light housing is designed that the filters only fit in one direction. I could try and make them fit, but I would have to grind off some of the inner plastic lip.
I didn’t feel the need to fix this and thought it was a funny detail regardless. Or at the least, a talking point.
Installed HTX2 Lights
HTX2 Output Shots

So of course, we gotta look at some output shots. Would this post be complete without them?
I’ll quickly run through the various outputs, as best as I can. The single biggest limitation here is finding a flat enough area to even allow the HID portion to show what it can do. I don’t know about you, but where can you go, that’s totally dark, and totally flat for a mile so that you can really test the distance? It’s a tough situation to replicate.
But we all know that (for the most part) we’re only going to use these lights at a maximum of a 1/4 mile, maybe a little bit more in a rare situation. So I did my best to replicate the light output over a reasonable distance. Below, you’ll see a series of output comparison shots. First, my AlphaRex NOVA Series LED Headlights, then the HTX2 LEDs, followed by the HTX2 HIDs, and finally, both the LED and HID together. The first series is on a wall, about 60 feet away from the truck, and the second series is focused on a tree line just under a quarter-mile away from the truck.
From photo to photo, the edits are as realistic as possible, to encourage an accurate dedication of output, and the camera settings were also the same.
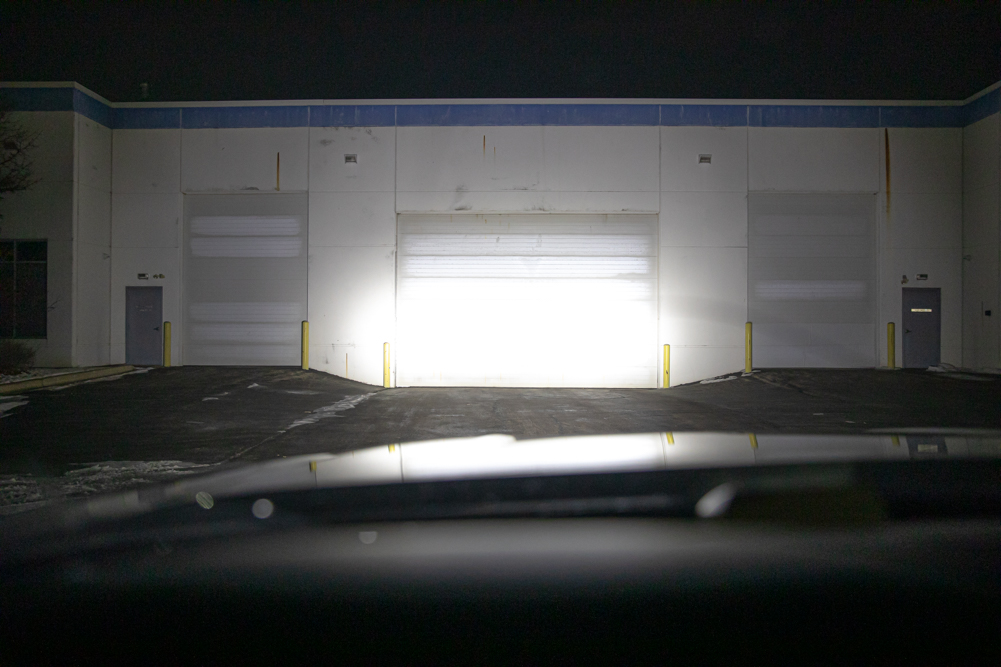
AlphaRex Output
I wanted to get some sort of a baseline to compare the Lightforce lights with – so I’m starting out each series with the AlphaRex lights. This one was on a large wall in a dark industrial park. All the first series images are from the same spot inside the cab.
These lights are an incredible aftermarket upgrade to the weak factory halogens/LEDs. Check out my AlphaRex install, review and overview post here.
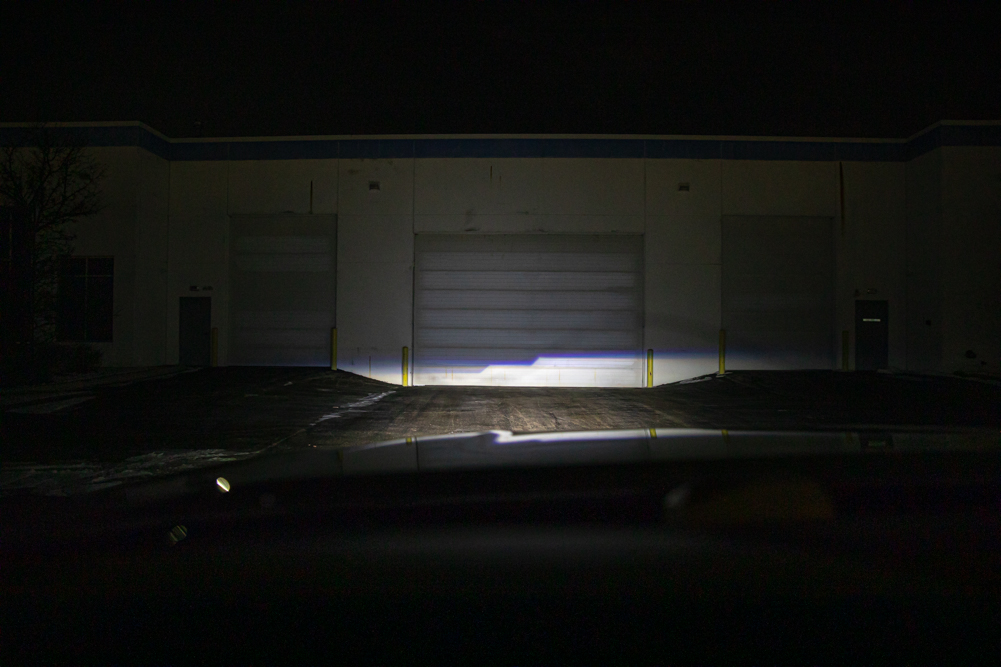
HTX2 Output – HID
Next up, the HID section. As you can see, the beam is extremely focused. It’s so bright, it washes out the design on the garage door.
This photo really doesn’t do the HIDs justice, nor is this the right application for them, but it’s still good to see how they compare. But yeah, the intensity is off the charts.
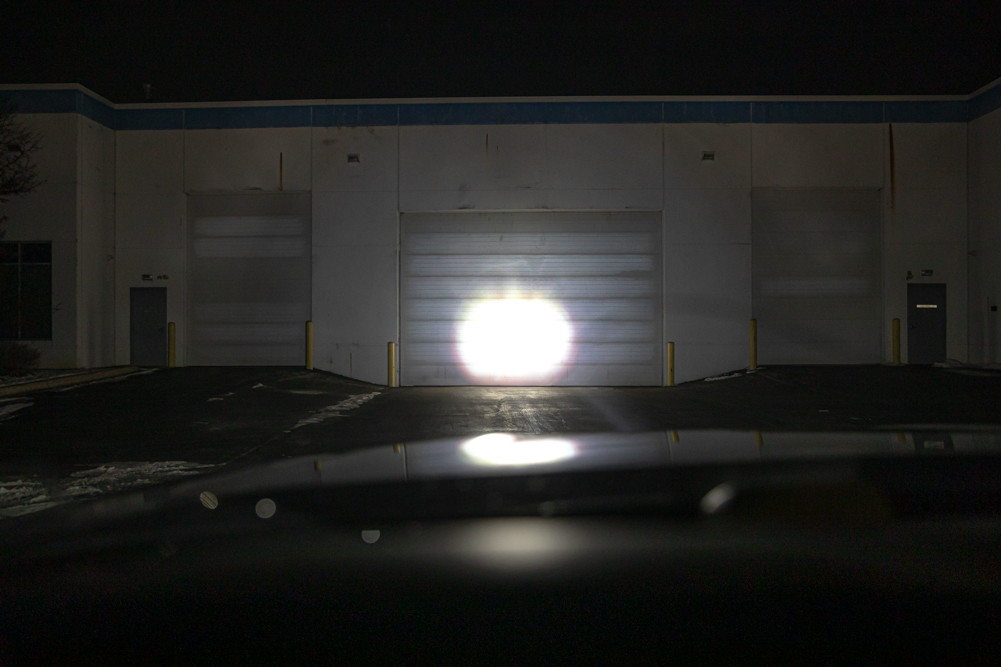
HTX2 Output – LED
Now we can move on to the LED portion. I think the image speaks for itself. Stupid amounts of light!
I would roughly equate each LED section, of each light, to a quality 20″ light bar. So about the same output as a 40″ bar, albeit focused a bit differently, obviously, due to the design.
HTX2 Output – LED & HID

Again, this image is more for reference. At first glance, it looks like the one above.
It really shouldn’t be too much brighter, at least in a photo, since the HID portion only adds more light output towards the middle. If you compare the image above side by side, you’ll see that the added reflection of the HIDs is lighting up the peripheral more than before.
AlphaRex Output (Long Distance) – LED
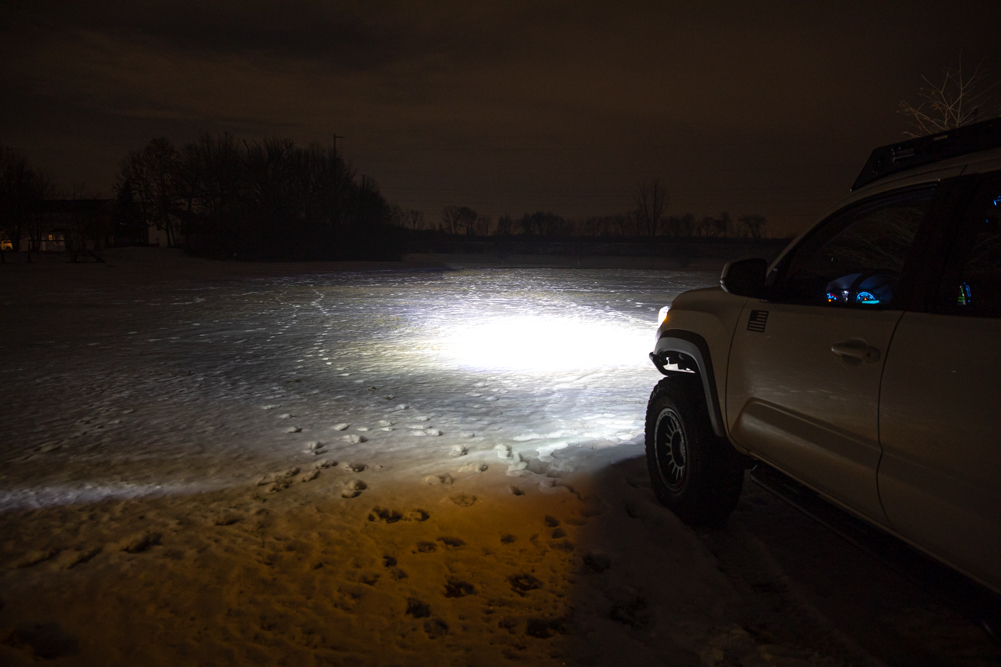
Moving onto an open field I found to grab long-distance output shots. First up for these, as a baseline again, the AlphaRex lights.
There was a bit of snow on the ground, but I felt that it only helped to highlight the output. These headlights pack plenty of punch too, but let’s see what the Lightforce lights look like.
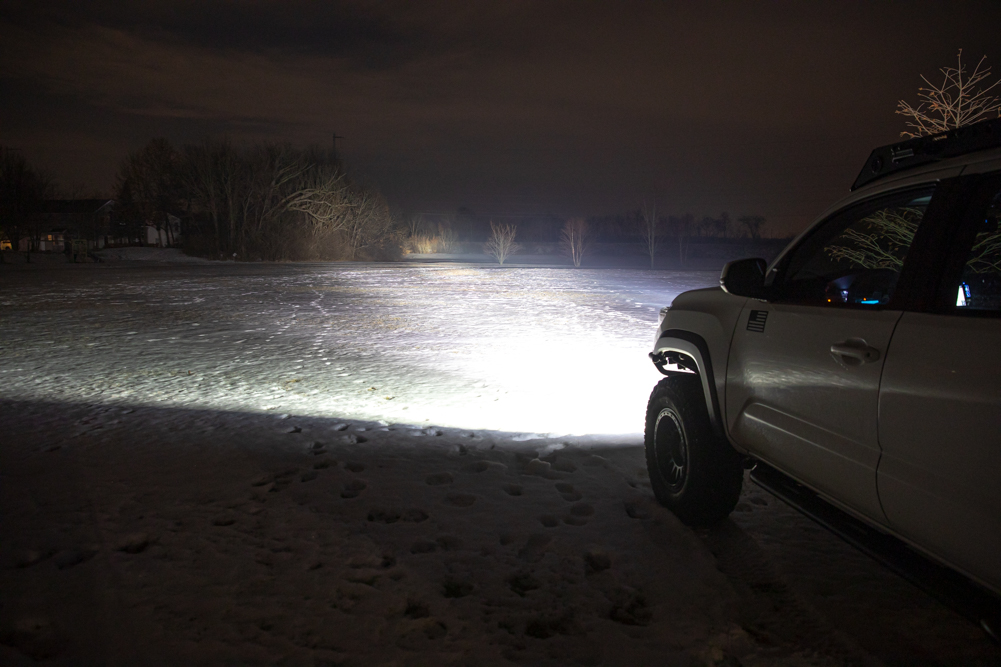
HTX2 Output (Long Distance) – HID
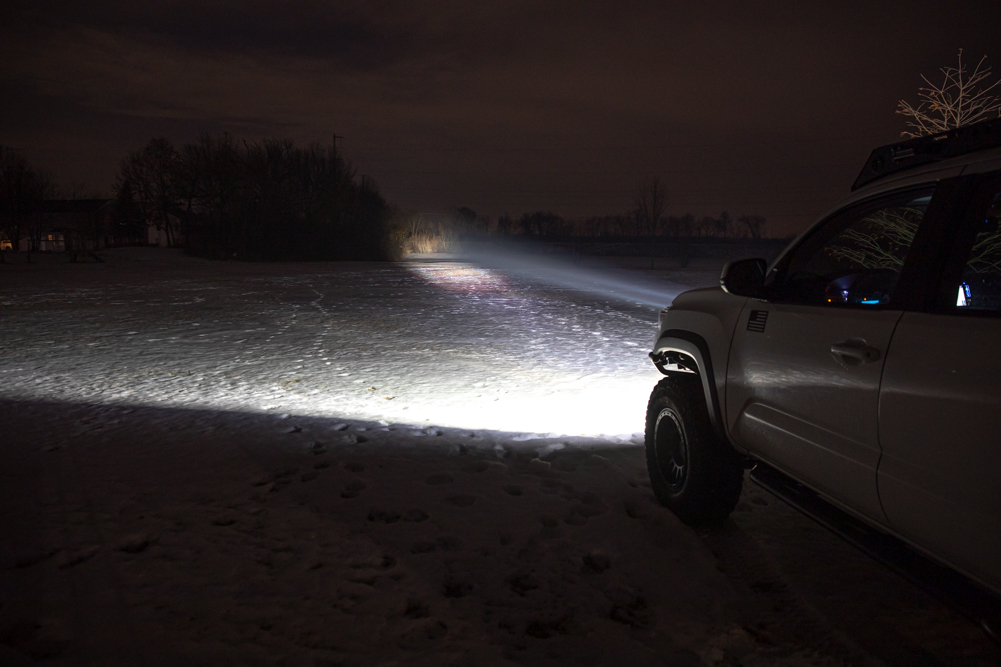
In this image, we can finally see the power of these lights. At just under a quarter-mile to the tree line near the end of the field, these HTX2s effortlessly light up the area. Just look at how dense those beams of light are. Wild. I feel like I could warm up on a cold night next to them, lol.
As I’m sure you can tell, there’s plenty of light in the distance. If these lights are this bright at a quarter-mile, imagine how much farther they can effectively reach. That claim of almost one mile of usable light starts to make a lot more sense. The HIDs throw some light up close, even if that’s not their main intention.
HTX2 Output (Long Distance) – LED
And the LEDs. So much light. It’s almost too much light – but that is impossible, haha.
But seriously, tons of close-range, mid-range, and even a fair amount of far-range light output. What more could you ask for?
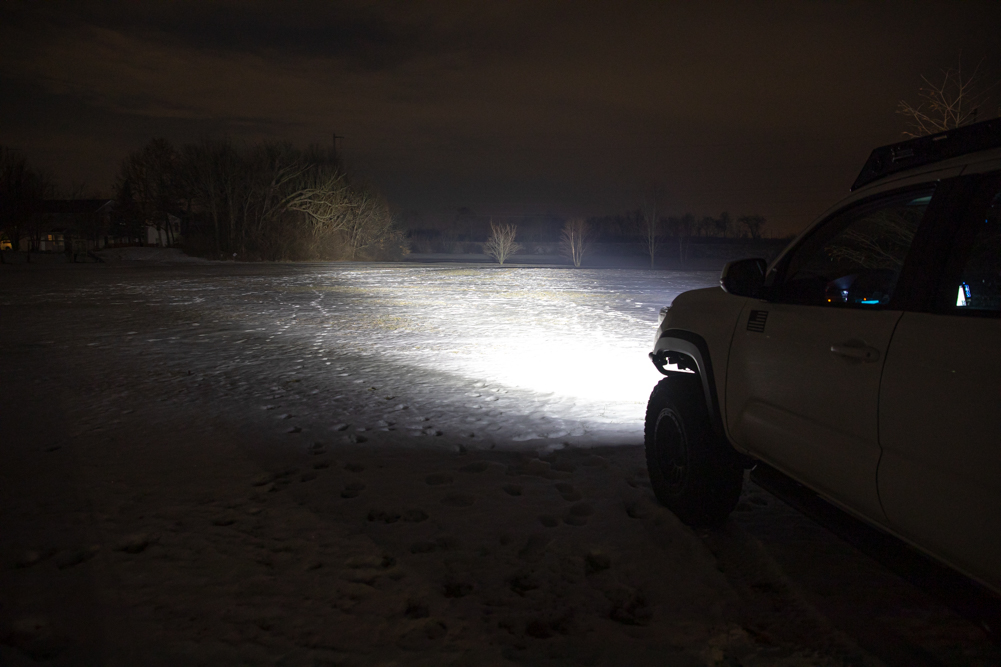
HTX2 Output (Long Distance) – LED & HID
And last but not least, both the HID and LED sections turned on at the same time. Much better perspective than inside the truck in a parking lot.
This shot is the money maker. It does the lights some justice, but in person, the output is literally jaw-dropping. Show me a brighter set of lights!
Long Term Review

Man. Where do I even start? We’ve already touched on a lot.
I think at this point, you can tell that I was at least a little excited about these. I mean, each light is as big as my head, and probably at least twice the size of the largest competitor’s biggest light offering. And no one offers dual combination lights. With the HTX2s throwing usable light for well over a half-mile, I feel like I could even stop here. But seriously, I’m stoked and thoroughly impressed with these.
They never skipped a beat, not a single issue from ordering and receiving them, to running them for the past 6 months. I could continue to reiterate the satisfaction from owning one of the single best light options on the market, but the rest of the post speaks for itself. On a final note for this section, considering the combination of the LED and HID, this setup is like 4 lights in one. In terms of value, for the quality and output you get, it would be very tough (if not impossible) to find another set of lights that can beat the HTX2s.
Final Thoughts
When I first saw these lights, I was a bit taken back. They were absolutely gigantic and I had never seen a combination light with both HIDs and LEDs. It was truly something new. Having run these lights for several months now, over thousands of miles, in all sorts of terrains and weather conditions, I can say without a doubt – these lights are spectacular.
I could repeat what I’ve already said numerous times above, so I’ll keep this short. The HTX2s look great, perform even better and have the specifications and features to genuinely claim to be one of the best options on the market. They’re not for everyone or every build, but when you find just the right place and application for them, these lights won’t ever leave you disappointed. And on that note, you should go buy a set, trust me!

Your FLAGSHIP COMBINATION HID & LED OFF-ROAD AUXILIARY LIGHTS seem incredibly versatile. Could you provide more details on how they compare in terms of brightness, durability, and energy efficiency compared to traditional off-road lights? I hope you will reply soon!
Those light forces are huge! Looks great on the truck.
They’re massive! But I love them. Haven’t seen a single other truck with these mounted.
Nice write up Konrad. I have the same lights in my 2019 Tacoma. I was curious what your solution was regarding wiring of the lights to a switch. I did not like the 2 cheap switches included in the extra harness kit and installed the Toyota Dual Lightforce Switch. The switch to control both LED and HID output correctly, but doesn’t light up like the rest of the dash buttons. I’m wondering what your switch solution was, were you able to get your switch to light up like the other dash buttons, and if so, how? Thanks again for your… Read more »
Thanks, George! Appreciate you.
I used a Trigger Controller 6 Shooter switch system. Makes wiring a breeze. I got mine from Spirit of 1876. It is similar to a Switch Pros system, if you are familiar, just a budget-friendly alternative.