

One fantastic upgrade for your off-roading rig should be a snorkel. Snorkels aren’t just for the most hardcore water-crossing adventures. They also provide clean air in dusty conditions – whether on the trail or on the highway. They do this by taking in the air above the normal grade of junk kicked up or spit out by other vehicles. This makes life easier on your engine. There’s also some anecdotal evidence suggesting they may help with mileage and power. They also look aggressive and adventurous!
As I was researching popular brands, I came across Airaid’s newly released snorkel for the Tacoma. Between the clean looks and the company’s respectable history, I decided to go with their intake, and I’m glad I did.
Find It Online
- Airaid Snorkel Kit: Check Price
Table Of Contents
Why Airaid?

First, Airaid is well-known in the wider motorsports world for delivering high-end air performance products for vehicles from dirt and trail to street and track autos. They pour countless hours into the dyno and field testing their equipment for maximum capability and durability across a variety of platforms and environments. Designed and fully made in the U.S., all of their products come with a “no-hassle” lifetime guarantee.
Second, the trim and contour just look awesome. Looking sharp is half the fun. So, I pulled the trigger and a few days later got a huge box in the mail.
Tools & Materials

- Mechanic’s Tool Kit
- Ratchet with extension
- 10mm socket
- 12mm socket
- 8mm wrench
- Flat Head Screwdriver
- Diagonal cutters
- Electric Drill
- ⅛” drill bit
- ¼” drill bit (optional, see step 6)
- ½” drill bit
- 4” circle/hole saw
- 4mm Allen
- Paint pen
- Dremel tool with metal cutting disc (optional)
Installation

Step 1. Stock Intake Removal

First, pop the hood and disconnect the mass air sensor, stowing it to the side.

Next, loosen the clamp ring’s 10mm bolt in order to disconnect the factory vent line from the air filter box.
Then, remove the lid of the air filter upper housing by releasing the two clamps on either side.

Now, use the 12mm socket and wrench with extension to remove the three bolts that secure the bottom of the air filter housing.
Remove this housing from the vehicle.

Disconnect this portion of the housing from the main box. Your rubber flex duct will attach in place of it.
There’s a tab on one side that depresses to release this extra piece. You will not be reinstalling it.
Step 2. Fender Flare Removal

Next up, the passenger fender needs to be removed.
First, remove the five 10mm bolts (or Philips screwdriver) that hold the fender in place.

Pop the fender off with some wiggling and pulling.
If any clips break during this process, they has included new clips you can use when reinstalling. (Sorry that my truck is so dirty!)

You’ll also have to remove or loosen a portion of the fender flare or liner. You do not need to remove all the clips. Only remove the ones shown as removed above. Do so by cutting them with the diagonal cutters. There are included replacement clips for reinstallation.
The fender liner itself can be easily bent away while working in the empty cavity above it. This is the preferred option, since most of these clips will break upon removal and Airaid doesn’t provide enough replacement clips for all of the OEM ones.
Step 3. Drill Holes

Now it’s time to start cutting your Taco! This is the point of no return!
Cut out the template provided in the instructions and tape the two pieces together. Align the template on the front fender as shown and tape it onto the truck to secure it in place. This will guide your pilot holes, so be careful to get the alignment right.
Next, affix the ⅛” drill bit to your drill and drill out a pilot hole at each of the four locations on the template. Afterward, you can remove the template for the next drilling.

Now drill the three outer holes to ½” for the snorkel mounting and the center 4” hole with the hole saw. Be careful with this larger hole saw. The sheet metal is uneven and the saw will pull and rip rather than cut smooth if you drill too slowly or at odd angles.
I recommend cutting partly with the hole saw to get the initial area outlined and then using the Dremel rotary tool to finish the job (wear some goggles when using the Dremel as it will throw metal pieces).

Once all the holes are drilled, use the Dremel or a file to remove metal burrs from the cuts.
Then, paint over the exposed metal to avoid corrosion down the road.
Step 4. Prep Snorkel

Now it’s time to get the snorkel ready for installation.
First, peel off the paper backing from the cushion pad and align and install it onto the underside. Be sure to follow the contours and get every part to stick well.

Next, install the three M6 studs onto the snorkel’s underside.
Be sure to put a good bead of blue Loctite on the studs first. All you need to do here is hand tighten the studs.

By the way, I’d recommend working with the snorkel on some cardboard and not directly on concrete.
I found it can scuff up quite easily on a rough surface.
Step 5. Installation without Roof Rack

This is not my truck, but I’ve included this section for those of us not running a roof rack.
If your truck does not have a roof rack, then you’ll need to mount the snorkel directly to the truck’s mounts underneath the weatherstrip on top of the truck.

Simply peel up the weatherstrip, poke two holes through the sealing tape, and install the Snorkel Mounting Bracket with provided screws.

It’d be wise to put a bead of silicone around these weather strip mount screws to prevent water from leaking into the truck.
Replace the weatherstrip. Now, go to the snorkel head section of Step 6 to finish this portion of the install.
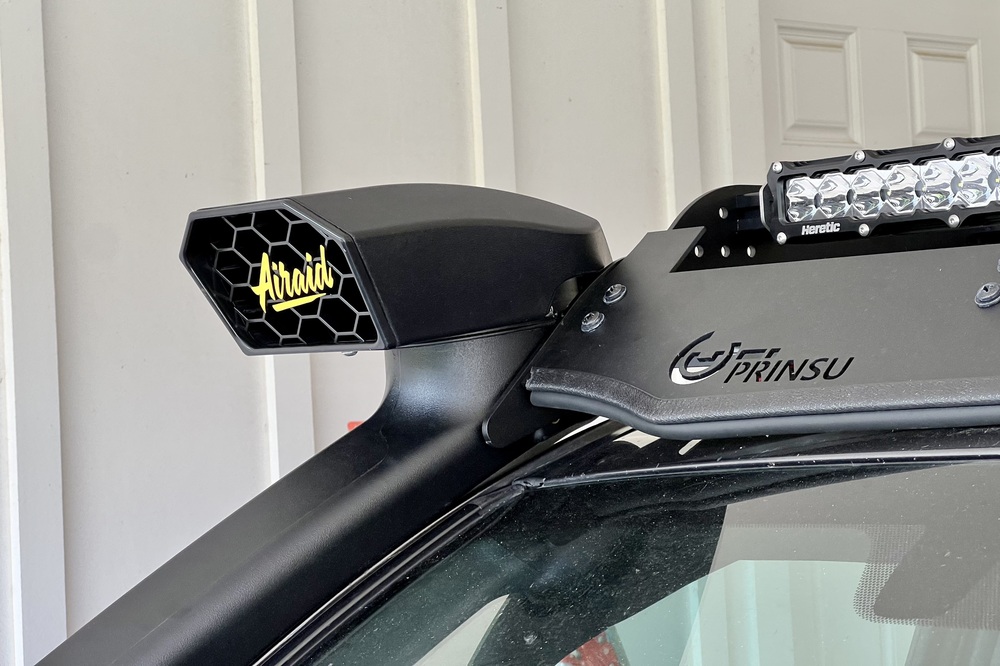
Step 6. Installation with Roof Rack

If your truck has a roof rack installed, you’ll want to read through this section. My truck has a Prinsu Roof Rack, but the Airaid does not naturally secure to it or to the truck with the supplied Mounting Bracket.
I also want to note here that the Desert Air Intake Compatible Roof Rack from Prinsu doesn’t make a difference. Prinsu’s Desert Air Roof Rack was designed for the TRD snorkel and it won’t align with the Airaid version (see image below).

But don’t worry, it can still fit and be secured with either version of Prinsu’s Roof Rack.
Here are the three ways you can secure with a roof rack (I chose the third option):
- Install the Mounting Bracket underneath the front right (passenger side) Prinsu roof rack mounting spacers. Sam (@rcky.mtn.yota) did this for his install. He said that you need to bend the bracket mount a bit to get it to fit alongside the Prinsu Roof Rack. I chose not to go with this option because the Airaid naturally seems to fit flush alongside the Prinsu Roof Rack. So, I didn’t want another mount and bolts protruding here. However, Sam said it works well for him and is definitely a good option.
- Secure the snorkel column section to the truck column with Double-Sided 3M Foam Tape. Simply note where the it makes contact with the truck and apply the foam tape to this area. I have seen guys with this setup on their rigs perform just fine. The other bolts securing the body to the truck fender will combine with the tape to provide a positive hold. Honestly, the reason I didn’t go with this option is that I prefer the mechanical bond of a screw or bolt over gluing/taping where possible, which leads me to the next option.
- Mount the it directly to the Prinsu Roof Rack by drilling a hole into the snorkel where it contacts the roof rack’s bottom mounting bolt (indicated below). Korey (@kb.toys10) went with this option. He said the process isn’t that difficult and has held strong for several months now. This is the option I chose as well. Here’s how it worked.

In order to do this, you’ll need to mount the snorkel and mark where it meets this bottom bolt (indicated above) on the Prinsu wind deflector.

Close up #1.

Close up #2.

Then, take the snorkel down and drill out this mark with a ¼” drill bit.

Then, remount the snorkel and feed the roof rack’s bolt through the insid into the wind deflector’s mounting location.

Close up #1.

Close up #2

This secures the snorkel to the roof rack directly.
I also used rubber washers on the bolt inside and outside to make it waterproof and so that I won’t have any metal rubbing on plastic. This setup fits securely.
Whether you went with step 5 or step 6, now it is time to fix the head atop the snorkel using one of the larger clamp rings and an 8mm wrench or flat head screwdriver.
Step 7. Air Duct Setup

Washers needed to secure the snorkel are seen above.

With the last portion out of the way, you can now secure the bottom body of the snorkel to the fender by installing the rubber washers, fender washers, and 10mm flange nuts. Make sure the rubber washers are touching the metal fender.

Maneuvering the rubber flex duct can be tricky, so your manner of getting it into the open cavity may vary.
The smaller end fits onto the snorkel duct and the larger end needs to be fed into the engine bay where the air filter box had been poking through.

The rubber flex duct should protrude into the engine bay as shown above.
Note the slots cut out on the flex duct. They should align with the slotted grooves on the OEM air filter box shown below.

Align the air filter box with the slots as you see here. Secure both ends with the clamp rings provided.

Finally, patch up and reinstall the parts you removed and you are good to go! Now let’s get that snorkel on the trail!
Final Thoughts

Everything about the Airaid snorkel speaks shrewdness and attention to detail. The curvature of the head, the lines of the neck, the serrations on the body. Just looks sleek and sexy.
Performance wise, as soon as I got it installed, I ran through some dusty sand pits, industrial areas, and bumpy trails. I heard no rattling or wind noises, and it is still fitting snugly. I removed the air filter box and found it clean.

I mentioned earlier that there’s some anecdotal evidence that snorkels improve your mpg and/or power.
The reasoning is that the engine is now getting truly “cooler” air and also rammed air. While this is disputed, here is my experience: I had little to no change in mpg. I also saw no noticeable change at low speeds.

However, at 50+ mph in 5th or 6th gear, the truck seems to be able to accelerate quicker and easier than normal.
To put it in practical terms, previously, if I was already going 55 mph and wanted to pass someone, the truck would be sluggish to accelerate. But now it seems like it’s got some real pickup even at these speeds. This makes sense considering the rammed air theory.

Overall, I have an on-point, trimmed-out design that provides better, cleaner air intake to my Taco’s engine.
Aesthetics is to form as performance is to function. And Airaid brings both into one great package.

Hi, I bought an Airaid snorkel for my used 3.5L Toyota Tacoma, but I don’t have the template. Do you have it? Could you sell me a copy?
Do you think this will work with an UpTop Overland rack? I’ve been searching and searching.
Sorry, I just read below. Please ignore the above comment.
Great article!
I’m going to try to put this snorkel on a Taco that has the UpTop Overland roof rack. My room rack is about 3 inches wider than the Prinsu rack.
With my rack being a little wider, it’s going to push the snorkel away from the A pillar some. Do you think that’s going to be an issue getting it installed?
Thanks! The snorkel fits flush against the Prinsu Roof Rack. It also follows the curvature of the side column (the part of your truck next to the windshield leading up from the hood to the roof). So, if your rack extends outward, it might push the snorkel away from the truck too.
I’m expecting my rack to push the snorkel aprox 1-1.5 inches from the truck. Do you think that would danger the structural integrity of the snorkel? Would there be any issues with the passenger side door opening fully?
Thanks for all your help!!!
Can confirm that this snorkel only works with a Prinsu rack unfortunately :(.
I had to return my UpTop Overland roof rack.
Last weekend, I installed the snorkel with my UpTop rack… The snorkel doesn’t hug the A-pillar like it’s designed to (it actually has a gap, which I was concerned about). But the snorkel still works, and it doesn’t hmmm while driving.
I’m using a 3 inch bolt screwed into one of the original snorkel threads. It pushes the snorkel out & up, to accommodate the rack and to open the door.
I’m still deciding if I’m going to keep it as-is, or take the rack off…
If you can secure the snorkel to the roof rack itself somehow, then the structural integrity should be fine. The snorkel itself is solid. It just needs to be bolted down up top somewhere. I doubt the bracket that comes with the kit will fit if your roof rack will push the snorkel out a little. The only issue might be the gap it’ll create between the truck column and the snorkel.
How does it work when it rains, and how does it not flood the air box with water? Also, have you had any issues with carwashes?
Hey man, yea I went through a car wash about two months ago and everything was fine. I wouldn’t do it again though, as the brushes and things rubbed really hard on the snorkel head. It might be a problem over time.
If you drive through snow or rain a lot, you can drill a few small drain holes in the bottom of the intake filter compartment. People usually do this with other snorkels as well.
Great article , answered my question about the compatibility of the air raid snorkel and the prinsu roof rack. Thank you sir , I’ll pass it onto other folks wondering the same thing.