

Have you ever just wished your truck had more cameras?
For most of us that answer is probably a no. I felt the same way until I went off-roading with a buddy who has the same truck as me (TRD Offroad) but the “premium” off-road package. His truck came from the factory with a front-facing camera and ever since I saw how well it works when off-roading I have been jealous.
I was able to find a solution that was affordable because we all knew getting it from Toyota would not be cheap. There is a kit you can purchase called the anytime camera kit that is offered for 2014-2023 Toyota Tacoma. That does have some crossover with the 2nd Gen. Not sure why it starts at 2014. This kit is a plug-and-play system that gives you the ability to turn your backup camera on whenever the truck has power. The kit also comes with an option to add their upgraded front-facing camera which can also be turned on at anytime the truck has power.
I know adding one to the front of your truck might sound silly, but once you see how it works you will want one for your truck too. When you are on the trail and coming up and over a hill, it’s hard to see what the trail looks like beyond your hood. With the front-facing upgrade you can turn the it on and verify if there are any obstacles you are about to face before taking the plunge over the hill. I’m sure there are multiple applications where it would come in handy but having the extra set of eyes on the trail is what sold it for me.
Features & Specs
- Control over viewing your backup camera
- Plug-and-play harness
- OEM style rocker switch to activate either front or rear
- Front-facing premium camera
This kit is compatible with select years of Tacoma, 4Runner, and Tundra.
Find It Online
- Anytime Camera Full Kit: Check Price
Table Of Contents
Installation

You can use this article as your guide to installing yours, or you can check out R4T’s install video at the end of this post.
Required Tools
- Power drill
- 5/32″ drill bit
- 5/16″ drill bit
- (optional) Flexible drill extension
- 10mm socket and ratchet
- Flathead screwdriver
- Wire crimpers
- Wire strippers
- Heat gun
- Zip ties
Step 1. Mount Front Camera

You first want to start off by measuring your front grille to locate where the center will be for the mounting location of your front camera. After locating the center point from left to right, you want to find the depth where to drill your hole so it is flush with the front of your grille.
Before drilling your hole, make sure you inspect the back side of your grille to see where the drill hole will come through. I will be installing my front camera on a TRD Offroad grill which will have a small amount of plastic interfering once it is inserted into the hole you drill. If you are installing this on a TRD Pro grille you will also have some interference but it will be a different design than the TRD Offroad grille. More on this later.
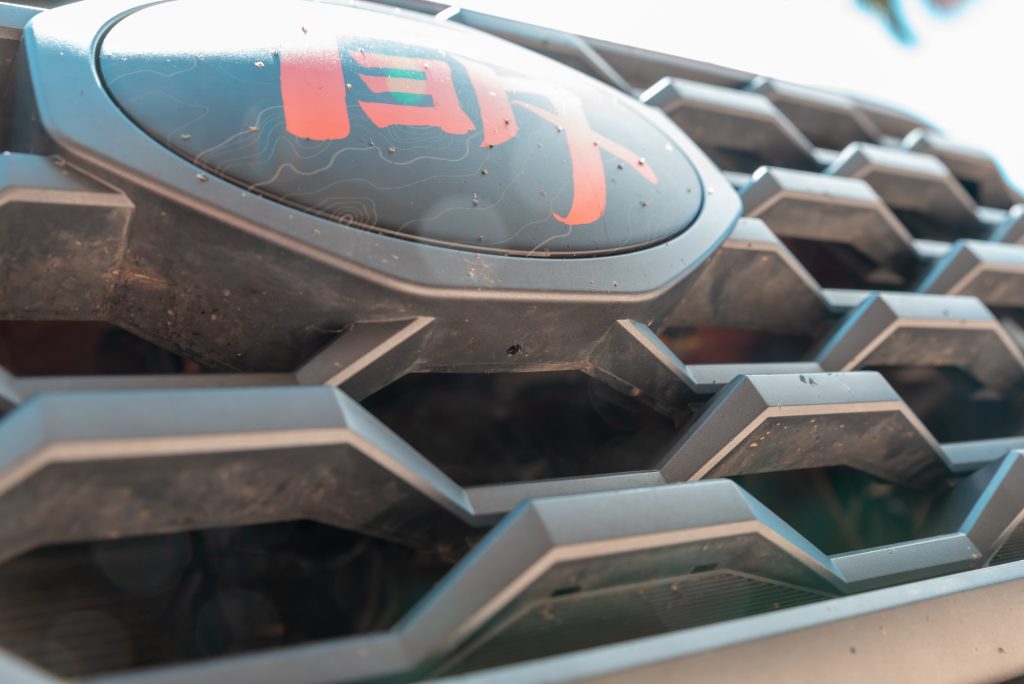
I started off by drilling a pilot hole with a 5/32 drill bit then I followed that up with drilling the 5/16 hole. Once you have your hole drilled, I found it easier to remove the grille to gain access to the backside so you can make some modifications to make the camera fit properly.

To remove a 3rd Gen Tacoma grille, you will need to unscrew (2) 10mm bolts and on either side, there are two push-pin style clips to pop up. Using a flathead screwdriver you can get underneath the clips and pop them up to take them out. Once the two screws and 2 clips are removed from the top of the grille, you can just pull the grille horizontally away from the truck and it will pop off.

With the grille removed I went ahead and had to do some grinding to a plastic tab near the TSS sensor that I found to have no use. Don’t judge my skills, I used a drill bit and a file to make this work because they are the tools I had available and I’m no expert at this. With the plastic knob on the TSS sensor area ground down, I was able to feed the camera wires through the hole and slide the nut over the wire harness and secure it to the grille.
Now that the camera is installed onto the front grille it’s time to route the wires through the engine bay for it to go through your firewall. I’m going to be using zip ties and running the wires along the TSS sensor harness, then I’m going to run the wires along the outer edge of the engine bay on the driver’s side.

After you have found a good route to run the wires you will need to feed the wires through your firewall into the cab of the truck. I found the best way to get wires through the firewall and into the cab is by using a metal coat hanger. Using electrical tape you will need to tightly wrap the tape around the end of the metal hanger with the camera wires inside of it to secure the wires onto the metal hanger.
After you have attached the wires to the metal hanger you need to locate the rubber grommet on the firewall that you can feed the wires through. On the driver’s side of the firewall, if you locate the power steering reservoir just behind it you will find the rubber grommet with a bundle of wires feeding through it. Using the metal hanger, you will need to gently poke the hanger through that grommet and push it through to feed the camera wires into the cab.
Step 2. Disassemble The Dash

The first trim piece you need to disassemble on the dash is going to be the plastic piece that is under the steering wheel. Starting on the left side of the steering wheel where your factory switches are you can gently pull back towards the driver’s seat to start the separation of the panel from the dash. After getting the left side out you will see this same piece goes under the steering wheel and on the right side of the wheel. You can then start to separate the right side until the whole top portion of the panel is separated.
On the bottom of this trim panel, there will be (2) Philips bolts holding the trim piece to the dash. You can leave these in because we won’t need to remove the whole trim panel, we just need to open the top portion to run wires through it.

The next trim piece to remove is going to be the trim pieces that surrounds the radio. This piece is just held in with clips, starting on the right side of the radio you can get your fingers behind the trim piece and pry back towards yourself until the trim piece pops off of the dash. You can take this trim piece and set it aside for now.

You will need to remove both the radio and A/C controls next. First, you will unbolt the (4) 10mm bolts that hold the radio in place, but you will not pull the radio all the way out. You need to remove the A/C controls so you will have room to let the radio hang while we do the wiring. On the top of the A/C controls there is a tab that goes under the bottom lip of the radio so the radio needs to be pulled out just slightly then you can remove the A/C controls.

To remove the A/C controls you just need to pry back on them and they will pop out of the dash. After pulling the A/C controls out you will need to disconnect all of the wire harnesses from the A/C then you can set the controls aside.

With the A/C out of the way, you can remove the radio from the dash. You won’t need to remove the radio completely, so I suggest grabbing a rag or some type of soft fabric to put over the screen so you can tip the radio forward and rest it on top of your shifter.
Step 3. Connect Anytime Wire Harnesses
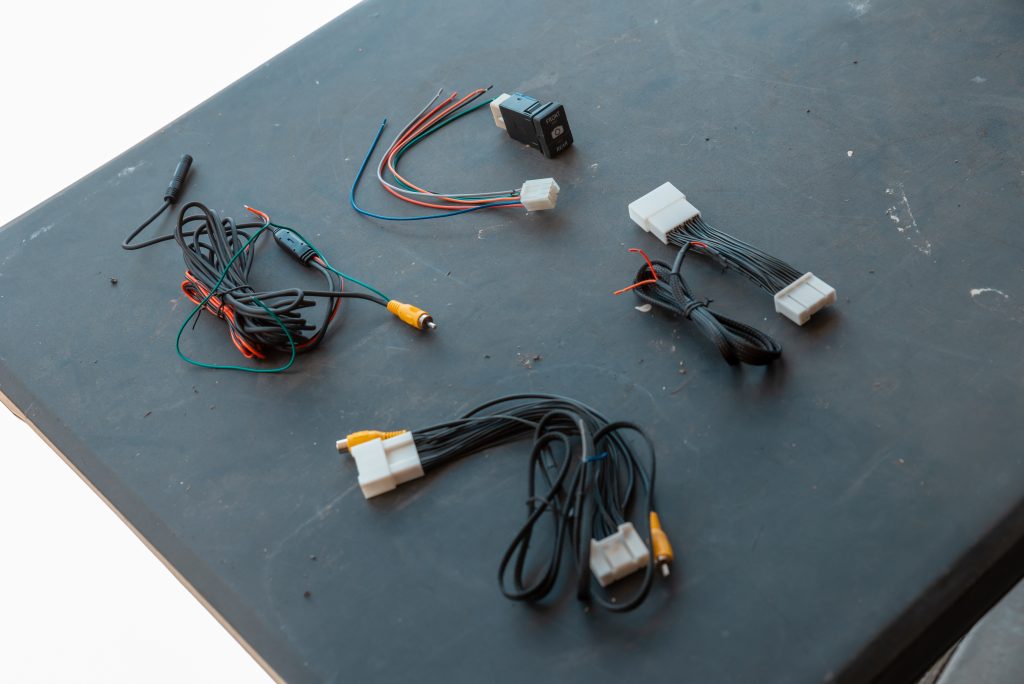
Above you will see a photo of all the jumper harnesses included in this kit. It might look like a mess at first but hopefully, my instructions and explanations can help this be a simple task.
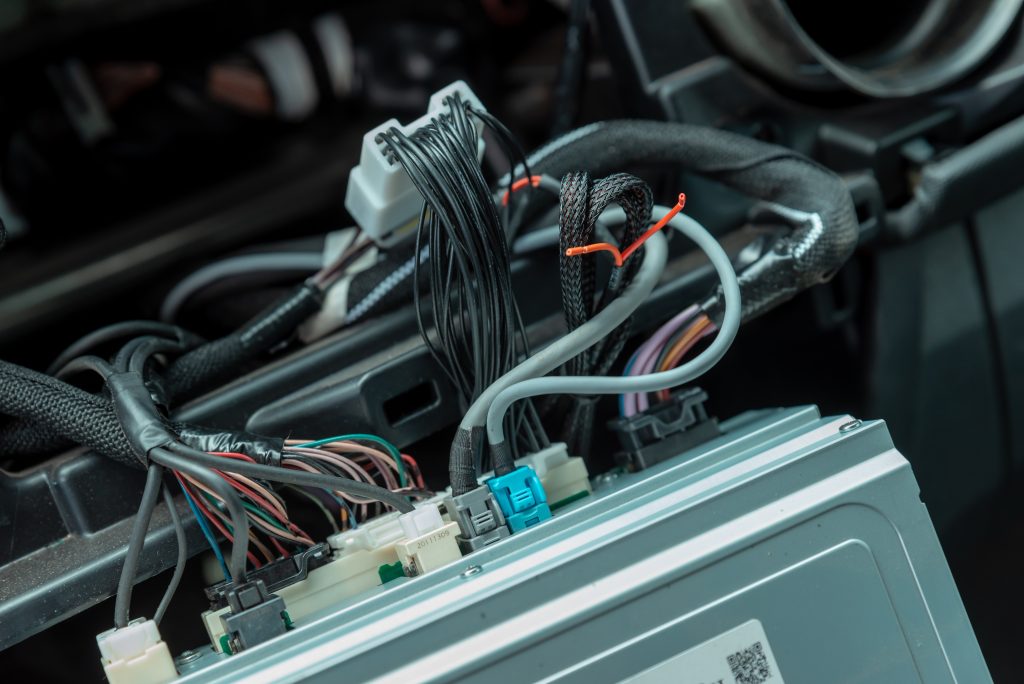
First, let’s take the jumper harness with the red and orange wires and connect this to the back of the radio. You will need to unplug the radio harness connector that is just below that blue and grey plug in my photo above. Then plug the red and orange jumper harnesses into that same spot on the radio. After you plug the red and orange jumper harness into the radio you can plug the factory connector you just disconnected into the other end of the red and orange jumper harness.
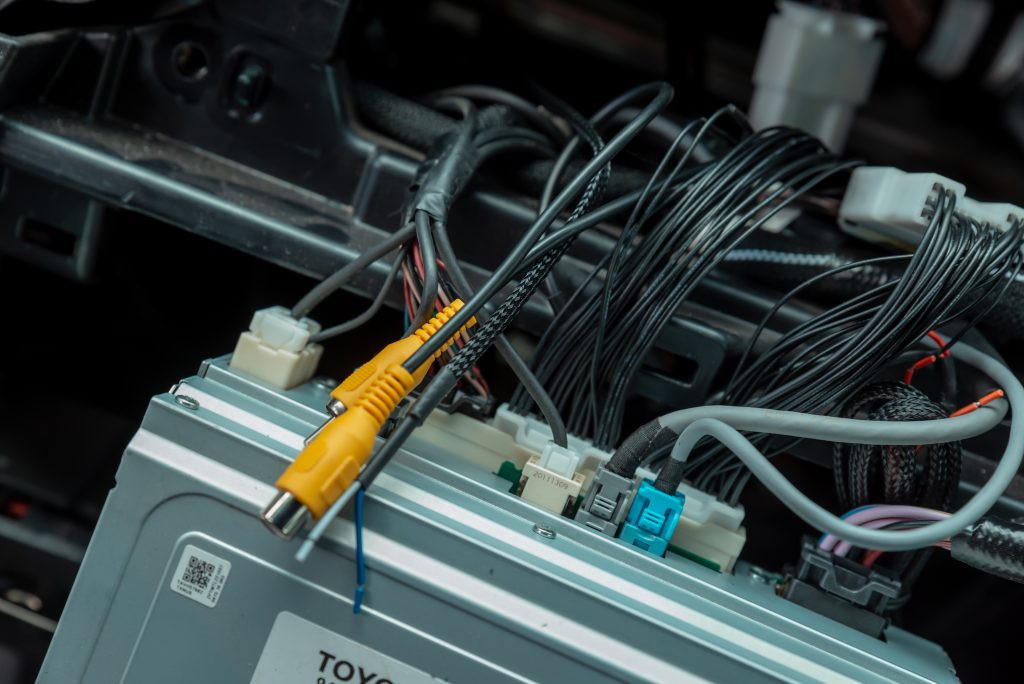
The next radio harness to disconnect will be directly next to the one you just plugged the red and orange jumper harness into. Same as we did for the last one you will connect the jumper harness with the two yellow RCA connectors into the radio and then connect the factory connector to the other end of this double yellow RCA jumper harness.

The next harness, which I forgot to capture in the photo of the wire harnesses above, is going to be the relay harness. The relay harness consists of a relay with 3 yellow RCA connectors along with a green and black wire coming out of it.
Take the female yellow RCA with the black Sharpie mark on it and connect it to the male RCA that is coming from the jumper harness with the 2 yellow RCAs we just connected to the radio. Then from that same jumper harness which now should have a single female yellow RCA available, connect that yellow RCA to the male RCA coming from the relay harness.

For the third and last yellow RCA coming from the relay harness, we will need to connect that to an RCA that is coming from the front camera we mounted. Go back to the wire harness that we earlier pulled through the firewall. We will need to route this harness through the panel below the steering wheel that we partially disassembled earlier.
Route the front camera wire harness under the steering wheel and through that lower steering wheel panel. Once you get the harness to the right side of the steering wheel you will need to route the harness through the dash so it comes out from behind the radio. Connect the yellow male RCA from the front harness to the 3rd and last yellow RCA from the relay harness.
Step 4. Wire Switch Harness

The last piece we have to connect to this kit is going to be the front and rear camera rocker switch. It does come in two separate pieces, the switch itself and the wire harness that the switch connects to. If you buy this Anytime kit from Runnin4Tacos (R4T) they will supply wire crimp connectors and a ring terminal connector for this step of wiring the switch.
For the switch wire harness, the wire colors are as follows:
- Red – 12v input
- Orange – Rear camera 12v output
- Green – Front camera 12v output
- Black – Ground
- Blue – Backlight 12v input
- Gray – Backlight ground

Take your first two crimp connectors and you’re going to be crimping the red and orange wire from the first jumper harness we connected to the radio. The other ends of those crimp connectors will connect to their matching colors on the switch wire harness, red connects to red and orange connects to orange.

The next crimp connection is going to give power to your front camera. Focus on these instructions and don’t let all the green wires confuse you. At one end of the crimp connector, you will crimp both the green wire from the relay harness and the green wire that is coming out of the yellow RCA on the camera wire harness. The other end of that crimp connector is going to be the green wire that comes from the switch wire harness.

The ring terminal connector is going to connect both of the ground wires together for one ground mounting location. One ground wire is the black wire coming from the switch wire harness and the second is the black wire coming from the relay. Twist both black wires together and insert then crimp both black wires inside of the ring terminal connector.

The last two crimp connectors are going to connect your last two remaining connections between the blue and grey wires. On the jumper harness connected to the radio with the two yellow RCA connectors on it, you will also find a blue and grey wire coming from that same harness. Connect the blue wire from that harness with a crimp connector to the blue wire on the switch wire harness. Lastly, connect the grey wire from the jumper harness and connect that with a crimp connector to the grey wire on the switch harness.
Now that we have all crimp connections done, using a heat gun or something similar, you want to heat up each crimp connection and the ring terminal to create a seal on each connection. All R4T supplied connections are made with a heat shrink material that creates a more secure connection when heat is applied to the connectors.

If you have the premium front camera, your camera wire harness will have a red and black wire coming off the harness inside of your engine bay. The red wire will not be connected to anything but the black wire needs to be connected to a ground location in the engine bay.
Step 5. Test The System

Just behind where the A/C controls are located when installed is going to be a bolt that is a ground connection. Using a 10mm socket, remove the bolt and connect the ground wire ring terminal to the bolt then reconnect the bolt to ground your harness.
Before we completely re-install everything it’s a good idea to test the system to verify everything works correctly. Grab your HVAC controls and connect the wire harness that is directly behind the power start button, just so you can turn your vehicle’s power on for testing. Now before you go pressing that start button, you also want to connect the Anytime Camera switches to the switch harness.
Pressing your start button once turns the truck’s power on, press the button a second time to place the truck into accessory power mode. Once your radio screen is powered on, toggle your switch up to activate your front camera. After verifying that it works, toggle the switch down to activate your rear camera.
Once your system has been tested and verified that your work was successful we can move on to finishing up the install. Unplug the switch from the switch harness, and you can disconnect the A/C controls just so we can gain access to the rear of the radio to clean up the wiring before installing the radio.
Step 6. Reassemble Dash

On my truck, I don’t have any free switch space available so I’m going to replace one of my existing factory switches to add my Anytime Backup switch. I’m choosing to install my switch in the location where the Blind Spot Monitor switch is. I popped the BSM switch out and then I just reconnected the switch to the connector behind the dash and then made sure the BSM switch was powered on. This way I don’t lose the ability of my BSM system I just can’t turn it on and off which doesn’t bother me. In the location where the BSM switch was, I installed my toggle switch.

Connect all of the wires back into the controls and then you can snap the whole control unit back into the dash. Tuck the wiring bundle behind where the radio will be installed and you can place the radio back into its pocket.

Once the radio is lined up in its correct position, you can install the radio by re-using the 4 – 10mm bolts you removed earlier. Make sure all 4 bolts and tight but don’t over-tighten them, you don’t want to cause any damage to the radio or the dash.

Grab the radio trim piece that has the two center vents attached to it and you can pop that back into place. Just be careful with this trim piece, you want to make sure all the tabs are lined up correctly before you go pressing on anything and breaking the plastic tabs.
The last interior piece to re-install is going to be the dash trim that is below the steering wheel. Before just snapping this piece back into place you are going to have some excess wiring from the front camera wire harness left over. I used a zip tie and bundled this extra wiring up so it wouldn’t get snagged or damaged behind the dash. After zip-tying this bundle of wires together, I zip-tied that bundle to the dash so it wouldn’t be moving around and causing any issues down the road.
With the camera wire harness cleaned up, you can now press the lower steering wheel trim piece back into place. Gently press the trim piece back into place verifying that you hear each clip snap into place.
Final Thoughts

As long as wiring is something you have experience in and you enjoy doing this project is pretty easy and well worth the time put into it. If you don’t feel comfortable doing this yourself then you could have someone else install it, but trust me when I say this mod is worth getting.
Having the ability to control power on your rear camera anytime you need it even when you’re not in reverse is pretty nice. When you are driving down the road and towing a trailer it’s a nice feature to have to be able to turn on the rearview camera and watch your trailer and hitch.

The first time I saw something similar to this was on my buddy’s 2021 TRD Offroad Premium. He has the factory Toyota front camera and when he showed me that he can just turn it on and watch what is under his hood when offroad – I was instantly jealous. Now I haven’t got a chance to go out on a trail to put this to use but I know when it comes to hill or rock climbing this will come in handy.
The camera is a small compact size and in my opinion, the perfect design to fit perfectly in the factory grille. It goes with the design of the front grille pretty well and it even looks like it was there from the factory. It also has a really nice picture, when turning on my backup or the front camera, I don’t see any difference in quality.

I was told won’t work on my 2020 trd pro cuz I have full camera around and bird eyes.
I didn’t realize it was compatible with that setup, but it makes sense because it’s a different technology.
Will this work with an aftermarket radio? Looking at getting the Pioneer DMH-WT3800NEXWill this work with an aftermarket radio? Looking at getting the pioneer DMH-WT3800NEX
I would assume it should work because the wiring would just plug into the factory wires then into the Pioneer radio but you might want to check with Anytime Backup Camera for this question.
I think 2014 was the first year Toyota integrated the backup camera with the entune head unit in the Tacoma. The earlier backup cameras were Integrated into the rearview mirror.
Just a comment from my personal experience….I’ve had to sometimes toggle my BSM switch a few times when my sensors failed to light up when a vehicle was in my blindspot. I have a 17 Pro if that makes a diff? I chose to get rid of the USB bc it never charged a phone at a rate faster than my wife used her phone, so I found it pointless. I’d recommend removing the USB in case you have problems with your BSM but everyone knows their own trucks. Love this mod and haven’t had any problems in a couple… Read more »
Everyone is going to have different uses for their truck. I choose the BSM because I don’t need to turn it on or off and I use my USB all the time. But it’s nice for everyone to have options for their setup.
The front camera that came with the kit from R4T hasn’t caused me any issues.
Have you found a camera that can withstand the AZ heat? I’ve got the Natikas and they work fine for a while but if I run them too long, they seem to overheat. They start flashing on the screen and then just go black. Once I wait a short period of time, they come back on to their normal operations unless I run them too long.