

Let’s talk about cooling.
Proper cooling is essential. It’s not only to prevent damage from overheating but, also, to protect your engine and transmission and ensure years of reliable use. This is where the CSF Performance Radiator comes in. A couple of months ago, they launched their 3rd Gen Tacoma compatible, heavy-duty radiator.
If you’re towing a heavy payload/workload or modifying your truck with extra weight and larger tires, you’ll be putting excess strain and load on various components. If you want to maintain performance, without sacrificing cooling capacity, it’s a good idea to add auxiliary or improved cooling capabilities to your rig.
An Industry First
While there is plenty of aftermarket support for things like shocks and bumpers, modifications like cooling upgrades don’t have as many options. CSF stepped in and wanted to ensure that the truck market could benefit as much as any other when they released this new one, an industry first.
This article will serve as a brief company/product highlight, a step-by-step install for a new radiator, and an initial review for its increased cooling capacity.
Let’s get started!
Find It Online
- CSF Radiator: Check Price
Table Of Contents
Who is CSF?

CSF has been around since the 1940s, so you already know they’ve got something good going.
Family Owned
They’re a family-owned company, and in 2009, had the fourth generation of family join the team. So the family blood runs deep with these guys. To add to that, they have sold more than 35 million units since its inception. Pretty impressive.
Proven, Extensive Portfolio
Their influence has spread into multiple industries and applications, bringing their innovation to just about anyone who needed it. The company is drive by passion, and we all know that the result of passion is a superior product.
Overview
- 2-Row, 42mm Ultra-High Performance Core
- 6.5mm Multi-Louvered Fins with Exclusive B-Tube Technology
- CNC Machined Mounting Brackets
- 100% All-Aluminum TIG Welded Construction
- True Drop-in Fitment with No Modifications Needed
- 2-Year Limited Warranty
- 1-Hour Mirror Finish Hand Polish
Make sure you check out the technology link above. You could write a small book just on their engineering, manufacturing, design and testing process.
Long story short? This isn’t some one-off company. These guys are the real deal and they don’t mess around.
Why Upgrade?

I guess the first question might be, for anyone not familiar with cooling systems, is what is a radiator and what does it do?
Radiator Functions
If your car runs on gas, you know that there are essentially controlled explosions occurring in the motor. As you might imagine, that can cause a lot of heat to build up. The radiator is the part of the cooling system, which, in combination with the fan and incoming air, acts to disperse the heat absorbed from the engine by the coolant.
The coolant runs through specific channels within the engine block, absorbing heat and returning coolant that has been cooled off in the radiator. This is essential to prevent overheating and irreparable damage to the engine and associated components. In much the same way, it also cools the transmission fluid.
Avoiding Overheating & Associated Damage
The OEM radiator is likely okay for most applications, but if you push your truck, you might start to see some excessively high engine and transmission temps. Not only is the CSF bigger, but its all-aluminum construction and unique cooling technology helps to dissipate heat better than the aluminum and plastic OEM one.
As I said, this upgrade is ideal if you’re consistently pushing your truck. With that being said, let’s get into the actual install!
Unboxing

Right out of the gate, I could tell CSF is a company that has some serious attention to detail.
The packaging better than anything else I’ve encountered, they go the extra step to protect the radiator, and its fins, from damage during transport.

The radiator itself is beefy, and I’m not just saying that.
This one is about twice the size of the OEM and the attention to detail is unparalleled. As far as we know, CSF is the only company that makes an aftermarket upgrade (not just an OEM replacement) for the 3rd Gen Tacoma.
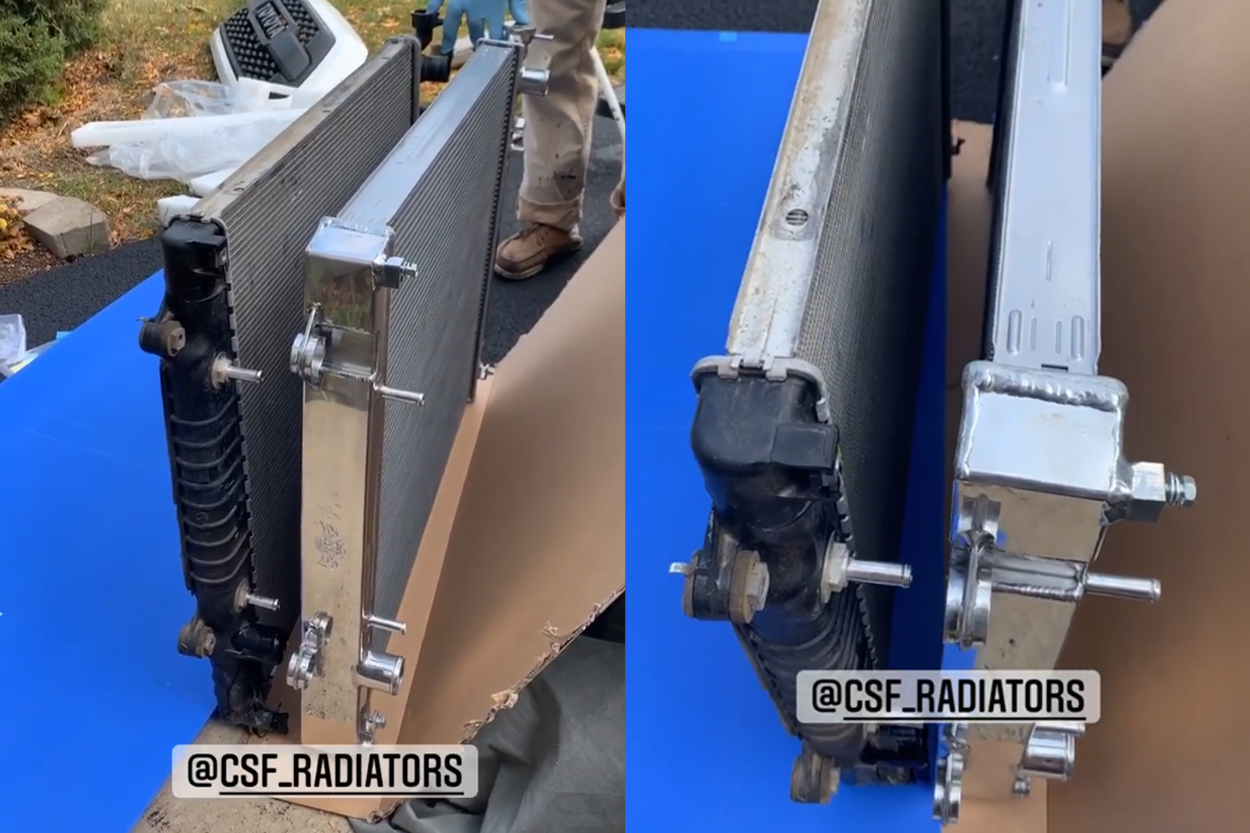
While I forgot to grab high-resolution comparison shots, the above image highlights the difference between the OEM and the CSF one. I had to pull it from our Instagram posts, hence the tags.
On my last Colorado trip, I overheated my transmission after ripping it to the top of the mountains south of Breckenridge. The stock Tacoma might be okay with the OEM coolers, but a lifted truck, with bigger tires, extra weight, and reduced aerodynamics needs an upgrade.
The answer? A beefier radiator.
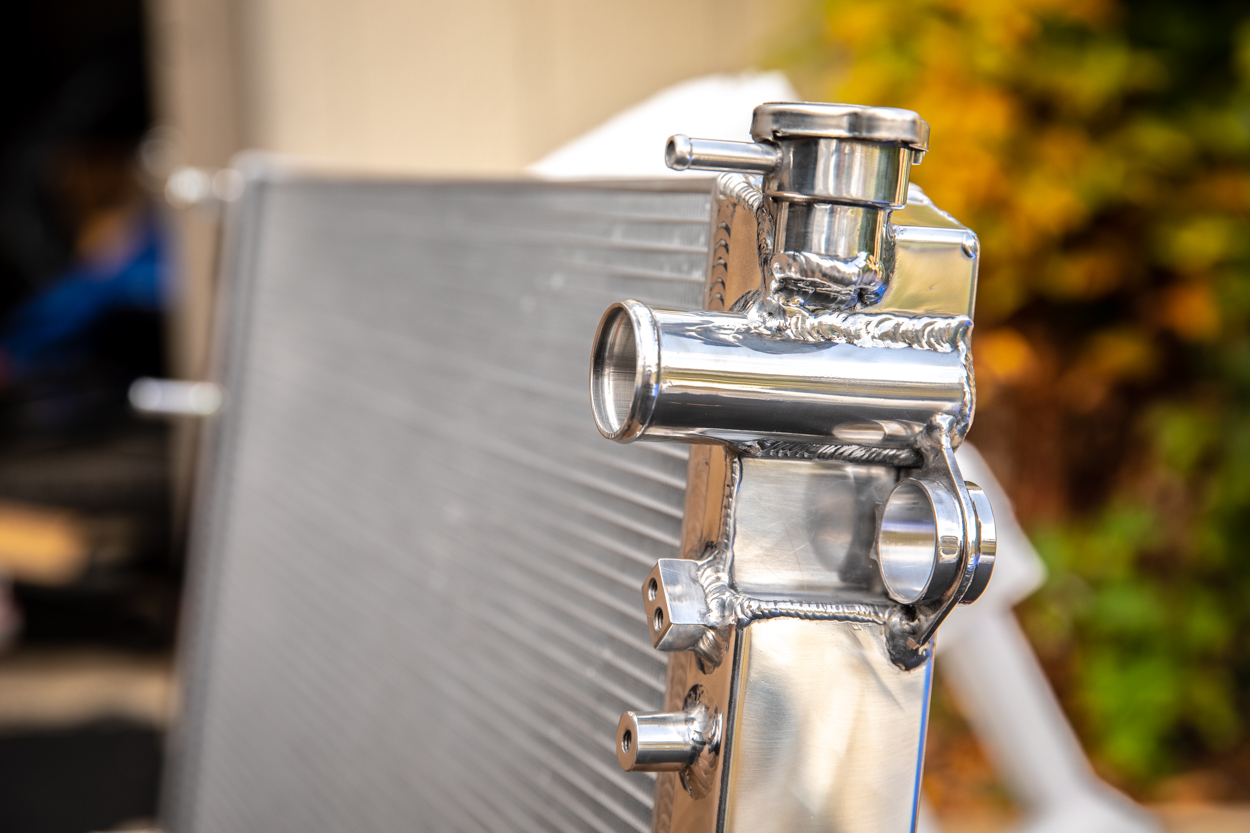
This is all about performance.
But that doesn’t mean it can’t look good at the same time. As you can see above, it looks great! The welds are super clean and it has a sheen that is hard to miss. While this modification won’t make you Instagram famous, it’s a great supportive mod.
Whether you’re looking to add weight or power, this modification is very important for a variety of builds.
Tools & Materials

This swap doesn’t require anything crazy. You’ll need the basics.
- Vice Grips
- Needle Nose Pliers
- Bent Needle Nose Pliers
- Shop Towels (optional)
- Funnel or Radiator Coolant Fill Kit
- Flat and Phillips Head Screwdrivers
- 2 Gallons Toyota Super Long Life Coolant (SLLC)
- Mechanic’s Tool Set
- 15mm open-end wrench
- Rachet
- Extension
- 10mm, 12mm deep sockets
- Tubing (to help drain coolant)
- Bucket (to catch fluid)
Step 1. Remove Radiator Cover

This plastic piece covers the radiator. It is attached with several clips.

There are a total of seven clips to remove to get the plastic cover off.

These clips are very easy to remove.
Using a screwdriver, pry the clip up, and as soon as it releases, you’ll be able to easily pull it out.

A shot of the removed cover.
Step 2. Remove Grille

There are two points where the grille is mounted to the body of the truck.
One, as seen above, is with two screws/bolts. Once located, remove them.

Next, similar to the plastic cover, remove the two clips at the ends of the grille.
Once you have done that, remove the grille by pulling it out by its edges.
Step 3. Drain Coolant

The bottom of the driver’s side has a drain valve.
It can be opened by unscrewing the plastic piece, as seen above. Before you do so, make sure you attach some sort of plastic tubing to the drain hole to prevent the coolant from making a mess while draining.
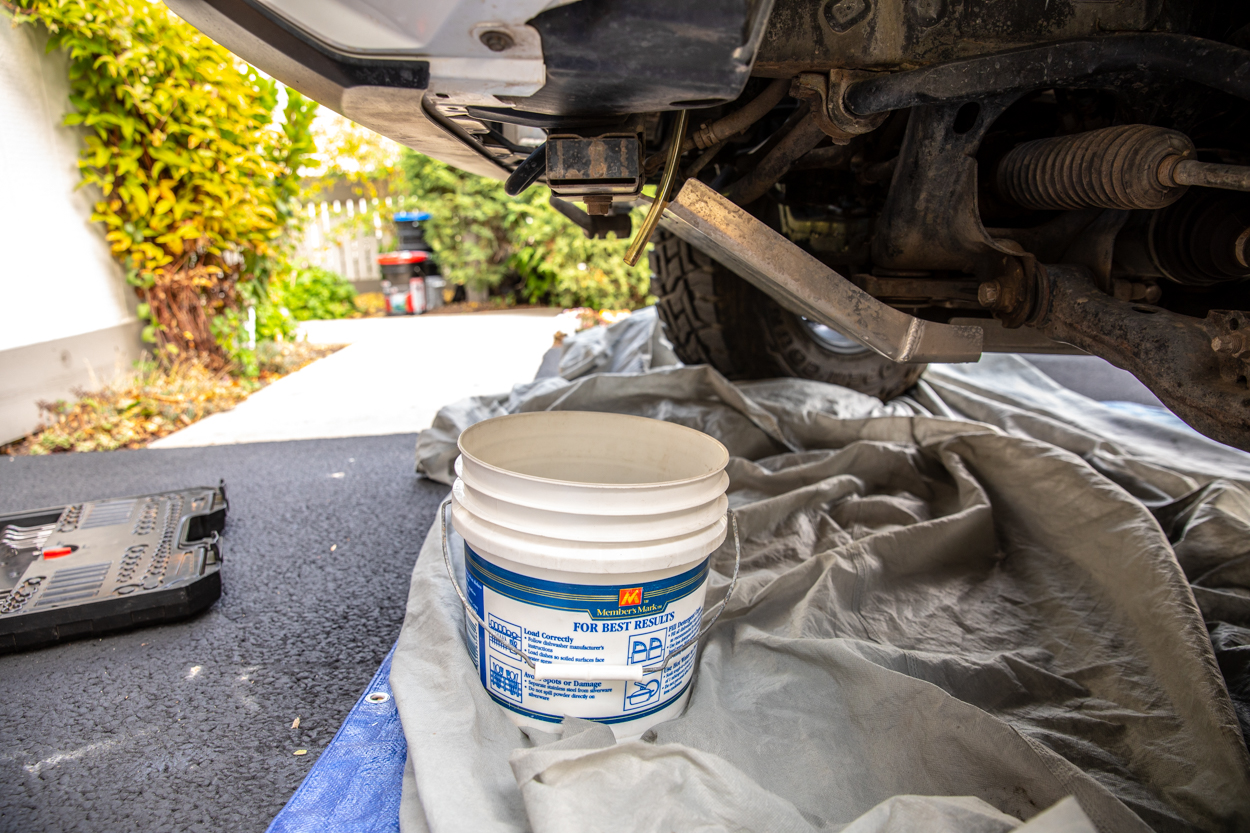
After attaching the plastic tubing to the drain hole, direct it towards a bucket.
Once you’ve got the tubing and bucket lined up, unscrew the plastic stopper and drain all of the coolant. Be careful if you’ve recently run your truck, the coolant can be very hot.

Since the coolant system is sealed, you’ll need to remove the cap to release any pressure and ensure quick and complete coolant drainage.
Step 4. Disconnect Tubing

To start, disconnect the radiator overflow reservoir.
Save this tubing, you’ll need to reuse it with the new CSF.

Next, disconnect the main input hose on the passenger side of the radiator that comes from the engine/thermostat.
You’ll need to use your pliers/vice grips to release the pressure fittings on each of the connections that attach to the radiator.

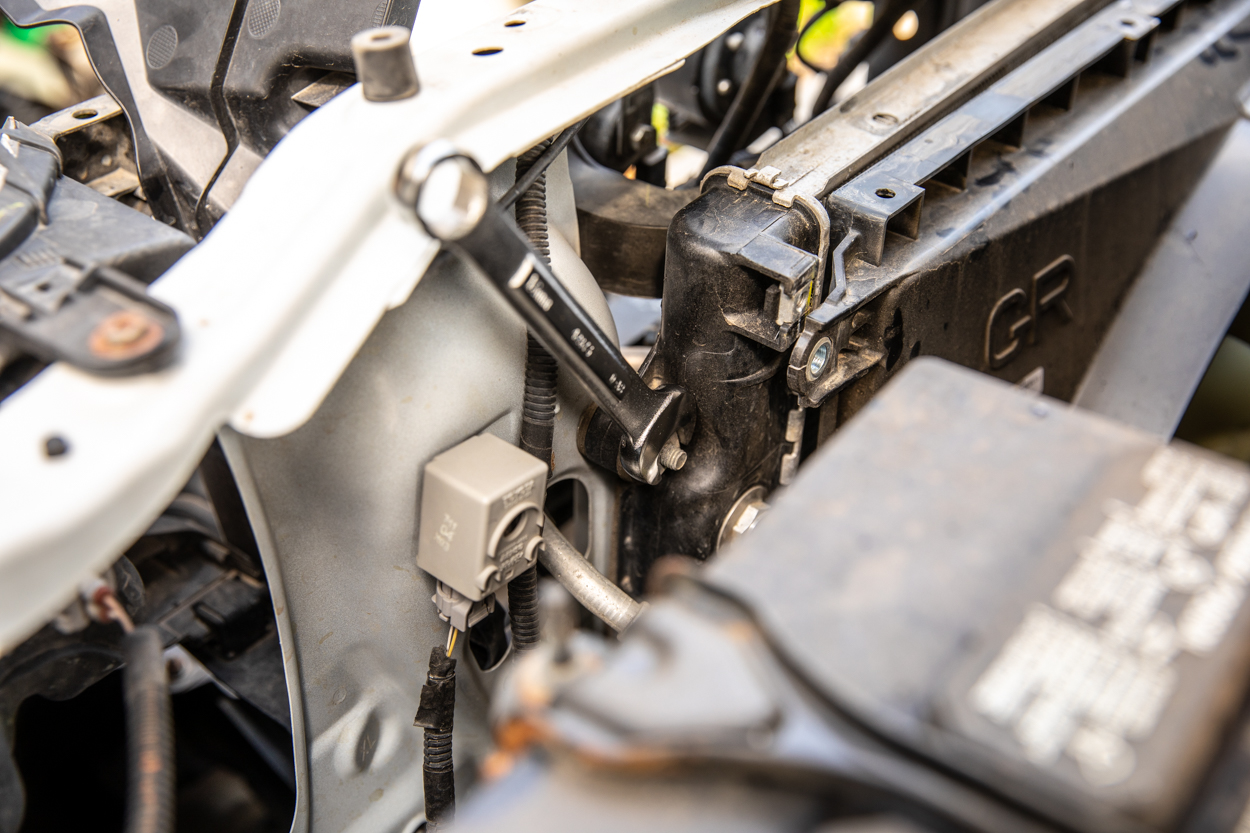
On the driver’s side, disconnect the uppermost transmission fluid tubing.
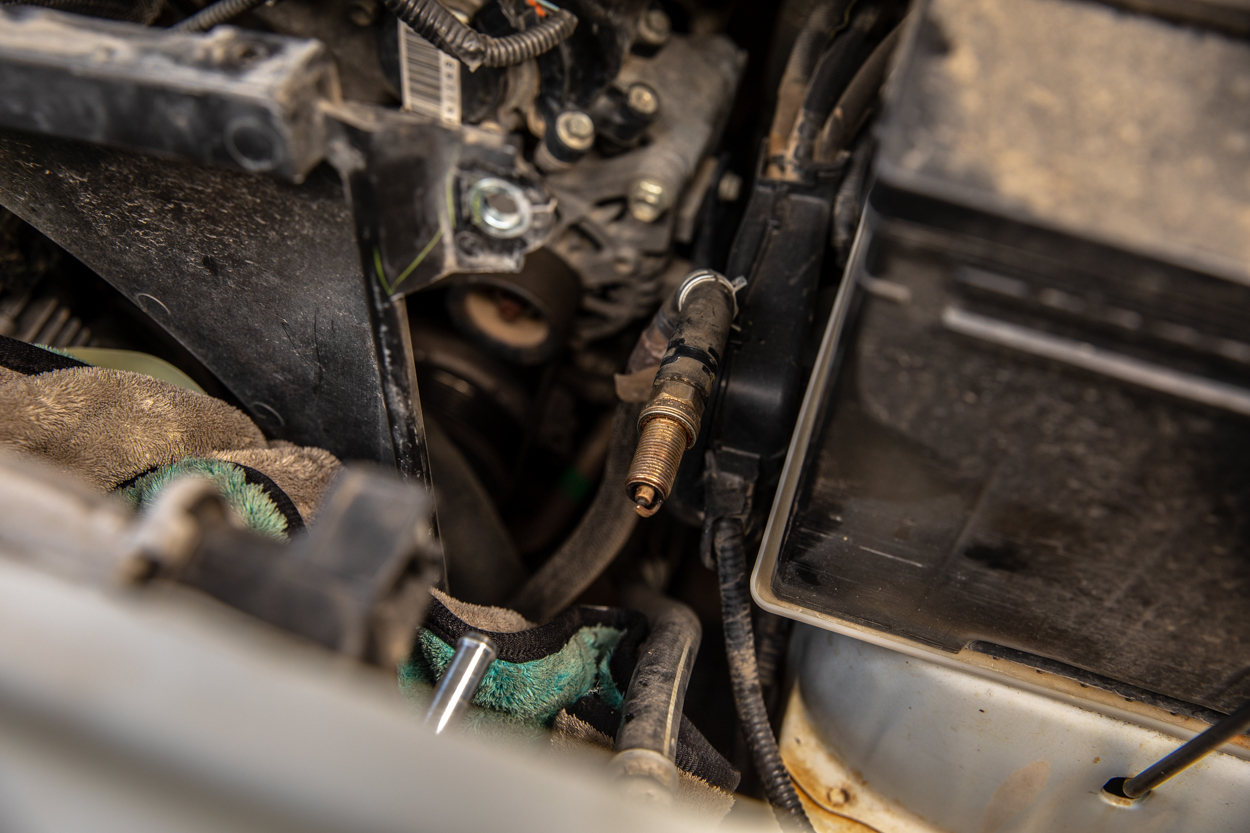
To prevent the transmission fluid from leaking out, I stuck an old spark plug into the tubing.

The final tubing that you will need to disconnect is behind the liner in the driver’s side wheel well. This is the easiest way to access this tubing, as well as, to the left of the tubing, one of the four mounting points for the radiator itself.
As before, remove the tubing and plug the smaller transmission line to prevent leaks.
Step 5. Disconnect Fan Shroud

I forgot to grab a shot here while disassembling everything, so I grabbed one after I installed the new one.
You can easily see where the fan shroud attaches. The positioning of these two nuts, one on each end of the top, is tough to miss and is the same on the OEM radiator. You’ll need to remove these nuts before you pull it out.
The shroud will float freely in the engine bay once you disconnect it.
Step 6. Remove OEM Radiator

There are a total of four bolts that hold the radiator to the body of the truck. They are easy to track down if you look at the perimeter of the four corners.
You can see one of them just to the right/left (respectively) and towards the top of the radiator on both sides. The upper bolts are partially hidden by the plastic splash guards. You might be able to squeeze your way past them, but I chose to quickly remove them.
They are held by one clip on each side with a tooth that attaches to the body which keeps them from moving around. Carefully remove these, they shouldn’t cause you too much trouble.

The bottom bolts are much tougher to access. I tried to grab the best shot I could, as the space is very tight.
The bottom bolts are under the body cross member, just to the inside of the frame rail.
To loosen these bolts, you’ll need to grab your rachet, socket, extension, and a wrench.
As seen above, you’ll need to use your 15mm wrench to secure the end of the nut to prevent it from spinning.

Once all the hoses and bolts are removed, gently remove the radiator.
You don’t want to do any damage to the fins of the nearby A/C condenser.

A shot of the space after the radiator has been removed.
Step 7. Prepare CSF Radiator
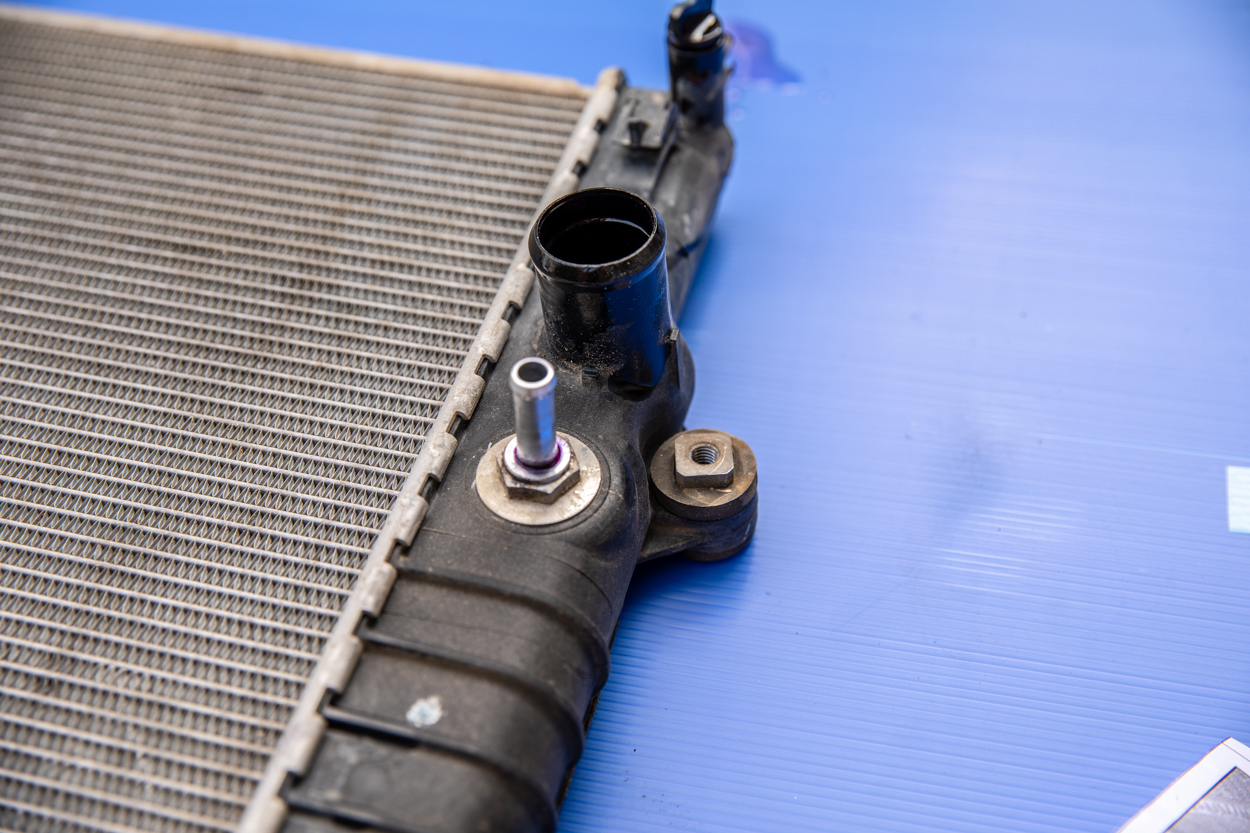
The main mounting nuts are seated in a rubber bushing that needs to be transferred to the new one.
They might give you hard time, due to being partially fused from the heat, but using a screwdriver, you should be able to pry them out with some elbow grease.
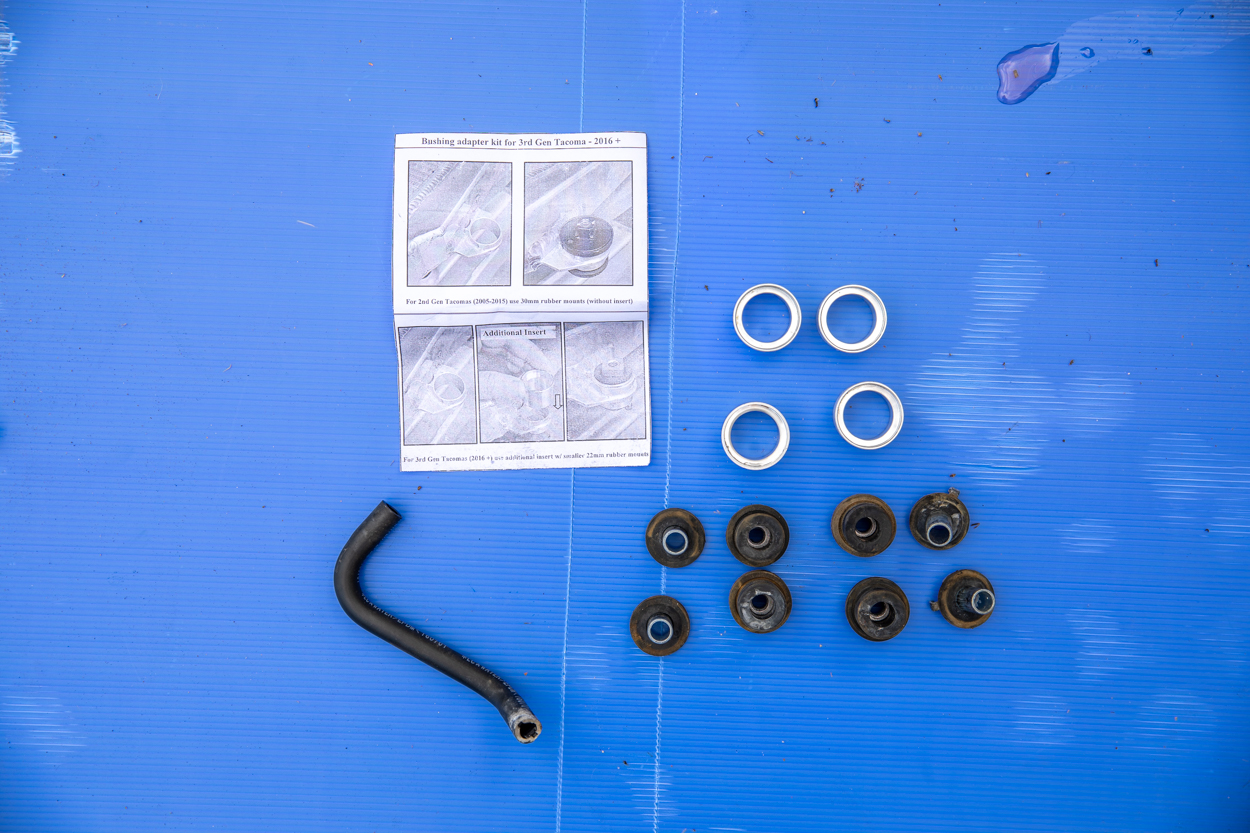
Above, you can see the removed bushings, the bushing adapter kit, and the directions included from CSF.

To properly fit the bushings/adapters, you need to ensure that the beveled edge of the adapter faces the back – as seen above.

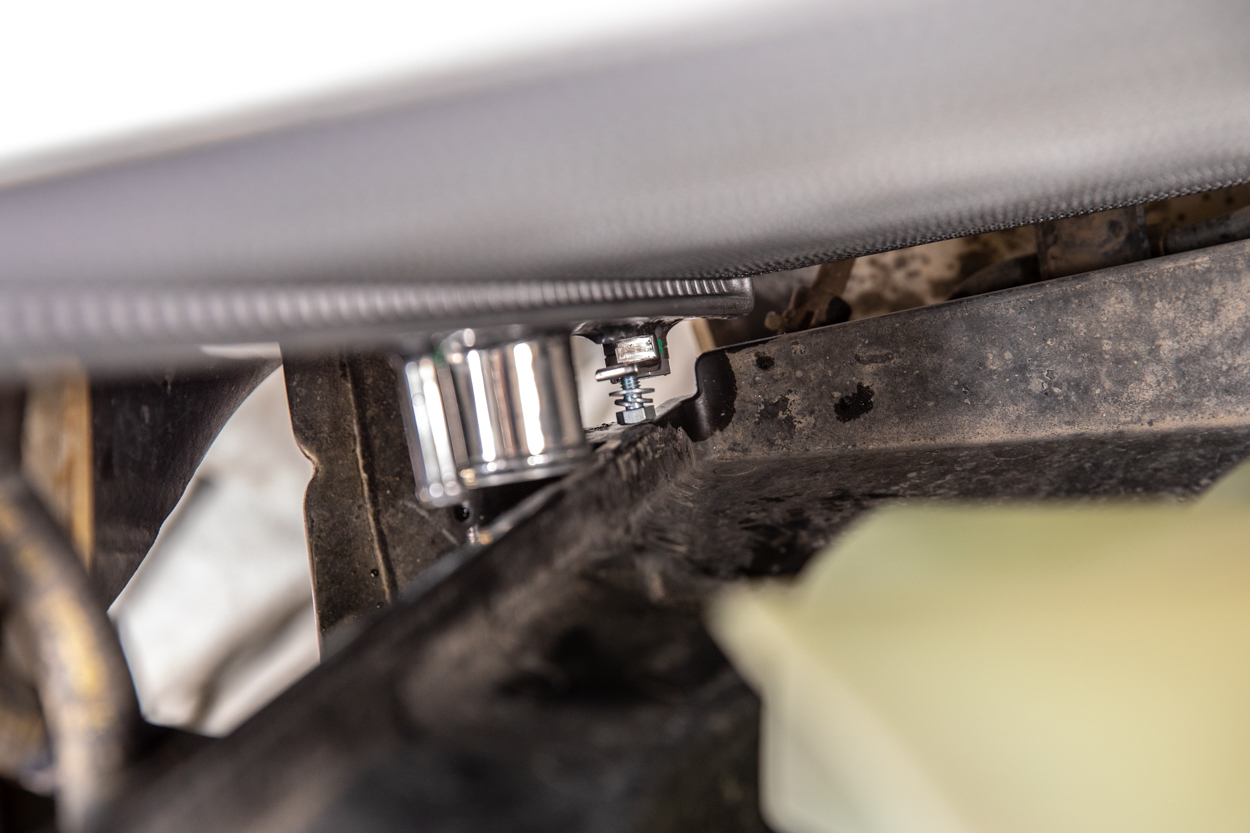
The finished bushing/adapter combo installed.
It is also important to note that you installed the OEM metal part of the bushing with the hook facing upwards and towards the front.
Step 8. Install Radiator

This part is pretty self-explanatory.
Being careful to not damage the fins, drop the new one in the truck. The radiator is obviously larger than the OEM one, so it might be helpful to have an extra set of hands to help wiggle it into place.
Do the previous steps in reverse, installing all the hoses and clamps correctly.
One final thing to note here. The CSF comes with a perch at the bottom where the fan shroud is seated.
There are supplied nuts to tighten the shroud, as seen above. After analyzing everything, I decided to only place bolts in the holts which originally held the shroud.
Is this a big deal? Probably not. But do so at your own discretion.
Step 9. Add Coolant

This is where you’ll need to be a little more careful.
The system will likely take in a full gallon (or so) of coolant before it looks to be full. To bleed the air from the system, you’ll need to do the following. Keep in mind, this is my personal method. I’ve included a good video for bleeding the cooling system below, just in case.
Adding Coolant & Bleeding the System
- Fill the system with as much coolant as you can.
- Give the hoses a few squeezes to push as much air out of the system as you can.
- Start the engine and watch as air bubbles start to bleed out, add coolant as needed.
- You’ll need to wait until the engine is warm, so the thermostat opens, to ensure all the air comes out.
- Once the engine is fully warmed up, fill the reservoir halfway and toss the cap on.
- Check for any leaks from the coolant or transmission lines.
Likely, there are still a few pockets left, so after a couple of drives, during which you should keep an eye on coolant temps, allow your engine to cool down, and take the cap off. Make sure it is topped off, as well as the reservoir. If the system is low, it likely pulled some coolant from the reservoir.
That’s it! You’re all done.
Coolant Change Tutorial
The video above is a guide to replacing the coolant on your truck, so if you’re only looking for the bleeding air portion, skip to about halfway into it.
Final Thoughts
First, it’s good to note that the plastic cover may not completely fit as it was previously mounted. This is due to the increase in size which moved the holes for the back of the cover. You can kind of see this issue above, next to the cap. You might be able to shimmy some stuff around and make it fit, or trim the plastic, but I didn’t see the need.
It’s no secret that this one blows the OEM one out of the water.
Twice the Cooling Capacity
CSF is a very trusted brand in the aftermarket cooling industry. This radiator packs literally twice the cooling capacity of an OEM and this ensures problem-free operation for years to come.
I’ll be hooking up an OBD2 reader soon to monitor engine and transmission temps. I will follow up with those as soon as possible. However, I have zero doubts that overheating is a thing of the past. With all the modifications many of us like to do, the engine and cooling system have to work much harder. This modification is exceptionally functional and with goals for forced induction in the future, it’s also very supportive.
*Update**
Since installing, the temps have been more stable. I never had any engine cooling issues but the transmission temps have been much slower to increase an I haven’t had any warning lights since.
Form vs. Function
The modified car/truck scene often overlooks function for form. While I want my truck to look good, what I really need, is for it to perform. We are taking longer and more remote trips as time goes on. The last thing I want to worry about is breaking down hundreds of miles from parts and help. Modifications like these ensure both the safety of everyone traveling and the longevity of two critical truck systems.
To clarify, you don’t need a built truck to take advantage of this upgrade. If you tow, live in the mountains, use your truck for work or hauling, you’re putting increased strain on the truck. Proper cooling is vitally important, and for less than $500, you can guarantee that your engine and transmission are protected for the long haul.
Bottom line? I would make this modification a priority.

Will this radiator work for manual transmission 3rd gen Tacomas?
It should work with all 3rd Gen Tacomas. If you wanted to be extra careful, I would reach out to CSF directly.
I bought a 2021 tacoma and I want to protect my radiator since the grill is so open. What’s the best material I can use? Thanks
Does this include transmission cooling as well, or would that still require an external add on?
This is a direct replacement for the entire factory cooling system. Just like the OEM radiator, this one is responsible for cooling the engine AND the transmission. Both will see an improvement in cooling efficiency.
I’m looking to put this on my 07 Tacoma. Is that smaller radiator in the front an oil cooler then?
Also, I see on the sites it does not come with an adapter for Transmission attachment. Do I need to buy an additional component, or is it as you said a direct replacement so we don’t require any addition items for this to be installed and function as intended.
Thank you, I am definitely using this page as my reference for this project.
no that’s the AC cooler. the transmission cooler is integrated into the radiator.
Any update on temps? I’m looking at this option for help with trans temps but am worried about cooling the engine down too much. Feedback with actual number would be great
I am waiting to hear from him also.
Engine temperatures are stable. Anywhere from 190-205. Zero issues with overcooling. Trans temperatures are also stable. Anywhere from 175-200, maybe a little bit more under long-term heavy loads.
We knew that there could not be over-cooling, because the engine has a thermostat that regulates the water flow into the engine from the radiator.
For sure. More so referencing the transmission temps there. Should have been more specific. I have seen too large of a trans cooler cause excessive cooling in the winter. But the temps have been great all around.
I noticed that your transmission temp played a key role in why you got this bigger radiator. You said your transmission overheated. I would think that a transmission cooling upgrade would include an external cooler on its own. If you already have an external cooler, then getting a larger one seems like the best idea to combat that particular problem. Some people even reroute the transmission cooler tubes so that they do not go through the engine coolant radiator. A hot transmission heats up coolant that needs to be cooled, and hot coolant heats up transmission fluid
Correct. I overheated the transmission on some steep grades heading toward a trail system. The truck shut off on me and I had to let it cool. Seeing this radiator, which helped to improve cooling capacity both for the coolant and the transmission fluid, I went this route instead of getting a larger auxiliary transmission cooler. My truck (like most Tacomas, to my knowledge) has an external OEM cooler. From the factory, it interrupts the transmission fluid and cools it beyond the capacity of the radiator itself. I understand your statement, but I chose to just knock them both out… Read more »
I would expect some transmission cooling gains from a larger all-metal radiator. I’m not a fan of the stock plastic side tanks myself. It’s got to be close to 50 or 60 square inches of plastic on the side tanks of the stock radiator, and even more square inches of heat-transferring aluminum side tanks. The engine tries to maintain a certain temperature; and the upgraded radiator is no longer stock size (not matched to the pump output and thermostatic temperature controlled valve). On cooler days of normal driving, the thermostatic valve will open less than it did before, because the… Read more »