
In a previous article, we did an in-depth review, overview, and installation for the Dirt King LCAs.
In this article, I’ll go through my experiences with Dirt King, reasons for upgrading your upper controls arms (UCAs), a complete step-by-step installation guide, my impressions, as well as a review.
At around $100 less than most popular comparable options, I think that this set of UCAs is not only fairly priced, but it’s also the best all-around option for the majority of Tacoma owners who are looking to compensate for geometric changes caused by lifting their truck.
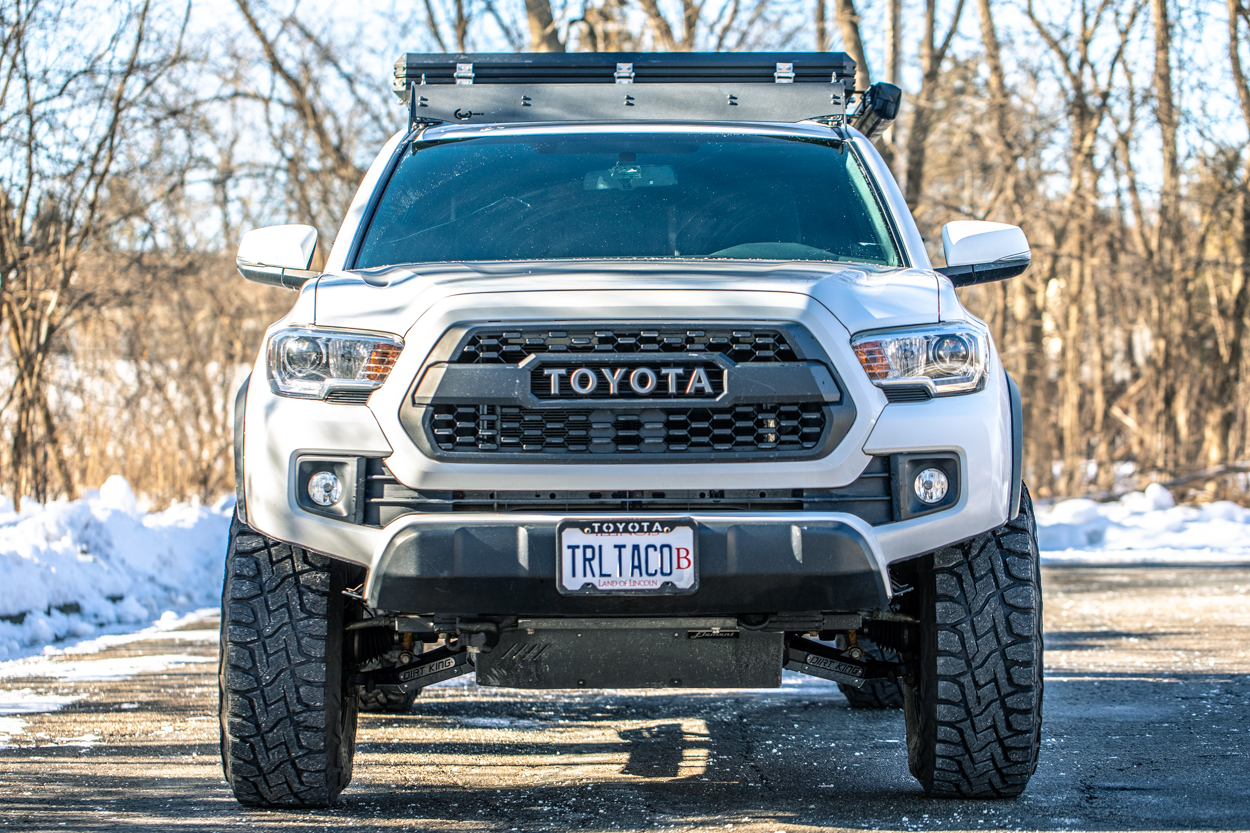
Just to clarify, although this post will surround a 4WD 3rd Gen Toyota Tacoma, this product fits all 2005-2023 Tacomas — both 2WD and 4WD. This post will also work for those just looking for a great guide to replacing upper control arms.
These have been discontinued and replaced with two newer options. Seen below!
Find It Online
- 4130 Tubular Ball Joint UCA: Check Price
- New Billet Aluminum UCA: Check Price
Use code “DIRTKING5” when ordering from TacomaForce!
Table Of Contents
Why Upgrade?

When you lift a truck, you drastically alter the factory geometry. Since the suspension system consists of multiple interconnected, moving parts, it logical to assume that when you alter or upgrade any part of the factory setup, you’ll need to compensate with other components.
Compensating for Lift
On a lifted vehicle, the factory upper controls arms cannot account for the increase in travel and its accompanying effects on different aspects such as alignment (caster, camber, toe) and articulation. The factory UCAs work great on a stock truck, but sitting on an aftermarket suspension, many factors are compromised.
Tacoma suspension is known for having a lot of anti-dive. Simply put, this means the more you lift your truck, the less caster you’ll see. The added support for the caster is one of the biggest reasons for making the jump into these control arms.
Accounting for Travel
Some shocks work with factory control arms, but many do not. The new suspension you install will increase the amount of travel seen in the front suspension. The OEM design doesn’t account for this, and it not only becomes the limiting factor, but the strength is greatly reduced, which will lead to premature failure. Dirt King solved all of these issues by incorporating features that increased the caster and changed the positioning of the pivot angles. This ultimately accounts for reduced stress on the joints of the upper control arm.
Ball Joints – Better than a Uniball?
The factory ball joint is also not strong enough to compensate for the added stresses and strains. DK upgraded their ball joints to a heavy-duty Moog option and the inner pivots got long-lasting urethane bushing that can be easily greased with the provided fittings. You may have heard bad things about ball joints. This is mainly due to some misinformation in the community. The reputation they have isn’t really accurate. In fact, these properly utilized ball joints can outlast a uniball, have less overall maintenance and essentially no noise.
To make things even easier, all of the parts on the UCAs are easily replaced or rebuilt. This setup is great for all-around use, be it for daily driving or mobbing around on the trails. Hopefully, this section covers any questions you might have had about your Tacoma’s suspension.
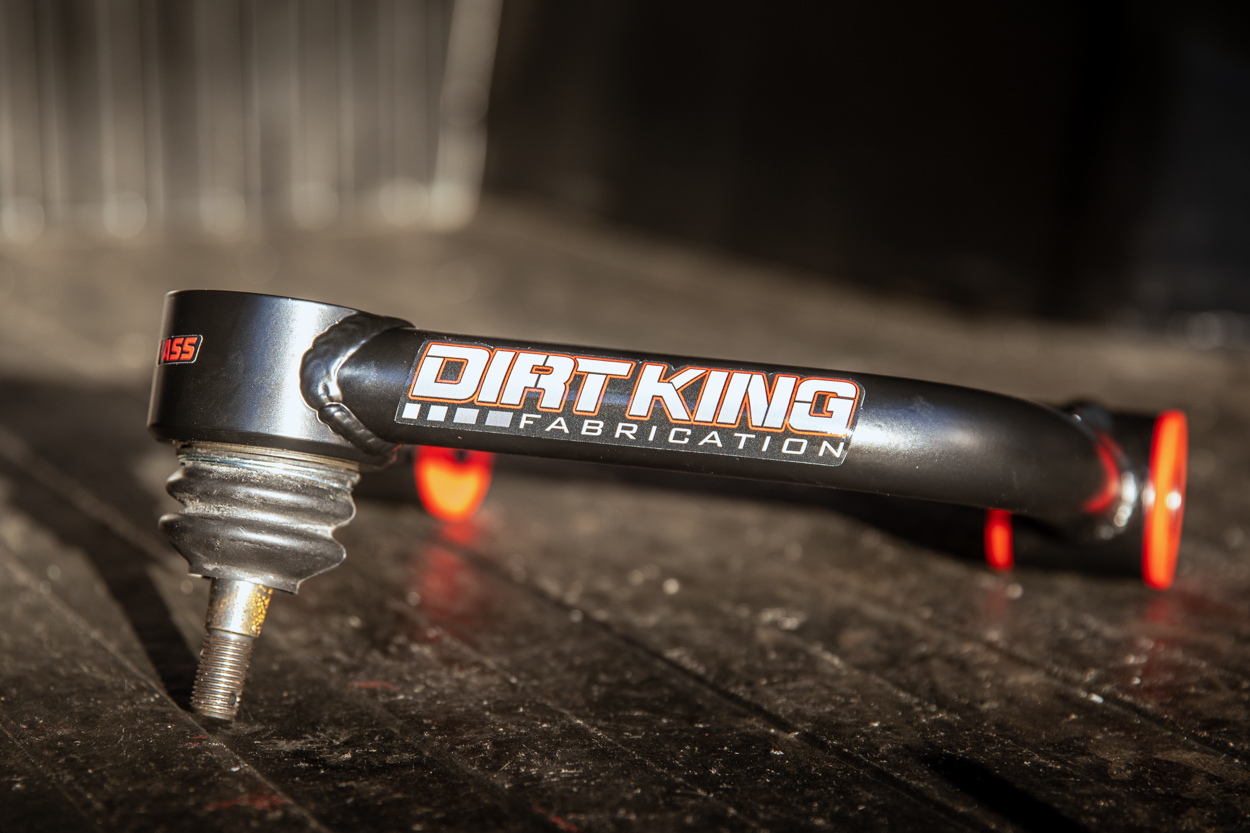
Specifications & Features

What’s Included
- Chromoly upper control arms
- Urethane inner bushings
- Grease fittings
- Moog ball joints
- Upgraded dust boots
- Zinc-plated bushing washers
- Zinc-plated inner bushing sleeves
- Durable black powder coat finish
- Dirt King swag
- Installation instructions
These control arms provide an increase of 1″ of wheel travel (down travel) when compared to the travel allowed by factory UCAs. They work for trucks with ~0-3 inches of lift. The maximum backspacing that can be accommodated is 4.75 inches and a minimum rim size of 16 inches. They work with all OEM or replacement coilovers.
You may have noticed that these UCAs are made from Chromoly steel. This steel is superior mainly because of the increased strength and weight savings. It’s an alloy that has two notable metals added: chromium and molybdenum. This steel is used throughout the industry when looking to maximize a product’s design in certain applications.
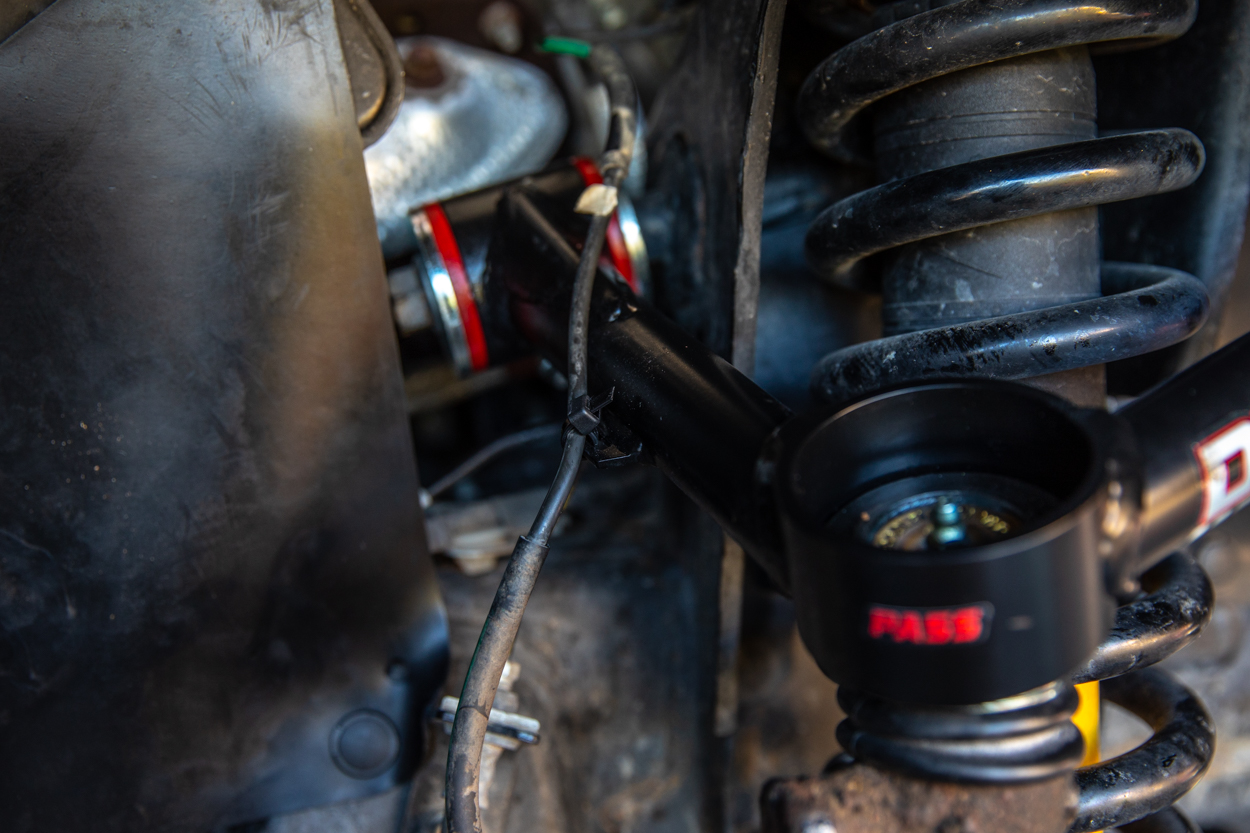
Heavy-Duty Moog Ball Joints
Urethane Inner Bushings

Unboxing & Packaging

If you read my previous article, you already know how impressed I was with the packaging of Dirt King products.
These guys really don’t leave a single stone unturned. The UCAs come wrapped in plastic wrap and are then encased in a foam that conforms to the shape of the product and the box. The packaging guarantees that your parts arrive swiftly and without even the smallest scuff on the powder-coated finish.
Dirt King is all about the details, even the smallest ones. Outside of the packaging, the hardware and instructions are very well organized to ensure that the entire installation process goes smoothly. The UCAs also come preassembled, meaning that the ball joints are already installed and so are the inner bushings and sleeves.
Installation
Required Tools
- Metric Shallow/Deep Socket Set
- 10mm
- 12mm
- 17mm
- 19mm
- 24mm
- Metric Wrench Set
- 19mm
- 3-Ton Floor Jack
- 3lb Sledgehammer
- Vice Grips
- Torque Wrench
- Suspension Grease
- Grease Gun
- Anti-Seize
- Jack Stands
- Wheel Chocks
- Red Loctite
- PB Blaster (optional)
- Shop Towels (optional)
Step 1. Lift & Secure Truck
This install will cover the passenger’s side, with appropriate notes for the driver’s side. The installation is relatively the same for both sides.
The first step is pretty self-explanatory. Try to find some ground that’s as level as possible and set your parking brake. Jack the truck up, remove the wheel/tire and place your jack stands. Might be worth it to throw your wheel/tire under the truck, just in case.
Step 2. Remove Splash Guards

If you’ve tried to remove or replace these in the past, you know how big of a pain the clips that hold the splash guards can be. They break really easily and are tough to seat properly once removed.
You can try your best to use a plastic trim removal tool, but those don’t always work either. I attribute that mainly to the design of the clips. Anyway, the factory guards are pretty weak. We suggest trying out the upgraded version from Rad Rubber Designs. These aftermarket splash guards are way beefier than the OEM ones and they do a better job too.
Step 3. Disconnect ABS Line
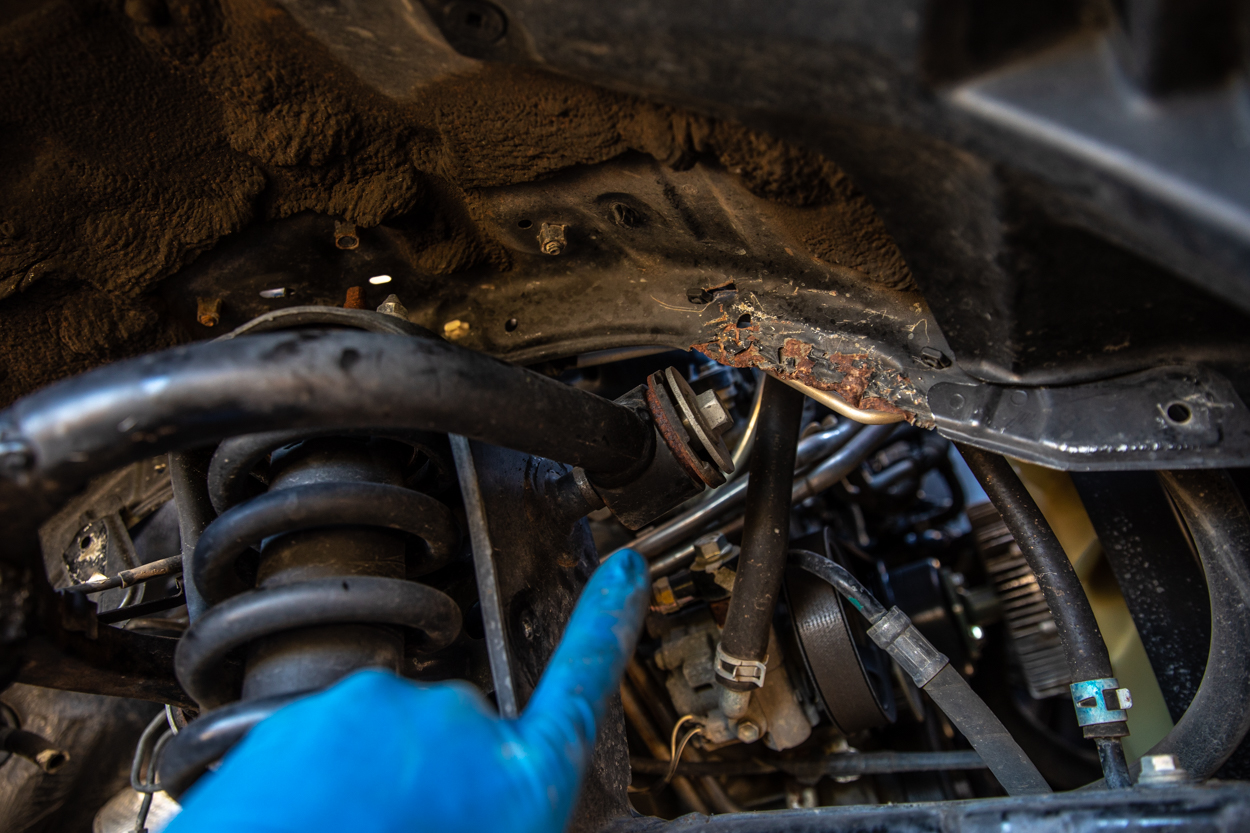
My Tacoma already had aftermarket control arms, and the previous owner/shop they used didn’t reattach the ABS line. I guess it’s not a huge deal, but I would recommend that you don’t skip that step.
Anyway, if you’re dealing with a factory UCA, you’ll need to grab your 10mm socket and undo the bolt which holds the line in place on the back of the upper control arm. The ABS line is also attached to the spindle. While I didn’t do this portion, because the line has a fair amount of slack, it’s highly recommended that you remove the bracket that holds the ABS line to the spindle. The bracket also uses a 10mm socket.
The last thing you want to deal with is the expensive headache of replacing an ABS wire or sensor. Now you can be sure that you’re not over tensioning this component.
Step 4. Disconnect Sway Bar
This part can be considered optional. The sway bar technically limits the travel of the suspension, so if you’re struggling with any part of the install, it might be wise to disconnect it.
The sway bar bolts to the middle of the spindle with a 17mm nut. If you want to see this in more detail, with images, I would direct you to the install portion of the Dirt King LCAs. Disconnecting the sway bar is discussed at length in Step 2.
It’s definitely easier to maneuver the spindle and new ball joint stud when it comes to installing the new UCAs. Food for thought before you move forward. I actually removed my sway bar completely when doing the LCA install – mainly for the reason that it limits the travel of the front suspension.
Step 5. Disconnect Ball Joint

First, remove the cotter pin as best you can, using some needle nose pliers, from the castle nut that holds the ball joint.
Grab your 19mm socket and undo the bolt holding the spindle to the UCA.

Depending on how much corrosion has set in, the ball joint may not separate completely from the spindle. You might need to give the ball joint stud and the spindle a few good whacks with your sledgehammer.
If you’re getting rid of your current UCAs, and you don’t plan on keeping them for resale or otherwise, you can swing away at the bottom of the stud. But if you’re going to save them, thread the nut you removed partially over the end of the stud and hit that instead. Hitting the spindle towards the top should also help.
If this portion is giving you a hard time, just remember you might need to give the joint a few really solid hits to break the corrosive seal. Once the ball joint is separated, grab a bungee cord and secure the spindle to the frame to prevent excessive movement.
Step 6. Remove UCA

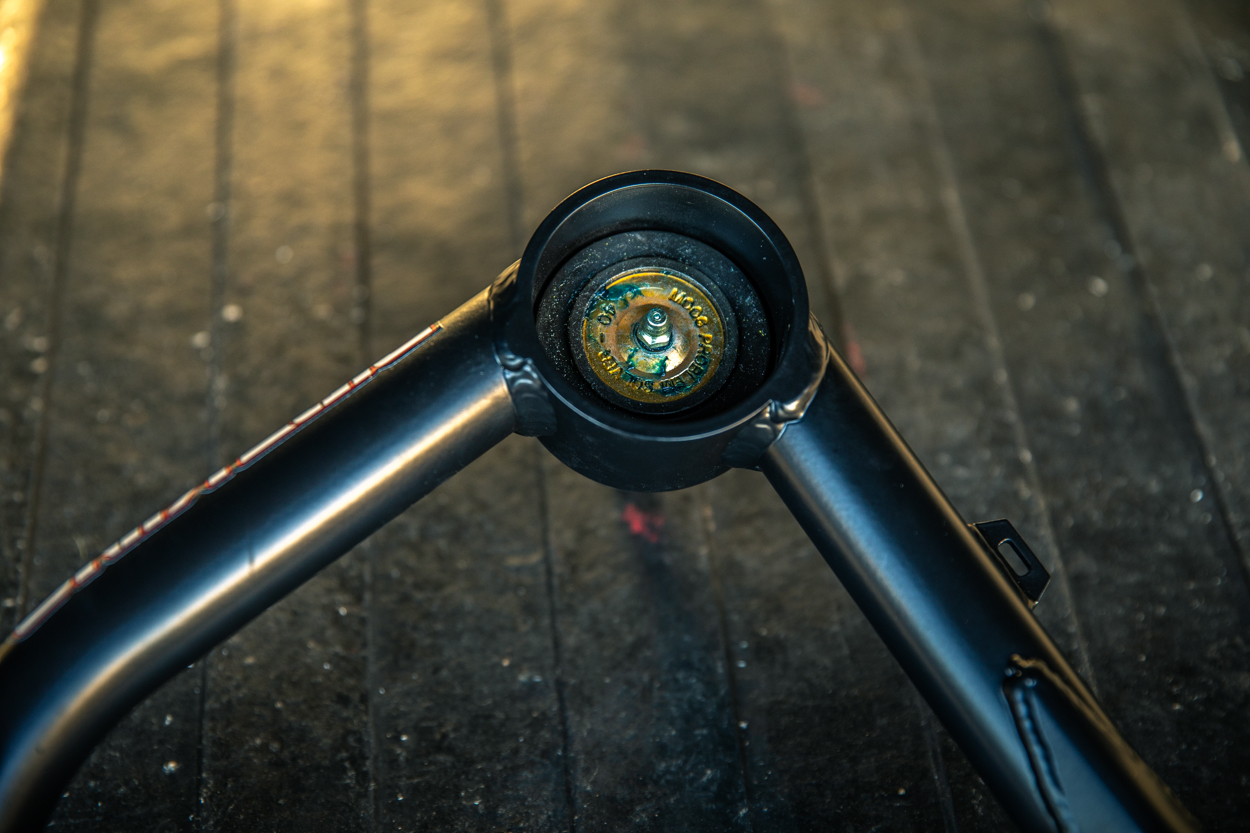
The main bolt that bolts the upper control arm to the shock tower is pretty hard to miss. You’ll need a 19mm socket at this end and a 19mm open wrench at the other end to remove this bolt.
It’s the largest and probably the longest bolt in the entire truck. Locate the nut towards the back of the control arm, as seen above.
Next, locate the head of the bolt towards the front of the control arm. Once you’ve located both ends, loosen and remove the bolt.
Now is a good time to note that, for some reason, Toyota designed the body of the truck to interfere with the removal of this bolt. As you can see, and/or imagine, the space that you have to pull this bolt through is very tight. I’m assuming Toyota assembles the frame and its associated components before the body is placed on it.
Basically, this means that you need to bend the body slightly out of the way of the bolt. There’s no way around it, but don’t worry, this isn’t going to affect your truck in any noticeable way. You might just scratch the paint, and that can easily be touched up. In the shot above, you can see that whoever installed the old aftermarket control arms, didn’t do it very mindfully. Hence why my inner fender looks the way it does.
If you grab the body with a big set of pliers or vice grips, you should be able to create enough room with a couple of bigger bends, you don’t need to do anything extra. Make sure you don’t pinch any wires. Once you’ve bent the body, you can use your 19mm socket and wrench to remove the bolt.
You can make your life easier by using a punch to help drive the UCA bolt out of its sleeve.
Passenger’s Side Note

On the passenger’s side, there are some brackets, tubing, and wires that will interfere with the UCA bolt as it comes out.
See what is interfering and push the components out of the way as you remove the long bolt.
Driver’s Side Note

On the driver’s side, there is a wire loom that prevents the UCA bolt from being removed.
You’ll need to use a 10mm socket to remove the small bolt holding it in and push the whole bundle of wires off to the side while you shimmy the UCA bolt out. The above image is just under the battery on the left side. You can see the missing bolts just right of the center of the image above.
Step 7. Prep DK UCAs

Prepping the new control arms is easy.
Dirt King preassembles their control arms, so you don’t need to fight with the bushing install. Install the included zerk fittings to the pivots, making sure not to overtighten them. Seriously, be careful here. You’re in for a big headache if you overtighten these or strip the threads.
Once the fittings are on, hit the bushings with some extra suspension grease. Pump just enough so that the bushings are slightly pushed outward. The same goes for the ball joint. Add just enough grease until you see the boot expand slightly. Over greasing the ball joint can damage the boot, so be careful.
Step 8. Install New UCA

Installing the new UCAs is as simple as reversing the removal steps.
The main thing to note here is that you have the big washers installed properly. There are four total washers, and you can see their order above. A washer goes on each side of the red bushings. Use the supplied grease to grease the surfaces in between the bushings and the washers. This should help to reduce noise.
Dirt King recommends using red Loctite on the UCA bolt/nut.
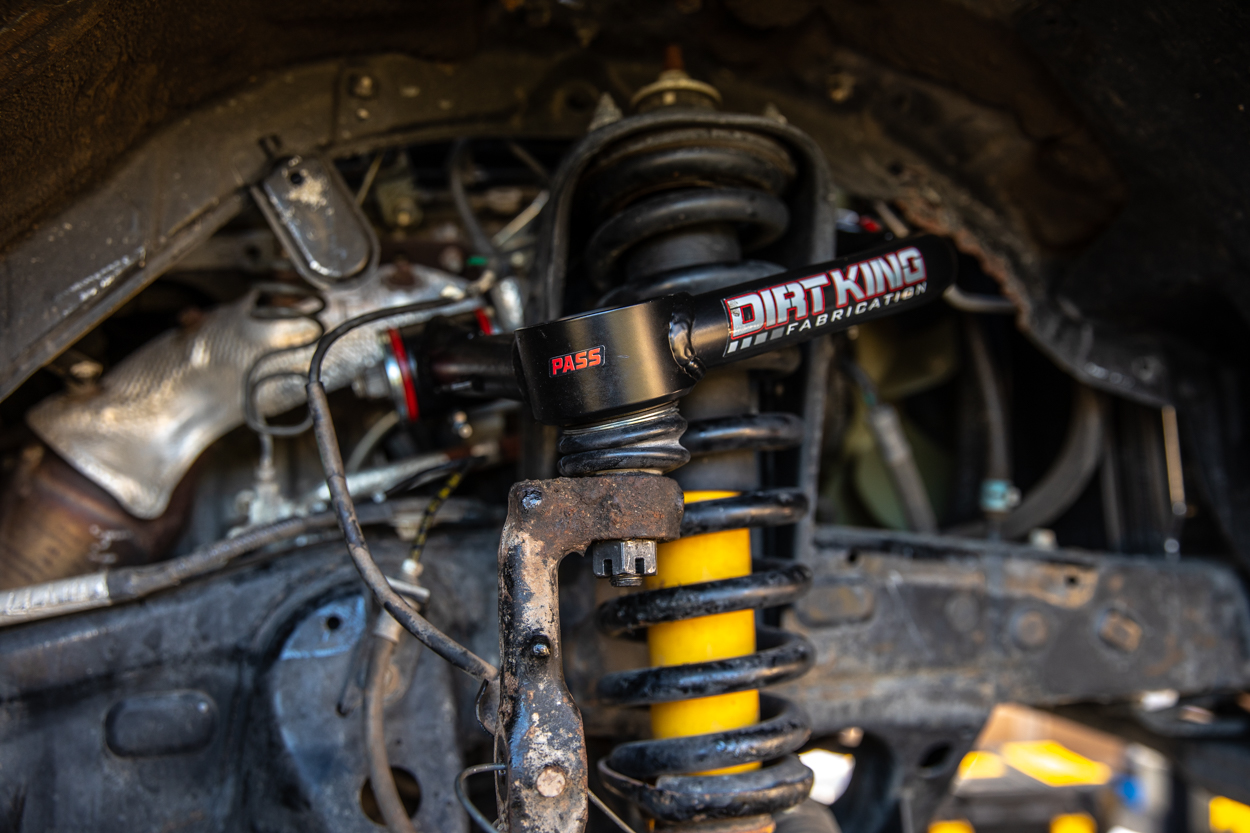
Next, attach the spindle to your new ball joint on the DK upper control arm with the new castle nut.
Bolt everything down and once you’ve properly torqued your new provided ball joint castle nut, grab a cotter pin and insert it into the proper place on the ball joint stud. Remember, don’t ever loosen the nut to make the cotter pin fit, only tighten.
Finally, using the provided zip tie, secure the ABS line to the new control arm.
Don’t forget to mount all of the ABS line brackets, splash guards and sway bar links in their appropriate positions.
Step 9. Torque To Spec
I find it good practice to leave all nuts and bolts slightly loose. Then, once the install is finished and I’ve checked that everything is properly installed, I go back and tighten everything to the right specifications.
Torque Specs
- Upper arm nuts: 85 ft-lbs
- Ball joint castle nuts: 81 ft-lbs
- Sway bar end links: 41 ft-lbs
- Lug nuts: 83 ft-lbs
With that done, you’re all finished! Drive over to an experienced off-road alignment shop and get your truck ready to roll.
Initial Review
If you read my DK LCA article, you know how much I was able to learn about the necessity of LCAs, and how much of my respect was earned by Dirt King throughout the installation and my experiences with them.
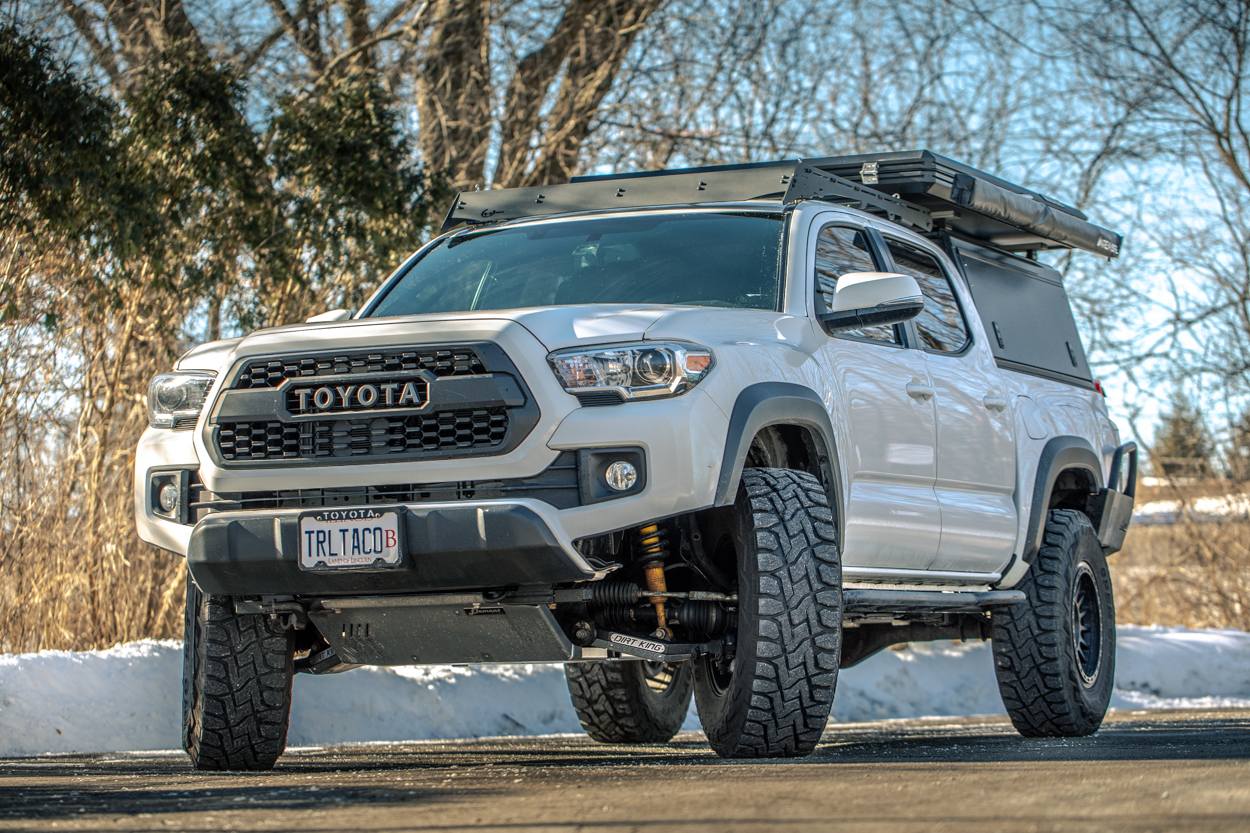
These UCAs provide extra down travel and account for the changes in suspension geometry and alignment. They look great and the easily greaseable ball joint is probably the single biggest benefit to them. Having a heavy-duty sealed joint that can easily be maintained is the best-case scenario for most Tacoma owners who are looking to lift their trucks or upgrade their current suspension setup. The relatively affordable price tag that these come in at is also important. Suspension parts can get expensive, and you often don’t see competitive pricing from a company like DK. Many manufacturers, once they achieve a level of success, tend to have higher prices.
Dirt King breaks the most by offering a control arm that is roughly $100 cheaper than the alternatives and provides the end-user with a setup that is significantly more worry-free than other options. Although the upper control arms might not have as big of a wow factor (compared to the LCAs), they’re still pretty impressive. From the details like packaging and preassembly, down to the clean welds and easy maintenance, you really can’t go wrong.

On a final note, I wanted to touch on alignment. With previous setups, I had been able to push 4-5+ degrees caster out of other control arms. With these control arms, the alignment shop was only able to pull ~3 degrees of caster. Now, this may be affected by the fact that I still have two bent spindles, and that’s limited the alignment due to camber and toe adjustment required to compensate for the spindles.
The real question is still: what does that mean to the user? Even at 3 degrees of caster, you’ve still adequately compensated for the changes caused by lifting the truck. I’m running a true 34-inch tire, and currently only about 2-2.5 inches of lift. Those of us who like to push the limits of adjustability really like to get higher caster numbers to account for larger tires. Many owners only run 32- or 33-inch tires. With that size, you shouldn’t really worry about getting upper-level numbers.
At the end of the day, these numbers aren’t bad. Most setups will rub off-road regardless of those higher caster numbers, just with a little less frequency. The fine-tuning really applies to those of us who really like to mess with our trucks. For the average person looking to lift their truck without going too deep, I would say these UCAs from Dirt King are the way to go.
Maintenance
These control arms may be low maintenance, but they aren’t a zero maintenance item.
In general, you want to grease these upper control arms every 20,000-30,000 miles, or whenever they start to get noisy. If you really get after it in your truck, using it as often as possible, it might be better to decrease the intervals to around 10,000 miles.
You must know that when greasing the inner pivots/bushings, you need to loosen the main UCA bolt, the longest bolt that runs through the frame. If you fail to do so, you’ll damage the bushings.
Final Thoughts
Clean design, great customer service/care and a dedication to being the industry’s best. These features are what make companies like Dirt King Fabrication so successful.
Without being too redundant, I highly recommend these bushings to the vast majority of Tacoma owners. Especially those who won’t expect to find themselves on more than the occasional trail or fire road. These UCAs will fix the issues associated with lifting a truck and are plenty strong for a long day out on the trail.
I look forward to putting these to work this upcoming wheeling season. Save a few bucks over some of the other competitors and get your Tacoma running right.

I’ve got a 2015 Tacoma with Fabtech 6″ with coil overs, would these UCAs help get my camber/caster more correct ?
Hey Mike! Yes, these UCAs account for the need for added adjustment needed when lifting your truck. I would confirm with Dirt King if they work for 6″ lifts though, just in case. I believe they do, but I don’t want to steer you the wrong way.
Love this website. Constantly finding useful reference articles and interesting stories. Thanks!
So glad! Working hard to collectively bring the best Tacoma information all in one place!
Love DK’s offerings and the ball joint, but if you want ultimate adjustability you need a boxed DK UCA with Heim’s. Have the DK LCA as well and was able to get 5.5 degrees of caster and run 35’s (not 315’s) with zero rub!
That’s awesome dude! Thanks for the feedback.