

Engineered, designed, manufactured and packaged by Fabtech in Southern California, meet the Dirt Logic lineup.
These Nitrogen Charged, Linear Digressive shocks are here to make a statement in the suspension scene not only for the Tacoma but 4Runner, Jeep and other popular off-road vehicles to compete directly with top tier names like Icon, Bilstein, Fox and more.
The Fabtech Dirt Logic shocks offer up to 10″ of travel in the front and rear. Featured on this specific kit are remote reservoirs on all four corners. Choosing the Add-A-Leaf will gain upwards of 1.5″ in the rear and support the added weight you overlanders may be running!
The shocks aren’t equipped with compression and rebound adjustment but are tuned and built to meet the everyday needs both on-road and off-road from extensive testing and development. These shocks are made out of an OD Stainless Body with a Billet Aluminum Piston not only giving them a stunning showroom finish, but incredible strength.
The design of these shocks are built to take on the toughest of terrain in all types of environments and speeds. The additional external reservoirs are engineered to take on heat dissipation, ensuring you have the best shock performance regardless of how much you work them. The non-traditional approach to the front mounting system allows the top of the shock to be reengineered to Fabtechs specs, making them stand out compared to the norm in the industry.
There’s a lot to talk about on this kit. Without wasting any more time, let’s dive into it!
Table Of Contents
Kit Overview

Front Coilovers

Features
- 2.5″ Corrosion Resistant Stainless Steel Body
- 2.25″ Billet Aluminum Piston
- 7/8″ NitroSteel BlackPiston Rod
- Cold Wound Coil Springs
- Height Adjustable Coilover
- 5/8″ Spherical Ball Mounting Ends
- 2.50″ OD Aluminum Reservoir w/ Stainless Steel Hose
- Internal Bump Stop
- Provide 10″ of Travel
- Preset for ~2.5″ Lift (depends on setup)
Rear Shocks

Features
- 2.25″ Stainless Steel Body
- 2.0″ Billet Aluminum Piston
- 7/8″ NitroSteel BlackPiston Rod
- Polyurethane Mounting Ends
- 2.25″ OD Aluminum Reservoir w/-6 Stainless Steel O-Ring Hose
- Provides 10″ of Travel
Upper Control Arms (UCA)

Features
- Additional caster built into UCAs for improved handling, performance, alignments
- 1.250″ OD .120″ wall 4130 chromoly tubing reduces flex found in stock arms for more positive road feel
- 17-4 heat-treated uni-ball pin fits into factory ball joint taper without modification to the spindle for easy return to stock feature
- 17-4 stainless steel misalignments for proper clearance of large uni-balls throughout the travel range
- .250 wall DOM bushing barrels with welded gussets for strength
Add-A-Leaf (AAL)

Features
- Additional 3 pack leaf
- Helps support added rear and bed weight
- Adds 1.5″ of rear lift
Find It Online
- Complete Fabtech Dirt Logic 3″ Lift Kit for 3rd Gen (2016+) Toyota Tacoma (w/ Reservoirs and AAL): Check Price
Installation

The installation of this full kit is definitely tedious, but with the right tools, knowledge, and patience, the install can go smoothly and according to plan.
If possible, completing this install in a garage will be helpful. If not you don’t have access to a garage, finding a flat and level surface out of the elements will do just fine! Plan for this install to take a full day, if not, two. Having an extra set of hands to assist and help where needed can make this install only go smoother. Here we go!
Difficulty
- Moderate to Hard
Time & Assistance (DIY)
- Hours: 6-12
- People: 2 (preferably)
Tools & Materials
- Floor Jack
- Jack Stands (at least 2)
- Socket Set
- Wrench Set
- Allen Wrench Set
- Flathead Screwdriver
- Adjustable (Polish Metric)
- Torque Wrench (up to 120 ft/lbs)
- Needle Nose Pliers
- Dremel, Barrel Sander (or some sort of sanding/cutting device)
- Impact (Optional)
- Drill (with bit assortment)
- Assortment of Hammers/Mallets
- Bungee Cords
- PB Blaster or WD-40
- Shop Gloves
- Eye Protection
- Grease Gun + Grease
Unboxing

When your kit arrives, you’ll be greeted with a few boxes. The kit comes extremely well packaged with hardened foam that conforms to the product, ensuring the parts won’t slide and get damaged during transit. Knowing these products arrived damage-free was relieving. Fabtech knocked it out of the park with the packaging, ensuring no stress.
Be sure to take time to get familiar with your kit as well as take a parts inventory. Making sure you know the parts and that all of them are there will help on the day of install leaving no potential for blindsides. During my parts inventory check, I noticed I was missing the front reservoir mounts and decided to reach out to Fabtech. I got a response within the hour asking for my address and that the parts would be there the next day. Sure enough, the parts were on my door step the next morning!
Fabtech has a history of quality customer service and my interaction with them just supported that. They care about their customers and are there to help.
Front Coilovers & UCAs
Let’s start the installation by focusing the attention on the front of the truck.
I’ll begin by outlining the process for the front coilovers and upper control arms.
Step 1. Jack Up Truck

I found the hockey puck shaped spot right behind the front skid plate is the ideal place to lift the truck up. Get that started and crack the lugs on both wheels before lifting it off the ground completely.
Once it’s off the ground, remove the lugs and wheels completely and set them up and out of the way. At this point, you can stick your two jack stands under the frame rails on both sides.
Step 2. Remove ABS Line

The ABS line is held on by a 10mm bolt. Removing that bolt allows the ABS bracket to be free from the UCA. Using a pair of pliers, bend back the plate enough to separate it from the wire. This plate and bolt will not be reused, but keep it in a safe space and out of the way.
While you’re at it, remove the clips that are holding the splash guards on. We will need access to some bolts behind the guards in a later step. Either using needle-nose pliers or a trim-specific tool will do the job of getting the tabs removed.
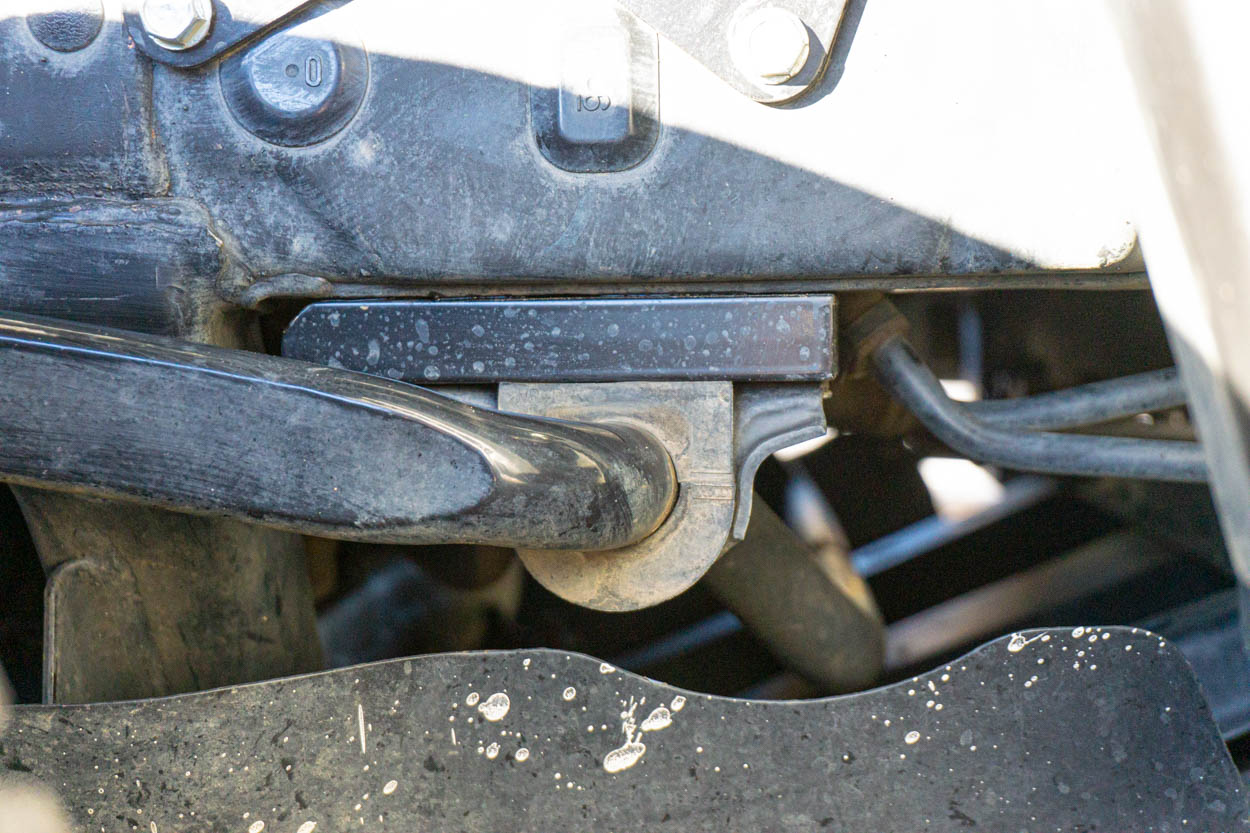
Step 3. Disconnect Sway Bar

The sway bar is held on by a 17mm bolt.
After removing the bolt, it’ll be free from the spindle. Some light tapping may be required to break it free from the spindle.

While we’re working on the sway bar, removing the bolts that hold it onto the frame will allow it to be completely free and out of the way. Please note that the other side has to be disconnected as well for it to move freely. Having the sway bar out of the way will allow us to get the old and new shock in and out easily as well as to add the sway bar relocation kit later on.
Step 4. Disconnect UCA from Spindle

The infamous “castle nut” is what holds the UCA to the spindle. First, you’ll need to remove the cotter pin by using needle-nose pliers. Once removed, use your 19mm to get the actual nut off. This nut is not going to be reused, so it should be set aside out of the way.

Using a hammer, hit the strike plate on the side of the top of the spindle. Alternatively, you can hit the bottom of the UCA bolt to free it from the spindle. My bolt was being stubborn, so I used a torch with a little heat to help free it.
With the spindle free, we can use a bungee cord and wrap the spindle with it a few times to help support it. Attach one of the bungee’s ends towards the front of the vehicle and the other up by the rear splash guard. Using the bungee cord will ensure that once the shock is free, there is no excess stress put onto the ABS and brake lines.
Step 5. Remove Front Shock

There are three (3) 14mm bolts holding the top of the shock onto the shock bucket. Remove the front two (2) and then move to the one (1) in the rear. This bolt can be tedious to reach, so take your time.
If the bolts are stubborn, striking the end of the wrench with a hammer will help break them free. These three bolts will not be reused, so like the others, they can be set aside.

With the top three (3) bolts removed now, we can move onto the 19mm bolt that is holding the bottom of the shock to the lower control arm. Once the nut is off, the bolt can be removed. If you notice that it’s still tough to remove, carefully strike the end of the bolt with a hammer, ensuring to not damage it since this bolt will be reused.
At this point, the shock will be free and the lower control arm will extend down. Carefully manipulate the stock shock out of the shock bucket and off of the vehicle.
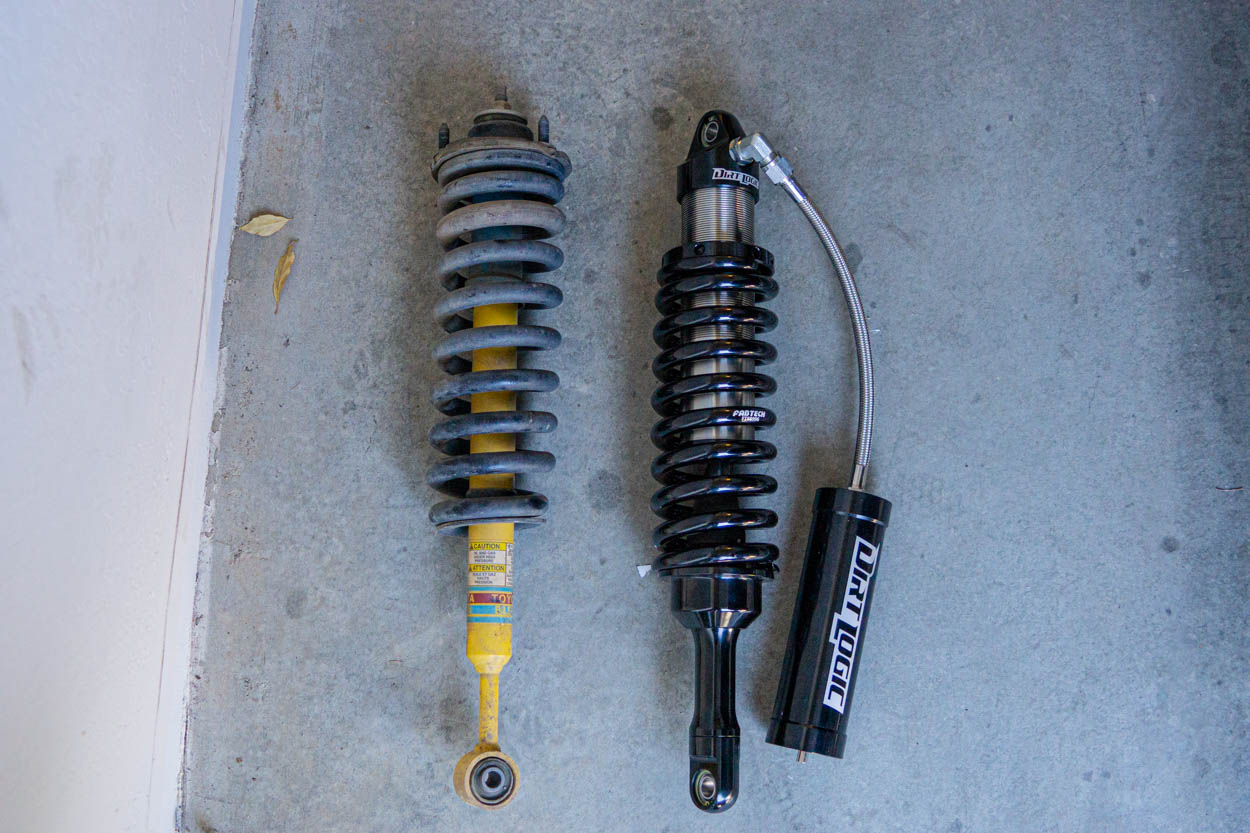
The side-by-side comparison of the stock shock and the new Fabtech Dirt Logic Coilover is no joke! The pictures do all the talking. Just look at the size difference!
Step 6. Remove UCA

Removing the stock UCA and installing the new one is without a doubt the most tedious part of the install, so be sure to take your time and have a second set of hands to help assist.
Remove the 19mm nut and washer and hold onto both of them. When you push the long bolt up into the engine bay, you run into an issue. There is some metal from the fender in the way preventing you from sliding it out. There are two options to get the bolt out:
- Use an adjustable wrench and bend the soft metal out of the way enough the get the bolt out.
- Use a Dremel/grinder and remove the metal completely.
This is a non-critical part of the engine bay having no real structural importance, so manipulating it is OK.

I went with recommendation #1 using an adjustable wrench and started working the metal back out of the way.
It’s soft and doesn’t take a lot of force to move it. Every so often, test the bolt and see how much more you have to bend until you feel you have enough clearance to remove it.

Once you’ve got the metal out of the way, you will realize there is a wiring module that’s preventing the bolt from being slid out. The 10mm bolt on the underside of the battery tray is the one that now has to be removed. This will allow the harness to be moved out of the way enough to slide the bolt out.
Having a second set of hands in the wheel well, tapping the bolt out while someone in the engine bay guiding it free is the easiest way to get it out. Be patient but persistent. The bolt rubs a bit up against the battery tray, so some force is needed to get it completely out. Be sure to not bend the bolt for any reason because it is going to be reused for the new Fabtech UCA.
Once you’ve completely removed it, save the bolt, washers, and the nut. The stock UCA is completely free and can now be set out of the way.
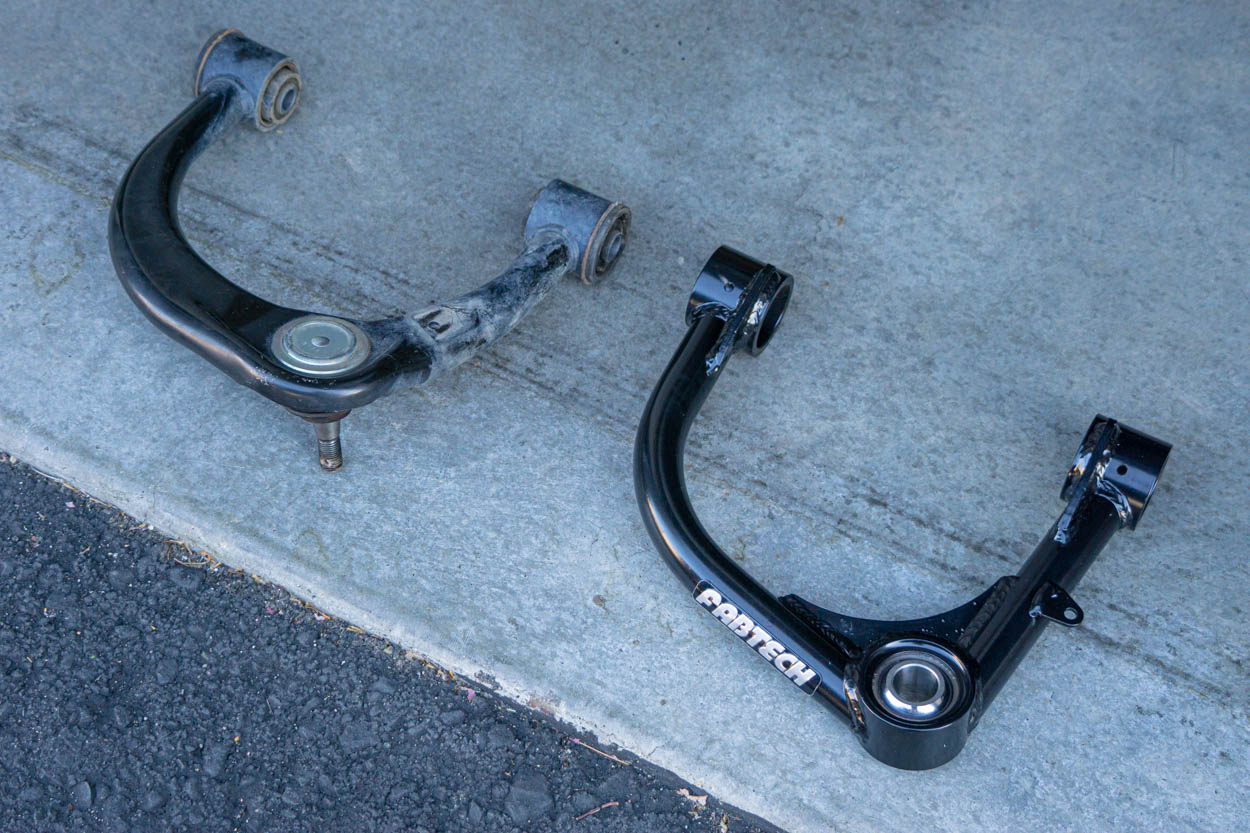
Just like the old shock comparison to the new ones, the control arms are a jaw-dropping upgrade.
The extra gussets and supports on the Fabtech show their strength and beefiness compared to the stock one.
Step 7. Notch Coilover Tower

If you didn’t notice already, the Fabtech Dirt Logic shocks use a different mounting system that requires minimal cutting/trimming of the shock bucket raised lip. This does not affect the structural integrity of the shock bucket.
Using the provided top hat from the Fabtech kit, dry fit it into the bucket while using a sharpie to mark where the bolt holes are on either side of the raised lip. That section is going to be what’s ultimately removed. The reason for cutting this area is that the new mounting system bolt conflicts with the raised lip. As such, it needs a seamless pass-through to be able to mount properly.
This is where you’ll need a Dremel or barrel sander to be able to successfully complete this step. I recommend using a corded Dremel or barrel sander with a 1.5″ attachment; the high RPM and heat caused my cordless Dremel to die and eventually burn out. If you’re still unsure about how to go about this step, refer to the provided instructions for the front shocks. There is a quality diagram depicting what has to be sanded or cut out.

Note the notch that is cut into the raised lip of the bucket. I repeated this on both sides of the lip to make sure I have no issues when installing.
To make sure that I cut in the right place, I did a dry-fit of the top hat, installing the three bolts to the bucket as well as the main bolt that is going to hold the shock in place. If you’re still running into clearance issues, cutting or sanding more will help. I left the assembly loosely fitted for when the time comes and we install the new shock.
If you were unsure about the hardware to use, it’s the three (3) zinc-plated 3/8″ bolts followed by a flat washer, then the lock washer to hold the top hat to the bucket. The 3/8″ Allen bolt will hold the shock to the top hat assembly.
Step 8. Misalignment Spacers

With the kit comes an assortment of misalignment spacers. Just one shock uses a total of four spacers.
The top two are the ones that’ll go into the top of the shock that eventually slides into the top hat. The bottom two are ones that go into the bottom of the shock and into the lower control arm. The larger of the two bottom misalignment spacers go towards the front of the vehicle while the smaller one goes towards the rear.

Photo: Top two (2) spacers are seen above, both the same size.

Photo: Bottom two (2) spacers; larger on the left indicating the front of the vehicle and smaller on the right indicating towards the rear of the vehicle.
Step 9. Install Coilover

Manipulate the shock into the bucket making sure to be careful and try your best to not hit anything. If the bottom two spacers fall out during the installation, they can be temporarily removed while you get the shock in place. Work the top of the shock into the top hat and loosely work the bottom of the shock into the lower control arm.
Once the top of the shock is in place you can grab the large Allen bolt, your wrench, and feed it through the shock. Then, loosely tighten it down enough to let the shock hold on its own. At this point, you can now reinstall the bottom misalignment spacers ensuring the proper orientation as specified above. The shock should be loosely in place.

Fabtech was thoughtful enough to include a tube of thread locker with the kit. This is going to be used when we are ready to torque down on the bolts.
I tightened the Allen bolt down to 90 FT/LBS before I went about torquing the plate bolts. Backing out the zinc plated bolts, I applied thread locker to all three (3) of them before using my 3/8″ wrench and torquing down to 37 FT/LBS. With the top completed, we can now focus our attention on the lower control arm and shock. Reusing the same 19mm lower shock bolt, work the lower control arm into place so that the shock and hole line up allowing for the bolt to be passed through. Torque this bolt down to 100 FT/LBS.
Now, the shock itself (minus the reservoir), is complete and everything is torqued down to spec.
Step 10. Remote Reservior

(If you don’t have the remote reservoir kit, this step can be skipped.)
If you haven’t already removed the front splash guard completely, now you will need to. With the external reservoir, the front splash guard will be in the way for the installation but can be reused or modified to fit behind the reservoir later on. This will allow the ability to dry-fit the front reservoir mount. I found the best place for it to sit is on either side of the two caps as depicted above. Using a Sharpie, mark the holes for what is going to be drilled out.

You may notice that the reservoir will end up hitting the front fender liner a little bit. I used a Dremel and did some trimming just enough to have the reservoir clear of conflict.

Using a 17/64″ drill bit, drill out the two holes you marked. In the hardware kit, there are two silver self-tapping screws. These are going to be the screws used to hold the reservoir in place. I used a drill to get them started, finishing them off by hand, making sure I didn’t cross-thread them.
Locate the two (2) hose clamps provided in the kit. Work them around the ends of the reservoir mount. I found that having the nut face down helped with tightening the reservoir down.

Grab the reservoir and set it into the mount. Using either a drill or flat head screwdriver, start tightening down on the hose clamps. This is another step when having a second set of hands is helpful; one holds the reservoir while the other tightens. Lining up where you’d like the caps to be, snug them down while making sure the reservoir is centered and the logo is in the right spot!
Success! The whole shock is completed. Now, we’ll focus our attention on the UCA.
Step 11. Assembling UCA
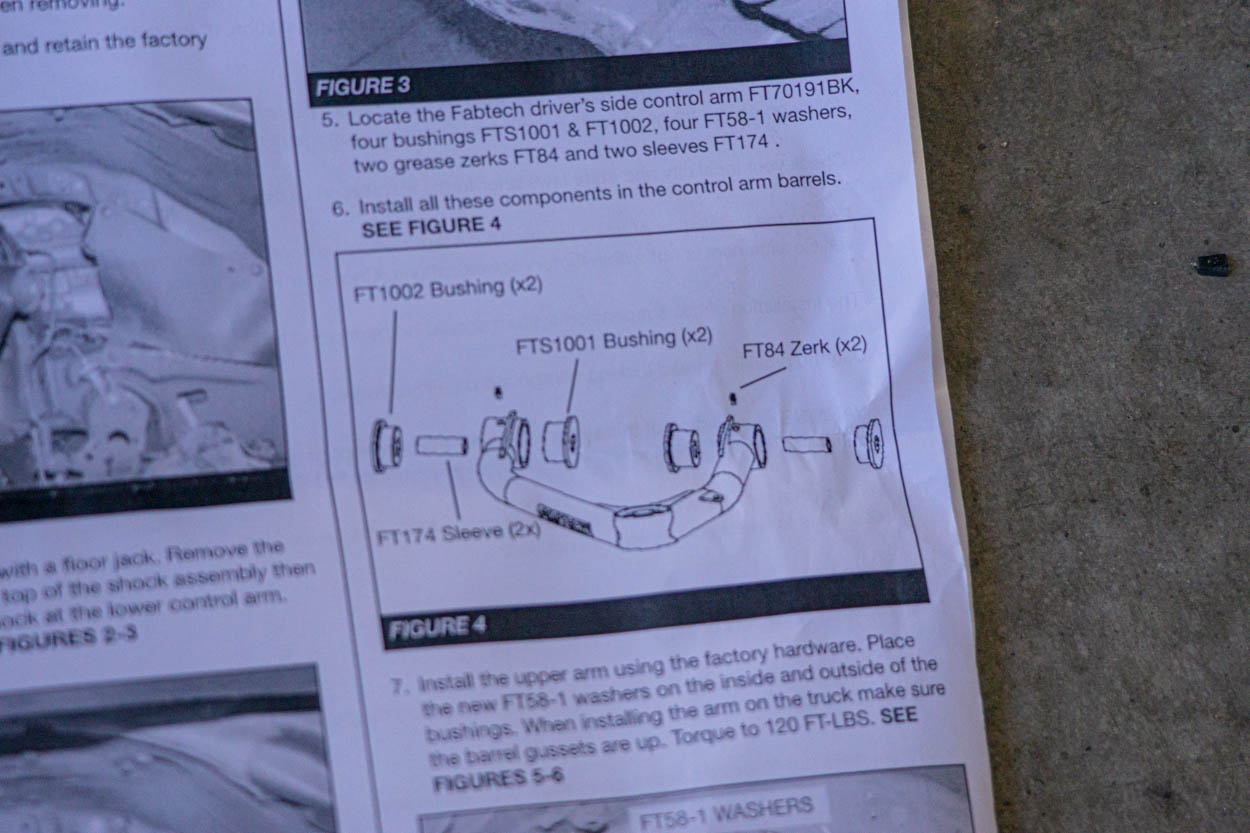
Figure 4 in the provided UCA instructions depicts how the bushings go together. Note that the larger of the two bushings go on the inside.
At this point, you have one of two options for greasing:
- You could pre-pack the bushings and then inserting them into the control arm.
- Wait until the zerk fittings are on to then grease it.
Whichever way you decide, make sure that you grease the bushings; if not the control arms will squeak.

With the bushings, zerks, and ball joint fittings on the control arm, it’s ready to be installed onto the truck.

Figure 7 depicts how the UCA will attach to the spindle. The bolt can only be installed one way with the tapered ends pointed towards the ground.

I installed the UCA a little differently than most. It may have been easier the other way, but it got the job done too.
Instead of installing the long bolt first, I opted to attach the control arm by the uniball joint to the spindle. I assembled the uniball, bolted it to the spindle, and then put the longer bolt in the back in.
If you wish to mount the new UCA the more conventional way, start with the long bolt first. To install the long UCA bolt, just follow the removal instructions in reverse. Thread the bolt in through the engine bay while someone is in the wheel well holding the washers and guiding the bolt to get started. A fair amount of force is going to have to be applied to get the bolt through. If able, use a small hammer, tap to work the bolt all the way through, and make sure everything is lined up.
To attach the uniball to the spindle, attach the tapered spacers on each end of the uniball, and run the stud through the uniball, then through the spindle. Thread the bottom part of the bolt on and tighten down as much as you can while holding an adjustable wrench at the top of the bolt (so it doesn’t spin). Then, thread a nut on the top of the bolt.

Wrapping up the UCA install, we can tighten down the rest of the bolts and torque to spec.
Torque the UCA long bolt to 120 FT/LBS. Torque both sides of spindle mounted bolt to 150 FT/LBS.
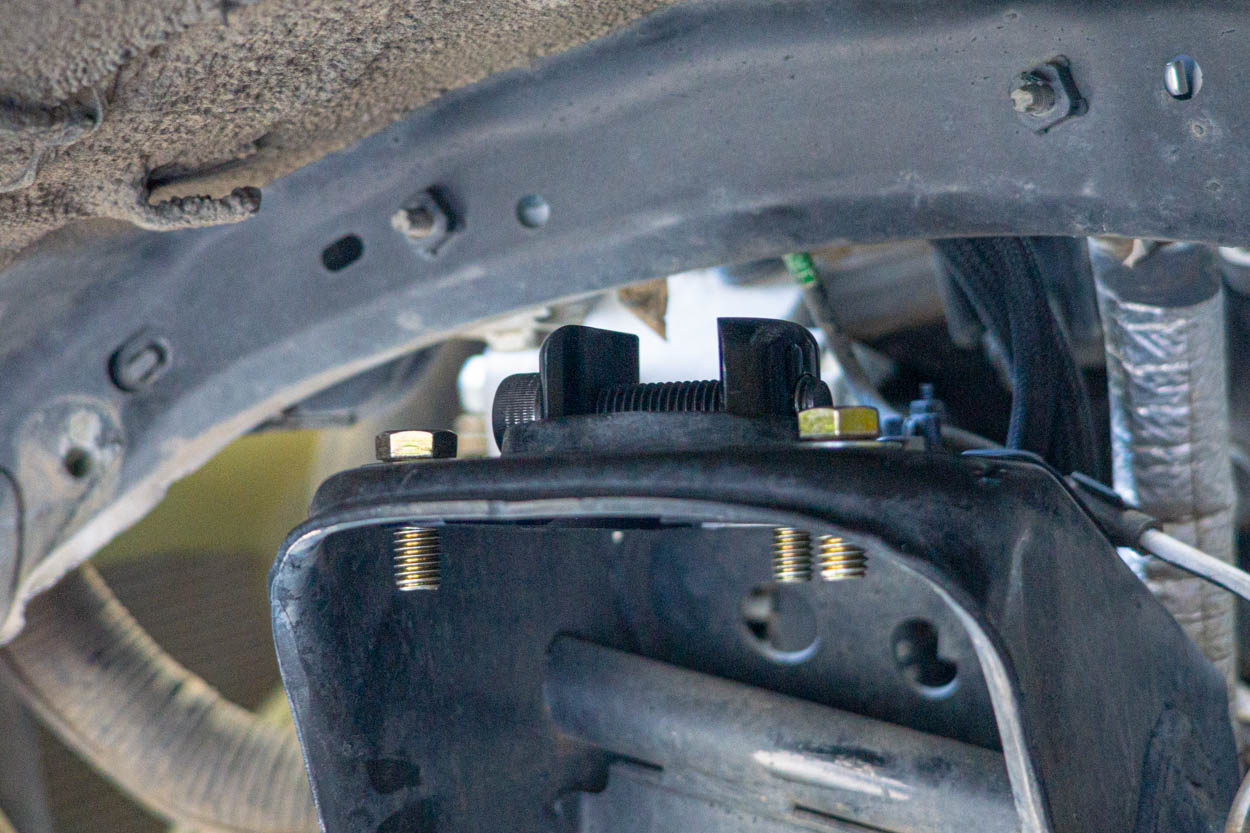
Step 12. Sway Bar Drop Bracket
Once you finish both sides, you can install the sway bar drop kit. In the kit of hardware, there will be four (4) zinc-plated bolts left and four (4) washers. Two (2) will be used for both sides in attaching the sway bar to the drop kit and the factory hardware is used to reattach the whole assembly back to the frame. Make sure that the tapered end is pointed towards the rear of the vehicle. Torque bolts to 59 FT/LBS. After that is completed, attaching the sway bar back to the spindle can be done!
Of course, be sure to look at everything, make sure it all looks right, everything is torqued down to spec, and nothing was missed. The rear splashguard can be reinstalled at this point in time. Getting the front end wrapped up consists of reinstalling the front wheels and torquing the lugs down to 85 FT/LBS. Drop the front-end off the jacks. You will notice that the truck will have some camber and alignment issues, which is a known effect when lifting a truck and will be needed realignment ASAP.
Phew, that’s a lot of work. Sit back and admire how awesome it looks!
Add-A-Leaf (AAL) & Rear Shocks

Time to work on the back of the truck.
Let’s start with the Add-A-Leaf (AAL).
Step 13. Jack Up Truck

The installation of the AAL requires jacking up the rear of the truck. You want to make sure the whole axle is off the ground and the truck resting on jack stands. This is because the axle needs to be manipulated out of the way to add the new AAL.
I’d recommend lifting it from the hitch if possible; other jack points include the frame or differential if your jack can’t accommodate the hitch. Before lifting the truck completely off the ground, crack the lug nuts loose on the wheels (just like the fronts) before removing them completely once the truck is in the air.
Step 14. Remove Shocks & U-Bolts
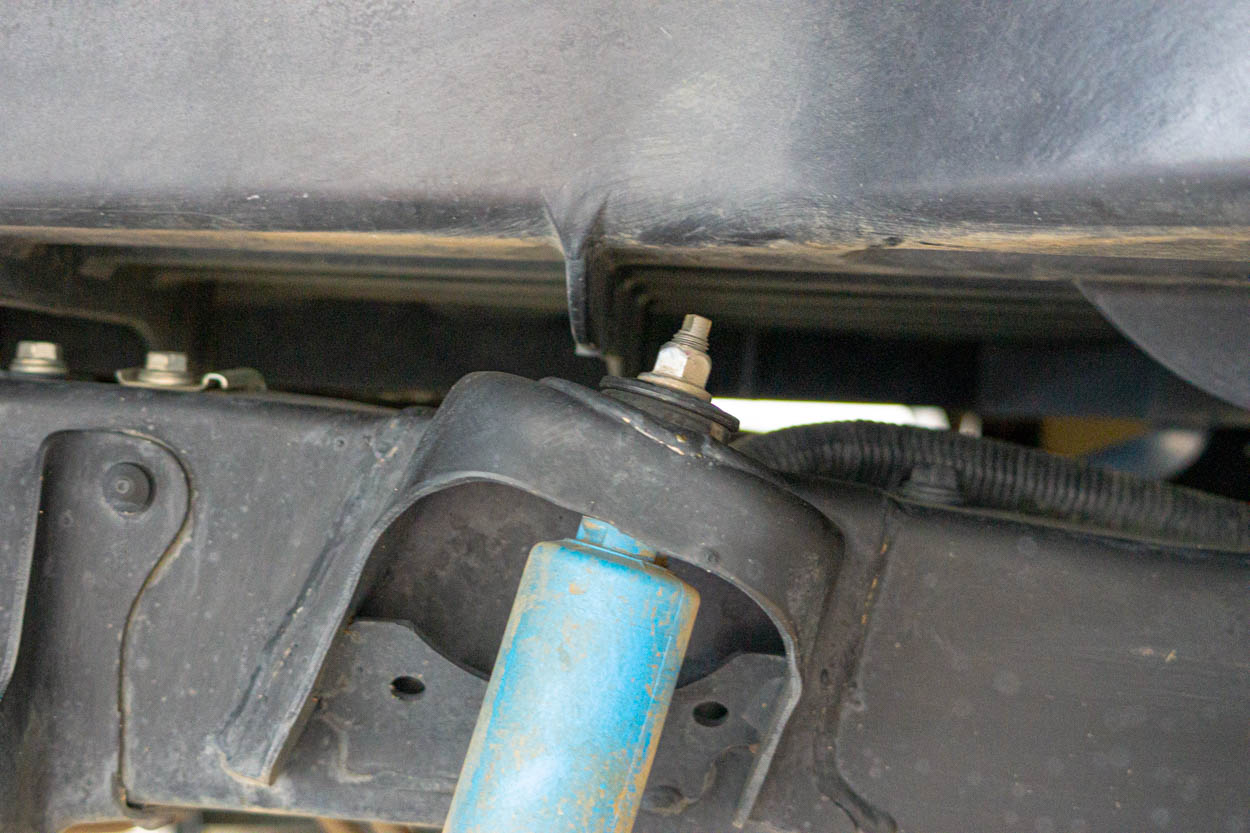
Removing the stock shock is as easy as removing two (2) bolts; one on the top, one on the bottom.
Using an adjustable wrench, adjust it to the size of the flat spot on top of the shock strut. With your other hand, use a 17mm wrench for the main nut. The adjustable wrench is there to stop the whole strut from spinning. In order to successfully remove the bolt, spin the wrenches towards each other until the bolt fully loosens. If the bolt is being stubborn, WD-40/PB Blaster will do the job! The nut, rubber bushings, and washers can be set aside as they won’t be reused for the new shock.

Let’s focus our attention on the bottom bolt as well as the U-bolts. The shock bolt is 17mm and can be loosened from either side. I found it was easier on the nut side. This bolt will most likely be tight, just like the top, so WD-40/PB Blaster will help. That, or a long breaker bar to get leverage will help stubborn bolts. Remove the bolt from the slot and set it aside as this bolt is going to be reused.
At this point, the shock is completely free and you can push and pull the shock out.
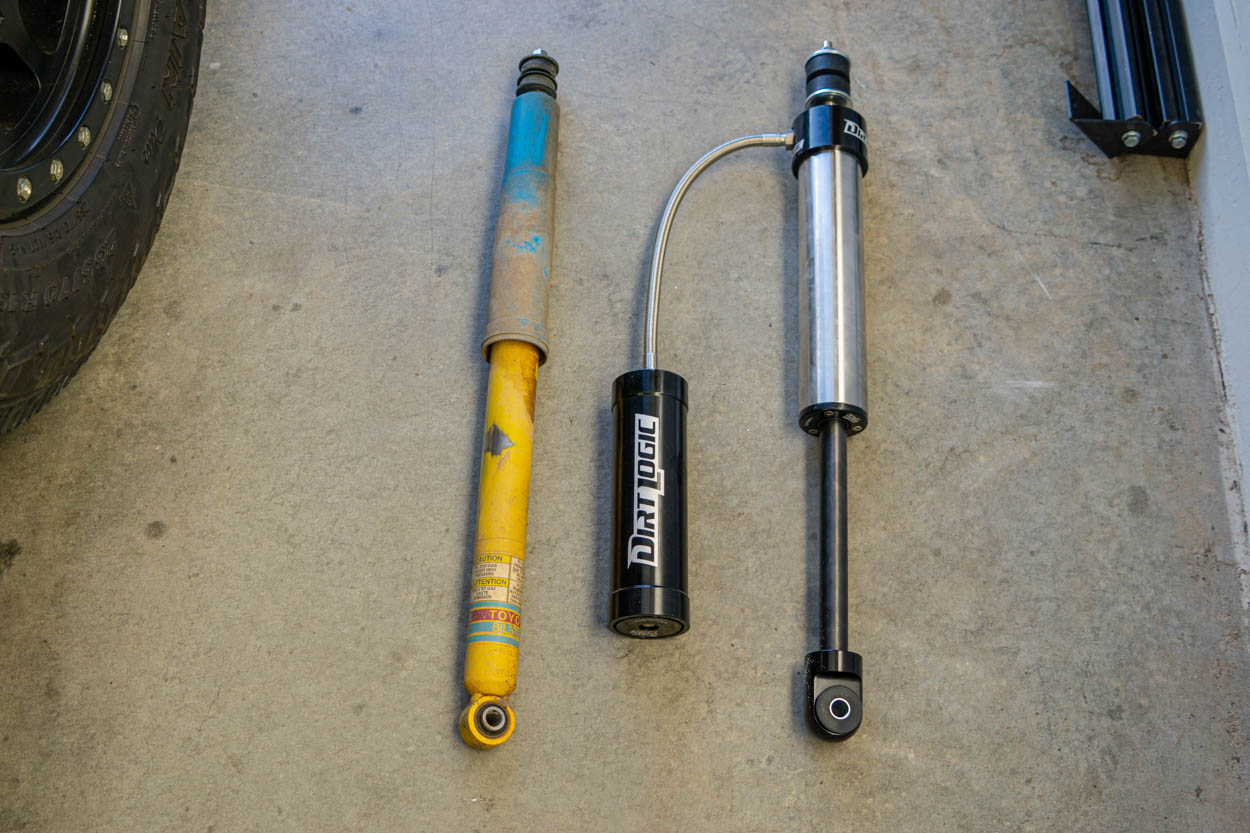
Picture: Look at that side by side. Between the stock shock and the new Fabtech rear shock, the picture does all the talking!
With the factory rear shock out, we can now focus all our attention on the factory U-Bolts and separating the leaf pack from the axle. Before fully separating the axle from the leaves, there are two (2) 12mm bolts that hold the brake line to the leaf pack and the frame. Removing those will ensure that the brake lines aren’t over-extended during this process. Once the rear shocks are removed, the U-Bolts on the bottom of the axle can be loosened with a 19mm deep socket.
If you have an impact driver, that can be used to remove the bolts as they’re torqued down pretty tight. Supporting the axle with either another jack or cinder block is recommended so no excess stress is put onto components. The factory U-Bolts and nuts can be removed and set aside. Fabtech provides new U-Bolts and hardware for the AAL.
Step 15. Prep Factory Leaf Spring

If you have a jack supporting the axle, slowly lower the jack enough to separate the axle from the leaf pack.
After examination of the stock leaf pack (when compared to the new Fabtech AAL), you’ll notice that the rear spring clamp is in the way of the new clamp on the AAL. Using a grinder, cut the side of the clamp as well as the rivet on the bottom, this will allow space for the new clamp to go in place of the old one.
Step 16. Separate Leaf Pack
Using a set of C-clamps, clamp both sides of the pack tightly together so when the center bolt is removed, the pack won’t separate abruptly on you. If the 14mm center nut is spinning on you, the head of the bolt can be held with vice grips to prevent that. Once the bolt is removed, slowly back off on the C-clamps making sure to not do it too fast so the pack doesn’t expand rapidly.
Now the bottom leaf pack that’s going to be removed should be free from the main pack. If there isn’t enough space to slide the bolt through, slowly lower the axle down enough to get the bottom leaf and bolt through and out. Between the stock leaf and axle platform, there is a spacer/shim. Make sure you keep the same orientation as it’s super important for the way the truck drives and the way the driveline orients. The thick end goes towards the rear while the skinny end goes towards the front of the vehicle.
Step 17. Fabtech AAL
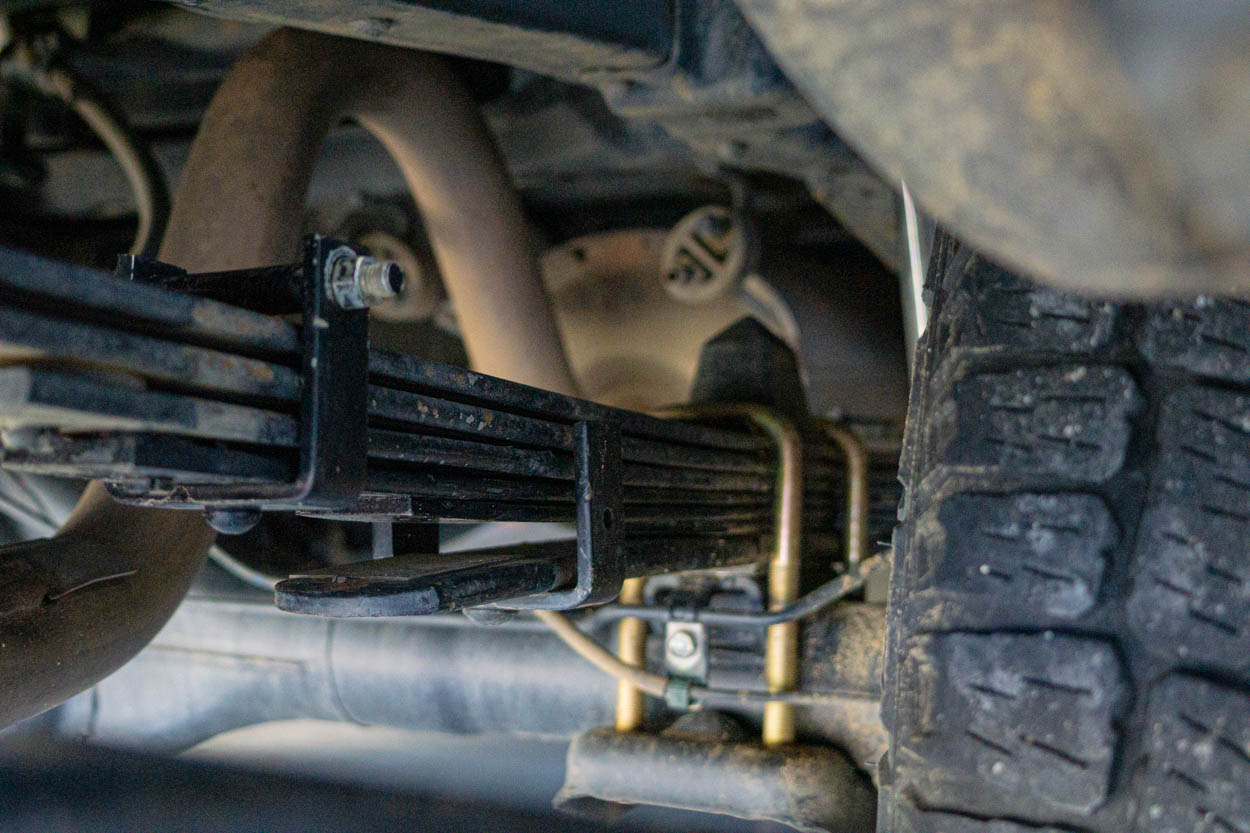
It’s now time to install the new Fabtech AAL. This new pack adds three (3) additional leaves to help level out the truck and support any additional weight you may be running.
From the center bolt, the leaf pack has a shorter end and a longer end; the long end goes towards the rear of the vehicle while the short end goes towards the front. The process for installing the new AAL is the reverse of taking out the old. The axle should already be lowered enough but if it’s contacting the new bolt, it may need to be dropped a little more. Line up the bolt with the hole and feed the pack through.
Some wiggling and shimming will need to be done to get the pack lined up straight. Work it enough for the center bolt to be poking through the top. The new bolt can now be threaded on which will help compress the pack together. Tighten the center bolt down tight as well as the two new clamps on each end of the leaf pack. The center bolt will have a few inches of extra thread and will need to be cut down with a grinder to accommodate the factory bump stop. If you have an after-market bump stop with a strike plate, then the factory bump stop won’t be reused and the hardware for the bump stop will.
Step 18. Install New U-Bolts

The axle can now be jacked up to line up with the leaf pack. Some manipulation may need to be done for it to line up, but the center hole in the axle will line up with the bolt head on the bottom of the leaf pack. Make sure the shim is in place, with the skinny side forward and the thick side towards the rear. Fabtech provides new longer U-bolts and hardware.
With the leaf pack and axle lined up install the factory bump stop and new U-bolts. The ends of the U-bolts may need to be compressed a bit to get them to feed through the plate. Using the new washers and nuts, thread them onto the U-bolts. When tightening down ensure that they’re being compressed evenly and there is an equal thread showing on both u-bolts. Those bolts get torqued down to 120 FT/LBS. Reinstall the brake line to the new rear clamp with the new hardware.
Step 19. Prepping Lower Shock Mounts

With the new leaf pack all buttoned up, let’s focus on installing the new Fabtech rear shock.
Fabtech recommends sanding a mild radius in the lower support of the shock mount. The reasoning for this is to accommodate the bigger bottom assembly without running into problems. Using a Dremel or barrel sander, sand a mild radius into the support. I came to find out that the sanding is extremely minimal (almost negligible) but rather be safe than sorry. I proceeded to sand a little bit to ensure proper fitment.
Step 20. Prep New Rear Shocks

In the provided hardware kit, there will be two (2) bushings for the top and two (2) for the bottom. The two (2) for the bottom are pretty obvious as they will only work for the bottom portion. Also, the metal spacer is what’s going to feed through the bushings.
These bushings can be installed by hand or pressing in via a hard surface. If the bushing are being stubborn, light tapping with a mallet will do the job and the same goes for the metal spacer!
As per the top portion of the shock, the orientation is as above.
One of the bushings is on the inside of the upper mount, with the other bushing on the outside along with the washer and nut.
Step 21. Mounting Dirt Logic Shock

Start with inserting the top of the shock into the bucket followed by the bushing and then the washer and nut.
Loosely tighten down to hold the shock in place.

The bottom of the shock is tight and requires some finesse to get in. To not damage the shock, using a small piece of 2×4 and a hammer, hit it from the back and the lip to get it lined up with the hole enough to feed the bolt through.
When it’s lined up, feed the bolt through and screw the nut on the other side. Torque the bottom bolt down to 65 FT/LBS. Apply thread locker to the top bolt before tightening down to 29 FT/LBS.
Step 22. Reservoir Mount

Just like the fronts, the rears have a reservoir mount, hose clamps, and self-tapping screws. Make sure the hose has some slack in it to avoid excess tension and strain to the line. Hold the reservoir and its mount up to the frame and see where you like it best.
I found that the position above is a good place for it. Once you’ve found its final resting place, use a sharpie to outline the holes that are going to be drilled out. Repeating the process like the front reservoirs, using a 17/64″ drill bit, drill two (2) pilot holes for the self-tapping screws. Threading the screws in, be sure to not cross-thread and/or break the bolt. Once the threads are cut out, install the reservoir mount with the provided screws and hand tighten down so there is no play.

As mentioned above, the reservoir mounting process is identical to the fronts.
Using the provided hose clamps, feed them around the ends of the mount and tighten down on the reservoir until snug (logo out!).

Check out that completed rear shock! How about that beauty?
Repeat these steps on the other side. Finish off the rears by reinstalling your wheels and torquing down to 85 FT/LBS. Also, check that all bolts are properly torqued down.
The installation is completed! Admire your work and how great it looks! Be wary of the front alignment as that’s going to need to be fixed before any sort of consistent driving is done. Furthermore, after the first drive both on-road and offroad, it is highly advised to do a bolt check and go around on all four corners and make sure your bolts are still properly torqued.
Initial Review

Now that we’ve gone through the entire installation, let’s talk about my initial impressions.
On-Road Driving

Out of the box with no adjustments, we tested the shocks.
Due to the linear digressive valving of these shocks, they’re stiffer, no doubt about that. But don’t let this fool you; the shocks are a night and day difference compared to the stock shocks in terms of ride comfortability and plushness. The Fabtech Dirt Logic shocks seem to be a happy medium between the other options available on the market (in terms of on-road comfort and ride). With the AAL in the rear, the kit makes the rear end not feel loose; rather, it feels planted when hitting bumps and going around corners at speed. At higher speeds, bumps are smoother and the truck doesn’t feel disconnected from the road. Lower speeds, such as speed bumps, road imperfections, etc. are on the stiffer side, but are more comfortable than stock, especially if you have additional weight.
Compression and rebound adjustment would be great, but the shocks have been tuned to meet the performance for someone who wants to daily a built truck comfortably, but also wants to use it off-road. I haven’t ran into an issue yet where I’ve felt like I’ve wanted to adjust the shocks differently from their factory setup. After driving for 300+ miles, the shocks have started to break in and feel like they’re absorbing driving loads better, making the ride even more comfortable.
Off-Road Driving

Fast Driving
We tested on speeds ranging from 20-60 mph on roads with whoops, ruts, loose rock, gravel, and all types of dirt/snow. This type of terrain is where the shocks are in their natural habitat. Just like mentioned above for the on-road experience, the shocks make the truck feel significantly more connected and planted.
The truck handled fantastically. The ride was most definitely smoother than stock suspension. With stock suspension on washboards and ruts, the truck would tend to jump or hop around – and the back end would kick out, almost giving a sensation of losing control. Furthermore, with the stock suspension, the ride was rougher and uncomfortable to an extent. The new Fabtech Dirt Logic read end took away most of those complaints and concerns, even without any real added weight. External reservoirs help to maintain the performance of the shocks even after extended periods of work.
In general, I was pleasantly surprised. With the type of valving that the shocks have, I was expecting them to feel stiff, instead, they soaked up whatever was thrown at them. The rebound isn’t as bouncy, either. Furthermore, the added internal bump stop on the struts gives peace of mind when taking impacts that would otherwise exceed the capacity of other shocks. With the added external reservoirs, the shocks dissipated the heat really well and continued to hold their performance even after consistent usage.
Slow Driving
We moved from high speed to low speed, up to about 15 mph, seeing how the shocks would handle the more crawling-orientated terrain.
Crawling has felt like luxury with this setup. Right away I noticed a ton of ground clearance, while this is pretty obvious, having an extra ~2.5″ of room to play with allows the ability to go places you’d otherwise shy away from on a stock setup. The front shocks handled the big hits and obstacles well and the reservoirs did their job. The internal bumps also work well here too, especially when going off large drops or hitting deep holes. Having those bump stops there ensures that the full shock won’t get over-compressed. The rears handled fantastically as well, with keeping the truck planted and offering 10″ of travel really allowing the ability to flex. Overall, I was impressed by the way the truck handled crawling, there aren’t really any complaints because at the end of the day crawling isn’t supposed to feel like your riding in a Rolls Royce, you’re off-roading!
Final Thoughts

These shocks are legit, no other way to put it.
Being a kit that I wasn’t too familiar with at first, while I’ve had my fair share of skepticism, it has all been taken away after I’ve had my hands on this system for an extended period of time. All the way from the packaging and customer interaction with Fabtech, to the build quality and performance both on-road and off-road, I can confidently say that these shocks are here to give other brands a run for their money.
The multiple different kit options allow you to be flexible with your wants and needs as well as your price point. We’re going to follow up in some time with a long-term review of the shocks to see how they’ve held up after putting them through other terrains and environments. Be sure to be on the lookout for that in the near future. In the meantime, happy trails!
I finally was able to redue all of my suspension I installed 21/2 inch lift struts new shocks and a two inch lift kit to the rear new rack and pinion steering upper and lower control arm rack and pinion steering kit it took me two days but it was definitely a upgrade that was worth doing my truck drives and ride’s far better than I would have thought I highly recommend this upgrade
Excellent overview of these shocks. They look to be a good all around performer on streets and off-road.