
Wheel spacers have always been a hot topic in the off-road community. Whether you just want to add more of an aggressive stance or clear bigger tires from your upper control arms, spacers are a cheaper alternative if you’re still rocking stock wheels. And popular to contrary belief, a set of hub-centric spacers are safe, so long as they are installed correctly.
We recently installed 33s (285/70R17) on our 2014 Tacoma with a Bilstein 3″ lift kit and Icon Add-a-leafs. We were pretty shocked to find that the bigger tires didn’t rub at all on the body.
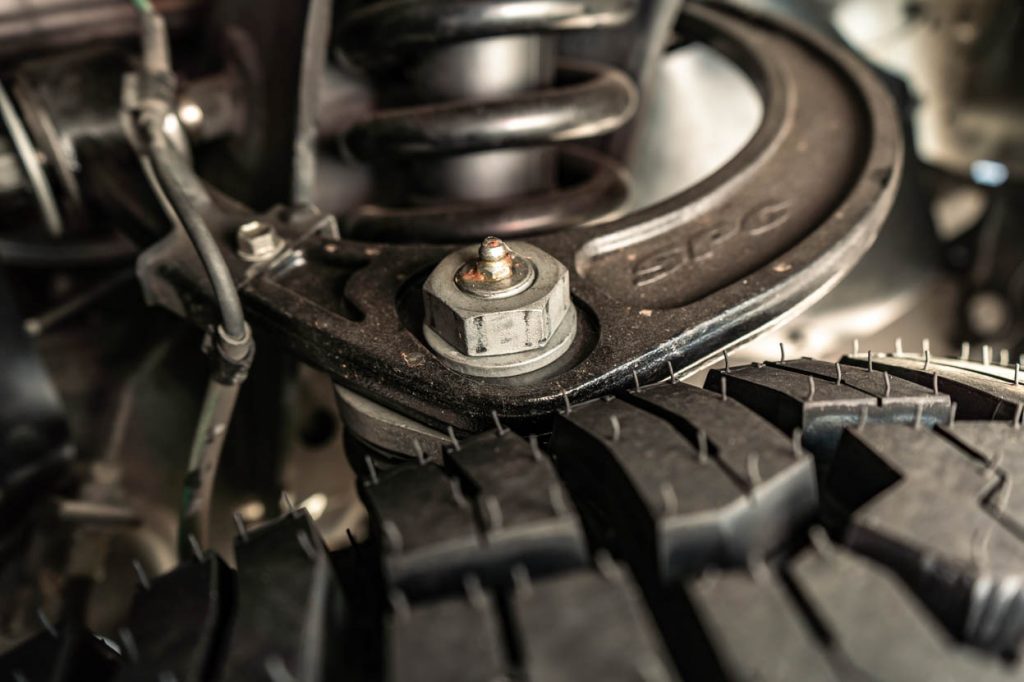
They did, however, rub on the SPC upper control arms (UCAs) pretty bad. We knew our solution to fix this issue was to either install new wheels or spacers.
Since we aren’t quite ready to mount the 17-inch -38 offset Dirty Life beadlocks, we opted for wheel spacers as a quick, affordable fix. And sure enough, the 1.25″ G2 wheel spacers from YotaMafia solved the upper control arm rubbing issue.
Table Of Contents
Do You Need Them?
Spacers have pretty much two uses. For looks/stance or clearance. They can give you a more aggressive stance with stock wheels and tires. But more importantly, they can give you some more clearance on suspension components like the upper control arms.
With that being said, spacers have been a heated topic amongst the off-road community for decades. A majority of people out there are quick to discard the idea of putting wheel spacers on because it shortens the life of your wheel bearing or they’re under the impression that the spacers will fail.
Is this the case for all spacers?
This (failure) may be true for generic lug-centric spacers, but companies like SpiderTrax and/or G2 specialize in providing a wheel spacer that is exclusively designed for the Tacoma hubs. This design makes their hub-centric spacer much more safe and reliable than a universal 6-lug spacer off eBay.
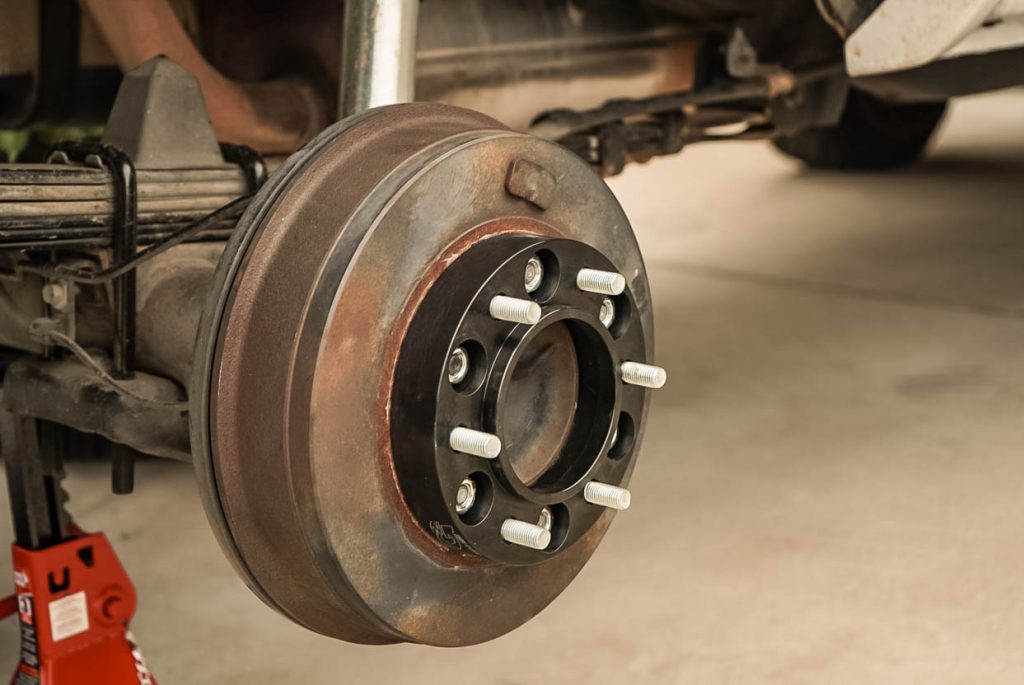
We installed a set of 1.25″ spacers right after we found out that our brand new 33-inch (285/70R17) Yokohama Geolandar X-ATs, rubbed on the upper control arm. While we are eventually going to put new wheels on the Taco build, for now, we just wanted for it to be driveable. After we installed the spacers, we took the truck for a test drive and it 100% fixed our control arm rubbing issue.
Are They Safe?

I have yet to hear an explanation as to why a solid set of hub-centric spacers are dangerous, assuming they were installed correctly. Sure, they may accelerate wear on your wheel bearing, but no more than wheels with aggressive offset. In fact, this is why we don’t recommend going with more than 1.25″ spacers. The farther away the outside edge of your tire is from the hub, the more it decreases the life of your wheel bearing and hub assembly.
Most of the horror stories of spacers failing are due to operator error. Torque wrenches are a necessity when it comes to this sort of thing. Tightening the nuts too little will obviously have the nuts loosening off of the stud over time, and tightening them too tightly could cause the stud to break.
When it comes to spacers, you get what you pay for. The problem with cheap spacers is that even though they match your Toyota bolt pattern, the studs are often not long enough. Meaning there’s going to be too much stress on the weakest part of the spacer due to not enough thread engagement. Companies like Spidertrax and G2 realized this was an issue and manufactured spacers that have factory-length studs.
What Does Hub-Centric Mean?
Hub Centric Basics
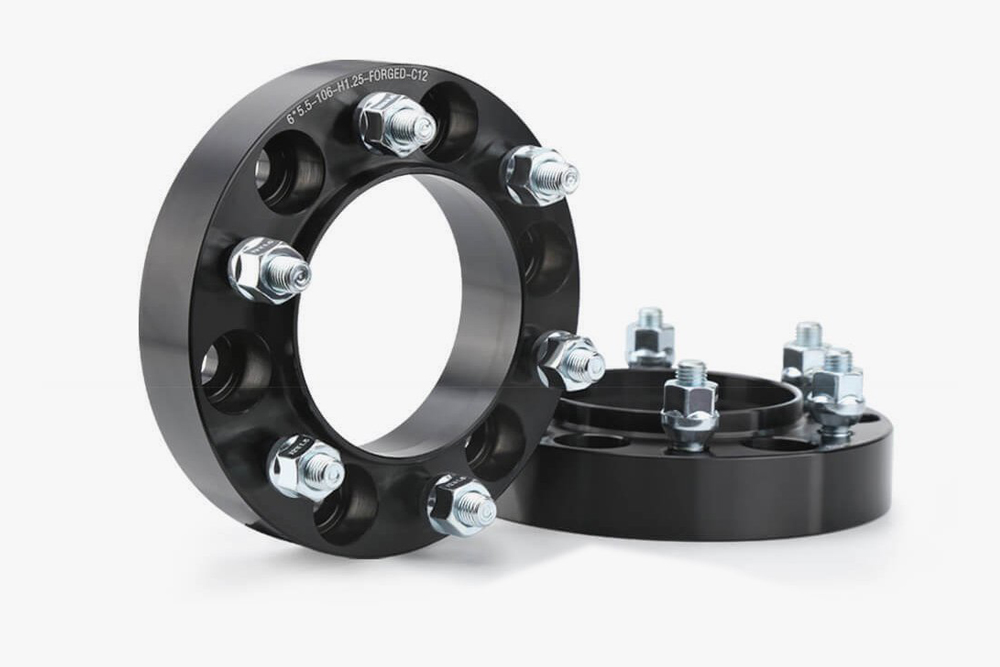
One of the key components that make spacers from Spidertrax and G2 safer than others is the fact that they are hub-centric. This means that the spacer is centered on the axle hub much like your factory wheels. This type of spacer has a small beveled edge on the edge that contacts the wheel hub. This feature is designed to make a snug connection between the wheel and the hub.
Hub-centric spacers ensure that there is constant contact between the hub, spacer, and wheel, thus creating a smooth and reliable ride. When the spacer is centered on the hub, it supports more weight and stress than if it centered on the lugs alone. This is why this style of the wheel spacer is typically more pricey than lug-centric because the center bore of the spacer is exclusive to a specific model of vehicle.
While it’s true that bringing your wheel assembly away from the hub leads to premature wear on your wheel bearings, hub-centric wheel spacers help keep the wear to a minimum, whereas lug-centric spacers would accelerate the life of your wheel bearings.
Lug Centric Basics
Lug-centric means that the spacer is centered on the wheel studs. This allows manufacturers to make more of a universal spacer. In other words, a spacer that fits an Isuzu Rodeo will fit on your Tacoma. This style of spacer can definitely cause some problems down the road. For starters, it is common to have a pretty noticeable wheel vibration with lug-centric spacers. This is due to a gap that is present between the spacer and the inside part of the wheel. If it were hub-centric, that gap would be filled by the little lip/bevel on the spacer that I mentioned earlier.
An often overlooked issue is that many companies that make universal spacers use cast aluminum rather than billet aluminum. Cast aluminum is far softer than billet, meaning if you hit a curb or rock too hard there’s a real possibility you could warp the spacer leading to several problems down the road.
Another common downside to lug-centric spacers is a majority of the time the studs are not the right size, or the stud holes are not deep enough. If one lug nut backs off the stud because it didn’t get threaded on far enough, you’re liable to break something or hurt yourself.
The biggest problem with lug-centric spacers is that the studs take most of the stress. This is because this style of spacer is centered on the lugs so there is going to be a gap between the spacer and the wheel. If you were to hit a curb or drive over rough terrain frequently, you run the risk of deforming one of the studs. This is a huge hazard, and obviously, if the studs were to fail, you would lose the wheel.
G2 Vs. SpiderTrax
Two of the better-known companies that make hub-centric spacers are G2 Gear and Axle and Spidertrax. Although there are many similarities between the two brands, there are a few distinct differences between each of their spacers. Each company makes a hub-centric spacer out of aluminum, but what are the differences?
G2
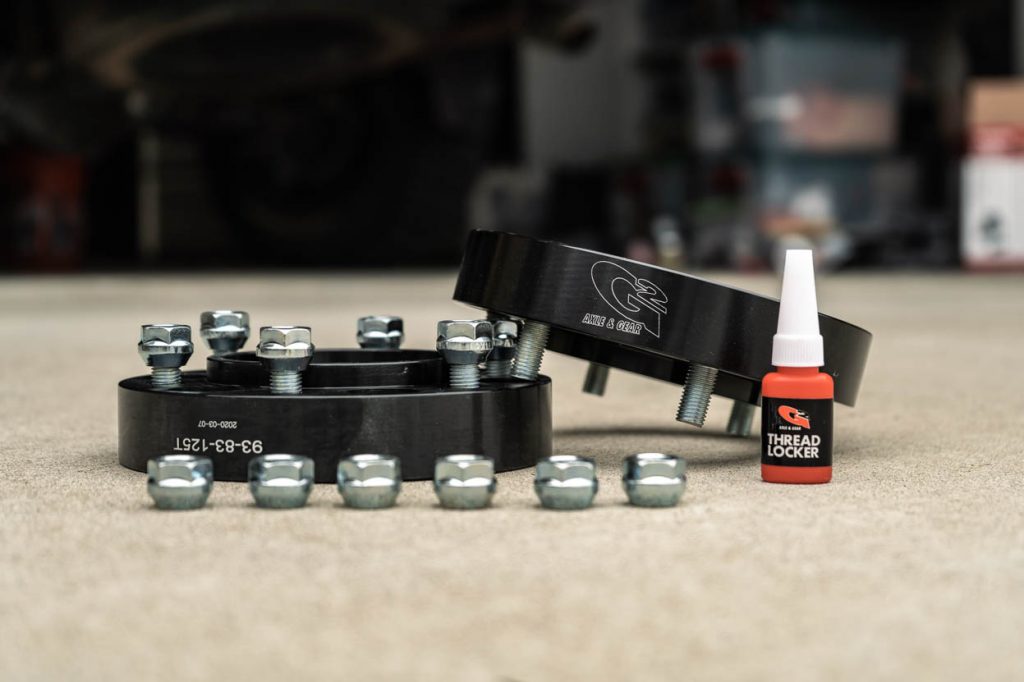
G2 Gear and Axle is a well-known company that has been a big name in the off-road world for quite some time. They offer hub-centric wheel spacers for Toyotas that come with a black anodized finish and comes standard with a limited lifetime warranty. These are the spacers we put on the white Tacoma (Tiffany) after we put 33s on to help clear the control arm – they look great.
Out of the box, these spacers come with all the hardware you’ll need and with G2 Thread Locker. G2 uses Grade 8 bolts on their spacers which is the bare minimum grade to use for something like a wheel spacer. Like the Spidertrax spacers, they are made out of 6061T6 aluminum which is a strong, lightweight material. Unlike the Spidertrax, the G2 wheel spacers are made in China.
Find it Online
- G2 Gear & Axle Hub Centric: Check Price
SpiderTrax
SpiderTrax is the leading wheel spacer company in the off-road industry. You get your choice of blue or black in an anodized finish on their hub-centric spacers. One of the things that set Spidertrax apart from their competitor is the fact that they’re made right here in the United States. We love to support local businesses and run these on three other builds here at Trail; two 5th Gen 4Runners and a 3rd Gen 4Runner.
Another important difference between Spiderdrax and G2 is that Spidertrax uses Chromoly wheel studs. Their 10.9+ grade studs are much stronger than G2s Grade 8 hardware. The Spidertrax wheel studs are stronger than OE studs, making it harder to break a stud.
The cherry on top is that Spidertrax is well known for its fast shipping and customer service. In fact, their wheel spacers ship out the day after you order them. This is extremely convenient because if you have a clearance issue after installing bigger tires, then you need to install spacers (or wheels) sooner rather than later.
Find it Online
- Spidertrax WHS-007 Hub Centric Check Price
| G2 | SpiderTrax | |
|---|---|---|
| Material: | 6061T6 aluminum | 6061T6 aluminum |
| Wheel Studs: | Grade 8 | Grade 10.9+ Chromoly |
| Produced: | China | USA |
| Warranty: | Limited Lifetime | N/A |
Potential Problems

Anytime you move the outside edge of the tire away from the hub, you may run into some issues whether it’s with spacers or negative offset wheels. The biggest issue is the stress put on your wheel bearing by having the tire farther away. Premature wear can also occur to the axles, hub, or ball joints. If you buy spacers to fix a rubbing issue, we recommend not going past a 1.25″ to minimize the wear and tear on these other components on your truck.
Another possible issue you might run into is broken wheel studs. This happens a lot with lug-centric spacers since the studs take most of the stress rather than the hub. During big bumps and driving rough roads, it isn’t uncommon to bend or shear a stud on a cheap set of spacers. It’s still possible to break a stud off of a reputable company like SpiderTrax or G2, but this is where torque specs come into play. It is important not to over-tighten or under-tighten these studs.
It’s safe to say you should avoid lug-centric spacers at all costs.
Additionally, cheap lug-centric spacers are notorious for having the nuts backing off the stud, or the stud isn’t long enough. If the stud isn’t long enough to thread a nut onto with good thread engagement, it is not safe. The nut will eventually come off and more than likely the tire with it. SpiderTrax and G2 take this into consideration by including thread locker with their spacers, ensuring the nuts won’t back or loosen.
Depending on what your tire size is and what lift you have, after you install a set of spacers, you may rub on the back part of your fender where you didn’t rub before. This is because when you bring out the outer edge of the tire away from the hub, you decrease your scrub (rubbing) radius.
Pros
- Help Gain Clearance
- Less Expensive Than Wheels
- More Stance
- Safe if Installed Correctly
Cons
- Unsafe if Installed Incorrectly
- Wear and Tear on Wheel Bearing & Hub Assembly
Installation Overview
Difficulty
- Easy
Time and Assistance
- 30-60 minutes
- People: 1
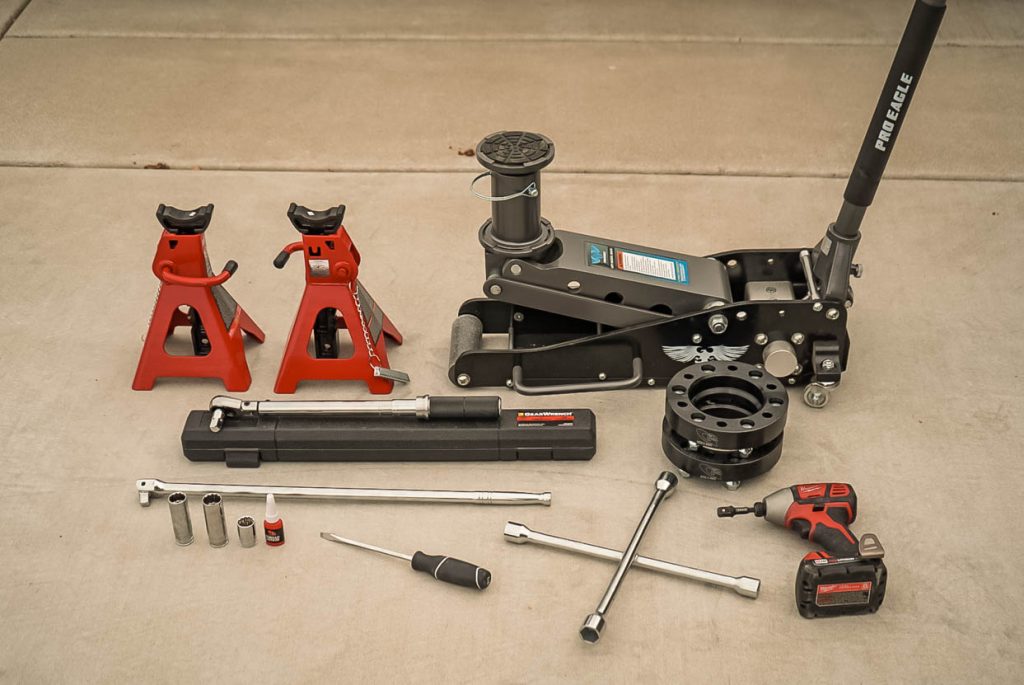
Tools and Materials
- Jack (we use Pro Eagle)
- 6-Ton Jack Stands
- 1/2″ Breaker Bar
- Torque Wrench
- Impact Gun or Tire Iron
- Medium Sized Screwdriver (Phillips or Flat Head)
- 1/2″ 21mm Deep Dish Socket
- 3/8″ & 1/2″ 19mm Socket
- Thread Locker (Included with G2 & SpiderTrax Spacers)
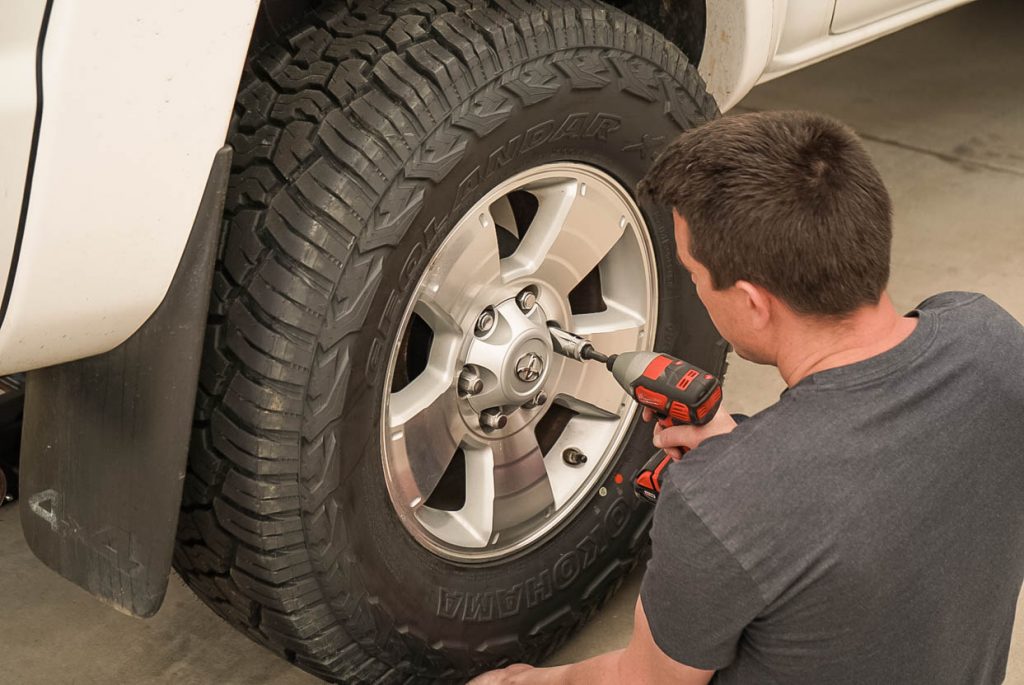
Step 1. Loosen Lug Nuts
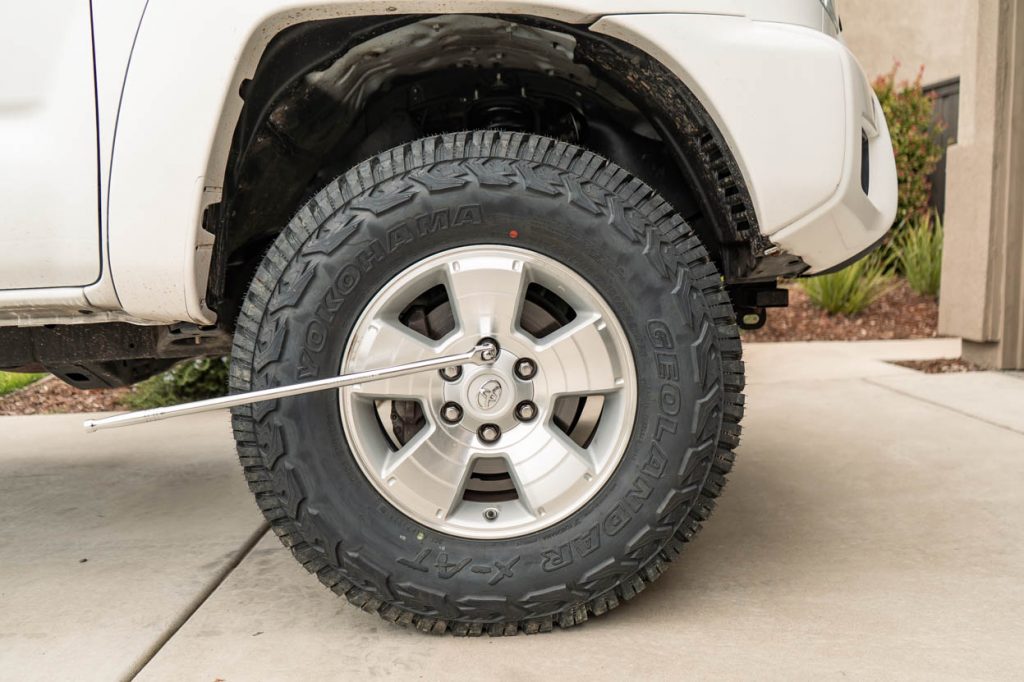
This first step is really just for the front end. Break the lug nuts loose with a breaker bar or an impact with the tires still on the ground. This will prevent the tire from spinning but it’s important to keep in mind not to take the lug nut completely off, just break it loose.
For the rear end, you can jack the truck up before breaking the lug nuts loose because you can prevent them from spinning by setting the parking brake. As a quick note, if you have the 4WD engaged, the front wheels won’t spin when off the ground either. Just something to know.
Step 2. Jack Up Truck
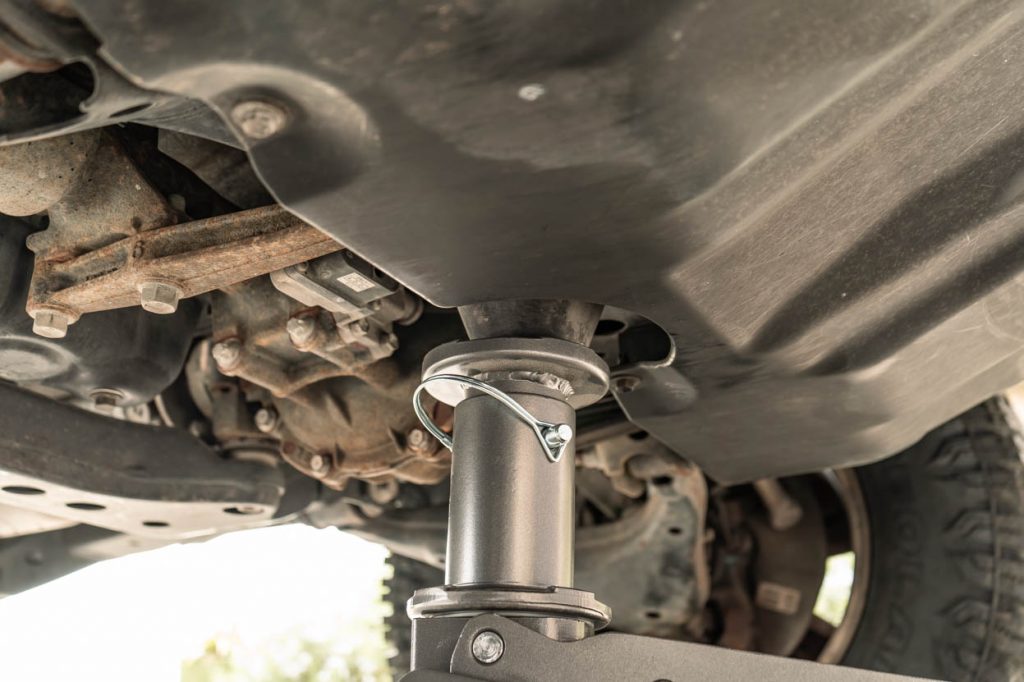
Make sure your truck is level, set the parking brake, and find a safe place to jack the truck up from.
For the front of your Tacoma, Toyota provides a jack point so you can jack both tires up at the same time. For the rear, it’s perfectly fine to use your rear diff, just keep the jack off of the drain plug.
Step 3. Place Jack Stands
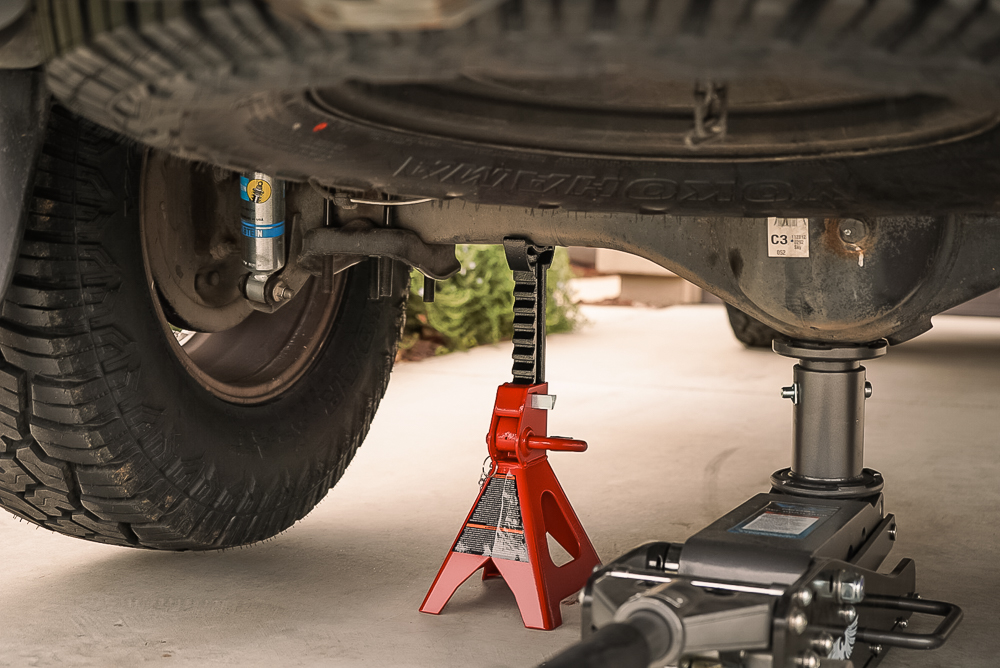
Safety is a priority. It’s important to use jack stands no matter how little the project is.
For the rear, the axle is the easiest and safest place. I like to leave the jack under the diff just as an extra precaution, but it’s not supporting any weight. Crossmembers or the frame is the best spot for jack stands at the front. It’s important to make sure the jack stand sits flush with whatever it’s supporting.
Step 4. Remove Wheels
Once the jack stands are under the truck, go ahead and remove the wheels.
Since you’ve already broken the lug nuts free, you can use an impact or tire iron to finish removing the lug nuts.
Step 5. Add Loctite To Studs
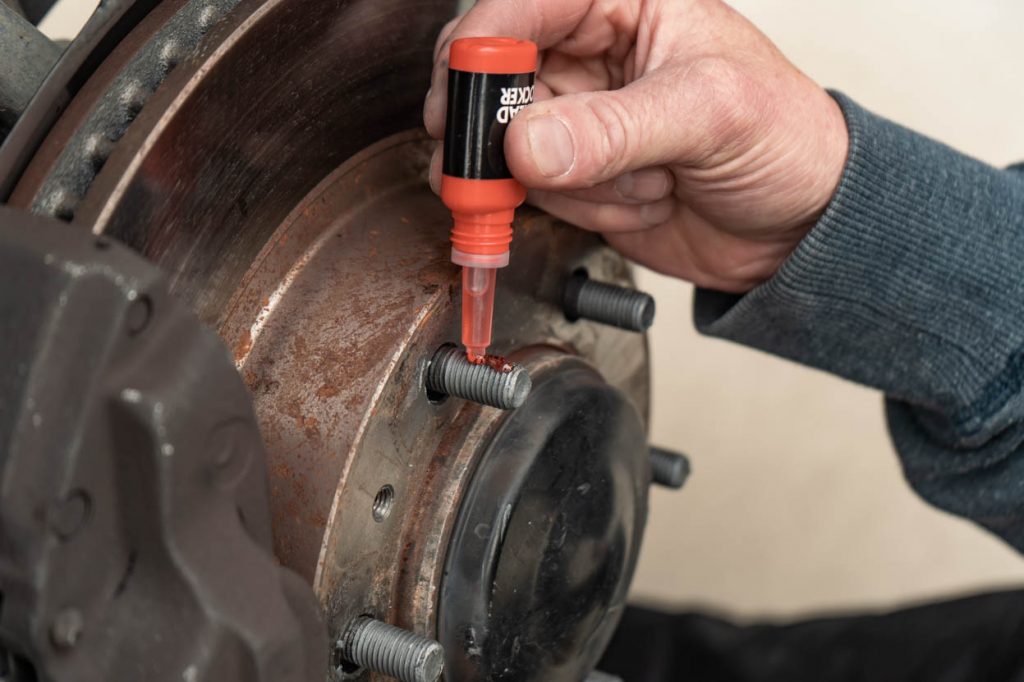
To ensure that the nuts don’t loosen over time, many spacer companies recommend using Loctite or thread locker on the wheel studs. G2 and SpiderTrax both include a bottle or one-time-use dap of thread locker with all of their spacers. Simply add thread locker to the length of the wheel stud and then install the spacer.
Try and have everything you need to put the spacer on next to you as you don’t want the thread locker drying before you get the spacer nuts on.
Step 6. Place Spacer On Hub

Once the thread locker is on, simply slide the spacer over the studs.
Step 7. Thread Spacer Nuts
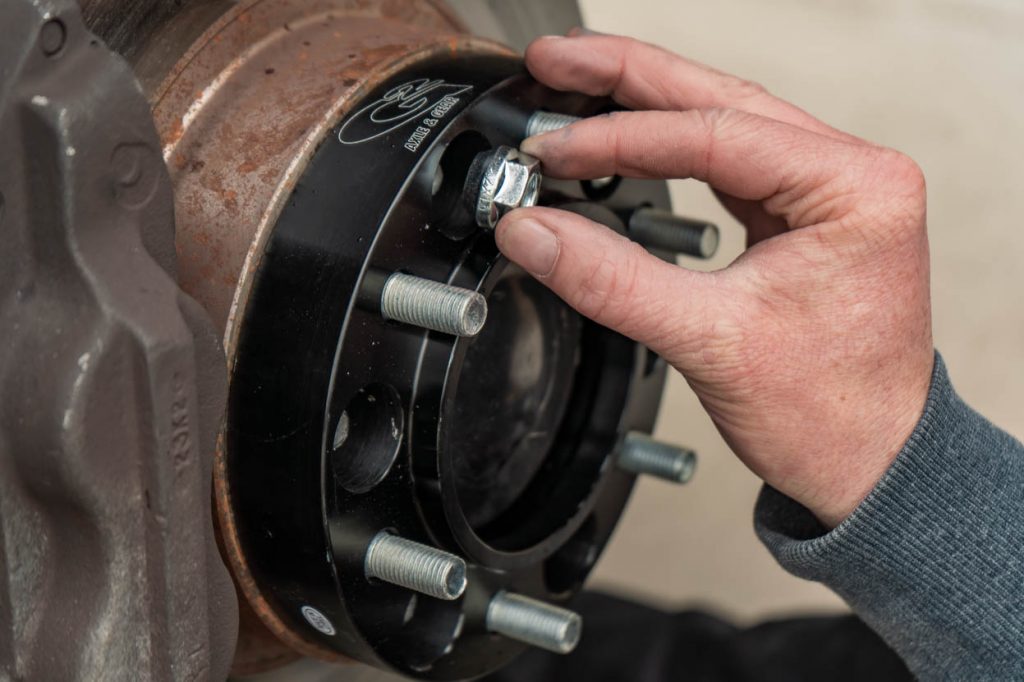
Next start by threading the nuts onto the studs by hand. It’s good practice to always start nuts by hand or else you run the risk of cross-threading the studs, which will ultimately weaken that stud and set you back with a time-consuming fix.
If you have big hands or fingers you might have an easier time putting the nut into a socket and tightening it by hand.
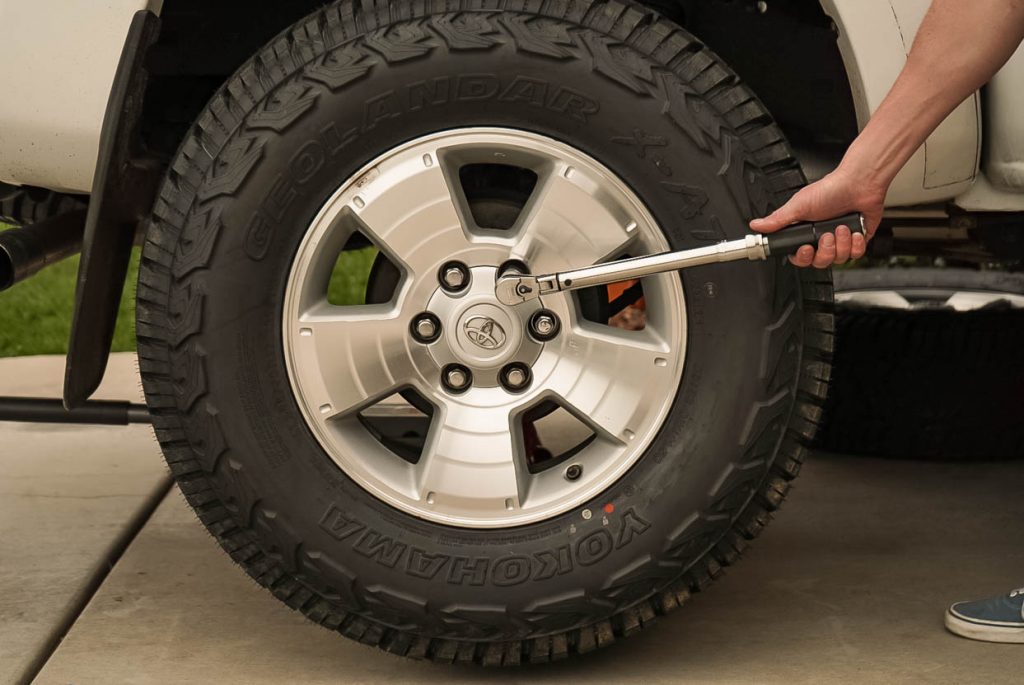
Step 8. Torque

One of the most important steps is to torque the spacers correctly. The easiest way I found to torque spacers down on the front end is to stick a screwdriver between the slots on the rotor.
When the hub rotates, the screwdriver gets stopped by the caliper and prevents everything from moving. This allows you to torque the spacers down accurately and without any struggles, plus it doesn’t bend the screwdriver, chip the rotor, or scuff up the caliper.
We torqued the spacers down to 85 ft-lbs which is what you would typically torque a wheel to.
Step 9. Put Wheels Back On
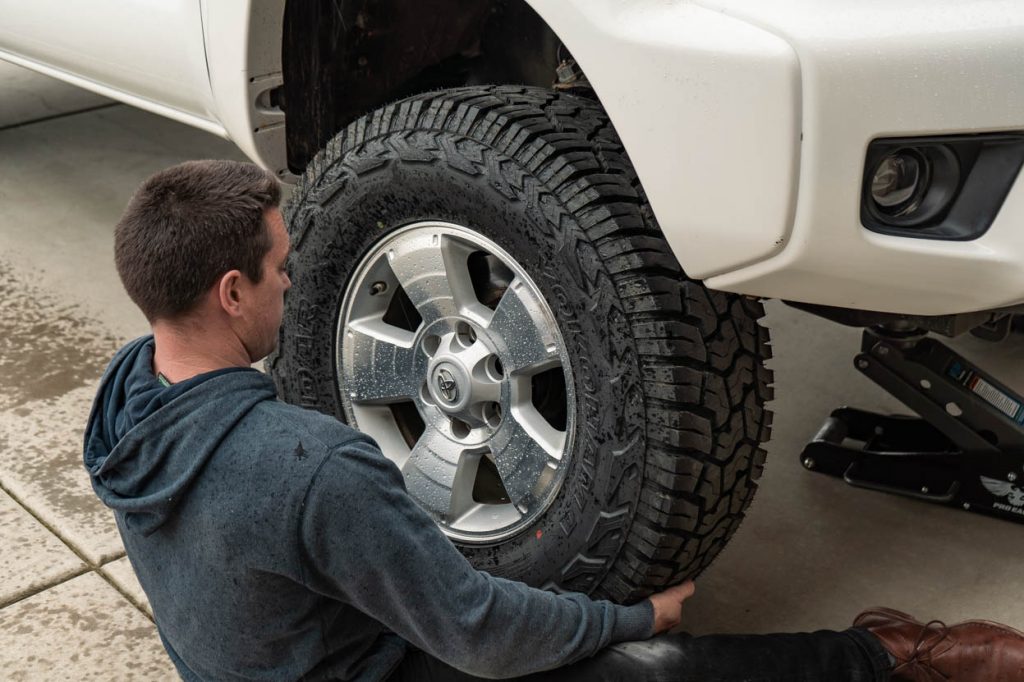
One of the last steps is to throw the wheel onto the spacers.
When the time comes to put the lug nuts back on, start them by hand just like you did with the nuts for the spacer to avoid cross-threading.
Step 10. Torque
And last but not least, torque your wheels down.
Torque is pretty important when it comes to wheels because without proper torque specs, the lug could back itself off the stud, or if you overtighten, you could break the stud clean off.
Final Thoughts
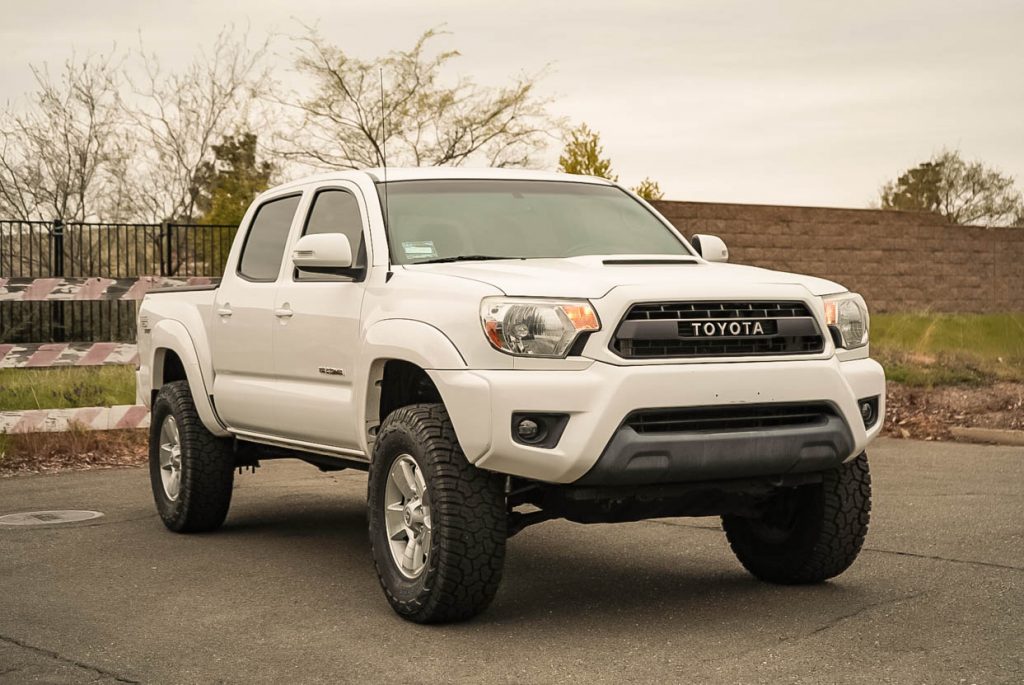
Spacers are a great way to gain extra clearance on your Tacoma without breaking the bank on a new set of wheels. We put a set on our 2014 Tacoma after we discovered that the new 285/70R17s rubbed on the upper control arm. After a brief install, our problem was solved with 1.25″ hub-centric spacers from G2 Gear and Axle.
Hub-centric spacers are perfectly safe so long as they’re installed correctly. A majority of the time a spacer fails due to the operator, or the fact that it is a cheap lug-centric spacer. When the spacer is centered over the lugs rather than the hub, then wheel vibrations will occur as well as accelerated wear to wheel bearings and other hub components.
Companies such as G2 and SpiderTrax offer high-quality hub-centric spacers that are an affordable way to clear larger tires. Although problems with high-end spacers are rare, they do happen. Wear on your wheel bearing is inevitable anytime you move your wheel away from the hub. The correct installation of spacers is extremely important to ensure they won’t fail on the freeway at 70mph. This is why you must double-check the torque specs of all the lug nuts and be sure to use the included thread locker.

Great read, this clears up a lot for me. If I Loctite down spacers on my truck, won’t that make it nearly impossible to take the spacers off down the road?
It does not make it impossible. With a good impact or a breaker bar, you can get them off yourself.
Great article. Did you have any issues with the wheel studs being too short or the spacer lug nuts not grabbing enough thread?
I just purchased a 2019 Tacoma TRD Pro. I’d like to get some bigger M/T tires on it. I’m open to lifting, re-gearing etc in order to fit them. Was hoping to avoid spacers. Is there way to accomplish this while maintaining equal or better suspension than what it comes with?
Hey Frank, you have a ton of options when it comes to running bigger tires. The question starts with “exactly what size tire”? Are you looking for a 33″ or 35″ tire? You don’t need spacers to run bigger tires. In fact, wheel spacers oftentimes cause bigger tires to rub even more due to the change in scrub radius. I would read through this post, and many other posts on the site about tire size and clearance and then go from there. For suspension lift kits, there are plenty of options on the market that offer substantial improvements over factory… Read more »
Thank you so much for this article (and all your other ones); you’ve done a great job!
Question: are you only installing the spacers on the front? If so, what’s your reasoning for that only? Thank you again!
We installed the spacers on the front and rear wheel hub.