

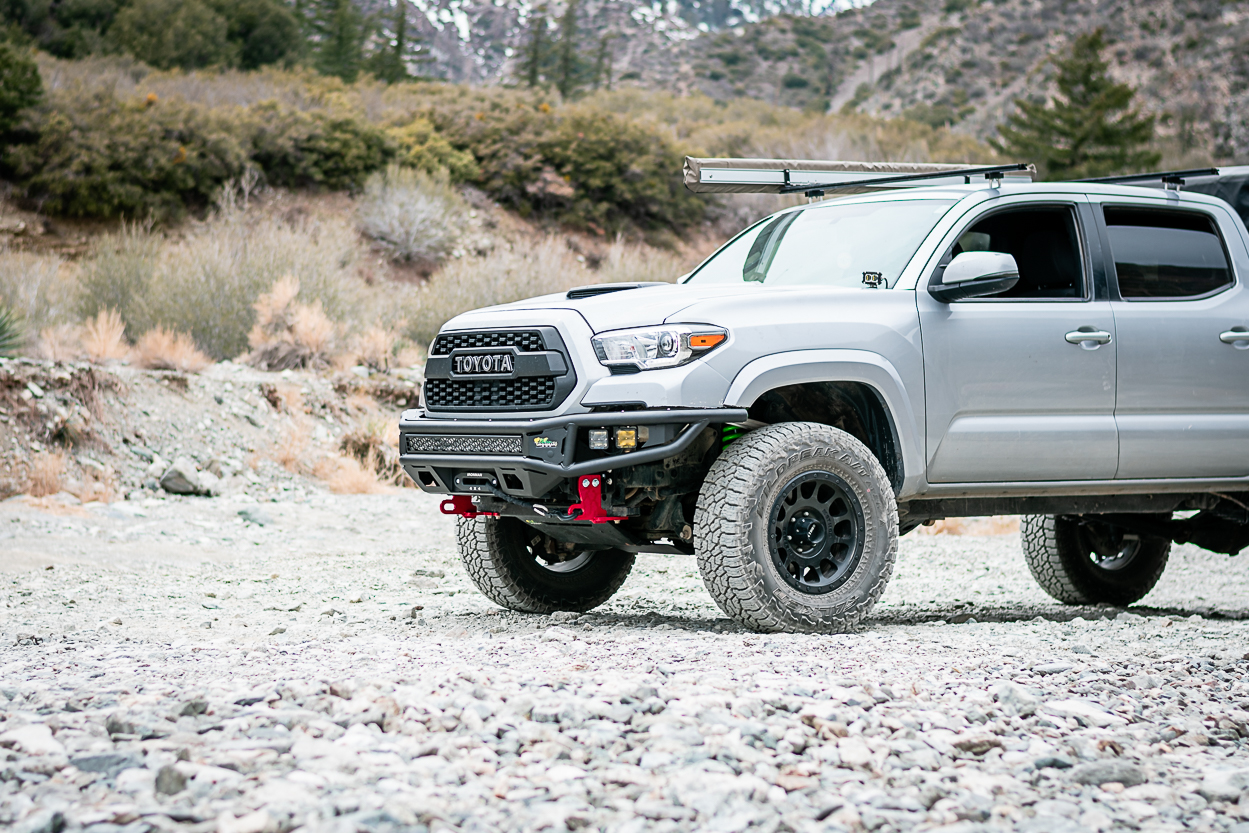
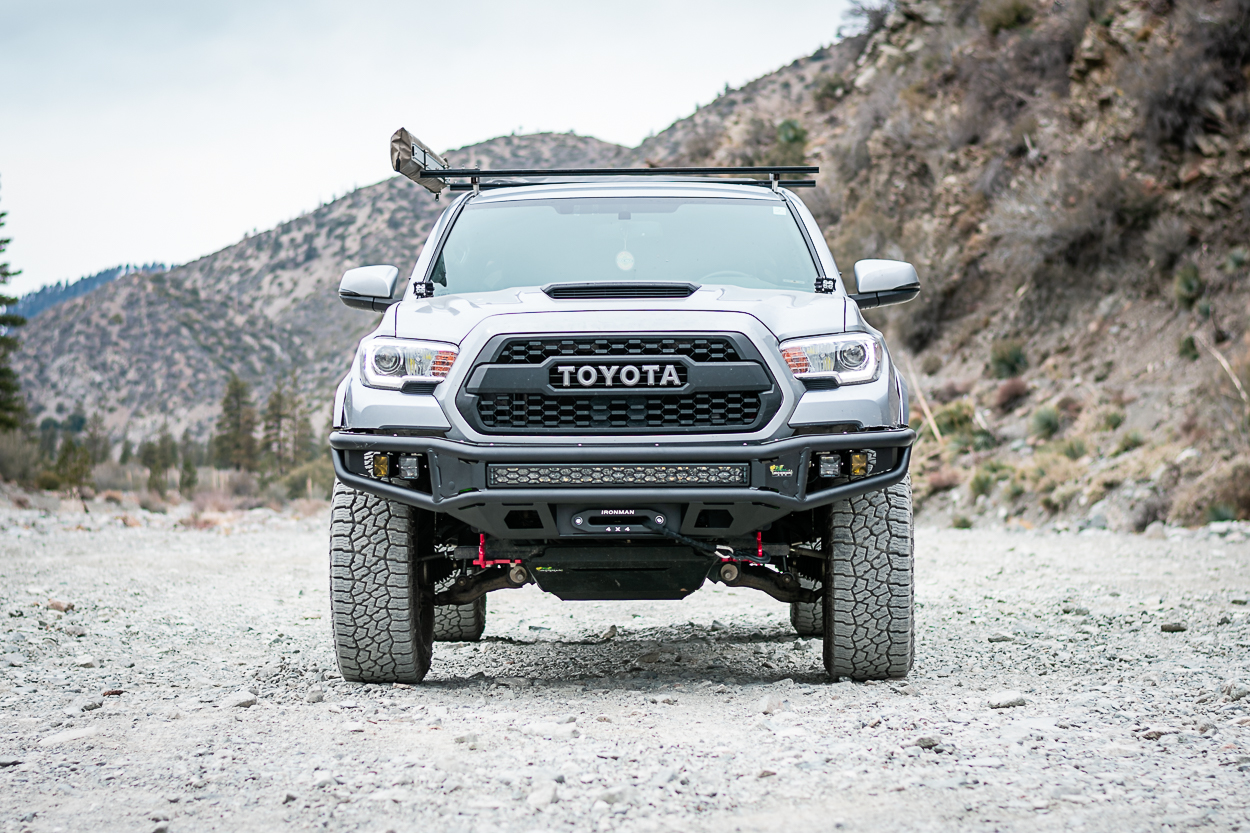
As important as it is to install comfort and performance-enhancing modifications to our rigs, not much can beat a great-looking front bumper. Let’s be honest, everyone wants to have a mean-looking front end on their Tacoma, and the stock plastics that come from the factory don’t always cut it. You don’t at all need an aftermarket front bumper to have a clean-looking, functional rig, but it makes it look a whole lot more interesting.
That being said, they don’t only provide aesthetics, depending on the model; they can offer a ton of function. Primarily, new bumpers allow you to mount things like lights and winches while increasing approach angles and overall protection. In this post, I’ll be covering the kit, including the complete installation and on-trail performance. Let’s take a look!
Find It Online
- Ironman 4X4 Raid Series: Check Price
Use code TRAILTACOMA20 for 20% Off at checkout.
Table Of Contents
Specs & Features

- Cold rolled steel construction
- Two part assembly with winch tray
- Bolt-on, frame-mounted recovery points
- Integrated crumple zone designed to transfer impact energy away from occupants
- ADR 69, 73 approved
- SRS Airbag tested and certified
- Winch compatible with clutch handle access
- Durable black powder coat
- Increased approach angle
- OEM parking sensor compatible
Installation

Before we start, you can also check out the entire installation video from Ironman at the end of this post.
You have the option to jack up the front end of your truck to make things easier to see and access. I chose not to, but if you do, make sure your rear tires are blocked from moving and you use some solid jack stands.
This install took me about 7 hours in total from start to finish while stopping to take photos of each step. I also didn’t have any experience wiring and working with winches and minimal experience wiring auxiliary lighting. So clearly, this is something you can do on your own if you follow the procedure and take your time.
Clear your schedule for a day, grab a few cold beverages, and let’s get into it.
Tools & Materials
- Trim removal tool (can also use flathead or pocket knife)
- Mechanic’s tool set
- 10mm socket
- 12mm socket
- 13mm socket
- 14mm socket
- 17mm socket
- 18mm open-end
- Painter’s tape
- Dremel (or some other plastic cutting tool)
- Wire Crimp/Strip Tool
- Zip Ties
Step 1. Fender Flare & Bumper Clips

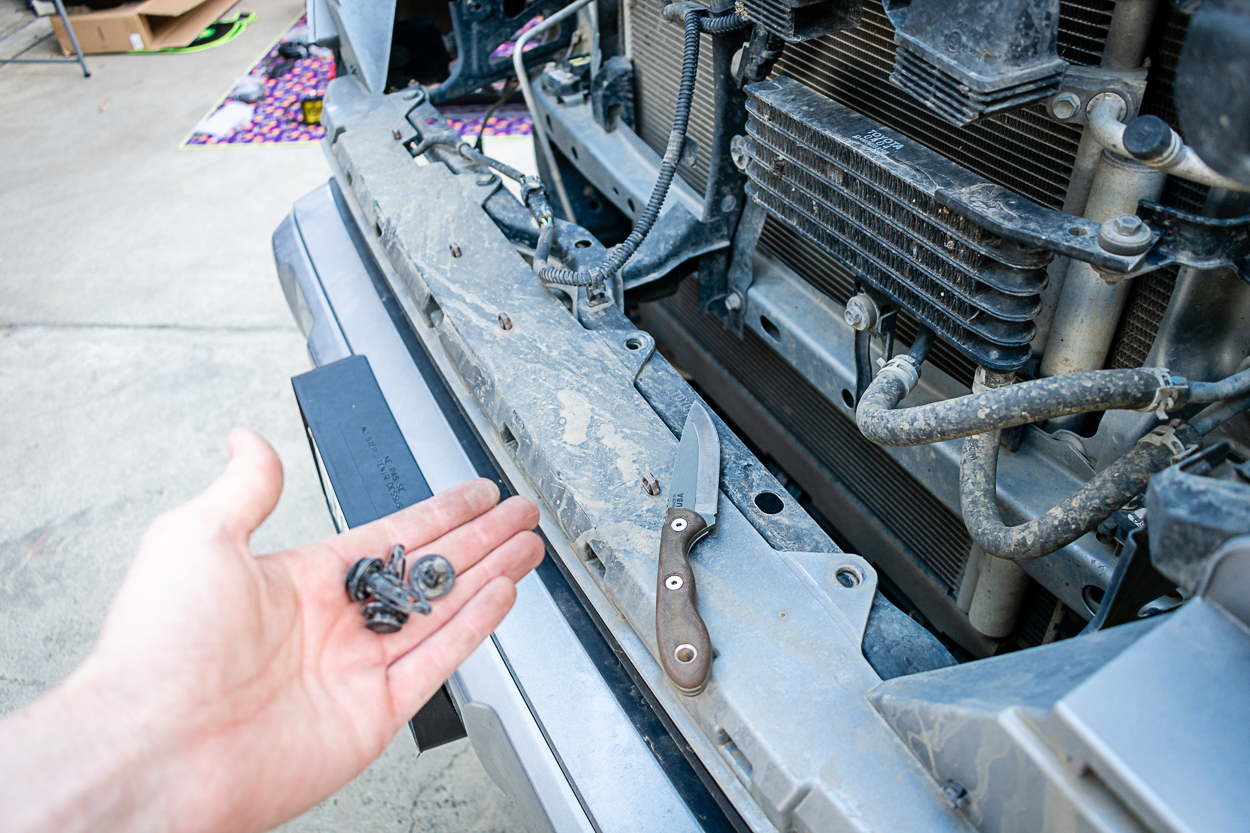
The first step is to remove the trim clips and screws that keep the fender flares and front bumper (if you have them) in place. Use your trim removal tool to pull out the plastic clips and a 10mm socket on a wrench or drill to pull out the screws that are found along the inside of the fender flares. You can also use the same 10mm to remove the screws that run along the bottom of the bumper.
There’s also a clip that you’ll see inside the fender flare in front of the front wheel when you pull it away from the body. Use your tool to compress that clip until it pops out. After you have these parts loose, make sure your fender flares and wheel liners are separated and can move freely by pushing them around. This will make things easier later on, as you’ll see.
Step 2. Bumper Corners

With the fender flares loose and all of the clips removed, grab the bumper’s corners found under the lights and pop them out of place (don’t entirely remove them).
Don’t worry too much about breaking them, as they are meant to be popped out. While doing this, note where the bumper is connected to the fender liner since there is a little flange there that you’ll need to pull the bumper corner up and over.
Step 3. Front Grille

Now that everything is loose, pop your hood and remove the grille.
If you haven’t done this before, it is just two 10mm screws on the top and two trim clips that you will remove. Then grab the grille firmly with two hands and give it a good tug away from the truck. It will pop out fairly quickly.
Step 4. Bumper Clips & Wiring
Next, moving along the top side of the bumper where the bottom of the grille met the bumper, remove the six automotive clips. Then you can use a flathead screwdriver to press the button on the wiring harness found in the center of the truck and unplug the harness.
Now that the harness is unplugged, use the removal tool to rock the piece of plastic holding the harness in place back and forth until it pops out of the truck.
Step 5. Remove OEM Bumper
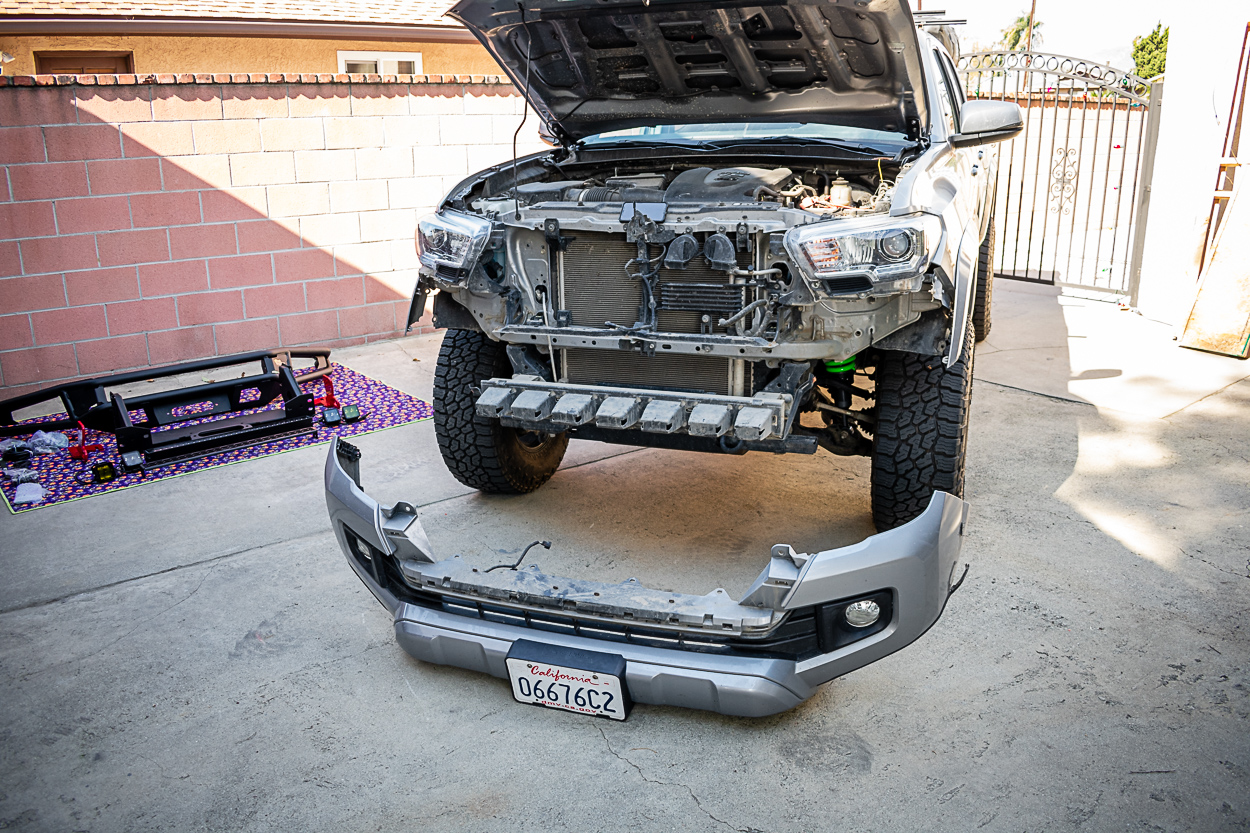
To remove the front bumper, having removed and loosened all of the parts mentioned so far, just give it a solid yank back from the truck and it should pop out with relative ease.
Step 6. Plastics & Aluminum Bar

You’ll see that with the lower bumper removed, there is an aluminum bar with many plastic boxes mounted to it. Go ahead and remove the strip of plastic containers from the bar by removing all the automotive clips holding it in place.
While you’re down there with the trim removal tool, unclip the bottom of the fender liners from the metal bars that stick out like wings from the aluminum bar.
You will remove the aluminum “safety” bar using a 14mm wrench or socket. There are two nuts on the outside of the bar and one on the inside on each side. Loosen all of them and remove four out of the six so that this piece does not fall on top of you.
Now you can remove the last two nuts and pull the bar away from the truck. Since my truck is five years old and this piece never got washed, it was stuck pretty good on there, so I took a 3lb mallet to it a few times to crack it loose.
Step 7. Power Steering Cooler

To make the Ironman Raid bumper fit well, as with other similar bumpers I have seen on the market, you will need to elevate the power steering cooler. Two bolts mount this assembly to the frame right above the front skid plate that you will loosen using your 12mm socket. Get them both very loose but keep one nut slightly threaded, so the cooler stays in place.
Now, you can grab the included spacers and longer bolts and install those by placing a spacer under the mounting point for the cooler and threading in the new bolt slightly. Before tightening it, do the same on the other side and get both sides nice and snug with your 13mm socket and an extender. As you tighten these bolts, try to use your free hand to keep the spacers centered.
Step 8. Plastic Caps

Behind those three open bolts you have on each side where the bumper will mount are two black plastic caps that face each other inwards – one on each side.
Use a clip removal tool or a flathead for popping those out. On the opposite side of the frame, near where the fender liners are hanging, you need to remove two more caps. These gave me a hard time, so I used a buck knife to break them into pieces so I could pull them out.
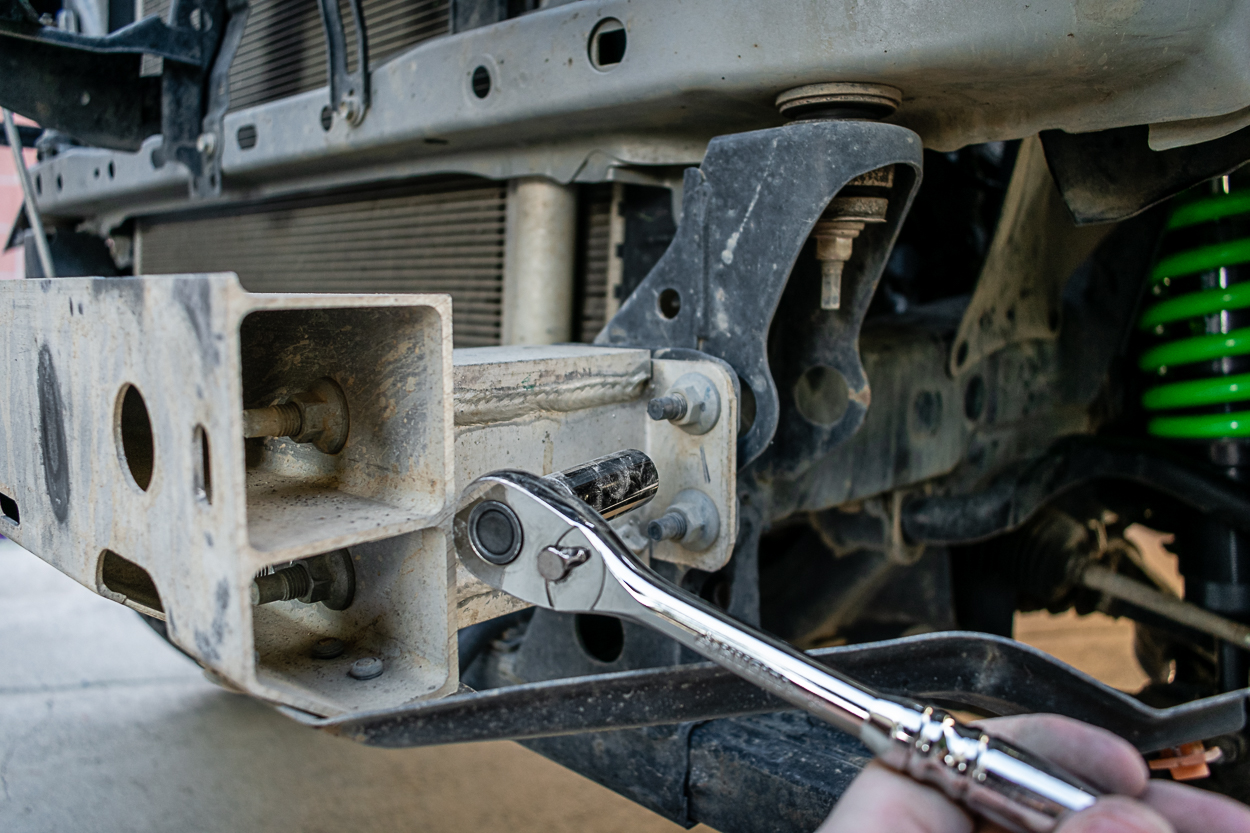
Step 9. Bumper Hardware

The kit from Ironman includes these two black steel pieces that are threaded. You’ll see that there is a threaded hole and a locating pin. These will rest right in the gaps from which you just removed the plastic caps. Starting on the inside of the frame and poking them through towards the outside of the truck, push the locating pin through the round hole and these will rest in place.
You should see the threaded pieces through the hole in the frame while looking towards the front of the truck. These two pieces are essential for the winch tray install as they will pull the winch tray tight into the truck’s frame when you get it mounted with a bolt that threads through them.
Step 10. Shim Plates

Next, you can grab the two slim metal pieces also included with the kit and install those shims onto the three bolts that face outwards from the front of the truck.
This is where you removed that OEM aluminum bar from. There is one for each side.
Step 11. Winch Tray

Finally, we can get to the fun stuff. Have those 6 OEM flange nuts that we removed when pulling off the aluminum bar nearby. Grab your winch tray and place it against the frame where the bolts line up. You can use your gut to hold the tray in place while you grab the nuts and get them started on the threads.
Before cinching down these six nuts, try to center your winch tray by knocking it slightly left or right. The holes on the tray are slotted so there is a little side-to-side adjustment. Just make sure you have an even gap in the slot around the bolts on both sides. Then use a 14mm socket to snug those down real tight.
Step 12. Draw Bolts

Remember those Zippo-looking pieces we placed in the frame? Well, now you can grab a provided bolt and a flat washer and thread those through.
There is not a lot of space to move around there, so take your time and get the threads going. Using your 18mm open-end wrench, get these draw bolts nice and snug.
Step 13. Monster Winch

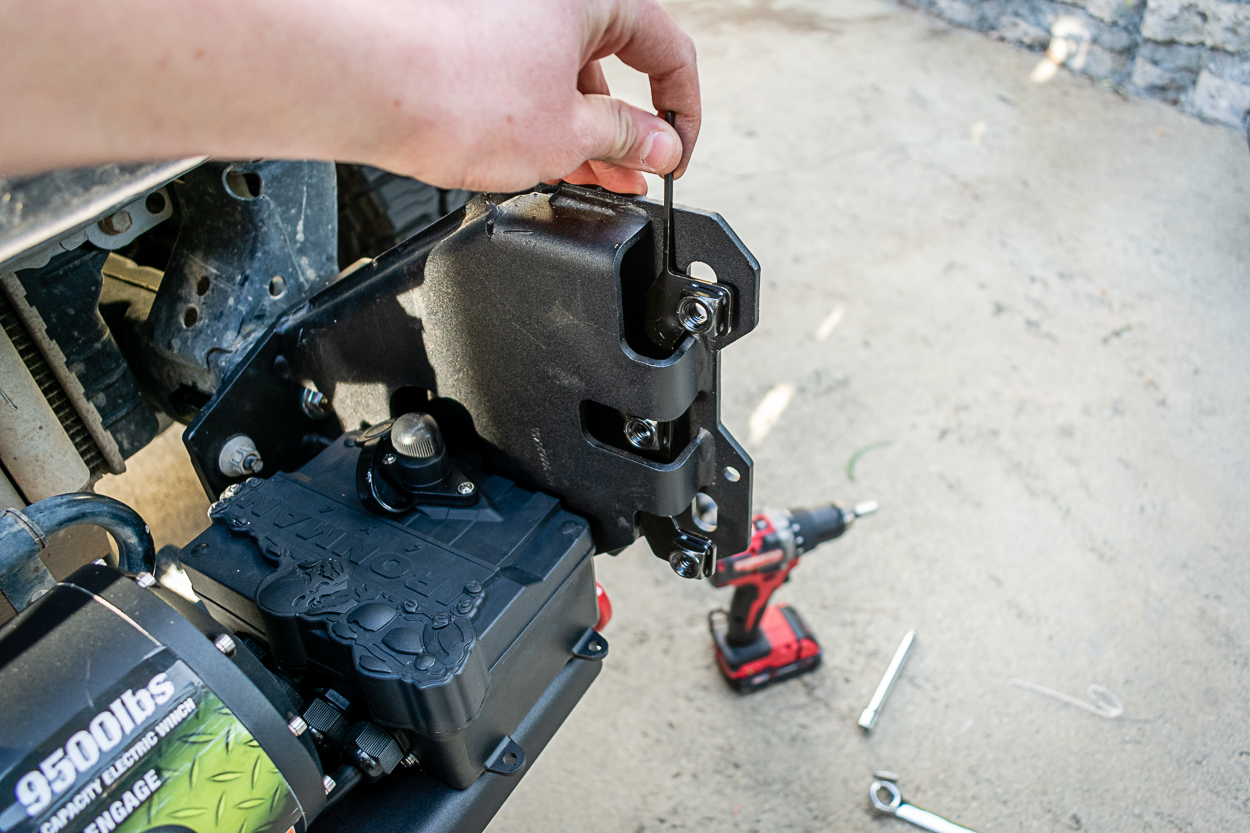
With the winch tray mounted, now you can install your Monster Winch.
Four holes line up with the winch’s mounting location, but first, you’ll want to mount your control box. There are a few different places you can put it, but I chose to mount it to the right of the winch. The clearance is tight so mount it against the right-side wall as possible. I only mounted it with two holes as the other two hung off the edge, but it was plenty secure.
With the wires going out to the left toward where the winch will be mounted, mark two holes where the back of the control panel will mount and drill them out with a bit slightly larger than the provided mounting bolts. Then grab two bolts, washers, and nuts and thread the control box down. I left it loose until I got the winch body installed.

Using Ironman’s hardware, install the winch to the tray in the four pre-drilled mounting holes. 4 square nuts sit within the feet of the winch, and you will thread the bolts from the bottom up into them. You can find some videos online for the winch setup, but it is pretty straightforward. A yellow, red, and black wire comes out of the control box, which bolts directly onto the winch at their respective color-coded mounting locations (yellow to yellow, black to black, etc.).
There is also a small ground wire that comes out of the control box that I extended with some extra wiring – this bolts to the bolt on the bottom of the winch on the left side. Finally, there are two more wires. A big red one comes out of the control box and a big black wire that comes in the bag with the hardware. Bolt the black ground wire with the ground wire that comes out of the control box to the winch, then run your power and large ground wire to the battery and a ground in the engine bay.
Note: Don’t forget about the breather line that also comes from the winch in the kit, which is a long black hose with a bit of microphone-looking thing on end. This is included, so your winch doesn’t “drown” when submerged during water crossings. Plug this into the winch’s spout and run it to the highest point in your engine bay, using zip ties to keep it in place.
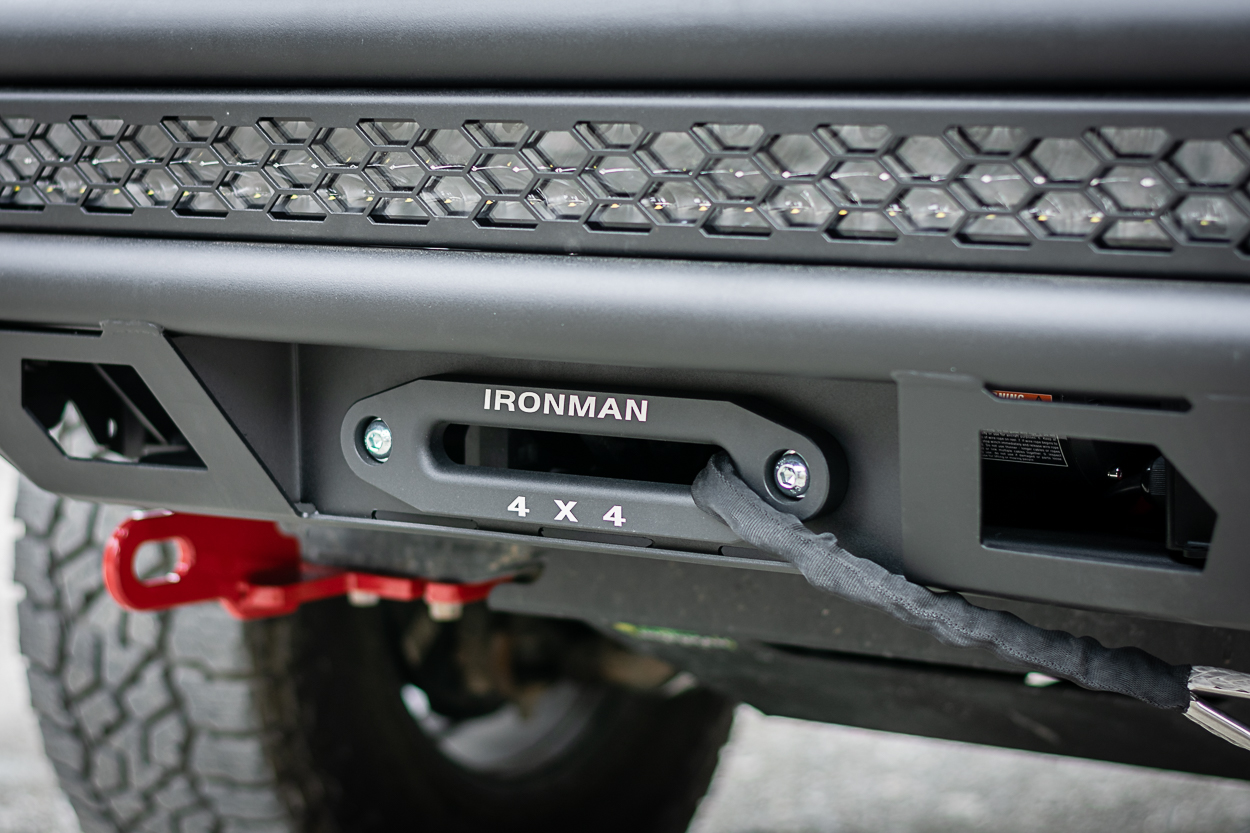
Step 14. Recovery Points

Using a 17mm socket, remove the bolts on the bottom of the truck near the sides of the winch tray. There will be one on the driver’s side and three on the passenger side.
Now it is time to install the recovery points on either side of the winch tray. Grab two bolts, split washers, and flat washers from the provided hardware and thread them through the recovery hook and into the side of the winch tray. Leave them hand tight. Then grab the OEM bolts that you just removed and thread them back to where they were, but with the recovery points now.
Before snugging these down, pull the recovery point out away from the front of the truck since this is how they would be pulled in a recovery. Then use an 18mm wrench to tighten them down well.
Step 15. Prep Bumper

Finally, we can get to the new bumper.
First, you will want to install the license plate flip-up bracket to run a front license plate. Then you can install your winch fairlead behind where the license plate would go using an 8mm Allen wrench and a 19mm socket. Tighten down the button-head bolt, flat washer, spring washer, and nut.
Step 16. Mount Lights

Starting with the lightbar, you need to decide if you will run the protective lightbar grille. I chose to, but you by no means need to. It is just up to you and whether or not you like the look or functionality. Provided are two shorter bolts with split washers and flat washers and two longer bolts. The shorter bolts mount the brackets to the light, and the longer bolts mount the light assembly to the bumper.
Use a 13mm wrench to tighten the brackets to the light and thread the serrated flange nuts onto the longer bolts attached to the bumper. You will probably need a second wrench to tighten the base bolts.
Note: Make sure your lightbar brackets are oriented so that they mount the light further forward rather than being placed back into the bumper.

Now for the LED pods. You will find the pod, a wiring end, and a mounting bracket with hardware in the packaging. Before installing the mounting bracket, make sure you put the larger bolt through the hole in the bottom. If you thread the mounting bracket onto the light before doing this, you won’t be able to get that base bolt through.
As far as orientation goes, remember that your lights will be hanging from above in the housing area of the bumper. Using a 4mm Allen, install the bracket onto the light with a small bolt and a split washer on both sides. Do this for all of the light pods you ordered. To mount these to the bumper, use the thinner, wider black spacers and place them between the bumper’s corner lights. Then thread and tighten your nut on. Use the taller, less wide spacers for the inside pods and do the same.
Step 17. Threaded Plates
These plates with the three threaded holes will go into the slot of the winch tray.
You can place them there and let them rest, keep the little pin on top. To prepare for the next step, organize yourself with the black hardware. You will have six bolts, spring washers, and flat washers (three for each side).
Step 18. Mount

Now things begin to take shape. This step could be possible alone, but I would highly suggest grabbing a buddy to help out, as getting things placed by yourself will be tough. I grabbed the bumper assembly with a friend and put it onto the truck roughly where I thought it should be. Then, while my buddy held the bumper in place, I grabbed four bolts and washers and threaded them through the bumper and into the top and bottom holes of the plates we located in the previous step.
This will most likely take you a little bit of shifting around to get the threads going, but be patient, and you’ll get it. Once you have the top and bottom holes in a few threads on both sides, your helper can gently let go, and you can begin threading the last two middle bolts. In completing this process, I just pulled my fender flares out and to the side of the corners of the bumpers.
Pull the bumper out and away from the front of the truck and use a wrench to tighten down those six mounting bolts once you are satisfied with the placement. Also, while completing this step, disengage your winch so you can spool a little of the rope out and pull it through the front bumper.
Step 19. Trim Flares

I would highly suggest watching Ironman’s install video for this part of the install. The information on trimming begins at around the 30-minute mark of the video.
For the fender flares, apply a few strips of painter’s tape and mark with a sharpie the line you need to cut from for a snug fitment. Using a Dremel (or, as in my case, a drill with a cutting wheel attachment), carefully trim the fender flare along the line. Trim less than you think you’ll need to! You can always take off more.
Step 20. Trim Bumper Caps
Now for the bumper trimming. Go back to your old OEM bumper and set it on a table or chair. Go around and remove all of the clips that hold the fog light trim, wiring harness, and the lower valence piece. We can apply painter’s tape to the cutting areas next to the fog light housing and mark our guideline with all of this removed.
Essentially, you will trim the tabs that hold the fog lights in place, then go slightly down the 90-degree corner and cut across to the end of the outside edge of the bumper. Do this on both sides carefully, and try to fit it onto your truck. You will want a substantial gap between the plastics and the bumper because they will otherwise contact when you flex the truck off-road.
If you need to make more trimming adjustments, a good idea, if completed carefully, is to use the bumper sort of as a trimming guide along with the plastics.
Step 21. Finishing Touches

With the OEM bumper plastics trimmed and popped back into place, grab those six automotive clips we removed at the beginning of the install and place them back onto the part of the stock bumper that we kept. Also, remember those threaded plates that we used to install the bumper with the little pin on top? You can now bend those pins with your hand inwards toward the cab of the truck, so they don’t move on you.
Another step that Ironman includes (though I chose to skip) is to install the locating pin. Essentially, you remove the bumper shell, drill a hole near the mounting bolts and install the bolt they provide. This is all outlined in the video and is a nifty feature that allows you to get perfect fitment and placement if you ever pull off the bumper shell and want to place it back precisely in the same spot.
Step 22. Reinstall OEM Pieces
If you still have them, you will want to trim your fender liners on your truck. You could use a Dremel-type tool, but the plastic is so thin that I just used a pocket knife. You won’t see much in this part, so use your discretion to choose where you want to cut it.
Reinstall all of those bolts and clips that we removed from the fender flares, as well as the front grille that we removed, and then you can lower your hood. One final touch I have yet to complete but plan on very soon is some automotive trim pieces to place along where I cut the OEM bumper to make things neat. I also suggest some double-sided tape for the end of the fender flare, so it stays in place.
Congrats on completing the install!
Wiring Your Lights

The methods of wiring lights vary remarkably from person to person. I picked up some wiring harness online for pretty cheap that included a relay, inline fuse, and switch.
They are accessible, easy to find, and simple to work with. Micah (@overlandunderbugdet) has an awesome tutorial video that I used to first learn how to wire lights. So, if you are just starting out, definitely watch his straightforward guide!
On-Trail Performance

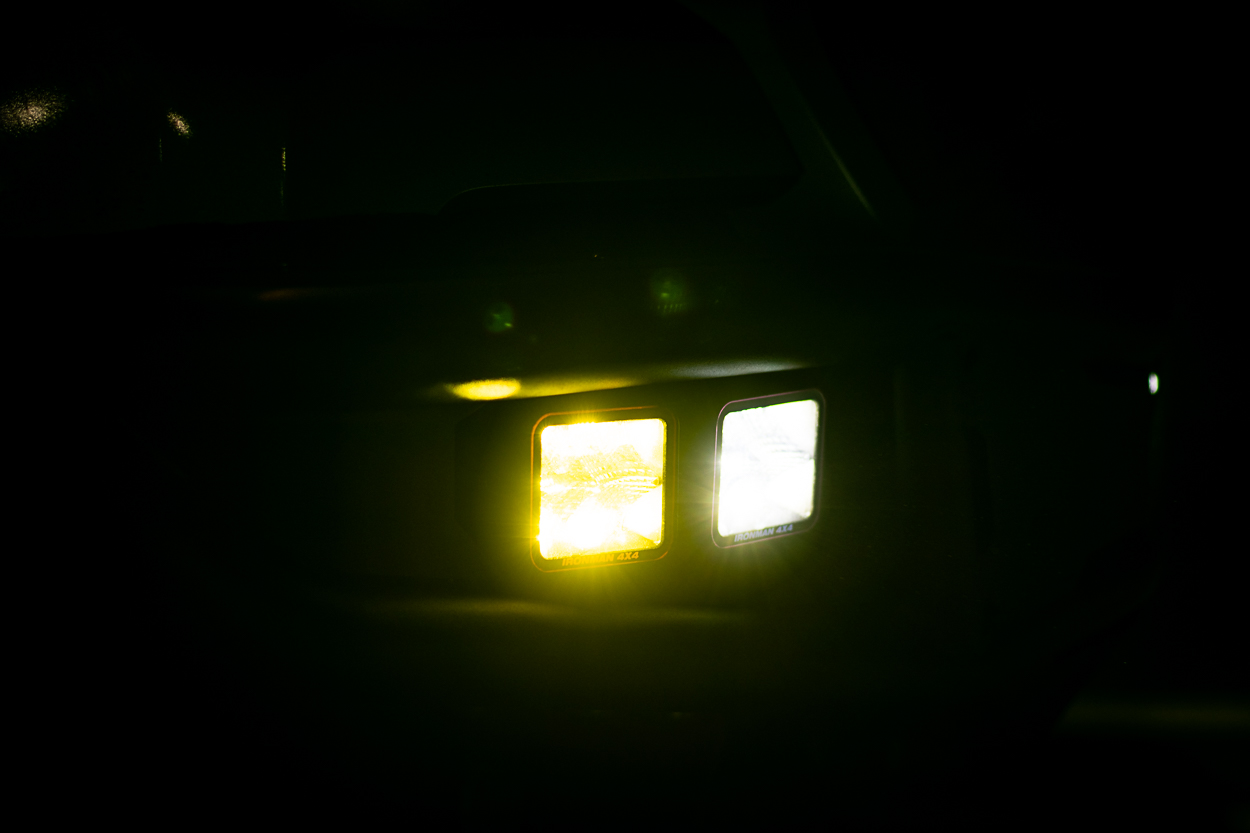
On the trail, this bumper performs amazingly. If you’re going for a late-night trail run, the lights on this bumper will provide you with more than enough lumens to see where you are going and what is ahead of you. Also, one of the first things I noticed was how much greater of an approach angle I have now with the raid bumper on.
While I haven’t put the winch to use during a recovery yet, it is very simple to operate – and this is coming from me as a first-time winch owner. It also comes with an operation manual if you are lost on how it functions. The included recovery points also make it super easy to attach to your truck in the event that you get stuck and need to be towed out.
Profile View
LED Lights On

Side Shooters LED Lights
Monster Winch Fairlead
Final Thoughts
All in all, I am beyond stoked on this addition to my Tacoma. Along with all of the insane features that provide so many new off-roading functions, it also just looks so clean. With so many options on the market for front bumpers, it can be hard to select exactly which one is for you. Well, I’m not going to try to tell you what you should or shouldn’t like. But, I can say that this bumper has by far had the most impact on both the aesthetic and functionality of my truck.
I can now get myself out if I get stuck on the trail with the winch, light up the entire forest with all of the Ironman LED lights, and I get about 15-20% more compliments from fellow Tacoma owners while out and about. No other modification has come close to providing me with that many benefits, and I am looking forward even more to hitting the trail and putting this thing to work!
On a final note, I’m also running the Raid Series rear bumper from Ironman 4X4. Check out my post on the new rear bumper here.
can I use Smittybilt X2O GEN3 wincher in that front bumper
You should be able to!
such a SWEEEEET kit!!! Looks amazing on your rig! I can’t wait for IronMan to (re)certify for 2nd gen (2012)…. cuz then, I’m IN!
Thanks Gareth! I’m sure your 2nd gen would look dialed with one!