

When you are out getting rowdy on the trail, you will inevitably slam your bumpers on rock ledges, tree stumps, or one of the millions of other potentially damaging trail features. Even if you drive a mall crawler that will never see an ounce of dirt, knowing that you will be protected if you get rear-ended can offer great peace of mind. Makes your truck look cool too… (just saying).
I never thought I would be the kind to want to install highly protective body armor that can make it look like you are driving around a tank. But after only a few times on the trail – and a few close calls – I realized how useful parts like this Ironman Raid Series rear bumper can be. In this post, I will dive into the install steps for the new bumper and how it performs on my truck.
Find It Online
- Ironman Raid Rear Bumper: Check Price
Table Of Contents
Specifications & Features

- Bolt-on installation w/ provided mounting hardware
- Frame-mounted recovery points
- Cold-rolled steel
- Super durable powder coat, prepped for corrosion resistance
- Increased departure angles
- Compatible w/ factory parking sensors
- Crumple zones to help protect passengers during impact
- LED light pods
- Completely crash safety tested
- SRS airbag compatible
Installation

While there are many steps to this installation, the process is very doable for anyone with knowledge of how to use basic tools.
While following along with these steps, you can complete this install in a few hours, or less if you have a buddy or two. Having someone else to help out will make this process a lot easier but I did it on my own without too much hardship. With all that said, let’s get into it.
Tools & Materials
- Mechanic’s Tool Set
- Hand Ratchet or Impact Driver
- 18mm Socket
- 13mm Socket
- Flat Head Screw Driver or Pry Tool
- Philips Head Screwdriver
- Zip-Ties (included in kit)
- Side Cutters
Step 1. License Plate & Wiring Harnesses

The first thing you’ll need to do is remove the license plate from your current rear bumper. Then, because we have a lot of wiring harnesses that go to the back of our trucks for sensors, license plate lights, and the towing plug – you’ll need to remove those. You can find many videos on YouTube but there are essentially 3 items you need to remove the harnesses for.
First, you have the wires that plug into the trailer light outlet. This is the big plug pictured above. Each of these harnesses works the same, in that there is a small clip on the side that you need to compress before removing the harness from the plug by pulling it out.

Next, you have the plugs for the license plate lights. There are two on the inside of the bumper on either side of the license plate facing inwards. Compress the side clips and remove these harnesses on both sides. These are a little hard to reach so using a flat head screwdriver to release the clips will make things easier.
Finally, there are two plugs on the upper right side of the bumper when you are looking at it from below. These are the main harnesses that supply electricity to the rear-end accessories. Once you have these unplugged you can move on to the next step. My Tacoma trim model had two plugs but I have seen videos where there is only one.
Step 2. Tow Plug

From the inside of the rear bumper, you can use your flathead to press the clips on the top and bottom of the plug while pushing it out.
Once this is loose, you can go around to the outside of the truck and pull the hitch plug housing out.
Step 3. Clips & License Plate Lights

Two lights face inwards toward the license plate that you have already removed wiring harnesses from. However, you still need to remove the lights themselves before moving forward with this install. The video I watched suggested doing this from the inside with a screwdriver to press it out. I chose to go a different route since that didn’t work well for me.
From the outside of the bumper, you can use a sharp pocket knife or trim removal tool to begin peeling up the black light housing. This trim can be damaged since it will not be used on the Ironman Raid bumper but be sure not to damage the light itself. Work slowly but surely and the light will eventually pop out. It took some elbow grease but working around the light with a knife at first to break the seal, then a screwdriver to complete the removal is the best method I found.

Finally, there are trim clips along the bottom. These are commonly found on our Tacomas and I have found the best way to remove these is with two flatheads to pull out the inner part.
There are two on either side of the license plate on the bottom side of the bumper and a third one above where the license plate usually sits. Once all of this is removed, you can pull up on the large black trim piece until it pops out of place and set that aside.
Step 4. OEM Metal Bumper Support

The final step for this bumper removal is to remove the 10 bolts that attach the OEM rear bumper to the truck. These bolts need a 10mm socket.
There are two bolts on the top of the left and right sides of the bumper. Then, there are another two on top of the bumper where the license plate sits. And finally, there are two underneath the bumper on both sides.

With all of those bolts removed, you can pull this last piece of the bumper off of the truck.
Step 5. Sensors & Harness

Before installing the Ironman Raid bumper, you need to remove the sensors from the stock bumper. I found the best way to do this is to reach in from the inside of the removed bumper and press them out until they are pop out of place. Try your best to keep these intact, because if you break these sensors, it will delay this whole install process until you can get a replacement. Also a potentially expensive mistake.
There will be two parking sensors that faced outwards from the tailgate and another two on the bumper caps at the corners of the stock bumper (if you have blind-spot monitors). The blind-spot monitors also have control panels that are attached to them so you’ll need to remove those. Be sure to remember which panel controls what.
Lastly, before we can move onto the fun stuff, you’ll need to cut the wiring harness that is attached to the OEM bumper free. These are zip-tied in several places along the inside of the bumper so grab some side cutters or a pocket knife to remove them.
Step 6. Reinstall Parts on Bumper

Now that we have completed the entire bumper removal, you can install all of the sensors and lights onto the Ironman Raid bumper. I opted to install the lights at a later time, more on that later.
First, you can install the license plate lights. These are super easy, as they just pop into place. Remove them from the black housing that I previously mentioned in the removal step before doing this, otherwise, they won’t fit. While you are here, you can press your tow plug into place vertically.
Then, you can mount Ironman’s LED light pods with the provided mounting brackets on either side of the bumper.
Step 7. Install Raid Bumper Caps

Finally, you need to install the bumper caps onto your new bumper. The way I chose to do this was by sliding the new bumper into place and roughly seeing where the bumper caps should sit. Then I pulled the bumper off and bolted the bumper caps to the bumper with the provided small hardware and a socket wrench.
Ironman built these caps to be adjustable in their position with the Raid bumper so it could look as sleek as possible.
Step 8. Set Up Sensor Systems

The last step before getting the bumper onto the truck is to install the sensor systems. You will notice that included in the kit are 4 oval-shaped plastic housings with 4 backplates as well. There are also 8 small screws.
Grab your sensors, keep track of which ones go where, and remove the black flange pieces on them. You can break the clips as needed because you will not be using those flanges anymore. Next, press the sensors into the Ironman housings, line up the backplate, and use a Philips head screwdriver to tighten both sides down.
Next, using the adhesion promoter and the double-sided adhesive, press one side into the flange of the Ironman sensor housings. Then peel off the tape on the other side of the adhesive and press them into the holes on the bumper from inside. Make sure to press these firmly for a few seconds to make sure they adhere.
The adhesion promoter comes in a little packet with a sponge but it dried quickly so I would suggest getting all of your sensors ready before applying the sponge to the sensors and also the inside of the rear bumper.
Step 9. Installing Raid Bumper Assembly
Now that all of the removal and prep work is completed, you can finally get this Raid bumper on your truck! This process is slightly different depending on if your Tacoma has the tow package or not but I’ll layout both below.
If your truck does have a tow package, this is super easy. You will notice on your new bumper, there are two tabs at the bottom with two holes each. There are the same tabs with two holes on the hitch receiver unit. So, pick up your bumper, roughly try to slide it in to where it looks like it should go, and the tabs on the Ironman bumper should go under the tabs on the hitch receiver.
This step can be a little finicky because the bumper is designed to fit very snuggly. I found that if I pushed one side of the bumper further in than the other, it would kind of get stuck and I would need to yank it out of place before trying again. Having a helper here would make things a lot easier. But regardless, keep working at it and it will fall into place.
If your Tacoma does NOT have a tow package, there is just a small added step. Provided with your bumper kit, two lengthy brackets act as arms for the bumper. In the previous step, the bumper sat on the hitch receiver. However, if you don’t have that, these brackets work in place of it.
You will notice that the holes in the bracket line up with the holes in the frame near where the spare tire is. Using the provided hardware, bolt these brackets into place with the flat part against the truck and the flange ends facing out. I am not sure on the torque spec of these but I would imagine they are the same as a hitch receiver. Then, follow the steps mentioned previously.
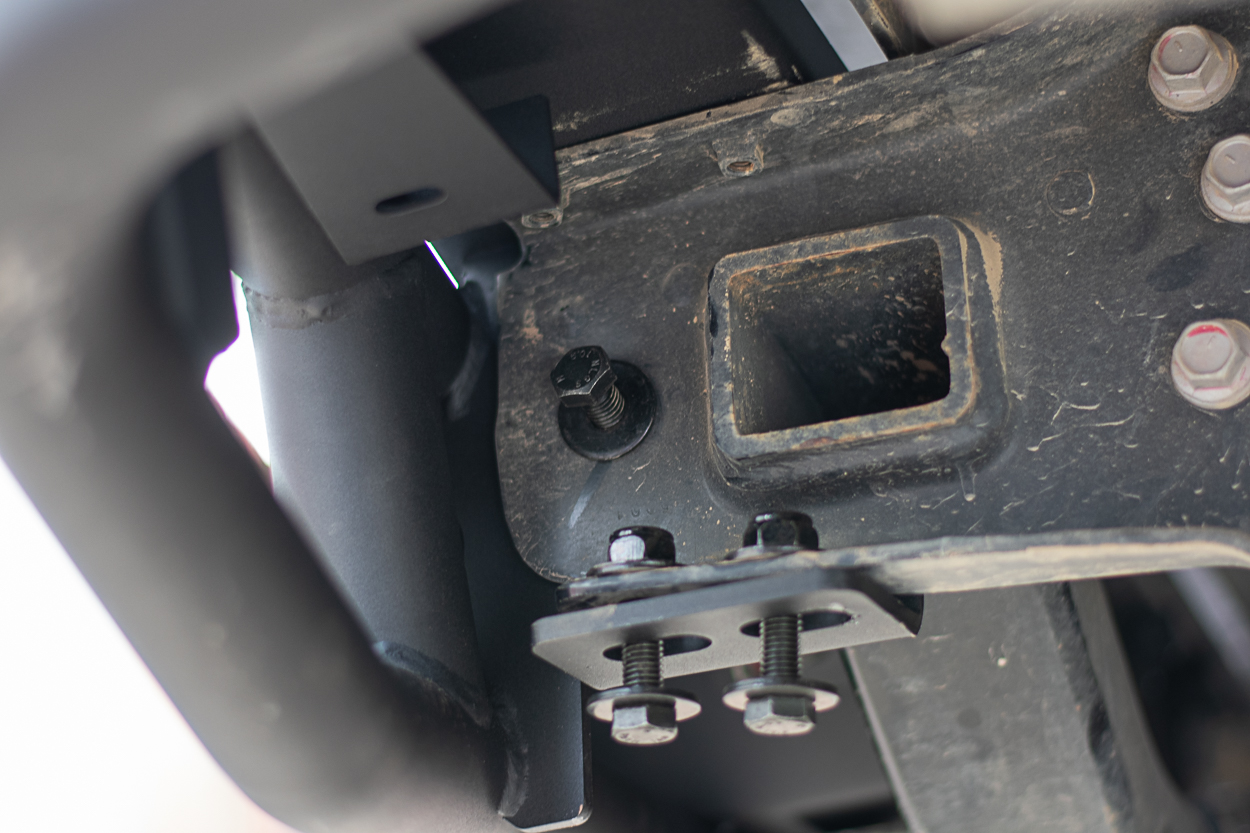
Step 10. Bolt Down Your Raid Bumper

Finally, with your bumper in place on the truck, grab the provided bolts, nuts, and washers, and use three sets on each side to bolt down the bumper. Two bolt/nut sets will be vertical where the tabs on the truck and bumper line up. The third set will be horizontal in the hole slightly above the tabs. I hand tightened these on all sides before going through them with a large ratchet and the 18mm socket while working at each bolt little by little to tighten them evenly.
Once they were all pretty snug, I tightened them down completely to be sure my bumper wasn’t going to be flying off anytime soon. These bolts are Nylock so no need to add thread locker. If you plan on using the included recovery points, check out step 12 before doing this step.
Step 11. Installing Recovery Points

Regardless of whether or not you have a tow package, installing the recovery points on your Raid bumper is the same. There are two red recovery points included in the kit that attach to your bumper where it bolts to the truck. You can skip this step if you don’t want to install these.
You’ll notice the recovery points have three holes that line up with the bumper’s mounting holes. The tab on the recovery points will rest below the bumper’s mounting point and the vertical part of it will bolt into the truck on the side opposite of the bumper’s vertical mounting point. Simply hold these in place before installing the 6 bolts for the bumper and tighten everything down.
Step 12. Reattach Wiring

With the bumper completely installed, I grabbed my wiring harnesses and began plugging in all of the wires that we unplugged in the first few steps of this install guide. Don’t forget any of the plugs, especially the blind-spot monitoring systems, and make sure they all click into place.
For the blind spot sensors, I would suggest connecting these harnesses before bolting down the bumper because it can be hard to get your hand into the bumper cap housing when it is tightened to the truck.
Once all of your plugs are in place, zip-tie your harness up and out of the way wherever you find is the best place for it. I zip-tied mine up into the inside of the bed, sort of near the rear of the spare tire.
Step 13. Mount & Wire Lights

The final step to complete my installation was to mount the lights to the bumper and wire them up. Mount your lights first to their provided mounting brackets and bolt them to the holes in the bumper.
There’s a positive and negative wire that come out of the lights and it is up to you to decide how to go about wiring them. Ironman sells wiring harnesses or you could attempt to make your own.
I found that the best way to route the wiring is to follow the main wiring harness that goes from the front of the truck to the rear hitch plugs/license plate lights, etc., that we worked on before. I threaded my harness along with this the whole way and zip-tied them together. To get the harnesses into the truck, you’ll find a rubber plug under the driver’s seat that you can push the wires through.
Once you have the wires in the truck, you can pop up the plastic pieces along the bottom of the driver-side door and press the wires into that groove. Then send the power and ground wires through the firewall and the switch wires to wherever you want to mount your switch. I went to Home Depot and bought about 50 ft of 18 AWG wire so that I could extend my harness with that.
Why Rear-Facing Lights?

You might be wondering: why would you need such bright lights behind you? For one, when you are off-roading at night, being able to see what’s behind you when you are reversing is essential. If it is dark or storming, odds are your OEM reverse lights won’t cut it, and back into a tree, rock, or worse, one of your wheeling buddies will definitely ruin the vibes out on the trail.
These lights would also be extremely handy if you were helping recover a buddy who got stuck. Trying to hook up tow straps or your trail friend’s winch cable to your Ironman-rated recovery points in the pitch-black dark does not sound fun. Being able to illuminate the scene with high-quality light output while you get everything sorted is way better than trying to use your iPhone flashlight.
And of course, using them on a dimly lit road would also be appropriate, just be careful not to blind too many people.
Side Profile View

First Time On the Trail

Ironman Sensor Kit Installed

No Accessories – Bare Raid Bumper

Daytime – Rear LED Lights On

LED Reverse Light Output

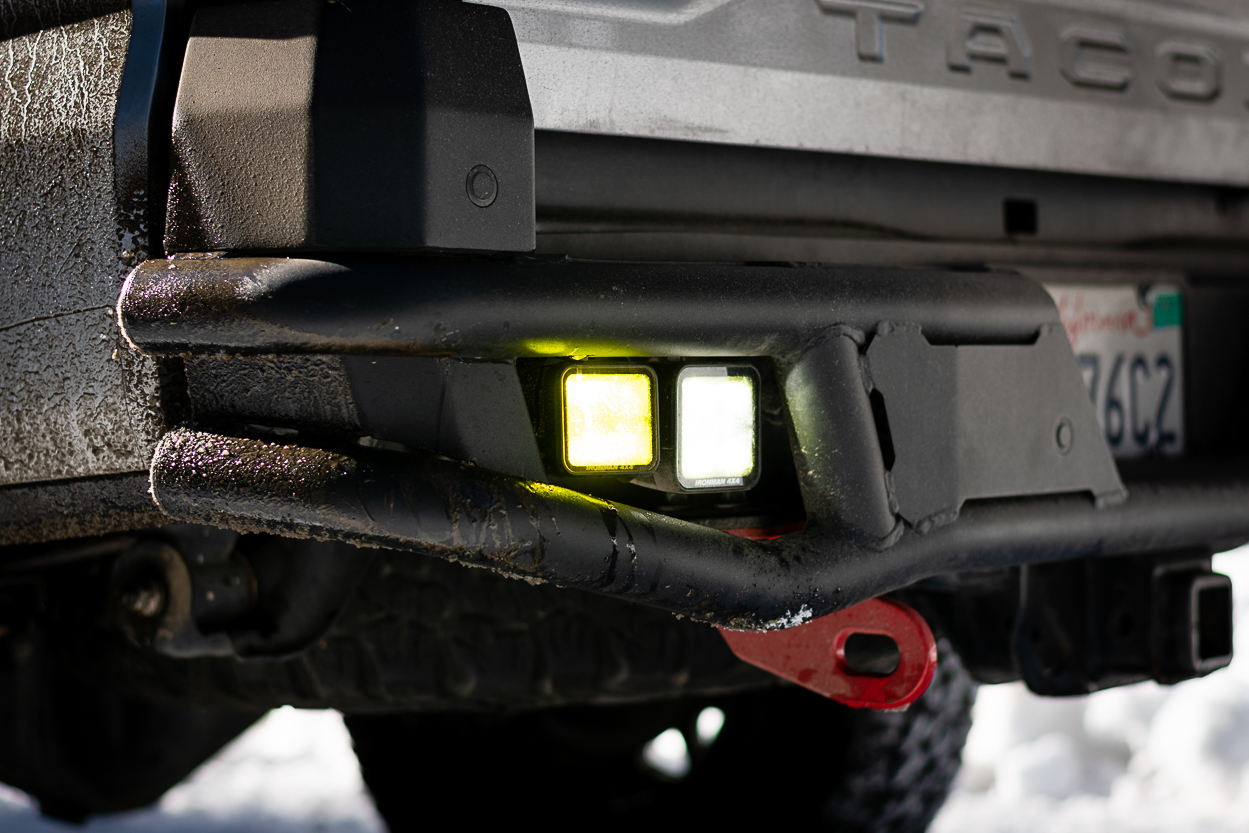
White LED Ironman 4X4 Light Pod Output

Amber LED Ironman 4X4 Light Pod Output

Reverse Lights + 4 Ironman 4X4 LED Light Pods

Final Thoughts

All in all, I am super stoked on this Raid Series bumper. For a while, I never saw the appeal for aftermarket rear bumpers as they often looked bulky and overdone. But, Ironman designed this bumper very well with both protection and aesthetics in mind. In my opinion, the Raid rear bumper strikes a perfect balance between standing out in a crowd and not making my truck look overly bulky.
This rear bumper is a hundred times more prepared for impact while out on the trail or even while on the road compared to the OEM parts. I have full confidence in this product and its ability to withstand heavy blows without any complications. It also provides you with perfectly pre-cut mounting locations with LED light pods and is one of the few bumpers on the market that I have seen that is still compatible with all of the OEM sensors.

If you’re on the lookout for an aftermarket rear bumper that will not only make your truck look mean but also provide greater protection when you’re tackling a challenging obstacle, look no further.
Ironman does a great job at balancing beefiness without unnecessary bulk. I would highly suggest this bumper for anyone in the market for a rear bumper or even for those on the fence debating about whether or not they need one. Happy trails!
Is there anyway I could use the BSM
Hi! Thank you for the very thorough write up. I have one question. Ironmans website says you can’t use this bumper with blind spot monitors but I noticed your stock bumper had BSM. We’re you able to mount those sensors inside the panels under the tail lights? Does your blind spot monitor work with the Ironman bumper? Thanks!
When it was first listed on their website (Labor Day?) I ordered for my ’12 2gen as it marketed for 2g+. A bit later, in anticipation, I visited the website again and they’d removed/updated to 3rd gen… I called and spoke with them and learned they’d changed to 3rd+ since they simply didn’t have a 2g to try it on. (Don’t get me wrong, IronMan was really great about giving me options and I decided to cancel my order since I can’t risk my daily-driver a couple g’s – still love them and most of my mods/upgrades are in their… Read more »
I haven’t heard of anyone trying it out so far on a 2nd gen unfortunately. Hopefully it works out since this kit is so well designed and built!