

As you begin to spend more and more time in your Tacoma, you might begin to want to improve upon its interior comfort and appearance. While there are many different places you could start, I recommend starting with high contact points.
Why you may ask? These are the parts of your truck that you most frequently use. Uncomfortable seating positions, bad steering wheel angles, and shift knob feel all play a massive role in your comfort. As someone whose truck is their pride and joy, these are all areas that I look to improve upon.
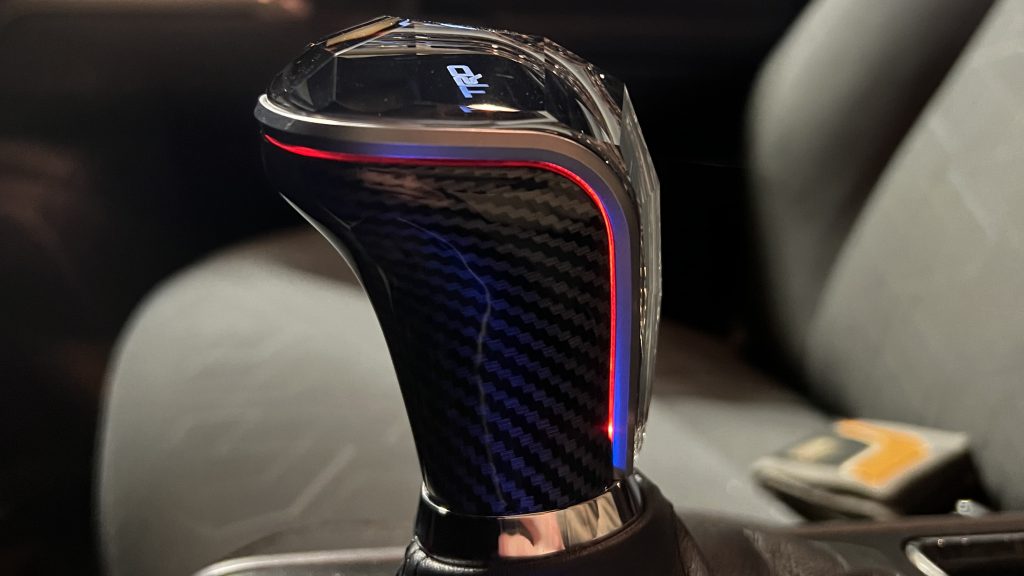
One part of your truck’s interior that you contact the most is your shift knob! While you may not think changing will make a big difference in the feel of your Tacoma, trust me, it does. The stock one doesn’t have the best ergonomics and certainly isn’t anything special to look at.
This neat crystal shift knob instantly elevates the look and feel of your interior. In addition to the rad crystal knob, it is lined with hidden LED lights along the edges that illuminate the TRD logo on top (they also have SR and SR5 etched logos available). The LEDs are also customizable; coming in both red and blue variants to best fit the color scheme of your Tacoma’s interior.
Find It Online
- KTJO 4×4 Crystal Shift Knob For 3rd Gen (2016+) Tacoma: Check Price
Table Of Contents
Step 1. Remove Old Knob

The stock shift knob can be easily removed. Start by pushing the silver ring at the base of the shift knob straight down. If it feels stuck, push a little harder, it pushes right off the shift knob.
After you have the ring (and shift boot) removed from the shift knob, you can unscrew (counterclockwise) the knob.
Step 2. Unclip & Remove Center Console

To remove the center console, you must first open the armrest. This gives you access to the seam where the center console joins the armrest compartment.
With the armrest open, take a plastic trim tool or screwdriver (beware, a metal screwdriver may scratch the plastic here) and slowly ply up on the center console.
Once you have one corner released, you can work your way around the console until it has been fully unclipped.
Step 3. Fully Expose Underside

You can now slowly lift the center console to expose the underside of the shift knob area. The E-brake shift boot will get hung up on the E-brake. To get past this, turn the E-brake shift boot inside out as you lift the center console over the E-brake lever.
Step 4. Remove Dash Trim

To gain access to the backside of the cigarette lighter (to power the LED lights), you must remove some of the dash trim. Don’t worry, this isn’t too hard.
To start, grab the upper trim (see the above picture), and pull straight out. It’s going to feel like you’re going to break it; you won’t. Give it a good pull and it will pop right off.
Once you get this removed, take a 10mm socket and loosen the screen a little bit. You don’t need to completely remove the screen, just loosen it enough to you can wiggle it around (you’ll see why in a minute).

The next (and final) piece of trim that you must remove is the piece that houses your climate control knobs and starter button. To remove this piece, start on the passenger side with a trim tool or screwdriver and pop that end of the trim off (see the picture above).
You will now see why you must loosen the screen; there is a tab on top of this trim piece that sits behind the bottom of the screen. Push up on the screen to clear it off this tab, and you can then continue to work your way down this piece of trim to remove it.
Note: There is a tab on the driver’s side of this trim that sits behind a part of the steering wheel. You must take your trim tool or flathead screwdriver and delicately pull this part of the steering wheel trim back just enough to clear it off the trim you are attempting to remove. I found disconnecting the first plug from the passenger side of the trim piece helped give better access to the backside of the dash.
Step 5. Connect Wiring Harness

This is probably the hardest part of the installation (even still, it’s pretty easy). Locate your cigarette lighter socket and directly behind it (inside the dash) is a plug. It has a female end to the connection. Grab it securely, and pull it straight off (towards the front of the vehicle).
Once you have this off, connect it to the black end of the KTJO 4×4 wiring harness. There is only one way it fits onto the wiring harness, so you don’t have to worry about connecting it the wrong way.
After you have fitted the KTJO 4×4 wiring harness to the truck’s power connector, connect the other end of the KTJO 4×4 wiring harness to the cigarette lighter prongs. Once again, it only fits one way.

You can now feed the small end of the KTJO 4×4 wiring harness down through the dash. It will pop out right below the wireless charging station (see the picture above). Once you have a little bit of the wire exposed, pull it all the way through. Make sure it isn’t snagged on any wires by the cigarette lighter.
Note: This isn’t required, but I highly recommend you plug the shift knob in at this point and turn the truck on. The reason to do this is to make sure you have it all plugged in correctly. The last thing you want to do is put all the trim back on, plug the knob in, and realize you didn’t fully connect the wires.
Step 6. Reinstall Trim

This step is pretty explanatory. Put all the dash trim back on in the reverse order that you removed it. Remember to tuck the lower bit of trim behind the screen.
After re-attaching the lower piece of trim, you can now take your 10mm socket and tighten the screen back up. Don’t go too tight, just enough to snug it up.
Lastly, take the upper trim piece and push it into place. Make sure it is all lined up and it will pop into place quite easily. You can now move on to putting the center console all back together!
Step 7. Reassemble Center Console

Before clicking the center console back together, run the power wire up through the shift boot. Make sure it won’t fall back through that hole; if it does, you will need to remove the center console trim and retrieve it.
You can now clip the center console back into place. Start by clicking the front of it in first, then work your way back and push it into place. It will be a little tough to click it into place by the armrest; don’t worry, it should be like that. Just push down and it’ll work.
Step 8. Install Knob

Take your new shift knob, and, without plugging it in, screw it clockwise onto the shift column. Spin it until it is hard to turn and is aligned correctly. Do not over-tighten!

After it is tightened on, you can connect the power wire to the shift knob wire. It only plugs in one way so don’t worry about messing it up.
Next, carefully thread the wires through the hole in the shift boot cap. You can now re-seat the silver ring atop the shift boot, and click it into place on the knob (see picture above).
You should now be done with the installation! Go back through and make sure that all of your trim is correctly attached. To illuminate the shift knob, just turn your truck on and it should light up. The TRD logo on top of the knob as well as the seam between the carbon fiber and crystal has LEDs.
Final Thoughts
This option feels great in your hand. In addition to increasing comfort, it looks amazing! The lights really make it stand out (and really help when using it at night). The installation isn’t too hard and is definitely a great beginner upgrade. If you are looking to start upgrading your truck’s interior, the KTJO 4×4 TRD crystal shift knob is something you should consider.
Will this fit 5th gen 4 runner 2wd
Automatic transmission