

From vehicle-specific panels to fully rigid panels, Lensun has everything you need to get your setup dialed.
Solar is becoming popular in the camping and overland world nowadays for adding an auxiliary source of power to help run all your accessories. There are tons of options out there when it comes to solar, but one choice that has been trending lately is these truck-specific, flexible panels.
These kits are meant to sit on the hood of your truck. They’re a great way to free up valuable space on a rack or back seat and are always out there converting energy when the sun is shining!
Today, we are going to dive into the unboxing, installation, and review.
This kit comes with everything you need to get the panel up and running. Before ordering, be sure to check what type of battery you have and if you want to run it directly to your battery or an external power station. If you are unsure about where to get started, or what type of system you need for your vehicle, feel free to reach out to Lensun with any questions.
Find It Online
- Hood Mounted Auxilary Solar Panel (2016-2023): Check Price
Table Of Contents
Features & Specifications

Electrical Specifications
- Peak power: 85W
- Solar cell efficiency: 22.5%
- Maximum power voltage: 17V
- Maximum power current: 5A
- Open circuit voltage: 21V
- Short circuit current: 5.5A
- Power allowance range: +/-3%
- Maximum system voltage: 500V
- Total Weight: 6.6 lbs.

Features
- Your battery or power station will always be topped off when the panel is exposed to sunlight.
- Emergency engine starting. If you ever manage to completely drain your battery, the solar panel can start the vehicle in 30 minutes based on sun exposure.
- Decreased hood glare. Extremely noticeable with a reflective color of paint like white.
- High-quality ultra-thin build quality that sits low profile on the hood.
Controller Overview

If you decided to get the solar controller, then I’d highly advise browsing the manual. As someone who never likes to read manuals and throws them out with the hopes of figuring things out myself, this one is super useful. The controller has tons of features and acronyms that are worthy of getting familiar with.
I found that Chapter 6, pages 14-16, is filled with the most pertinent information, descriptions, diagrams, and shortcuts. The controller continuously changes screens, displaying new and different information all with their separate meanings. I also found it was useful to get to know these functions to check up every once in a while to see how much power I am drawing and when the solar panel is gathering energy.
Furthermore on the controller, are two USB ports. If you haven’t noticed already, they are located on the top of the controller. These are super handy for the sake of having the ability to charge devices straight from the battery and not worry about draining it when it’s in the sun charging away. The controller is loaded with features and the manual does a great job outlining them. Take the time to get familiar with the functions to help better understand your power draw and intake.
Unboxing

Something myself and others value is quality packaging.
Knowing your product came damage-free is a huge relief. Lensun did a great job ensuring that all products came well supported and safe from potential damage.

The panel was sandwiched between two dense pieces of cardboard.
Be sure not to bend the panel excessively.

The panel’s texture resembles nonslip plastic due to the fine dimples on it. As you might have assumed, the panel is waterproof.
Side note, don’t touch the top of the panel after it’s been in the sun for a while, it gets really hot!

In the smaller of the two boxes is the controller. The controller is an optional piece but is highly recommended if you are going to hook the panel up to your battery.
The contents of the box include the controller, wire harness, extra crimp ends, and the manual.

Note that the complete kit comes with a custom-fitted wrap, if you opt not to get it, you can still purchase a hood wrap from a third-party company.
Lensun highly suggests using a vinyl wrap between the panel and hood because if you decide to install it without the vinyl wrap, it could potentially damage the paint if you try and remove it. Lensun provides a wrap-specific squeegee too.
Installation
Let’s run through how to install and mount this solar panel to your truck.
Tools & Materials

Since this is the complete kit, the only thing that I needed to purchased was double-sided tape.
- Assortment of Zipties
- Electrical Tape
- Dikes (Wires Cutters)
- Mechanic’s Tool Set
- 10mm & 12mm Socket
- Phillips Head Screwdriver
- Scissors
- Double-Sided Tape (2 Rolls Minimum)
- 1/4 Phillips Head Screws (Optional)
- Velcro (Optional)
- Coat Hanger (Optional)
Step 1. Install Controller Module

Source your positive and negative cable ends, the red (positive) cable will have the fuse on it.

These are what will attach to the battery or power tray. Red to red, black to black, of course.

If you are wiring to a battery like me, remove the terminal cover and get your 12mm socket and ratchet. Unscrew the nut all the way.
Route your positive wire under the cover and attach it to the terminal along with any other accessories you may previously have had on the terminal. Locate your socket again and tighten it all up. Disregard the nasty terminals, they were cleaned later.
Please note that if you have a power tray for all your accessories, the install will differ. You will have to wire up to the tray instead of the battery. Wire the same way you have with previous accessories.

Repeat the step on the negative side with the black wire. The negative side has a 10mm nut.
Step 2. Mounting Controller Panel

I decided to mount the controller alongside the engine bay near the fuse box. Please note if you have a power tray, this space will be occupied and this step can be disregarded.
Unfortunately, the wires on the controller aren’t long enough to route inside the cab, I had tried and only had about a foot and a half of wire to play with leaving no space to mount it. Extending the wires to mount in the cab is a potential job I may tackle down the road.
Holding the panel in the location you want it, mark the top two holes on the controller with a sharpie. These are what you’re going to drill out to mount the controller to.

I used a tap and hammer to open up the holes but a drill will do the job just as well. Using two 1/4″ screws, tighten down the module to the engine bay. You can now remove the protective plastic over the screen if you haven’t already.
The controller will indicate numbers if wired up to the battery, these aren’t accurate, but a good indication you are receiving power!
Step 3. Cable Management

With the excess wires from the controller, I wrapped them up as clean as I could and stuffed them under the controller. Taking two zip ties, you can utilize the bottom holes on the controller to zip tie the wires. Repeat on the other side. For a cleaner look, the wires can be shortened and crimped together to remove any unnecessary excess.
With the excess wires coming off the battery, use some electrical tape and the Velcro roll that came holding the wires together to tidy them up. For a sleeker look, the cables can be routed around the fuse box to hide them better.

To get the wiring up and situated for the panel, routing it along the stock harness is a good place for it to sit.
With the controller mounted up and out of the way, it is time to move on to mounting the panel.
Step 4. Installing Vinyl

There are a couple of ways to go about mounting the vinyl and panel. The first is to lay the vinyl onto the hood, squeegee it out, and then lay (using double-sided tape) the panel onto it. The second way, the way that I went with, was to lay the vinyl out on top of the cardboard and then place the panel on top of it (using double-sided tape), then installing the whole assembly onto the hood together.
A tip I learned was to use duct tape on the corners as it is stronger than painter’s tape and will hold it better. Please note too, that the wrap has a plastic wrap on the top so when the time comes, go ahead and remove that.

Now, dry-fit the panel onto the wrap. You will note that the wrap is about 1/2″ wider than the panel. The wrap is precut to fit the shape of the panel, so if you choose to keep the overhang, then leave it as is and move on to the next step of laying down the tape.
I chose to have a sleeker look and decided I was going to cut the excess vinyl once the panel is on the wrap.

Being careful, flip the panel over and grab your double-sided tape. Run it along all the edges of the solar panel and add a couple in the middle as well. If you would like to add some more in the blank spaces, it wouldn’t hurt. Just don’t buy the cheap stuff.
Once the tape is laid, you can go ahead and remove the plastic on the wrap, if you haven’t already. Having a second set of hands helps tremendously and is highly recommended.

Remove the backing on the tape and lift the panel carefully and lay it center onto the vinyl. Press firmly around all edges and the center of the panel to make sure the adhesive has done its job.
If you are planning on leaving the excess go ahead and leave as is, if you want to score the excess, take a knife or scissors and cut alongside the edges to clean everything up.

Success! Now the panel is all set up ready to go onto the truck.
Step 5. Wash the Hood

This step is crucial to have the vinyl sit properly on the truck.
Gotta show the truck some love, so I went about washing the whole thing, because why not, when all the products are out. Make sure to wipe up all the water and that the hood has fully dried before placing any vinyl.
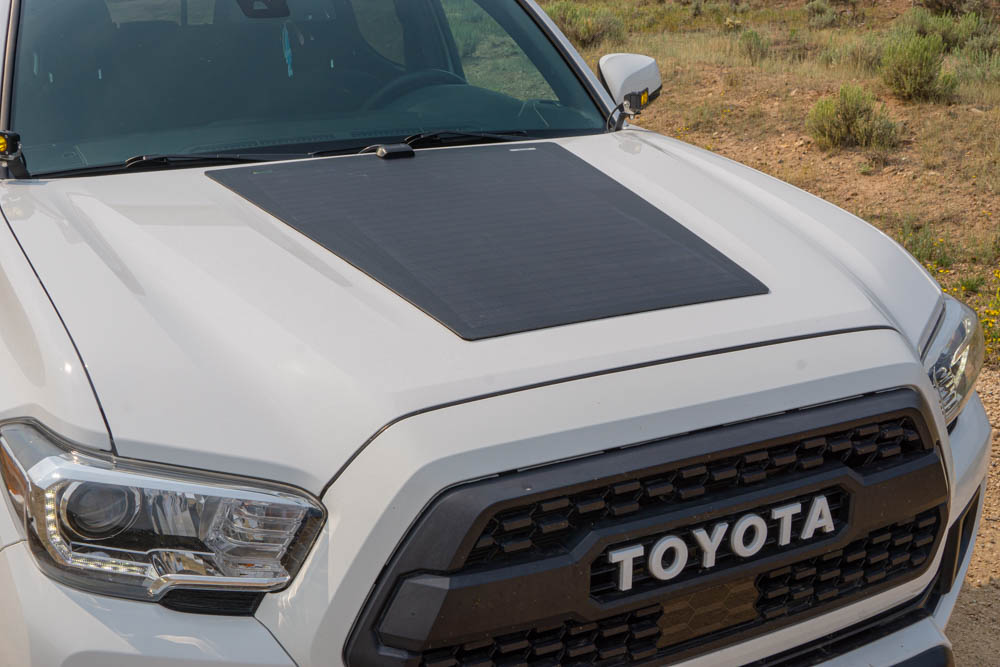
Step 6. Place Panel on Hood

Time to mount the panel onto the hood. As mentioned above, recruit another helper for this step to make sure it’s properly installed and aligned. The 3rd Gen Tacoma has two dimples roughly aligned with the driver and passenger seats, use those lines as guides to get the panel centered.
Another helpful tip is to use the Toyota logo on the grille as a reference point to getting it centered.

Once you’ve got the panel where you like it, take some painter’s tape and tape the corners to have a guide once you get ready to place it for real.
Walk around the truck one more time and make sure you like where it is sitting.

Starting with the front of the panel, remove the backing off the vinyl, about 6-8 inches, and get the front of the panel lined up with your tape corners. Once that is sitting in its happy place, move towards the back, removing the vinyl while simultaneously pressing down on the panel.
Once the panel is stuck to the hood, go around applying pressure all over to make sure it’s all sitting straight and flat. I added some weight over the wire module to make sure that it’s getting the proper pressure since it’s a little harder to reach.

Let the panel sit for 5 or so minutes and make sure nothing is peeling. If it does, apply pressure and push down any corners or edges that have popped up. Adding weight can also help, as seen in the previous step.
With that, the panel is on! Walk around and ensure it’s where you had planned it to end up.
Step 7. Wiring Panel to Controller

Unravel the wiring harness if you haven’t already, and feed it under the hood towards the controller.

The connectors are opposite of each other so you cannot accidentally mess up the connections.
Press the ends together until you hear the subtle click. Small amounts of pressure may need to be applied to get the seal to cooperate.

If you mounted the controller in the same place I did, then you will notice excess wires to wrap up. Since I may want to relocate my controller in the future, I am going to leave the excess.
Gathering the harness as best as I could, I found the best place to stow the wires would be the factory harness that runs along the rain gutter. Place zip ties along the harness and start tightening while making sure your harness is sitting nice and isn’t pinched anywhere.
Now you have completed the install of your Lensun VSS Solar Panel!

Take a step back and admire your work. Always a great day when an install goes well!
As installs always go, walk around to make sure everything is where it’s supposed to be and is looking right. If need be, you can stuff some more wire into the engine bay if there is excess coming off the panel.
Final Thoughts

Overall, my first impressions are great, from the packaging to the build quality.
Overlanders are running more and more accessories nowadays, and these draw significant amounts of power. It is pretty much required to have another source of energy if you want to keep all your gear charged and running for days on end. While traditional solar panels are more than enough for a lot of people and do a great job, having a panel on your hood at all times is a nice benefit. No more forgetting your packable panel and no more having a power station or battery go dead while out exploring.
After running the panel for a few weeks now, I have learned a lot about solar. The most noticeable difference I saw right off the bat was the reduction in hood glare. Having a white Tacoma, the glare from off the hood can be blinding when the sun hits it just right. With the panel taking up nearly half the hood, it helps tremendously with the glare.
Furthermore, having the panel mounted on the hood and hooked up to the battery gives me the ability to use the bed outlet, interior 12-volt plugs, and other USB ports without the worry of draining the battery. Down the road, I plan on adding a fridge to my build along with a power station and other devices that draw power. Knowing this panel is with me all the time and charging my battery and accessories is a huge positive and reassurance when off the grid.
If you’re in the market for solar, seriously consider the Lensun Vehicle Specific Hood Stamp Solar Panel. Their panel has left me nothing short of impressed and eager to continue putting it through its paces out in the wild. Get out there and explore!
Ordered a panel kit for my Tacoma. They charged me. And are suddenly unreachable by phone, e-mail, etc. Lensun seems like a very sketchy company. And it looks like I’m out several hundred dollars. BTW, this article was a big factor in my decision to order. Lesson learned. Don’t do business with foreign companies with little to no track record of quality customer service like Lensun.
Any updates with your order? I can’t seem to find many reviews at all and am still hesitant to purchase.
I was eventually able to reach them after several weeks of radio silence. They claim they were on holiday. I was able to get a refund. But only after several more emails exchanged. They offered to give me $80 off to keep the order open. But the hassle and faith lost in their customer service to that point was not worth it for me. I’ve since come up with better solutions to my power needs. So the hood mounted panel isn’t a consideration for me anymore.
When did you place your order? Chinese New Year catches many people by surprise, not much gets done late January and a couple of weeks into February. One company I worked for in California encouraged employees to take their vacations at this time because so much of their work was put on hold by China shutting down for their New Year celebration, they celebrate for weeks not just a day like the U.S. my order came fast considering it was shipped from Asia, it too was packaged extremely well. Haven’t installed it yet, so jury is out on the quality… Read more »
Do they make this panel
For the 3rd gen trd pro hood?