

Two of the most important things, in my opinion, when it comes to wheeling, are ground clearance and armor for your rig. Ground clearance is crucial for getting over obstacles, big or small. Without enough ground clearance, you face the possibility of severely damaging or jeopardizing your rig. Everything from high centering, scraping your undercarriage, or smashing your bumpers. That’s why most rigs on the trails have oversized tires and lift kits.
This is where armor comes into play as well. Strapping on skid plates, sliders, and high clearance bumpers adds armor to your vehicle to protect it from hard hits. Skid plates protect the undercarriage, rock sliders help with protecting your rocker panels, and high clearance bumpers protect the front and rear of the vehicle. This armor is typically made of either steel or aluminum. I’m not here to debate which performs better, but I can say both are much stronger than your factory plastic bumper.
Editor’s Disclaimer: Outgear Solutions has had some issues surrounding communication and lead times. While we are unable to verify each and every claim, buy at your own risk/discretion. We are not looking to hurt their business, but also don’t want to be held responsible for negative experiences.
Find It Online
- Outgear Solutions Tube Bumper: Check Price
Table Of Contents
Why High Clearance?

As I mentioned above, ground clearance is everything when it comes to wheeling. Driving up a steep grade or coming down a big drop, the first thing to (usually) hit is the front or rear bumper. I can’t count how many times I was coming off a steep hill or dropping from an obstacle and I smacked my hitch. I was lucky enough to choose decent angles to avoid major damage to my stock rear bumper.
Secondly, a steel high clearance bumper offers protection. In those situations where it doesn’t matter what angle you take, at least if you smack the rear bumper, you know your rig is protected and the bumper can handle it.
Why Outgear Solutions?

Outgear Solutions is a small business that has quickly grown in popularity. They operate out of Southern California. Products offered include bumpers, rock sliders, LED lighting, roof rack accessories, and they also offer fabrication work. All of their products are made and manufactured on American soil.
The customer service is next to none! I can’t emphasize this enough. I had a question during my install on a Sunday afternoon and reached out to the owner, Joe, and got an immediate response. Every other company I’ve dealt with would have had me waiting until Monday.
The packaging upon arrival was comforting, especially with a valuable item like this bumper. The entire box was tied and wrapped, and the bumper inside was wrapped with styrofoam as well as plastic wrap. This insured no dings or scratches on the brand-new paint before I got it onto my vehicle.
Their price point is also unmatched. Most companies offering aftermarket bumpers are charging thousands of dollars, especially if you want your bumper powder coated. Outgear Solutions is selling this exact bumper powder-coated black at an extremely affordable price. Best prices on the market compared to every other company I’ve seen.
Specifications
- 2” Hitch receiver (not rated for towing)
- Main Hitch Receiver is 2” ID and .1875” Thick
- Ties into the main frame plates so everything is structurally sound
- Slotted Tabs for Light Pods on Either Side of Bumper
- Baja Designs S2s will fit best
- Bed Reinforcement Tabs
- Body Filler Panels
- Bumper Main Plates are .375” thick where it mounts & .750” thick to the outside of the round tubes to mount recovery or D-rings
- Round Tubes are all 1.75” DOM .120” thick
Installation
Tools Required
• Socket + Ratchet Wrench Set
• Dremel or Angle Grinder or Reciprocating Saw
• Power Drill
• Tape Measure
• Painter’s Tape
• OEM Touch Up Paint
• Safety Goggle/Gloves
Step 1. Assemble Parts

Straight out of the box should be the bumper, (2) bed end caps, (2) bed support brackets, (2) strips of rubber trim, and several nuts, washers, and bolts.
Step 2. Disconnect Electrical Wiring
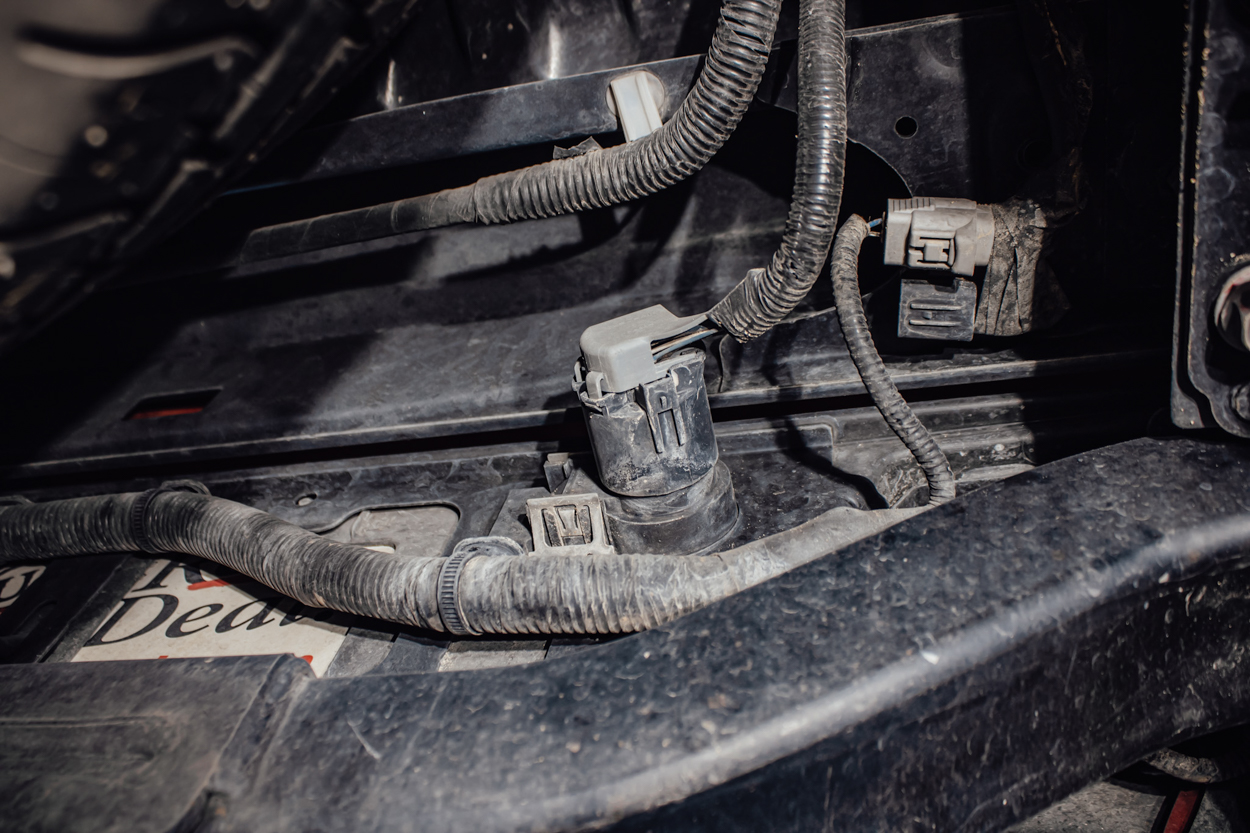
Disconnect the wiring for the license plate lights as well as the hitch plug as seen in the images above and below.

NOTE: If you have parking sensors on your bumper then you will have some additional wiring to disconnect for each sensor. My year and model Tacoma did not come with any sensors on the bumper.
Step 3. Remove Bolts Securing OEM Bumper to Frame

Loosen and remove the five bolts shown above. These bolts secure the OEM bumper to the frame. The driver’s and passenger’s sides are identical, so just repeat the process for both sides. Set all of these bolts aside, because you will be reusing them to secure Outgear Solutions bumper to the frame in the same spot.
NOTE: The bumper should be extremely snug, so it won’t just drop to the ground. For assurance/safety, get a jack, and place it under the hitch to support the bumper as you remove the bolts.
Step 4. Drop the OEM Rear Bumper

With all the wires disconnected and the bolts removed, you can now drop the bumper from the vehicle.
Get a firm grip on it, and yank it off. It is extremely snug, so it may take a couple of yanks.
Step 5. Remove Hitch Plug & License Plate

Remove the hitch plug by releasing the two metal brackets on either side of it on the rear.
Be careful not to break the plastic though.

Remove the license plate as well since it will be going on the new bumper.
Step 6. Remove OEM Plastic Bed Caps

Clip (1 of 3).

Clip (2 of 3).

Clip (3 of 3).
The OEM plastic bed caps are secured by three clips. You can be gentle about removing them, or just or break them all.
You won’t be reusing them, so it’s your choice. You can find each clip based on the pictures above. Repeat the process for both sides.
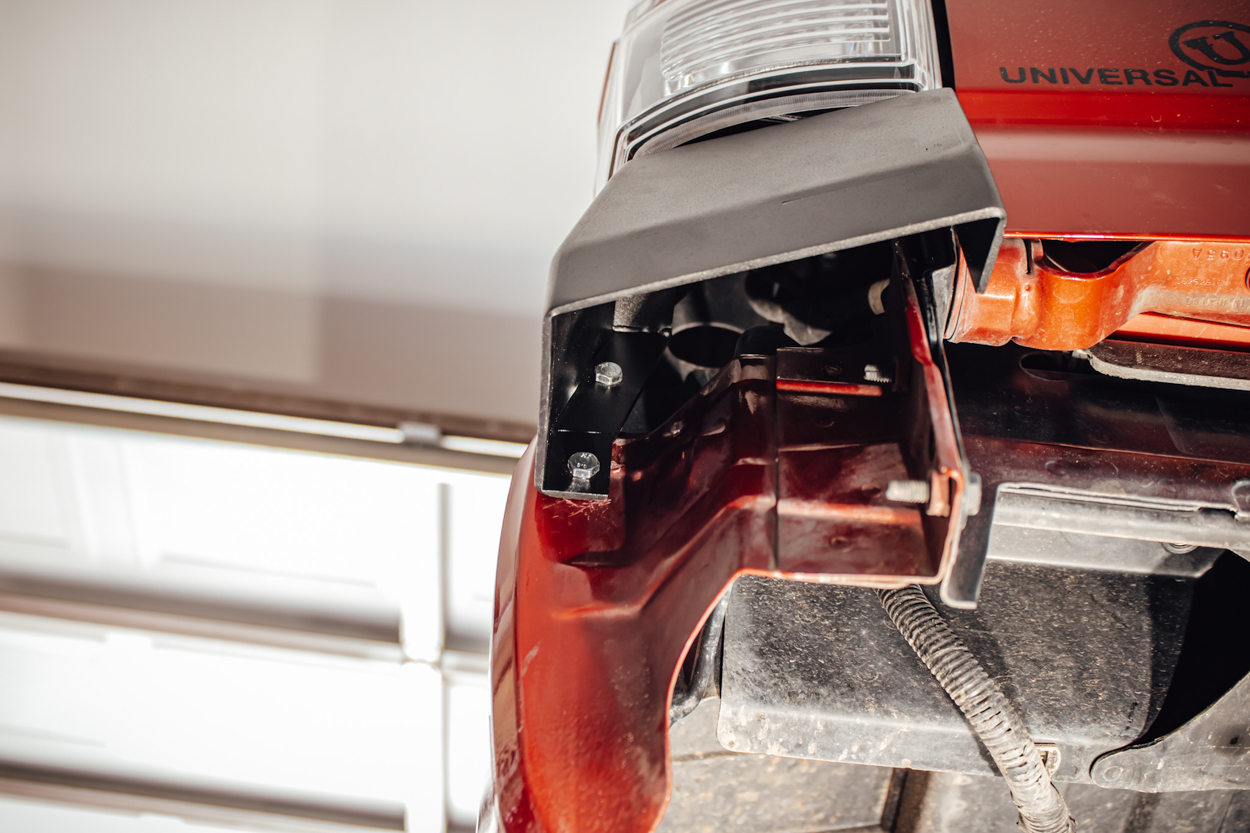
Step 7. Mount Outgear Solutions Metal Bed Caps

The bed cap will rest under the taillight as shown in the image above. Using a marker or sharpie mark the bottom hole as it rests against the outer fender.
Now take the measurements for the top hole from the bed cap, and using those same measurements, mark the top hole with a sharpie on the outer fender. It should resemble the picture below.

Measure twice and drill once! Once you are sure the holes are accurately marked, use a power drill to drill out the holes. Put the new bed cap in place, and bolt it down.
Slide the longer provided bolts through the bed cap and fender, then on the opposite side, place a washer followed by the nut. Tighten down fully. It should resemble the images below.

Side angle.
From below the bumper.

From inside the truck bed.
Step 8. Prepping to Cut Bedside & Fender Flare

Place your tape along the fender, and under the bed cap.
With all the tape placed, you can take your measurements and use a marker or sharpie to accurately mark your cut line. For the portion under the bed cap, trace a line following the bottom of the bed.

Once you get directly under the bed cap you can taper your cut line upwards so that it reaches the bottom of the bed cap on the outer fender.
This will be your guideline for how high to cut your outer fender area. Shown in the image below.

The actual cut line is determined after you install your metal bed cap.
Using the bottom of the bed cap as your guide, take your measurement from the top of the bed underneath your bed liner to the bottom of the bed cap. It should be roughly 21.75” from the top of the bed.
Step 9. Trimming Bedside & Fender Flare

Following the cut lines that you marked in the previous step, begin cutting your fender. Don’t forget your gloves and eye protection!
Helpful Hints
Before cutting the bedsides, leave the factory bed support brackets in place. It will assist you by keeping the bedsides more stable as you cut.
Also, I found that using a reciprocating saw on the portion just below the bed was much more efficient with cutting through the various layers. Once I got below the metal bed cap, I switched to the Dremel for more precision cutting. This also eliminates a majority of the vibration once you get to the bedsides.
You can also remove the fender flare before cutting, but I opted to leave mine on and cut through it. Saved a little extra time, and didn’t have to stress about breaking fender flare clips.
Step 10. Deburr, Paint & Place Rubber Trim

With the bedsides now cut, deburr the freshly cut metal.
Once the bare metal has a smooth surface, use your touch-up paint to paint all spots with bare metal exposed.

Allow sufficient time for the paint to dry fully, then place the provided rubber trim along the bedside for a clean finish.
Step 11. Replace OEM Bed Support Brackets

The OEM bracket is simple to remove. The portion attached to the bedside was just cut off in Step 9.
To completely remove it, just remove the two bolts from the factory mounting point shown in the image above. Save those two bolts because you will be reusing them.

Mount the support bracket provided by Outgear Solutions in the same spot. Mark the hole on the bedside using a marker or sharpie, and drill out the hole. Using the short bolts provided, bolt down the support bracket to the bedside.
Helpful Hint
The bolt to the bedside will be hidden underneath the fender flare. To ensure you don’t drill through the fender flare, place a small piece of wood underneath the fender flare on the outside of the bedside. When you drill the hole, the piece of wood will stop the drill from punching through your fender flare.
Step 12. Mount Outgear Solutions Bumper

Grab a friend to help you lift the bumper, otherwise, it will be a struggle getting it on yourself. Lift the bumper into place and slide it onto the frame.
Adjust it so that the holes from the bumper line up with the holes on the frame. Once aligned, place all the bolts you removed in Step 3 back into the frame. Bolt the bumper down fully to secure it.
Step 13. Mount Hitch Plug to New Bumper

There is a plate welded underneath the bumper that is cut out in the exact shape as the hitch plug.
Mount your hitch plug there, and reconnect it to the wiring harness. You can secure it the same way it was secured to the factory bumper.
Optional Step

If you chose to remove your spare tire, you will have the long chain hanging down unsecured. There are two solutions to this.
You can either completely remove the bracket, or just loop it through the frame a few times and secure it to the frame. I opted to loop it through the frame a few times and secured it to the frame using a metal hose clamp. Reference the image above.
Final Thoughts

Outgear Solutions completely killed it with this High Clearance Rear Tube Bumper! Out the door with powder coating, it is currently under $1,200. Most companies on the market aren’t even selling bare metal aftermarket bumpers for that cheap. This thing is solid and has a super sleek design. The welds on the bumper drive in the fact that Outgear Solutions knows what they’re doing.
I was able to get it installed before heading to Colorado for a week-long trip, and it came in clutch! The trails out there are no joke, and I smacked it a few times on some large rocks. The only proof of making contact with the rocks was some minor scrapes on the bottom sides of the tubes. This bumper ate it up. It doesn’t come with a spare tire swing out, but don’t let that be a deciding factor for you. There are several options out there to add one to it.
If you are in the market for a high clearance rear bumper, check out Outgear Solutions. Price point, design, packaging, shipping, and protection… they have it all! Don’t sleep on them. They are doing huge things out there in California!
Can you still run spare tire underneath?
Yes you can. It doesn’t affect your spare tire in anyway. Just be aware that the spare tire will now be visible underneath the truck once the bumper is installed.
I know we dont buy the tacoma for towing, but I do run into times where i have to tow something. Have you towed with it before? If you did howd it hold up?
Unfortunately I have not towed with it, so I couldn’t offer any valid feedback on it.
Great article, enjoyed reading it. I’ve wanted this bumper but held off due to the lack of a swing out. What are some of the options you are referring to that would work with this bumper?
You could have someone fab up a swing away. Know anyone local? I also believe that Outgear does custom work. Might be able to get that done with them. Just a thought.
RIGd and Wilco are both great companies with solid hitch swing outs.
Do those actually work? Has that been confirmed? But if you want the best option, RIGd is the way to go!
It has not been confirmed. Best bet is to reach out to Joe directly and see which brands work best with the bumper. Joe does custom fab work too though.