
Overview of the Plano Case
So you’ve finally installed your roof rack on your truck! Congrats!
In our last post, we covered an overview of 2nd Gen and 3rd Gen Tacoma Mods. If you’re like me, you want to utilize those mods (like your roof rack) to use it for storage, so you can utilize your bed space and/or cab space. Using your roof for storage will keep your friends happy when the ride with you on long excursions.
Upon some research, I have found that many people have been using Pelican cases for storage on their racks. When I clicked on the link to see the price, I was amazed at how expensive they were.
So I dug a little deeper and came across these Plano cases for a fraction of the price.
Find These Products Online:
- Plano Case: Check Price
- Pelican Case: Check Price
- Prinsu Rack: Check Price
At first, I was hesitant at ordering these cases because I hadn’t seen many reviews or installs with these cases online but I figured, why not. I was glad I did so. While the Plano case costs about $100 less than Pelican, It may give Pelican a run for its money in the near future.
When first unboxing my 36” Plano rifle cases, I was amazed by the quality of this product. Right on top in large words, it said: “Made In U.S.A”. Which is awesome because who doesn’t love supporting products from this amazing country?
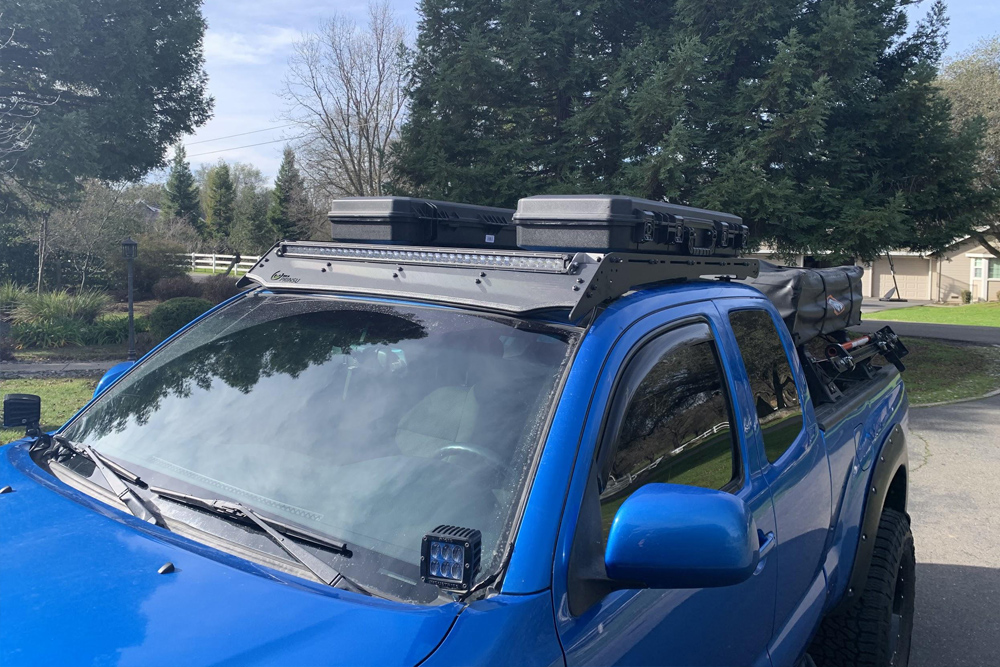
These cases come in size 36”,42” and 52” depending on what size you want/need for your roof rack. For me, the 36” case was the perfect size for my access cab Tacoma.
Table Of Contents
“Overland” Look

At first glance, the case is very sleek and tactical, giving it that perfect “overland” look.
One heavy-duty handle with four easy to use clips. Two of which lock with a key given to you from Plano. Each case comes with two extra holes, next to clip one and four that allow you to put your own master lock or lock system you want to further protect what you put in your case. These cases also are equipped with a pressure equalizer that is adjustable no matter where you go, whether that be up in the mountains, down by the beach, or straight to the mall. Haha!
Among opening the case, I was amazed at what they give you for such a good price.
What’s Included

Two foam inserts, one of which (Bottom piece) you can cut and customize to fit your recovery gear, rifles, camping items, etc.
Or if you don’t want/need to use the foam bottom insert, you can take it out completely to fully utilize all of the case’s space for your gear! They also open flat which allows for easy access and allows you to see everything inside. This case is also equipped with a rubber weatherproof ring to keep all weather conditions out of the box when it is closed.
Whether your offroading in the snow, driving through a rainstorm, or simply washing your truck after the long weekend, this case will keep all of your gear dry.
Installation
Overall, install for both cases took me about 45 minutes to an hour to complete. Quick and easy. You’ll need some basic tools too.
If you’re planning on mounting the cases to a Prinsu rack like me, I used…
- Use half of these materials if only mounting one case
- 8 Carriage bolts measuring at ¼
- 8 Wingnuts
- 16 Washers
- Silicone Adhesive
- ¼ Drill Bit
- Straight Edge or Ruler
Pencil to mark out holes.
Take into consideration that if you are planning on mounting these cases to another roof rack, the install and/or materials used may differ.
Step 1. Measure Where To Drill
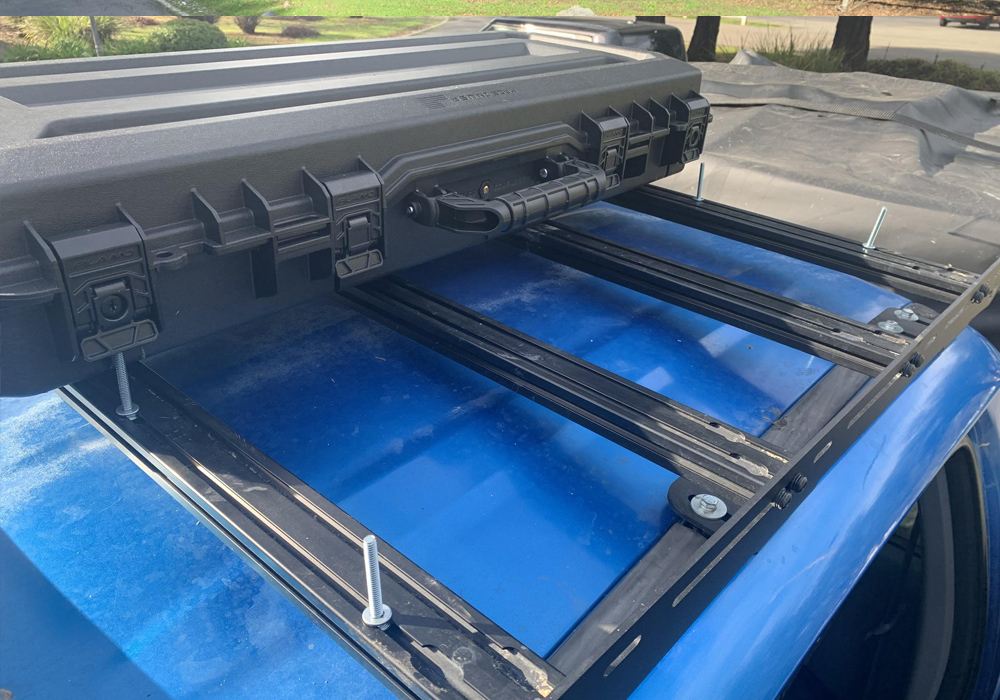
I set the case up on the roof rack and carefully measured where to drill the holes for the carriage bolts.
For me, I set the cases more to the back of the rack in order to help aerodynamics and wind noise when driving. Measure accurately – you don’t want to mess up.
Step 2. Carriage Bolts
I placed the carriage bolts and first set of washers into the crossbars. Then, I placed the case over the bolts through the holes that I had drilled in step one.
Step 3. Waterproofing

Use your silicone adhesive around the holes that you had drilled in order to secure that your case is waterproof and doesn’t allow any water to get to your gear. Once the silicone is on all 4 holes, I placed 4 more washers down on the carriage bolts along with the wingnuts to secure the case to the roof rack.
Step 4. Let It Dry
Allow the silicone to dry before putting your gear inside.
Step 5. Enjoy New Cases
Once you’re done with all five steps, you can finally utilize your new case(s).
Off-Road Use

When comparing the Plano case to other brands such as Pelican, I am quite surprised by the quality, build, sleekness, and durability for a fraction of the price.
Both cases were also able to hold all of my recovery gear, tools, and extras that I used to carry with me in my back seats! While I know most of you Tacoma owners probably own a double cab unlike me with the access cab, the extra room in the cab is very convenient for those without 4 full doors.
When driving, the cases do make a little wind noise but not too much to make you go crazy about it. It also depends on the placement of your cases. Since I placed mine further to the back, there is most likely less wind noise over if I was to put them more towards the front.
While I’ll give the case a 5-star rating, the only thing I would change about them is the locking system.
Both cases were able to be locked/unlocked by the keys from either box which makes me wonder if anyone with a Plano box key can or could open my cases. To fix this problem, I added a master lock to both sides so others couldn’t get to my belongings.
Final Thoughts
Overall, I am very pleased with these cases and would buy more again in a heartbeat.
Mounting these to the Prinsu rack was quick and easy and give your Tacoma that look it was missing all along. The amount of storage space these cases have for your gear and belongings are perfect. If I were you, I would stop hesitating and start ordering your new Plano case for your roof rack right away!
ordered 2 based on your write-up. Thank you!
8 1\4 inch carriage bolts. ?
Why will it not allow one quarter? Not 14 ?