

When looking for a new suspension for your Tacoma, you may have heard about Ironman 4X4.
I spent a vast amount of time researching the best kits for my truck, considering products from Eibach, OME, Fox, and Bilstein.
Just when I thought I was ready to make a decision, I discovered Ironman 4X4. Want to learn more about their options? Read Kenny’s post overview of Ironman lift kit options.
Table Of Contents
Overview
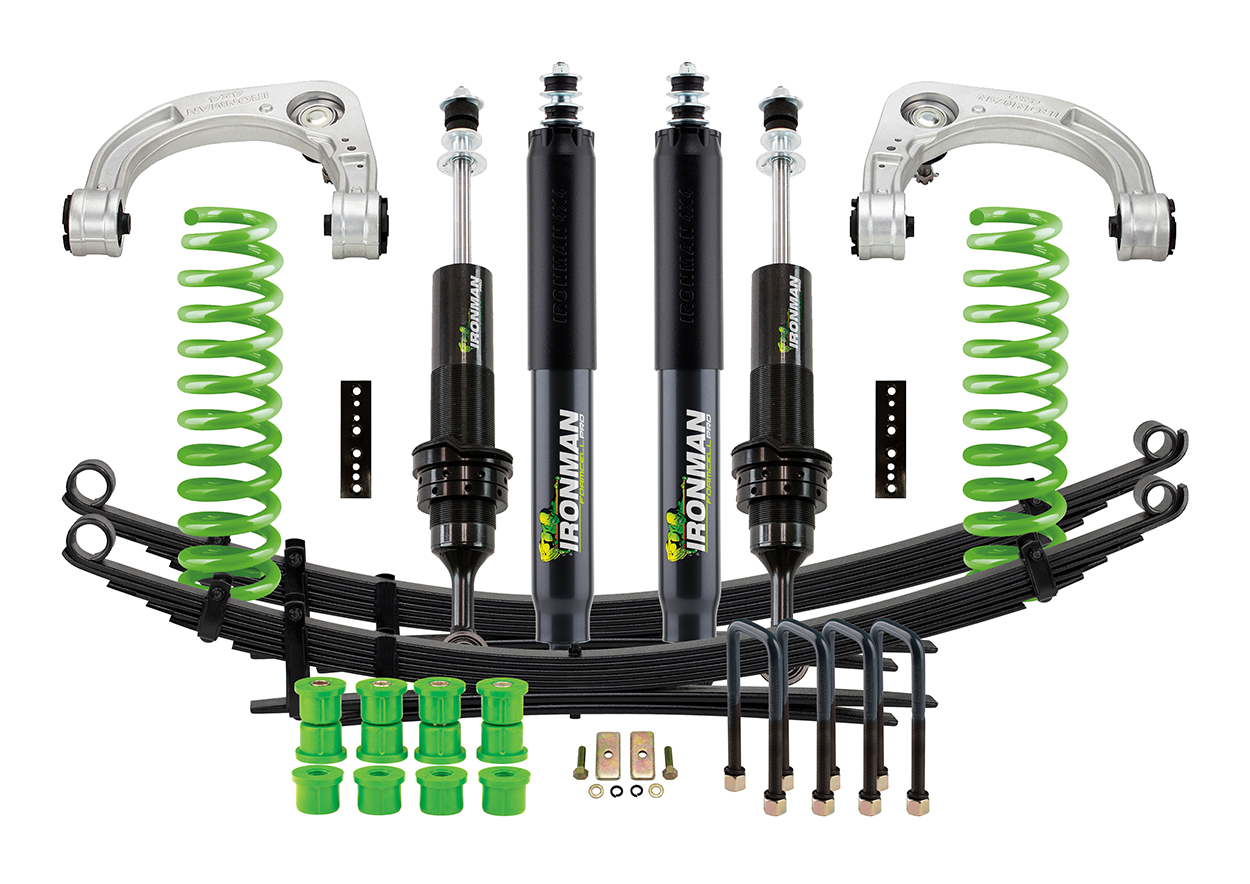
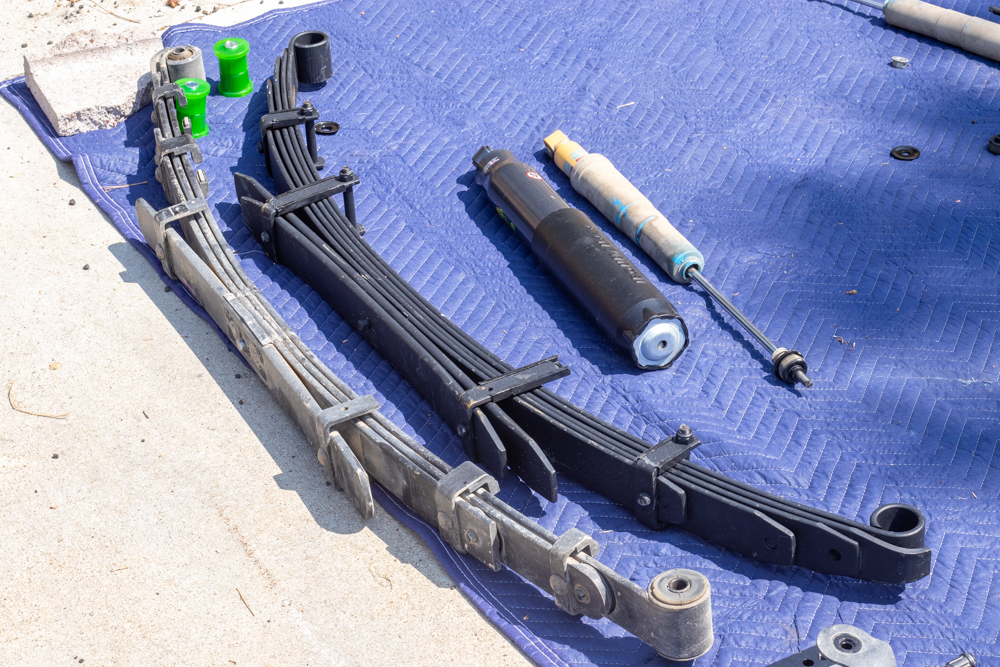
The Ironman 4X4 Foam Cell Pro Stage 2 is a truly complete kit.
Most companies include two front coilovers and two rear shocks, and if you’re lucky, they’ll also include an add-a-leaf option for your factory rear leaf pack. Ironman, however, goes above and beyond this industry norm.
Their kit includes (2) front coilovers, (2) rear shocks, (2) new upper control arms, (2) leaf packs, (4) composite leaf bushings, (4) extended U-bolts and new hardware, a front sway bar relocation kit, and a driveline spacer kit!
For the front springs, you have 3 options: 2.5″ of lift (with 0-110 or 110-220 lb. capacity) and 3″ of lift (with 0-110 lb capacity). For the rear, you have two options for leaf springs, both provide 2.5″ of lift, one with 0-440 lbs. of payload, and the other for 440+ lbs.
You can have Ironman pre-build your front coilovers. To save me some time, and avoid any mishaps, I decided to go this route. Worth it.
Although this install will be on a 3rd Gen Tacoma, the fitment and process is the same.
Find It Online
- Ironman 4X4 2005-2023 Tacoma Stage 2 Foam Cell: Check Price
Find Individual Parts
- Front Coilovers
- Pro-Forge UCAs
- Sway Bar Spacer
- Rear Leaf Springs
- Rear Polyurethane Bushings
- Rear Shocks
Tools & Materials
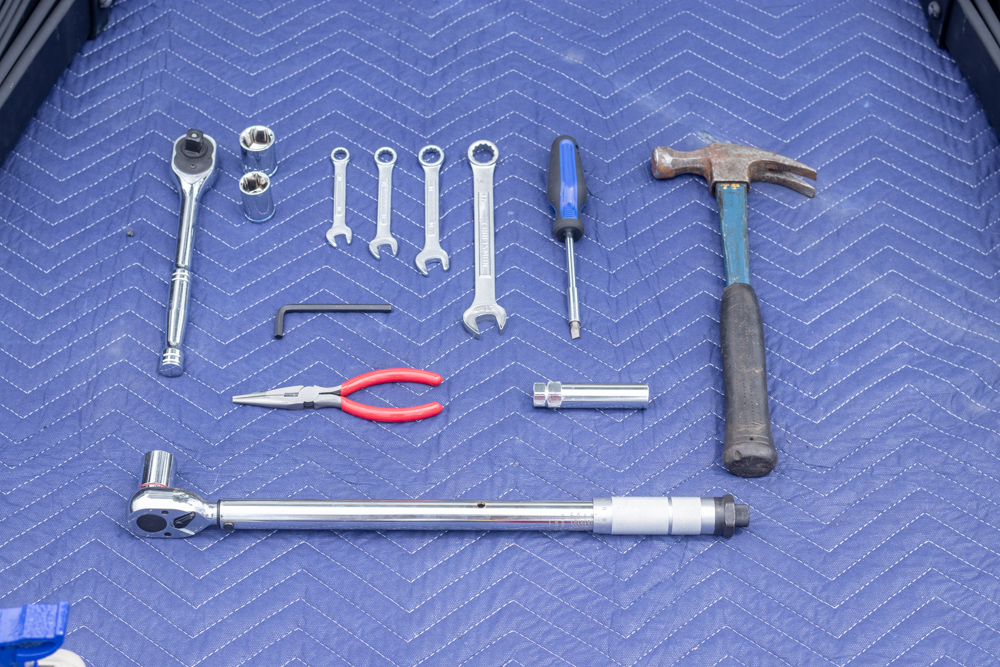
For this installation, you will need the following tools
- Metric Wrench Set
- 10mm, 12mm, 14mm, 17mm, 19mm
- Metric Deep/Shallow socket set
- 10mm, 12mm, 19mm, 22mm (shallow)
- 19mm, 22mm (deep, optional)
- Torque Wrench (minimum 120 ft/lbs of torque)
- Bent Needle Nose Pliers
- Needle Nose Vice Grips
- Universal Screwdriver
- 6mm Allen Wrench
- Large Pry Bar
- 3 Ton Floor Jack or the Pro Eagle
- 2 Jack Stands (4 recommended but not required)
- Wheel Chocks
- Rubber Mallet
- 3lb Sledge Hammer
- Bungee Cords (perfect bungee)
- Body Clip Tool
- Nitrile Gloves
- Suspension Grease
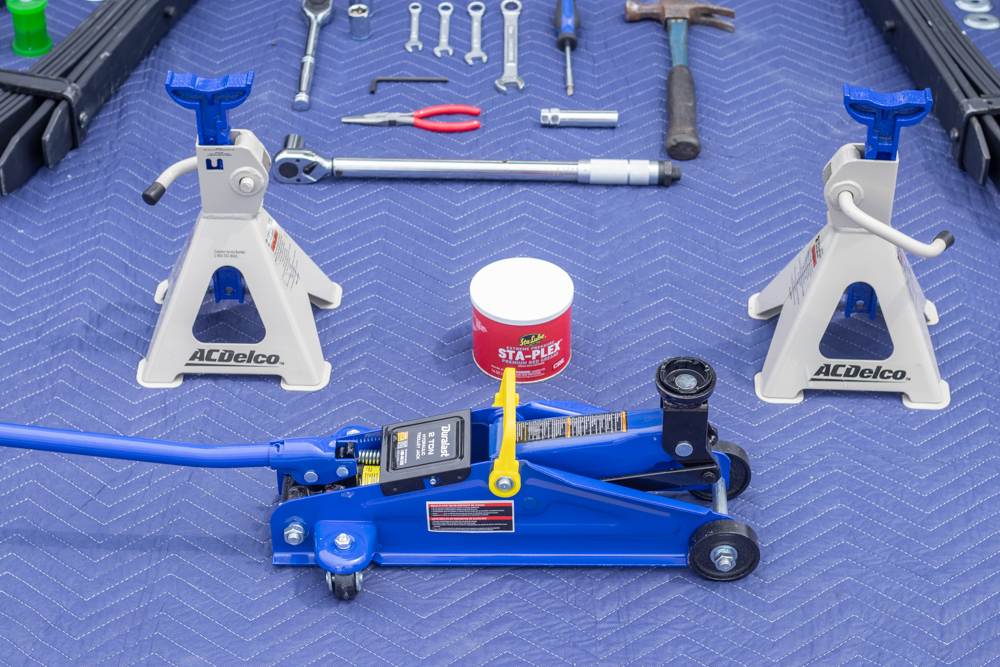
You might have noticed I only used a 2-ton jack. This is not recommended and made it more difficult.
Installation
Choose a level, flat and covered area to work.
You should allow at least one full day to complete this install start to finish, and in some cases, it could take longer.
My install from beginning to end, while stopping to take photographs, took around 16 hours total, split across two days.
Step 1. Organize Parts

To begin, lay out all your tools and parts neatly on a packing blanket or sheet.
This will help you stay organized after unpacking all the parts for the kit. Keeping track of your hardware and tools will save you valuable time, trust me.
I divided up the full kit into the driver’s side and passenger side, although you may wish to split it up into front and rear.
Step 2. Lift Front Of Truck

Once you’ve established that the area you’re working in is flat and level, put your vehicle in park and set the parking brake.
Then, chock the rear wheels to keep the vehicle from moving. You can now place your floor jack under the truck and begin lifting the truck off of the ground. The best jacking spot on the front of the truck is the metal, cylinder-shaped point just behind the factory skid plate.
Once the wheels are off the ground, place two jack stands under the frame of the vehicle near the front and lock them in place. You will need less than an inch of space off the ground to remove the tires, so only jack as high as you need to.
Step 3. Remove Wheels/Tires

Once the vehicle is secure, you can remove the front tires. If you have aftermarket wheels with special lugs, you will also need your lug removal tool for this part.
Using the torque wrench, remove all six lugs from your wheels and place them to the side. Remove your front wheels, and place them underneath the frame of the vehicle just to the rear of the jack stands. This will ensure your safety if the jack stands were to fail.
Step 4. Remove UCA ABS Bolt
At this point, I let the complete weight of the vehicle rest on the jack stands, and I removed the floor jack, to be used later in articulating the front suspension.
Now that you have access to the wheel wells, choose a side to work on and remove the ABS bolt from the upper control arm and move it out of the way.
You can then remove the two plastic clips closest to the shock tower holding the splash guards in place on each side with the clip removal tool. If you don’t have one, a flathead screwdriver can also be used.
Step 5. Disconnect Sway Bar

Next, remove the 17mm bolt connecting the sway bar to the spindle with a 17mm wrench.
To avoid spinning the ball joint in the sway bar, a 6mm Allen wrench should be used to hold the bolt in place while removing the nut. Once the nut is off, it can be reinstalled onto the bolt in the other direction to provide a flat surface to strike the bolt and remove it from the spindle.
Once this is disconnected, repeat on the other side of the vehicle so the sway bar can be manipulated out of the way.
Step 6. Disconnect UCA

Once the sway bar is out of the way, remove the spring clip from the castle nut on the upper control arm.
You can then remove the 19mm castle nut with your 19mm wrench. If this nut is too tight, you can link two wrenches together to increase torque on the bolt. Once the castle nut is removed, you can strike the spindle with your sledgehammer on the flat striking surface to dislodge the ball joint bolt from the spindle.
Then, push the UCA up and out and secure the spindle with a bungee cord
Once removed, push the upper control arm up and out of the way, and use a bungee cord to secure the spindle in place. This ensures no stress is put on your brake line and ABS wire, as nothing is holding the assembly in place.
Step 7. Remove Top Nuts

Now we can work on getting the shock out of the vehicle.
Remove two of the three 14mm nuts on the upper shock perch. Removing the rear nut first makes the front two easier, but this is a tight location, so take your time. A 14mm wrench barely fits behind the shock perch, but there is room to link two wrenches together for more torque to break the nut off.
Once two are removed, loosen the third but do not remove it entirely. This nut is now holding the shock in place.
Step 8. Disconnect Shock

Now, remove the 19mm lower shock bolt from the lower shock mount.
You may need to hold the bolt in place with a 19mm wrench and remove the 19mm nut with a socket wrench. Once this nut is off, it can be reinstalled in the opposite direction for a safe striking surface.
After this bolt is removed, we can remove the factory coilover from the truck by lifting the coilover upwards, and removing the top 14mm shock mount bolt. Carefully manipulate the coilover out of the truck, avoiding the spindle, upper control arm, and front sway bar.
Since everything was previously moved out of the way, there should be plenty of clearance for this.

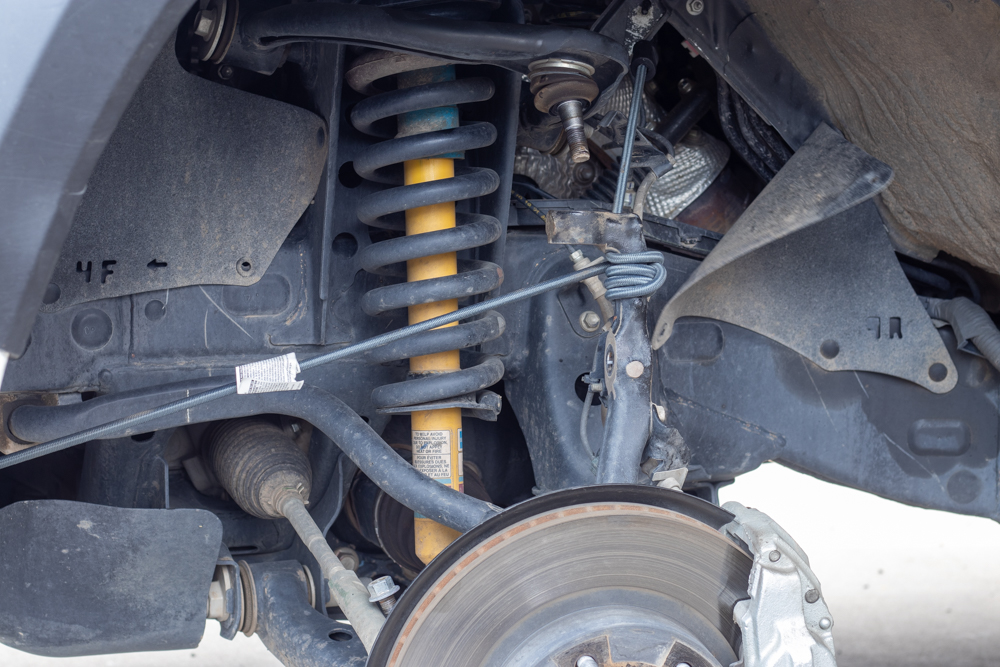
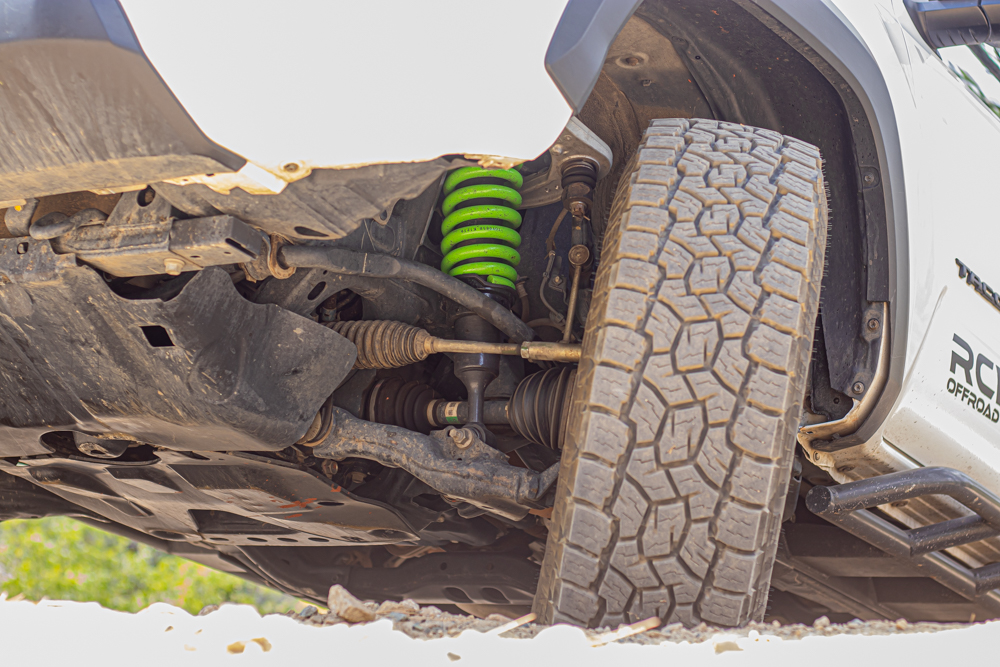
Now that your old shock is out, take a moment to compare it to the new Ironman 4X4 coilover.
As you can see, the new shocks are so much beefier. No comparison.
Step 9. Install Front Shocks
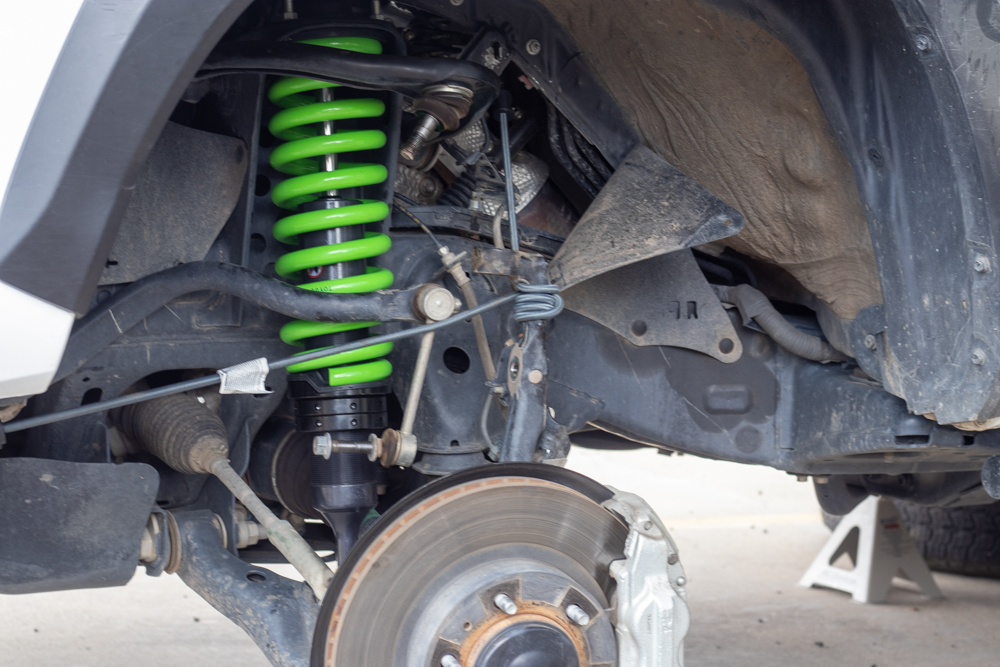
To install the new coilovers from Ironman 4X4, manipulate the new coilovers into position being careful to avoid other suspension components.
Lift the coilover into the upper shock mount area and carefully place all three bolts in the holes. If the bottom of the shock is not oriented correctly with the lower shock mount, you will need to lower the coilover and spin it until it is aligned.
Install one 14mm shock nut to a shock bolt hand tight to hold the coilover in place. You can then install the other two nuts and tighten them down. We will not be tightening most bolts to torque specs until the truck is back on the ground, so leave everything hand tight. You can now reinstall the lower shock bolt into the shock mount and tighten this 19mm nut by hand.
You may need to manipulate the suspension to get this bolt aligned. You can do this by lifting the lower control arm upwards.
Step 10. Remove UCA

Now we will remove the stock upper control arm from the vehicle.
Remove the 19mm nut and washer on the lower end of the control arm bolt. Once the bolt is free to move, you may find there is a clearance issue, the bolt cannot be removed.
There are two options: the metal in the fender well can either be bent out of the way or cut out completely. This is not a major structural component of the truck, so either option is viable, but I chose to bend this metal out of the way.

This is the most difficult and time-consuming part of the entire install.
Pro tip: I would recommend using a pry bar and a wooden block to pry the metal outwards to fit the bolt through to the engine bay. You can use other tools available to you, as I also used an adjustable crescent wrench to pry on the metal. You can also carefully tap the bolt through into the engine bay by using a short screwdriver or punch tool, just be careful not to bend or damage this bolt in any way.
Once this bolt is removed, the upper control arm should slide right out of the assembly. Be sure to save all the washers along with the bolt, these will be reused.
Step 11. Install New UCA

Place your new upper control arm in place. The ball joint should be towards the rear of the vehicle. You may have to slide one side of the upper control arm in place and then the other, these will fit relatively tightly in place.
Once in place, feed the bolt back towards the upper control arm from the engine bay. Reinstall the washer if it has been removed, cupped outwards, and reinsert the bolt in the hole. This will require as much work as removing the bolt, so take your time, use leverage or a hammer, and be careful not to bend or damage the bolt.
Once securely in place, you can place the second washer cupped outwards back on the bolt and hand tighten the 19mm nut.
Step 12. Connect UCA

Now that the Ironman 4×4 upper control arm is in place, we can reconnect it to the spindle.
To adjust the angle of the ball joint, you may need to reinstall the castle nut on the end of the threaded bolt and pry it forwards or backward. Once it aligns properly with the spindle, undo the bungee cords and reinsert it into the top of the spindle.

Reinstall the castle nut onto the shaft and tighten to around 50 ft-lbs. The aim is to line up the hole with one of the castellation slots on the nut.
Always tighten the castle nut to achieve this alignment, never loosen. Once it is tight and aligned, install the cotter pin into the slot and bend it down underneath the shaft. This will ensure the castle nut cannot work itself loose.
Step 13. Attach ABS Line

After the castle nut is reinstalled, the ABS line can be reattached to the upper control arm.
Ironman 4×4 supplies a new 5mm Allen bolt to install the factory clip into the hole in the upper control. I found this bolt to be too big to fit through the factory clip, so I used a drill bit to drill through the bracket to correct its size.
Once drilled out, I reinstalled the bracket to the upper control arm and tightened it down by hand. The bracket may have to be bent back into place against the new upper control arm, so I used a hammer to bend it to shape. Be careful not to damage any other suspension components while doing this. You can then reinstall the plastic clips to the mudguards in the fender well.
Take the time to complete these steps on both sides of the vehicle. To reconnect the sway bar, both sides of the truck must be completed. The other side will follow the same procedures as above.
Step 14. Reinstall Sway Bar
Now that both sides of the vehicle’s front suspension have been replaced, we can reconnect the sway bar to the spindles. The sway bar was left disconnected from both sides to allow more clearance to remove the factory coilovers and install the new Ironman 4×4 coilovers. Assembling the sway bar prematurely will reduce your clearance and ultimately not allow you to reinstall the spindle to the upper control arm ball joint and reconnect the sway bar.
To reconnect the sway bar, lower the bar back into position. This sway bar should clear your shock and all other suspension components, but if it rubs at all, the sway bar relocation kit provided in your complete suspension kit can be installed. I did not need to relocate my sway bar for this install and plan to ultimately remove it altogether.
Once in position, reinsert the bolt into the hole in the spindle and tap the sway bar lightly into place with the rubber mallet. Reinstall the 17mm nut onto the bolt with a 17mm wrench, and use the 6mm Allen wrench to secure the bolt in place as to not spin the ball joint. Complete this step on both sides.
Step 15. Replace Wheels/Tires

The front suspension is now completely installed, and the tires can be replaced. I used my jack to articulate each side of the front suspension up and down individually to reinstall my tires. I placed the jack directly under the lower control arm and only raised the suspension enough to clear my tires.
Be careful not to lift the vehicle too high during this step. Once in place, I used my legs and knees to lift the tire onto the vehicle and lined up the lugs. Avoid straining your back and arms during this process, especially if you have oversized tires. Sitting in front of the suspension and propping the tire onto your legs makes manipulating the tires much easier.
Once in place, I screwed my lugs back onto the wheels by hand. As with all other bolts, this will be torqued to spec once the vehicle is on the ground. Repeat this on the other side.
Step 16. Torque Bolts

Once everything is secured, you can remove the jack from the lower control arm and lift the truck from the center lifting location to remove the jack stands.
Once the jack stands are out of the way and nothing is left under the vehicle, release the pressure on the floor jack to lower the truck. We can now torque everything to spec – everything is load-bearing. The 14mm top shock mount bolts should be torqued to 50 ft-lbs, but clearance is very tight.

I ended up tightening these bolts as tightly as I could by linking two wrenches together. Next, tighten the 19mm lower shock mount bolt to 65 ft-lbs using the torque wrench and another 19mm wrench. Then, tighten the 19mm upper control arm bolt to 75 ft-lbs.
I found that slightly bending the brake lines downwards gave me enough clearance to fit my torque wrench on this nut. You may need to use another 19mm wrench on the head of the bolt. Once completed, torque the lugs on your wheels to their specs. For my setup, and the stock setup on a 3rd gen Tacoma, this is 85 ft-lbs. Tighten these lugs in a star pattern to avoid an imbalance.
The front of the vehicle is now done!
If you chose the prebuilt coilover option, these coilovers may need to be adjusted to the desired height after they settle. You can do this by loosening the small threaded bolts on the shock collar and spinning the collars up and down.
Be sure to retighten the locking bolts in place when you have the desired height. Out of the box, I have about 2.5” true inches of lift in the front before doing any adjustments and after letting the truck settle.
Step 17. Move To Rear

It is now time to work on the rear. For this step, it is very important to chock the front wheels to avoid the truck rolling away.
The parking brake does not work on the front wheels! After this is done, you can place the floor jack directly underneath the rear differential.

This jacking point is best in the rear because it will allow us to articulate the axle enough to remove the leaf packs.

Once the truck is sufficiently high, place jack stands underneath the frame in the rear of the vehicle. Your tires should be about an inch or less off the ground. Remove both tires and place them once again under the frame near the jack stands for safety.
Step 18. Remove U-Bolts

You can now remove the four 19mm nuts on the two U-bolts securing your leaf pack to the axle.
These were quite hard to break, so I used the torque wrench to remove them. Be careful not to drop the metal plate when removing the fourth nut. Once all four nuts are off, remove the metal plate, two U-bolts, and the rubber bump stop from the top of your leaf pack.
Step 19.Disconnect Parking Brake

Remove the two 12mm brake line bracket bolts from the side of the leaf pack.
I removed both to ensure I did not put any unnecessary strain on the brackets. Keep track of these bolts, as they are small and easy to lose.
Step 20. Rear Shock Bolt
It is now time to remove the rear shock. Using a needle nose vice grip, grab the top flat part of the shock bolt to keep it from spinning while removing the top nut.
You can then remove the 14mm nut with a 14mm wrench. Once the nut is broken, I would strongly recommend spraying the nut with some WD-40 or similar to make sure it is loose and free spinning. There comes a point where your vice grips will no longer be able to hold the flat part of the bolt, but the nut still has more thread left before it’s removed.
At this point, it was extremely hard for me to get the bolt off, as the shaft of the shock cannot be gripped properly to avoid spinning without damaging it. Once the bolt is sufficiently free-spinning, remove it from the top of the shock bolt. You can then remove the excess hardware from the top of the shock mount as well.
Step 21. Remove Shock
Next, you can remove the 17mm bottom shock bolt with a 17mm wrench and socket. This bolt was also hard to break but was removed fairly easily.
If you need to strike the bolt to remove it from the lower shock mount, thread the nut back on in the opposite direction to give yourself a safe, flat surface to strike. Once removed, the suspension can be articulated downwards with the jack to drop the shock out of the top mount.
You can then remove this shock and all hardware completely from the vehicle.
Step 22. Remove Leaf Springs

The leaf pack can now be removed. Starting on the front side of the leaf pack, remove the 19mm nut from the 19mm bolt. The clearance here is tight, so you may need to link two wrenches together to get this bolt removed. As always, strike the threaded nut on the bolt to remove it if necessary.
Next, you can move towards the rear of the vehicle and remove the 19mm bottom shackle bolt from the frame. This bolt should be easier to break loose than the front. Once both bolts are removed, the leaf pack will rest on the axle and in the rear mounting position.

Carefully lift this leaf pack out from under the vehicle, being careful not to pull on any brake lines or hit any suspension components.
You should be removing the rear shackle along with the leaf pack.
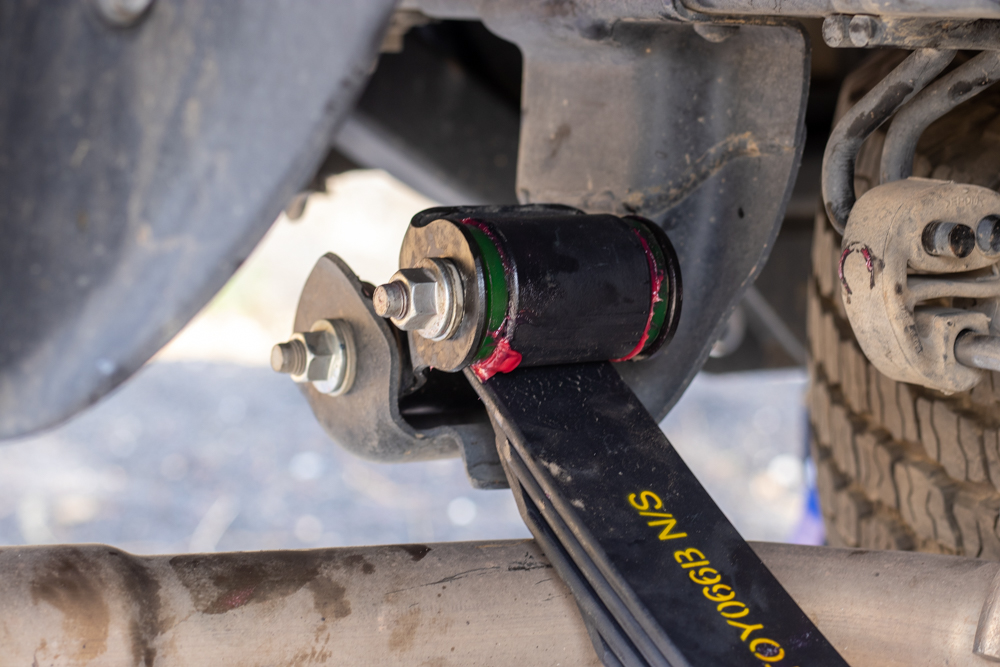
Step 23. Install Bushings
You can now uninstall the rear shackle from the leaf pack. This shackle and bushing will be reused with the new Ironman 4×4 leaf pack, so you do not need to remove this bushing.
You also do not need to remove the bushings from the stock leaf pack. There are four polyurethane bushings included in the complete suspension kit for use in the new leaf packs.

With gloved hands, thoroughly grease the outsides and insides of the polyurethane bushing and insert it into the leaf pack. Insert the greased metal tube into the bushings as well. I wiped away the excess grease that had seeped from the leaf pack.
If no grease has seeped out, you have not used enough. This grease prevents premature wear on the bushings and alleviates that annoying squeaking sound from new leaf packs and poly bushings. You can now reinstall the rear shackle onto the leaf packs.
They should be placed on the end of the leaf pack that does not have the hook curling over the bushing hole and should be oriented with the cupped end facing the rear of the vehicle, so the metal side travels over the top of the leaf pack and not underneath, as shown in the picture.
Step 24. Install New Leaf Pack

Now that these bushings are in place, you can insert this new leaf pack into position.
Carefully manipulate the leaf pack down into the space next to the frame and place the rear shackle in the frame mount. I found it easiest to insert the front bolt first and then the rear.
Once both bolts are in place, the 19mm nuts can be hand tightened. Once secured, you can use your floor jack to articulate the rear axle up to the leaf pack.
Line up the alignment pin with the hole in the bottom of the leafs. Once aligned, the leaf pack should rest firmly on the rear axle.
Step 25. Install New U-Bolts

We can now install the new extended U-bolts included in the complete kit to accommodate the thicker leaf pack. First, reinstall your factory bump stop onto the top of the leaf pack. It also has an alignment pin that will hold it in the right position. You can then place the U-bolts downwards on the bump stop, which has small tabs that hold them in place.
The nuts for these U-bolts are 22mm. Place the metal plate back onto the two U-bolts, and then install a locking washer and the 22mm nut onto the bolts. Be sure the metal plate fits snugly along the rear axle. Hand tighten these nuts onto the bolts evenly.
Step 26. Install New Shocks

The rear shock can now be installed. These shocks contain foam cells to regulate the rate the oil moves through them and they do not contain any nitrogen gas. This means the shocks can be adjusted to the length you need without bouncing back out due to gas pressure.
To build the top of the shock, you will install the provided hardware in this order: first, install a cupped washer cupped upwards, then the flat rubber bushing, then the cupped washer with the locating flange cupped downwards. You can see this order in the image above.
You can then install the top of the shock into the shock mount, and install the rubber bushing with the locating flange facing downwards first, then the last flat washer cupped downwards, then your 14mm nylon lock nut. Lift upwards on the shock to get enough thread showing to start the nut, then tighten it down loosely.

To install the bottom of the shock into the lower shock mount, you will first need to inspect if the lower part of the shock mounts into position correctly. These shocks are such a large diameter that the lower mount is offset towards one direction to correctly fit into the shock mount without rubbing the shock body on the vehicle.
If it does not line up, simply rotate the shock 180 degrees and reinstall it. Reinstall the lower shock bolt. If necessary, you can articulate the axle up and down to line this up. Tighten the 19mm nut onto the bolt hand tight.
Step 27. Reinstall & Replace

Now that everything is installed, you can reinstall your brake line brackets to the holes in the leaf pack. These 12mm bolts should be able to secure your brake lines into place. Install the ones closest to the brake drum first, then the ones further forward second.
This will ensure you have enough slack to properly connect the line. Once both sides of the truck are complete, you can reinstall your tires onto the lugs using your legs and knees. Reinstall your lug nuts hand tight, remove the jack stands from the vehicle, and drop the vehicle onto the wheels.
Step 28. Torque To Spec
We will now torque everything in the rear to spec. Your brake line bolts should be tightened hand tight. You can now torque the lower shock bolt to 45 ft-lbs using a 19mm wrench if necessary to hold the bolt.
The rear shackle bolt, rear leaf spring bolt, and front leaf spring bolt can all be tightened down to 90 ft-lbs, again with the assistance of a wrench if necessary. If the bolts are installed from the inside to the outside, the nuts are exposed. If the bolts are installed outside to inside, the heads of the bolts are exposed.
It is okay to use your torque wrench on either side clearance permits, as long as you use a wrench on the other side to prevent it from rotating. You can then tighten the upper shock mount bolt down to 50 ft-lbs. If a torque wrench will not fit, getting it snug by linking two wrenches together will be sufficient.
Then, torque each of the 22mm U-bolts to 55 ft-lbs evenly front to back. Do not tighten one side down before the other three, they need to sit evenly on the metal plate. You can count threads or wrench turns to accomplish this.
The rear suspension is now completed! Marvel at the leveled lift you’ve achieved with this all-inclusive kit!
Step 29. Driveline Spacer
Ironman 4×4 also provides a driveline spacer kit.
This install is as easy as removing the 17mm bolts one at a time under the driveline connection towards the front of the truck and inserting the spacer plates between the frame and the bracket. These plates prevent any premature wear on your driveline, and potential vibrations by returning the angle closer to stock.
First Impressions
Throughout the installation process, I was impressed and surprised by the build quality of these suspension components. Everything felt great in my hands and seemed very durable. The ease of having everything you need in one single kit is incredible, as no other kit from any manufacturer is as inclusive and complete. Not having to search around on YouTube and forums for the best components to order separately, wait for them to be shipped, and potentially miss a crucial part put me at ease, and made the installation more stress-free.
After everything was installed, I took a test trip to some pretty rough back roads. The Stage 2 kit performed flawlessly on washboard roads with deep ruts, rocky and gravel roads, and even large bumps and whoops. The truck feels completely planted on the road surface no matter what your driver input is, and the dampening is unreal. The front springs help you float over even the most difficult and abrupt obstacles, and the front shocks control your damping and rebound effortlessly.
Huge Upgrade
The biggest problem with the stock suspension was how out of control the body movement was because the rebound was so harsh. This new kit keeps you feeling in control through every obstacle. Before this suspension, I could feel the factory shocks fading almost instantly, as soon as 5 minutes into the trip.
This made long wheeling trips, no matter what difficulty, uncomfortable and unpleasant. The Foam Cell Pro Stage 2 kit completely changes that! I didn’t notice any shock fade until over an hour into my very harsh testing trip, and I’m confident it wouldn’t be noticeable at all unless you are pushing your truck hard. The fade was minimal and didn’t leave the truck feeling out of control like the factory shocks did.
The rear of the truck is much less jittery than stock but is still prone to a little stiffness because of my medium-duty leaf pack. I would recommend getting some weight on the back of your truck before upgrading to this leaf pack to keep the ride smooth. It should perform flawlessly when my tent is installed, and I can already tell the damping is completely under control.
Final Thoughts
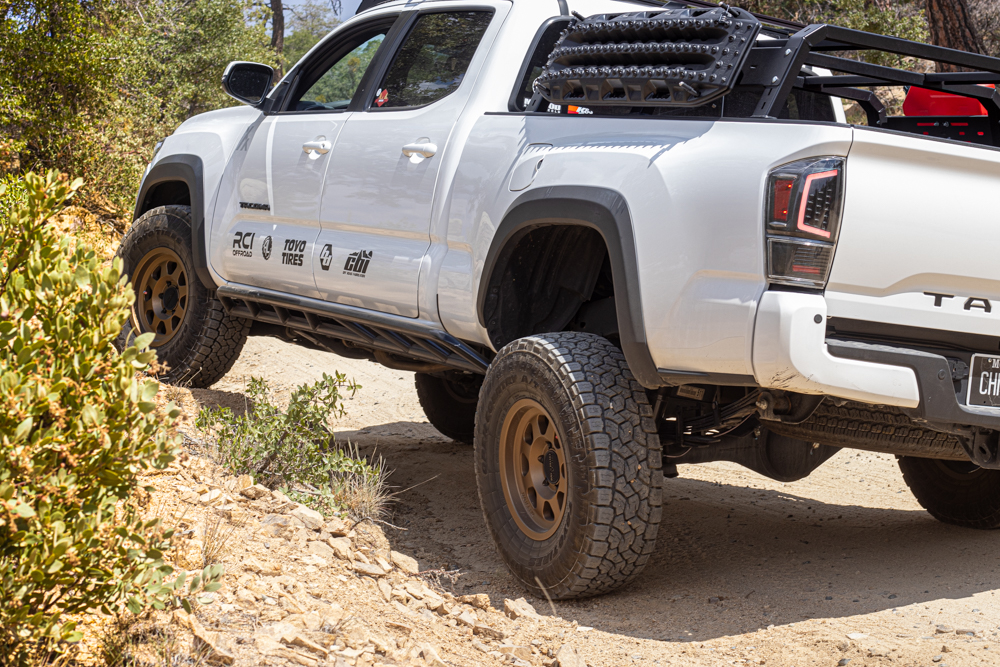
On the road, the truck feels completely different. The added stiffness of the ride keeps the body roll to an absolute minimum, making corners effortless. Don’t worry about the stiffness though, as small potholes and bumps in the road are not as jarring as before.
I was fearful I would lose the on and off-road feedback from the steering and the suspension after upgrading the kit, that the truck would feel sloppy or dull. However, the steering is still sharp and responsive, and feedback of the road surface is even better than the stock suspension. The truck is much more fun to drive, and much more comfortable in all settings.
After this trip and some in town and highway driving, I got a proper alignment to take advantage of the built-in 4 degrees of caster from the upper control arms and returned to the truck to make sure everything was still torqued down to spec and nothing had worked loose. Check all connections and bolts to make sure they are still at the torque spec and everything is aligned properly after 500 miles or so.
If I could have done anything differently, I wouldn’t have. Ironman 4×4 makes a complete, solid suspension kit that greatly improves the capabilities and comfort of the 3rd Gen Tacoma at an unbeatable price.
I have the stage 1 kit I literally just installed this weekend, I had truck aligned this morning and the majority of any vibration is gone but pre 30mph there’s some vibration I can feel in the truck/steering wheel; suggestions?
James,
If you’re feeling vibration in the steering wheel, the first thing I’d do is check the torque on all of the suspension related hardware, including the sway bar linkages. I’d also check all of the lug nuts, and that your tires are mounted properly against the wheel hub. Lastly, I’ve heard of people having issues with the wheel hub assemblies themselves wiggling side to side with other Toyotas.
As always, you should consult a trusted mechanic! Hope that helps!
Getting this kit and thanks for write up. What size tires you running and what wheel offset.
thanks!
Dean,
These tires are 285/75/16 with no offset, but you should be good for some negative offset with a proper alignment! I did a bit of plastic trimming to accommodate the larger tires, but haven’t cut the cab mount yet, as I don’t rub there.
Great info, I did do the CMC since my Nitro Gears have still not shipped and had time while truck is up on stands. Goal is no rubbing for offroad use. Have a hope to fit BFG 295s, but OK with the 285s. Rims I am considering are a -6 offset.
Side note, get front shocks pre-assembled from Ironman. It’s a big hassle, local shop had trouble.
I am going to start setting up my truck for overlanding, no serious rock crawling, but I want to be prepared to stay out of trouble. What is your opinion of the nitro stage 2 kit.
Thank you for this fantastically detailed article! Did you find that you needed longer brake lines after installing this suspension?
Jason,
With the heavy duty leaf pack, I got more lift than I expected – over 3″ for sure. However, the brake lines have just enough length for the suspension to cycle completely. There may be some strain on the brackets however, and I don’t want to unnecessarily rub the brake lines on them, so I will be lengthening them in the near future.
These guys are actually local where I live and I’m so glad someone put up a in depth install and review! Definitely making my choices a lot easier!
I don’t think you can go wrong with this company. Great customer support too.
Hey everyone, does anyone know if I can stack shims on top of these coilovers in the front? I would like to get a little higher of a lift in the front without sacrificing the maxed out preload. Maybe Iron Man 4×4 can comment on what they would suggest to get a little above the max recommended lift height of 3″. Also, does Iron Man offer different spring rate coils for the front? 600lb, 650lb, 700lb? Any guidance would be super helpful. Thanks guys.
Thanks for your interest, Jessi. It’s possible but not recommended as it will adversely affect down travel. We have three different spring rates for the front available: 720, 827 and 827 + 5mm. Holler if we can help in any way!
This suspension is my choice as well, trying to budget into my truck with locker and gears, Big Investment but I am sure it is the correct setup for a no regret build?
For sure! Thanks for reading.
Well done here. Those shocks are massive!! It says on their website “2.8 outer body diameter”. What is the actual internal core pushing oil size? Found an interesting video on the difference between oil + gas shocks and oil + foam cell shocks. https://www.youtube.com/watch?v=uKjltW4e6X8. These look pretty nice for the price, not going to lie.
Thank you for an awesome run down. I just found my new project.
Glad you found it useful. Let us know if you ever need anything else!