

Sometimes, the best mods are ones that don’t break the bank and subtly update the look of your truck.
Certain 3rd Gen Tacoma models come standard with chrome side mirror turn signals. If you’re anything like me, you want to remove all of your chrome as fast as possible. Enter the USR Auto LED mirror signal kit. I decided to install these lights for two reasons. Increased visibility, and therefore safety, and, let’s face it… these things are way cool.
Those of us who despise chrome know how ugly the factory mirror turn signals on the Tacoma are. On top of that, the OEM LEDs are weak, to say the least. The output is not very impressive. They might not be the worst at night, but they’re very difficult to see, almost useless in the daytime.
There are a few options for replacements/upgrades but only one, as far as we know, comes with a switchback option. So what does that mean? Simply put, with some additional wiring, this replacement will have a DRL function.
They are smoked plastic with black housings and offer a much brighter LED strip than OEM. USR’s lights have the option of being a plug-and-play replacement for the factory lights, making the install short and very simple. However, the DRL function allows you to run a bright white that comes on with your factory DRLs.
This white DRL light automatically changes to the orange turn signal when you’re turning, and back to white when you’re not. For this installation, I chose to run the white DRL option but will explain how these are installed if you do not wish to do that additional wiring.
Find It Online
3rd Gen Tacoma Smoke Lens Switchback Amber/White Signals
- Unique Style Racing Lights: Check Price
Table Of Contents
Installation
Tools & Materials:
- Plastic Trim Removal Kit
- 10mm Socket and wrench
- A Flat Head + Phillips Head Screwdriver
- Electrical Tape
- Wire Stripper
- Pliers
- Wire Coat Hanger (or similar)
Step 1. Remove Plastic Cover

The installation process without the DRL feature is very straight forward.
To begin, you will need to use a plastic trim removal tool to pry the color-matched cover off of both side mirrors. You can try to remove the covers by hand, but I found that it was much easier with the tool. There are tabs located on the four corners of the housing, as well as in the center.
You can see the removed cover and the tabs I’m referencing above. These tabs can be a little bit tricky, but take your time and slowly pry them loose and the cover will pop right off.
Step 2. Remove Turn Signal

Once the cover is removed, you will need to remove the two Phillips head screws in the assembly.
These are fairly easy to get out without stripping. After these screws are out, you can unplug the wiring clip from the light wiring harness, and pinch the plastic clip holding the mirror lights in place. This light will slide out completely, just pry back the plastic plate holding it in and remove the light.
Step 3. Prepare New Signals
Once these factory lights are removed, you can prepare your new USR lights for install.
Remove the protective plastic film on the lights. If you are not interested in doing the extra wiring for the switchback, you can remove the majority of the harness by cutting it off. Save enough wiring so that you don’t have a hard time rewiring the harness if you ever change your mind.
For the record, removing this harness will not affect the actual turn signal itself. You just won’t be able to use the switchback portion.
Step 4. Install Turn Signal

You can now install your new smoked turn signal lights into the housing. Pull back on the plastic plate which hugs the housing and slide in your lights, with the bottom edge first.
Once the bottom edge is completely in place and none of the foam is exposed, you can push the top edge of the lights in. It’s a very snug fit, don’t worry about damaging your lights or the mirror housing. I worked my way from the bottom of the light to the top and from the pointed end of the light out to the flat end to make it fit perfectly.
Once it’s in position, you can plug your new lights into the wiring harness in the housing. Then simply push the plastic clip into place and reinstall your Phillips screws. The holes should line up perfectly, but if you’re a little off, carefully tighten the screws, they should naturally align your light correctly.
You can tuck your wires into the back of the housing and test the signals to ensure they’re working. You don’t want to do any extra work if they’re not. If everything checks out, replace your color matched mirror cover.
If you are not wiring the DRL function, you’re finished!
If you are wiring the DRL function, continue to the next step.
Step 5. Remove Interior Trim
Now, we can work on removing the mirror from the door.
First, remove the plastic covering on the inside of the door. This piece is only held on with a few small clips. Pick an edge, and pry the plastic off carefully.
Once the plastic is removed, this will partly expose three black stickers. Behind these stickers are three 10mm bolts that hold the mirror in place.
Step 6. Remove Door Panel

To get the best access to the three previously mentioned 10mm bolts, and to be able to feed the wires for the DRL function into the cab, we will need to remove the door panel.
After making sure everything is out of the storage spaces in the doors, remove the plastic plate behind the door handle, then remove the felt at the bottom of the door grab handle. These will expose the two Phillips head screws holding the door in place.

Remove these two screws, as seen in the two pictures above, being careful not to strip them. Next, using your screwdriver, press the center of the plastic clip located near the mirror. Remove the now released clip.
Once the above are removed, the door panel can be removed by prying away from the door first from the bottom, starting with a corner, and then working your way up the sides of the door panel. Roughly 10 clips are holding the panel in place. Once all of these clips are removed, you can push the door panel upwards and away from the window.
You will then have to remove the two, door mechanism cables from the back of the door handle. These are easy to remove, just align the wires with the notches and pull up lightly to release these cables. It is important to note the green cable is on top.

You can then unclip the two wire harnesses running to the door panel. These are tricky because there isn’t much space to work with and you don’t have a clear view of the clips. Be patient with them, and feel around for the push tabs. It took me quite a while to find them and release them.
Now that the door panel is off the door, be sure to gather any clips from the triangular panel and the door and reinstall them onto the trim piece and door panel. When you reinstall the pieces you removed, the plastic clips will not seat properly if they’re attached to the door itself.
Step 7. Remove Mirror Assembly

You can now remove the three black stickers which cover the bolts for the mirror and remove the three 10mm bolts. Unplug the wire harness running to the mirror, and remove the mirror from the door completely. Be careful not to drop any of the nuts into the door panel!
Step 8. Routing DRL Harness

To cleanly route the wire from the mirror into the engine bay, we will run it into the door with the wiring harness from the mirror, through the door, and into the cab through the rubber grommet.
First, you must route the white wire through the port that the wiring harness is run through. To do this, pull the green wiring harness into the headlight housing as far as it will go. You may need to remove some tape to get this wire bundle to move.

Then, using electrical tape, tape the end of the white wire to the green wiring harness bundle tightly and pull it back through the port. Your white wire should now be routed out of the mirror and into your door panel.
Step 9. Reinstall Your Mirror
We can now reinstall the mirror but first, route the white wire and the green wire harness bundle back into the cabin through the door. Realign the bolts for the mirror with the proper holes and reinstall the three 10mm nuts.
Again, take care not to drop them into the door frame. Once secured, reconnect the wiring harness plugs.
Step 10. Remove Door Speaker

Next, we will remove the door speaker to gain access to the inside of the door frame. This will help route the wiring into the cab through the grommet on the inside of the door.
This can be done by unplugging the wiring harness from the speaker and removing the four 10mm bolts holding the speaker in place. Once removed, locate the blue lining on the door and pull up a small section of adhesive.
We will run our white wire through this gap and into the door down towards the door hinge. Once routed, the adhesive can easily be pressed back onto the door frame to make a tight seal.
Step 11. Remove Plastic Panel
Next, we will remove the kick panel and the triangular panel that covers the fuses with a plastic trim pry tool.
You will also need to unscrew the plastic cap from the bolt holding the triangular pillar piece in by turning it clockwise. Once these are removed, we can begin the process of fishing the wire through the rubber hose in the door.
Step 12. Route Wires

Pinch the end of the rubber hose that connects to the door and pull outwards to expose the wires within. Once the wires are exposed, feed a metal coat hanger or something similar from the cab into the weather seal between the door and body of the truck.
Take care not to push too hard, as you may damage the rubber hose or wires inside. You may need to bend the coat hanger as you go to keep from puncturing the hose or damaging wires. Once the power wire is in the cab, reinsert the rubber hose into the door to protect the wires inside.
Step 13. Splice Wires

Now that the white wire is routed into the cab, we can splice the black wire onto it to reach into the engine bay.
Using wire strippers, strip half an inch off each wire’s end and fold the exposed wire onto itself. Use the butt splice to attach the two wires by crimping each end with a pair of pliers or wiring tools.
A strong connection is required, so be sure it’s connected securely. Tape the connection up with electrical tape for a clean look and to protect the connection.
Step 14. Route Wires

With the wire spliced, we can now route it into the engine bay.
Each side of the vehicle has a rubber grommet that’s used to route wires from inside the cab into the engine bay. With a sharp tool, like a screwdriver or coat hanger, puncture the rubber grommet to the side of the bundle of wires to ensure no damage is done to them.
Once a hole is made, securely tape the end of the black wire to the coat hanger, as this is a tight fit and the wire is likely to be pulled off. Fish the wire through the rubber grommet and into the engine bay. Make sure the whole length of the wire is inside the engine bay and check that the wire isn’t snagged on any wires inside the cab.
Step 15. Wire Harness To DR

Now that the wire is in the engine bay, route it along the floor of the bay towards the front headlight assembly. Once there, locate the DRL plug on the back of the headlight assembly.
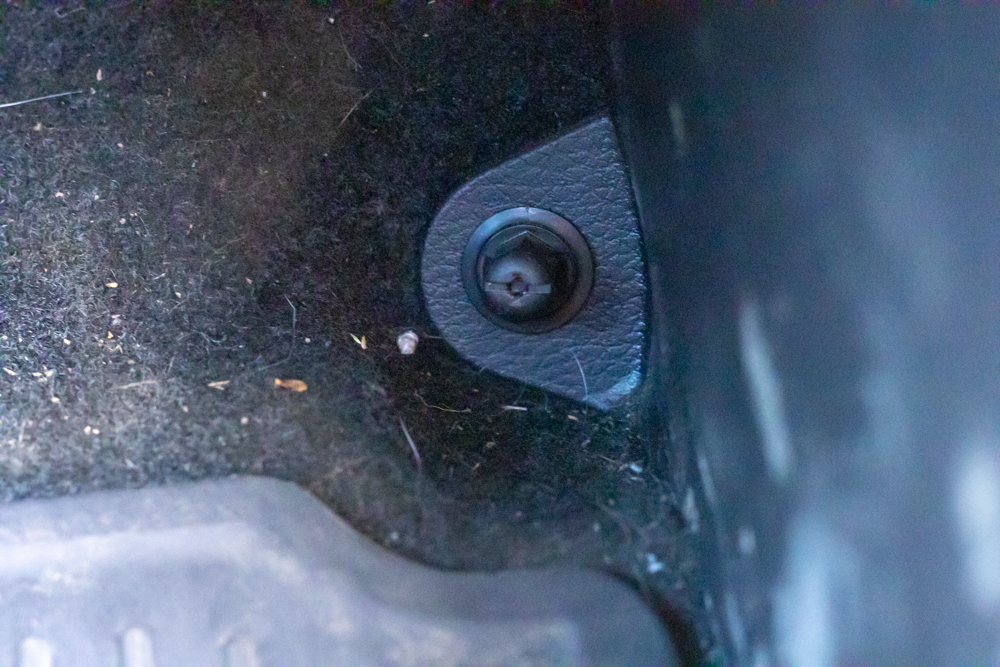
There will be plenty of room to make a connection on the driver’s side, but on the passenger side, it may be more convenient to remove the windshield wiper fluid reservoir by removing the two 10mm bolts. This will give you more room to access the DRL wire.
Once you’ve found the wire which controls the DRLs, it’s as easy as splicing the black wire onto the off-colored wire on the outside of the plug. I had to remove a bit of electrical tape to have enough of the off-colored wire to work with.
In my Tacoma, this wire was orange but could be blue or green on another truck. It should not be the black or red wire and should be off to the side of the other two wires. Using the supplied quick connector, attach the black power wire to the DRL circuit. I chose to tape up the connection to make sure it was protected.
Step 16. Test DRL
Now that your wire is connected to the DRL, check to make sure the turn signal light runs white when your DRL’s are on, and switch to an amber flash when your turn signal is activated. Once verified, you can begin reassembling your door panel.
Step 17. Reinstall Removed Parts
Replace the door speaker with the four 10mm bolts and reconnect the wire harness. You can then reattach the triangular trim piece and kick piece on the floor of the truck. Be sure to reattach the plastic nut by screwing it on counterclockwise.
After verifying all the clips are in the door panel, reconnect the two-wire harness plugs to the switches. Once connected, reconnect the two locking cords to the door handle with the green on top. These simply snap back into place and twist inward to secure.
You can then snap the door panel back onto the door, ensuring all clips snap and the door panel fits well. Then, replace the triangular trim piece that covers the mirror bolts. I found it helpful to do another check of all the clips on these pieces, as there are so many trim pieces being reattached. I found a few clips that had not seated completely.
Step 18. Clean Excess Wires
Now that everything is reassembled, zip tie the black wire in the engine bay to anchor points along its length to ensure it doesn’t get pulled out. I also zip-tied the DRL wiring harness to the frame to keep it from moving and pulling on the wire.
You can now repeat these steps on the other side of the vehicle. There are few differences between the driver side and passenger sides of the install, except for the wiring harness clips that attach the door panel to the door. I found these to be the most tricky on the driver’s side. Just be patient and feel for the correct locations of the clips.
Review

While the write up for this install is lengthy, it only requires a few basic tools and a little skill. I spent a total of six hours on this install, but took extra time to stop and take photos of the progress. If you follow the guide it should take around 2-3 hours to do, and is much easier the second time around after you know what you’re doing. This guide should serve to speed things up as well.
I am still very impressed with the quality of the lights, wiring, and connectors. I was glad to see all the connectors, and even some extras, were included in the kit.
The light output is impressive, and the colors match the OEM white DRL and amber turn signal perfectly. The flashes are crisp and fix the timing issue I had when I replaced my turn signal bulb in the headlight housing with an LED bulb.
Final Thoughts
These lights cast a nice glow at night and compliment the DRLs and any aftermarket lighting perfectly. It is important to note that these lights do not have a sequential flash, as do some others on the market. It more than makes up for this fact with a bright white DRL and a nice smoked finish. I highly recommend these lights for anyone looking to make their Tacoma stand out!