

There’s no denying that there are a TON of aftermarket bumpers for the 3rd Gen Tacoma. Body Armor 4×4 is a trusted and well-established company that carries quite a few options for the Tacoma. In this article, we’re going to go through the installation process for one of their latest products, the HiLine front bumper.
This is a great choice for someone looking for a trail, winch, and light-ready bumper at a great price point. If you’re looking to save on weight and add functionality, this bumper is definitely for you! The install takes about 1-2 hours, depending on your skill level. It’s straightforward, and we didn’t have any hangups along the way.
Table Of Contents
Specifications

- Constructed from 3/16″ steel plate
- Winch plate is 1/4″ steel plate
- High clearance
- 10,000lb winch capacity
- 20″ dual row LED light cutout
Tools Required:
- Painters Tape
- 3/8″ Ratcheting Wrench
- Drill driver or Impact driver
- Socket Extensions
- Metric Socket set
- 10mm Socket
- 14mm Socket
- Gloves
- Oscillating Multi-Tool (good for cutting bumper body)
- Body Panel Remover (optional)
Unboxing

From the time we placed the order to the delivery, the whole process was effortless.
The package arrived promptly, the box was in good condition, and the bumper was delivered quickly after the order was processed.

Pictured above is what the bumper looked like straight out of the box.
Once we removed it, it was in perfect condition. We didn’t notice any flaws or poor workmanship whatsoever. The bumper was packaged well, and we were stoked to get in on the truck.

The bumper came with instructions and all the necessary hardware. A small, but thoughtful addition is the included edge trim you’ll need to hide the bumper cuts.
Without further delay, let’s jump right into the installation.
Step 1. Remove Plate Bracket

This goes without saying, but the license plate is installed on the plastic bumper portion that will be cut out.
Step 2. Remove Valence Bolts

Underneath the front bumper cover, you will see some bolts that will need to be removed for the bottom valence to be removed.
If your truck still has the factory air damn this will be connected to it as well, so either way, the bolts have to come off.
Step 3. Remove Grille

Next, remove the (2) clips and (2) bolts from the top of the grille.
These are the only hardware holding the grill in.

The next step is to remove the grille and the bezel from the truck, just pull straight out, applying even pressure to each side to remove.
Be careful with this step so you don’t damage the plastic.
Step 4. Apply Tape

Per BodyArmor 4×4’s instructions, we covered the sides of the bumper with painters’ tape to protect it.
This will help to avoid any unnecessary scratches while cutting.
Step 5: Remove Lower Parts

We then removed the front bumper cap from the main body of the bumper.
This is held on with a couple of bolts we already removed and some plastic clips.

Next, pull the crash pads off the front of the crash bar.

With the crash pads removed, you can remove the aluminum crash bar.

Once you’ve removed the two bolts holding the crash bar in place, you can remove the whole bar from the bumper.

With the crash bar removed, you can remove the bolts that hold the crash bar pillars/spacers from the front of the frame rail.
Step 6. Relocate Cooler

As you may have seen before, the OEM cooler lines interfere with the vast majority of aftermarket bumpers, and this one is no exception.
Start by unbolting the OEM cooler bolts on the front frame rail.

Then, undo the retainer bolt on the driver’s side frame rail.

Finally, twist on the relocation bracket with the bolt into the truck and use the OEM bolt to secure the cooler about an inch back from the OEM positioning.
This will help when you insert a winch and for overall bumper fitment.

You can see the finished relocation above.
Step 7. Trim OEM Bumper

Once the radiator support relocation is done, you must cut 19-20mm of the excess bumper from the license plate bracket.
Take your time, follow the instructions, and you’ll do just fine.

The finished cut should look like this. If needed, you can clean the edges with a box cutter or a very sharp knife.
Before putting the bumper on, I recommend getting a little bit of clear coat and applying it to the cut line. This will prevent paint from peeling in the future. Then, use the provided edge trim to cover it up. Some people like it, and some people don’t—it’s all personal preference.
At this point, you might want to crack open a cold one. You deserve it! Haha.
Step 8. Install New Bumper

At this point, you might want to get a hand from a friend to make things easier.
Get a buddy, put the bumper onto the front frame brackets, and use the OEM nuts you previously removed to secure the bumper to the vehicle.
Step 9. Final Fitment

Put your grill back in and voila! You are done!
As you can see, the bumper fits very well with the Tacoma’s body lines. The cutting process is pretty forgiving because you can always clean up the cut; just make sure you leave some excess plastic on the bumper if you are not sure.
Side Profile

Front End

Final Thoughts
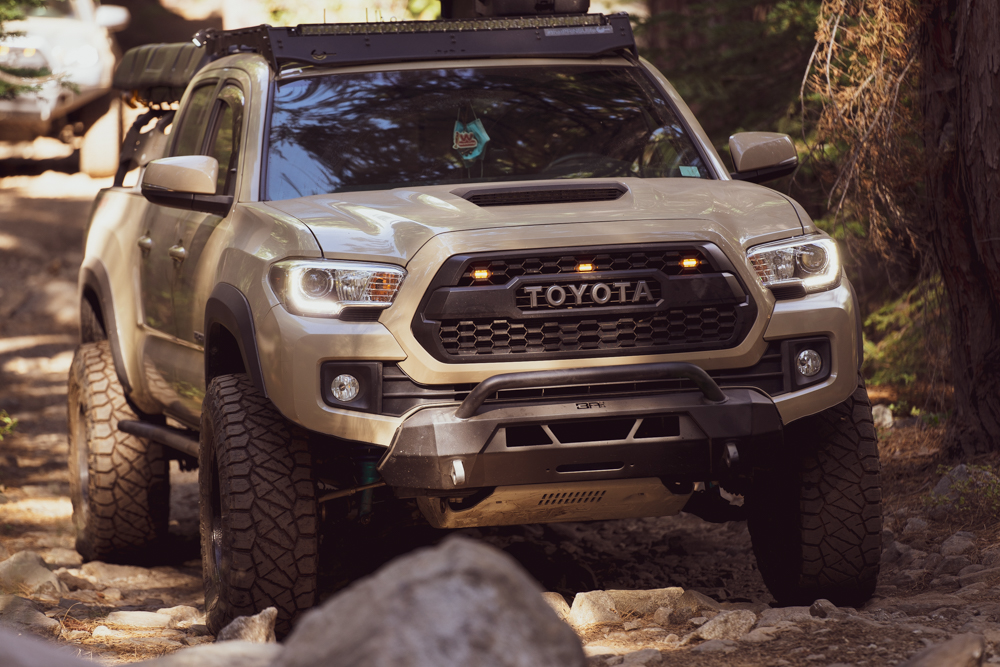
This bumper is an ideal addition to your 3rd Gen Tacoma. It’s built extremely well and Body Armor 4×4 did not cut any corners.
The HiLine bumper is super strong, and equipped with a winch, it’s ready for all sorts of recoveries. Even without a winch, the bumper provides recovery points for D-rings, shackles, and the like. And of course, it looks awesome! I would highly recommend considering this option if you’re in the market for a minimalist front bumper for your Tacoma.

On your photo titled “Side Profile”, it looks like you cut away your bumper for additional clearance. Do you have a write up for that? More specifically, what did you do with your fender liner?
Would you recommend installing the light bar and winch before installation on the truck or after?
Pretty much all aftermarket bumpers require removal of the bumper to install accessories like those you mentioned. If you want to make your life easier, knock it all out in one go.
Looks awesome, but what about lisence plate. Is there a place to mount it back to where it belongs?
There’s a license plate bracket supplied with the bumper and it mounts using the fair lead bolt holes.
Super awesome to see the step by step instructions laid out clearly. I just got my Tacoma recently and this is the bumper I’m planning on getting when I can!
Glad you found the article useful! It’s a great option.
if you aren’t going to use a winch or lights do you still have to relocate the cooler lines?
Good question. I would direct you to Body Armor with that question.
What light bar would you recommend running with this bumper? Looks like a dual row?
You could pull up a thicker single row which is what I’m most likely gonna do. But made for a double row.
How much does this High Line Bumper for a 2020 Tacoma weigh?
Ship weight is 80 lbs , which includes all the packaging materials and optional front plate bracket.