
If you’re anything like me, you like to keep your truck clean. Not only does it feel great to drive a clean car, but you’re doing your part to make sure your Tacoma lasts for years to come. But cleaning your truck doesn’t just stop at your interior and exterior. Your undercarriage and engine bay need some love too!
As you probably noticed above, mine needed some attention. In this write-up, I’ll be going over the step-by-step process to safely and effectively clean the engine bay on your Tacoma, or any car for that matter. If you ever thought about tackling this kind of job but you’re worried about damaging something, you’ve come to the right place.
Let’s get started.
Table Of Contents
Is This Necessary?

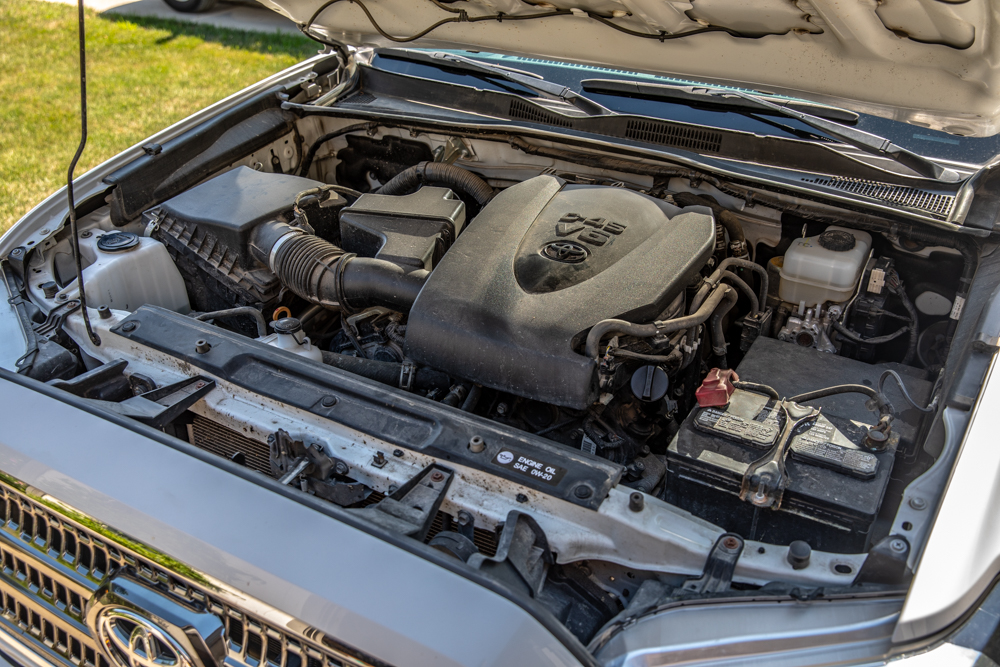
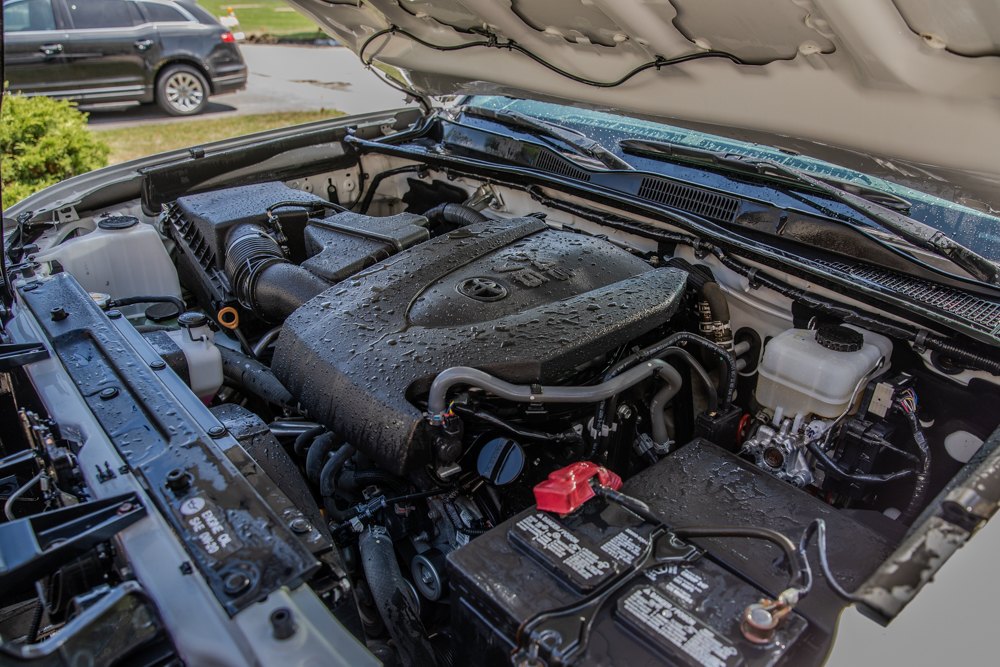
The above image might not look too bad in pictures, but my engine bay was covered in mud, dust, and a boatload of bugs.
I bought my 3rd Gen Tacoma with about 50K miles on the odometer, and I doubt it had ever been cleaned. After flying into Salt Lake City to pick it up and promptly taking it on a 4-day off-road trip, consisting of as many trails as we could fit in, the car needed some extra attention.
I had already done a full interior and exterior detail a few days after returning but neglected to do the engine bay. This was mainly because I felt that this would be a great write-up for those who had never washed inside before. I got my camera ready and we start snapping some pictures.

So, why do I even bother?
Well, first of all, there are a lot of working parts and plenty of them are very exposed to the elements. If you want to prevent corrosion, and extend the life of your hoses, etc., you need to clean your engine.
Second, if you like to work on your truck, you know how quickly you and your hands can get filthy. Having a clean engine makes maintenance and upgrades much less stressful.
Third, it’s much easier to identify certain issues, for example, leaks.
Finally, if you’re like a lot of us, you like to take your truck off the pavement. It’s inevitable that your engine bay will get covered in mud, dust and whatever else is flying through the air. A super dirty engine, especially if it’s caked in dirt, mud, etc., will likely run hotter than a clean one. Leaving yours dirty, as touched on above, will affect the life of your parts. A clean engine is a happy one.
You can see in the image above, mine had quite a few bugs plastered inside it. Dead bugs can be very acidic and over time, if you don’t clean them off, they can start to eat away at your paint/plastic. No good haha.
Long story short? If you want to get a lifetime of use, keep it clean! It’s a simple preventative maintenance item.
Supplies

First things first, you need to have a few essentials.
- Cleaner/Degreaser
- Water Source (garden hose or power washer, either or will work) – I used my SunJoe SPX3000
- Microfiber Towels (can even be a rag)
- Brush (optional)
- Gloves (optional)
- Dressing (optional)
Step 1. Rinsing Engine Bay
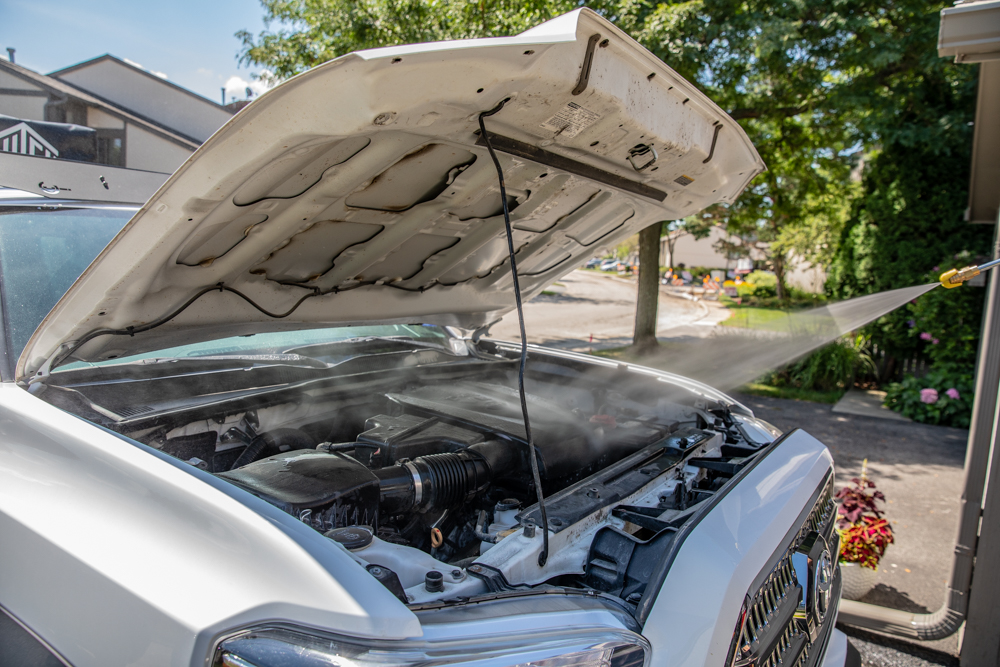
To begin, you’ll want to get the entire engine bay wet so the bugs, dirt and grime can soak. This will make it easier than trying to remove the baked-on mess.
Before you begin, you should prepare the area. There are two schools of thought here. Some people believe that you should wash the engine with the engine and battery off and disconnected, to prevent any potential electrical sorts. Others believe that the electrical system is well insulated and protected from temporary water exposure and that the best course of action is to run it at operating temp.
Personally, I have done both methods but I prefer to keep mine running. This only applies to rinsing before you apply your cleaner/degreaser, and after. You don’t want to run the engine while you spray it with cleaner because it will likely hit the hottest parts and promptly burn up, potentially leaving unwanted residue and a bigger mess.
To keep it simple, turn on your engine. Let it run for a few minutes and quickly spray everything down, including the hood, while keeping your hose/power washer at a safe distance, as seen above. Once you are finished, turn it off and proceed to the next step.

You might be wondering which brand of power washer I like to use.
One of our other writers, Nate, had previously covered a budget-friendly power washer from SunJoe. You can see the full review/over here. As a bonus, you can check out the MATCC Foam Cannon review there as well.
After seeing the positive review from Nate, I had to buy one for myself. I have a professional 3800 PSI gas power washer, but its a bit of overkill for projects like these. The SunJoe seemed like a cool addition to the team and it comes with a great warranty. I couldn’t be happier. At 1450 working PSI, it’s perfect for smaller jobs such as this one.
Step 2. Applying Cleaner/Degreaser
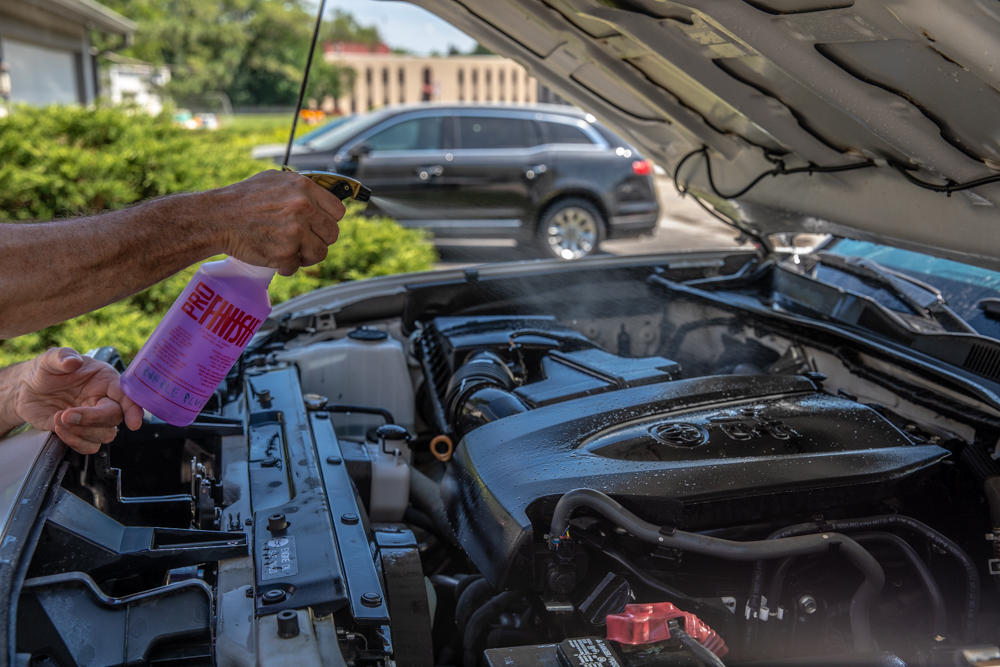
Once you’re happy with the initial rinse, it’s time to apply your cleaner/degreaser. This is where throwing on some gloves isn’t the worst idea. It’s no secret we’re using chemicals which can easily penetrate the skin.
I have tried quite a few products myself. From industrial degreaser to Simple Green, to foam cleaners and professional car detailing spray. I have had good experiences with all of them, but I like my ProFinish Purple Plus the best. Unfortunately, because it has a high chemical content, it’s only available for professional purchase. I have a small detailing business so I’m able to purchase these directly from the manufacturer.
Not to worry! All of the other options are also very good. Simple Green is especially great because it is non-toxic and biodegradable. You can’t say that with very many cleaning products. While I choose to use the ProFinish product because it’s accessible and does an incredible job of cutting grease. The major difference is, you might need to use more of the other products and slightly more elbow grease.
After spraying your entire engine bay, let the product sit for a few minutes to get the best results and to break down as much gunk as possible. Don’t forget to spray the bottom of the hood as well. Mine was quite dirty.
Step 3. Scrub Everything
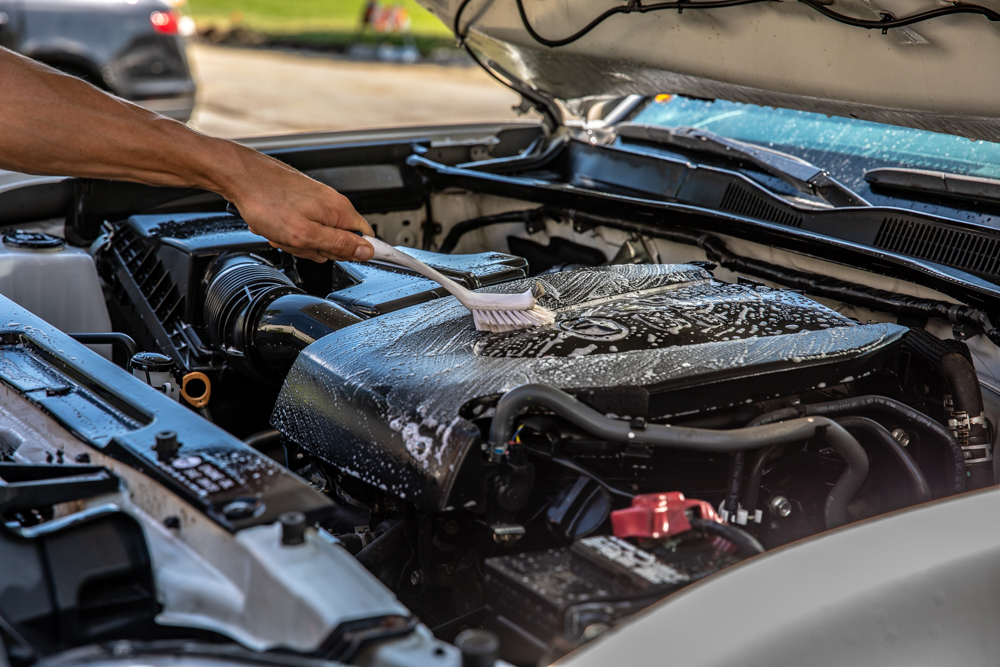
Even though I use a very strong degreaser/cleaner, I still like to give the engine bay a good scrubbing by hand.
The degreaser/cleaner will get the majority of the grime, but without a little manual brushing, it’s tough to get everything off. Grab a brush and scrub all the stuck on junk and make sure to get into those tight spaces that accumulate extra dirt. You may also need to spray some extra cleaner here and there to ensure the absolute best final product.
Just like a touch-free car wash won’t completely clean your truck, simply spraying some cleaner/degreaser will only go so far. Put some elbow grease in to get the best results. Again, remember to clean the bottom of the hood.
Step 4. Final Rinse & Dry
Once you’re happy with the last step, start your engine, and give it a really solid rinse. This is where you want to focus on removing all the residue from the dirt and cleaners/degreasers.
Start with the hood, if you start with the engine, you’ll be rinsing all the dirt from the hood onto a clean engine, making your job unnecessarily time-consuming and difficult. Once you finish, make sure to keep a lookout for any spots you might have missed. When you finish rinsing bay, you might as well quickly rinse the bottom of the front end to clean up any runoff.
Leave it running, and carefully dry all up the majority of water using a rag or towel and/or some compressed air. Leave the engine running for 10-15 minutes to make sure most, if not all, of the water evaporates from around the engine. Give everything a final wipe down. Make sure to be careful not to stick your hand into the fan or touch anything hot!
After you finish the above steps, turn off your engine. It’s optional to let it sit for 20-30 minutes after this step to more completely allow all the water to evaporate.
Step 5. Apply Favorite Protector

Personally, I can’t stand super greasy and slick products that are meant to shine. I mean, the engine never looked wet and shiny when the truck was new, it just has a nice light sheen to it. That’s exactly what I’m trying to replicate.
I use some professional-grade plastic and vinyl coating, mainly because it has a very light shine and isn’t very greasy unless applied way too liberally. I prefer not to spray this type of product directly on. I usually grab a microfiber towel and spray the protectant/restorer onto the towel until its fairly moist.
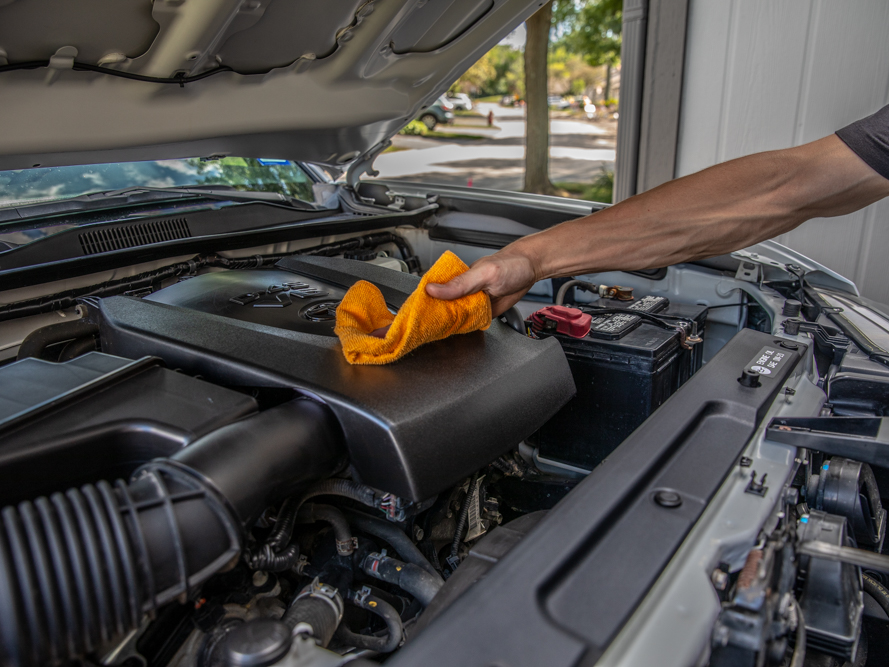
Carefully wipe down the entire bay, taking care to make sure you have a nice and even coat over the entire area. Apply extra shine to the rag as needed.
Again, be careful not to touch anything that might still be hot if you recently ran your motor. Once you finish this part, that’s it, you’re done!
Final Thoughts

Above, you can see the finished product. So much better! That wasn’t too bad, right?
Like I already said, this is a fairly simple maintenance item and an often overlooked one. Hopefully, you found this guide helpful and you have the basics of safely cleaning your engine down.

Thanks for the great article. Any ideas and products to consider for spraying the vibration pad under the plastic engine cover? This seems to be made out of a cloth like light weight cloth material with very small air pockets for breathing. Mine is filthy and covered with dirt, dust so I’m wondering if a water rinse would do, or if cleaning products could damage it.
Thanks, Jared! I would probably just use water and a neutral dish soap, or a cleaner like simple green. At the end of the day, the engine cover itself or the cloth isn’t necessary, it’s just more aesthetically pleasing.
Thank you for answering. Seems the cover just taps dirt and dust to get blown into the MAF sensor itself.
It definitely traps some debris, but it would be worse without I would guess. Especially if you’re going through dusty or muddy areas.