
So you bought yourself a 3rd Gen Tacoma. With every car and truck, proper, timely maintenance is paramount to ensuring you get the most out of your vehicle.
Changing your oil is arguably one of the most important maintenance items you can perform. Your engine is pretty much the heart of your truck and as far as maintenance goes, there is nothing that requires more attention than your oil.
Some sources recommend that you change your oil every 10k miles, but the majority of us (including Toyota) recommend that you change your oil every 5k for maximum performance and longevity. If you’ve never worked on your truck before, doing your own oil change is a great place to start.
The following is a detailed step-by-step guide to performing an oil change at home. Follow the procedure, and you’ll be a professional in no time!
Table Of Contents
Tools & Materials

So your first question is probably, “what exactly do I need to perform a DIY oil change?”
Tools & Materials
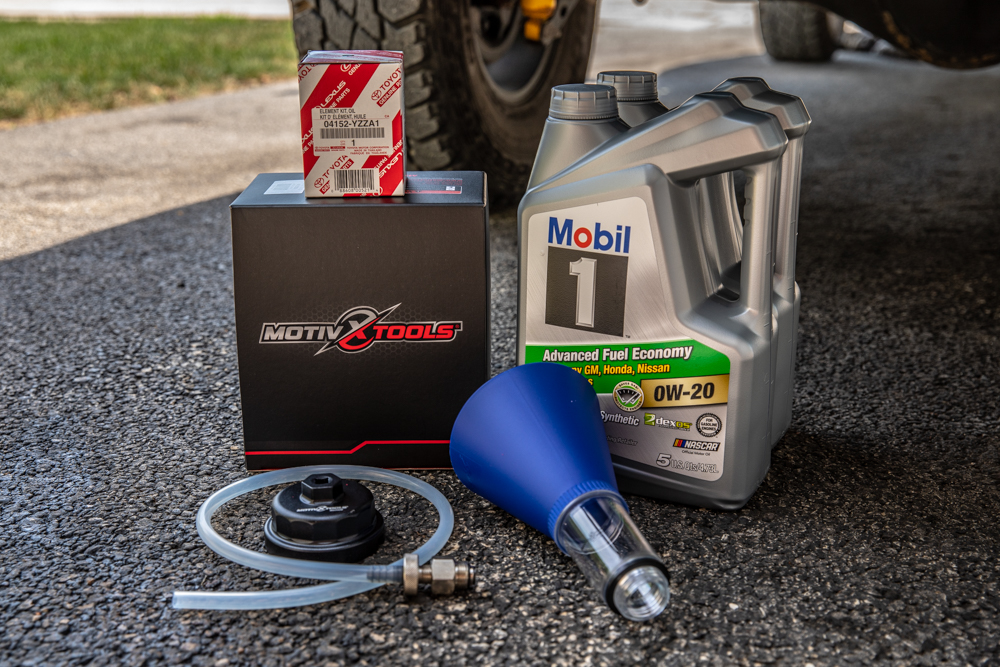
- 6-7 Quarts of 0W-20 Oil (I use Mobil 1 Full Synthetic, find it here.)
- Oil Filter: Check Price (OEM or TRD – Either Includes Oil Filter Drain Tool, Seals & Gaskets)
- 64mm Oil Change Wrench: Check Price
- Oil Catch Pan: Check Price
- Funnel
- 3/8″ Ratcheting Wrench
- Socket Extensions
- Metric Socket set
- 10mm Socket
- 14mm Socket
- Gloves
Optional
- MotivX Tools Oil Change Kit for 3rd Gen Tacoma: Check Price
- Fumoto Original F103S Engine Oil Drain Valve: Check Price
Installation Notes
You might be wondering why there is a range for the amount of oil you need. Well, depending on how much oil drains, whether or not you have an oil cooler and a few other factors, the amount of oil you pour back into your crankcase can vary. For example, I added almost 7 quarts of oil for this particular oil change, to get the oil level dipstick to read the proper amount. Others have added just over 6 quarts. Long story short, plan for at least 6 quarts but be prepared with 7.
The bottom line? Add enough oil until your dipstick shows oil up to the second marker/divot.
Pro Tip: Don’t waste your money on 1-quart containers. They are significantly more expensive than buying in bulk. You should purchase two 5-quart containers, or, you can find 12-quart containers online and at certain retailers. The same thing goes for filters. Buy in bulk!
The optional part of this oil change is the previously mentioned MotivX Tools oil change kit. Do you need this kit? No. Is it extremely convenient and does it make your life easier? Heck yeah! The kit includes everything you need and then some. The kit contains the following: an oil filter wrench, a drain tool, and an oil funnel set.
Step 1. Remove Skid Plate

To begin, make sure your vehicle is on even ground. This will ensure that you fully drain the used oil and replace as much of it as possible with the new stuff.
In the 3rd Gen Tacoma, the oil filter and drain plug are located at the bottom of the engine.
This is mildly inconvenient because you need to remove your skid plate in order to change the oil.

There are a total of four bolts that hold the front skid plate to the frame.
You can see the front two above. Grab your 10mm socket and loosen both of the front bolts.

Next, find the two bolts in the rear and loosen them as well.
Once you have all four bolts loosened, support the skid plate by hand (it’s not very heavy) and remove all four bolts. There are two tabs at the front of the skid plates which prevent it from falling, even when not being held up by the four bolts you just removed.
Maneuver the skid plate in a way to unhook it from the tabs and place it off to the side.

Pictured above, you can see me pointing to the location of the oil filter.
This is simply for reference if this is your first ever oil change.
Step 2. Drain Old Oil

Above, you can see the drain plug for your engine oil.
It sits right in between the cross-member and the smaller portion of the engine skid plate. You’ll need your 14mm socket for this one.
Before you loosen this bolt, check the next paragraph.

Since the engine compartment is essentially a sealed system, you’ll want to relieve the pressure inside the crankcase to allow the oil to drain faster and more efficiently.
Before you loosen the drain plug completely, unscrew your oil cap and place it to the side. Once you’ve done that, go ahead and remove the drain plug bolt. Make sure you have your oil catch pan under the bolt.

If you’ve recently run the motor, be careful! The oil is around 200 degrees Fahrenheit and can burn you.
It’s suggested that you wear gloves to avoid too much skin contact with the oil as well.

Side note. The oil comes out fairly forcefully and quicker than you might imagine.
As seen above, if you’re not ready for it, you can make a mess. Take your time so you don’t have any issues.
A fellow DIY’er mentioned to me that to avoid this rush of oil and potential mess, to leave the engine oil fill cap on until the flow has dramatically slowed. Then you open the cap to relieve the pressure. Thanks, Paul!

Once all the oil has completely been drained, grab your new supplied gasket and reinstall the bolt.
Personally, I tighten the bolt by feel. Toyota recommends torquing the bolt at 30 ft/lbs. To make your life and the next oil change even easier, consider installing a Fumoto Valve. I wasn’t able to order one in time, but during the next oil change, I’ll be swapping one in to save time and make less of a mess.
Find It Online
- Fumoto Original F103S Engine Oil Drain Valve: Check Price
Step 3. Drain Oil Filter

The first step to removing the oil filter housing is to take off the metal covering.
Take your ratcheting wrench, along with the extension (3/8″), and remove the cover. A small amount of oil usually collects inside the cover, so be prepared with a rag to wipe it up to avoid making a mess.

Once the cover is removed, you’ll be able to see the exposed filter housing.
The next step is to drain the oil filter.

For this part, I grabbed my MotivX drain tool and screwed it into the filter housing.
Once that is done, place the tubing into your oil catch pan and tighten the bottom portion of the drain tool. This will allow the old oil to drain through the tube.

You might be wondering how the filter drain tool works.
Basically, it has ports on the inside, which help drain the filter when the tool is tightened. You can see the ports/holes above, in the black portion of the drain tool. Pretty neat!

If you didn’t buy the MotivX kit, you’ll most likely have a plastic piece that looks similar to the one above.
Place your oil catch pan beneath the filter and be ready for the oil to drain as soon as you insert the plastic tool.
Step 4. Remove Filter Housing

Next, its time to remove the filter housing.
Using your filter wrench, extension and ratcheting wrench, remove the oil filter housing.
Step 5. Replace Filter Medium & Seals

You can see the removed filter housing above.
Next to it, you can also see the newly provided seals.

Remove and replace the large O-ring, being careful not to use anything like a screwdriver to remove the old one.
The housing is plastic and you do not want to damage the threads. What a massive headache that will turn this relatively simple job into. Before you install the new seal, dip it in some oil to ensure that you get the best possible seal when reinstalling.

Now, replace the seal at the bottom of the housing.
Same process as above.

If you’re like me, and you tinker with things too much, you might accidentally take apart the part which holds the oil filter in place.
For the record, don’t! (lol). Reinstalling the above pieces can be a pain and requires you to bend the two outermost tabs on the cylinder to get it to properly seat again. Then, you’ll have to bend them back to ensure that the cylinder remains firmly in place.

Drop the new filter into the housing.
You’re now ready to reinstall the housing with your newly replaced filter.

Just for reference, you can see the old and new filter above.
If that’s not enough evidence that filters need to be replaced in a timely manner, I’m not sure what is!
Step 6. Replace Filter Housing
This part is self-explanatory. Install the housing in the reverse manner in which you removed it.
There is a small metal tab that helps to prevent the housing from slipping off in case it becomes loose. You don’t need to mess with it. Just screw in the housing and you’re done. Again, I do this by feel, but Toyota recommends 18 ft/lbs of torque.
Step 7. Pour Fresh Oil

You can see the MotivX funnel above. The two best features of this funnel are the viewing window and the fact that it screws directly into where the oil cap goes.
This frees your hands to ensure you don’t make a huge mess.
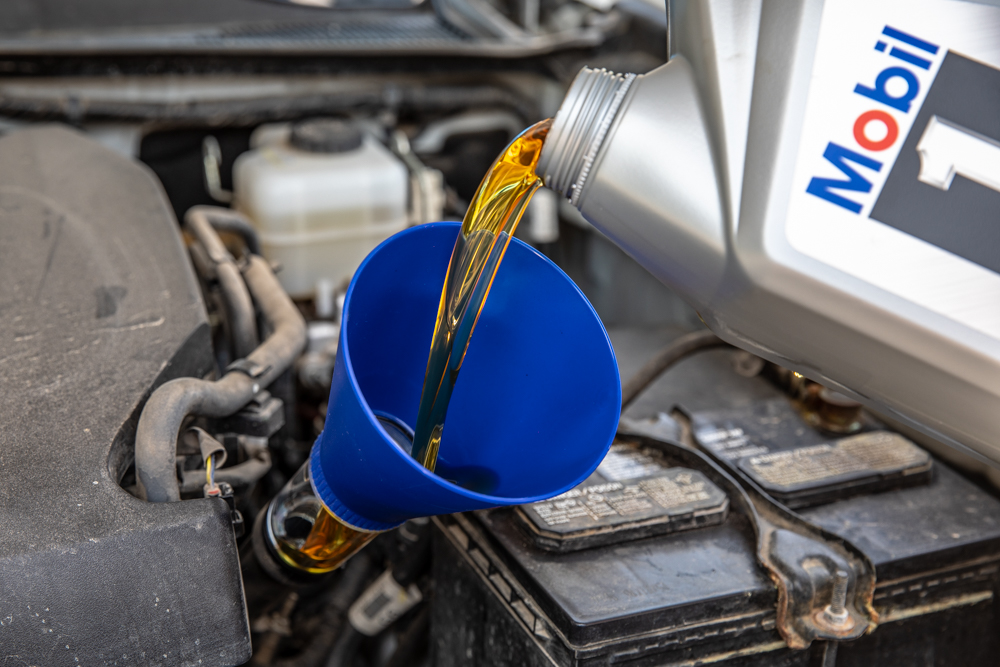
Finally, add 6 quarts of oil.
Once you’ve poured the oil in, check your dipstick. If you do not see oil up until the second marker/divot, add more oil until it is. Put the cap back on the oil filler neck and start the vehicle. Let the truck run for a minute or two and check for any leaks. Typically, once the new oil has been circulated, you’ll see that you will have to add a little more oil to ensure the engine has the perfect amount.
Reinstall your skid plate and you’re finished! You’ve just completed your oil change. The whole process shouldn’t take more than 45-60 minutes if it’s your first time. Congrats! You’ve just performed your first oil change. Great work.
Step 8. Reset Maintenance Light
The final step is to reset your maintenance light. There are two ways to do this.
Option A
- Hit the start/stop button twice, or if you have a physical key, turn it to accessory power.
- Wait for all the welcome messages to display on the screen.
- Change the odometer to trip A.
- Click the start/stop button (or turn your key to the off position) to turn off the car.
- While holding the odometer trip button, start the truck.
- Without letting the trip button go wait until you see five dots appear where the odometer normally is, and then disappear one by one.
- If the odometer flashes 000000, the maintenance light should be reset. You’re finished!
Option B
- Start the truck.
- Using your directional arrows on the right side of the steering wheel, navigate to the settings tab on the main heads up display.
- Click down through the setting tab until you see the maintenance reset option.
- Click into that menu and then hit yes to confirm.
- You’re all set!
Although both options work, the second seems to be a bit easier.
Final Thoughts
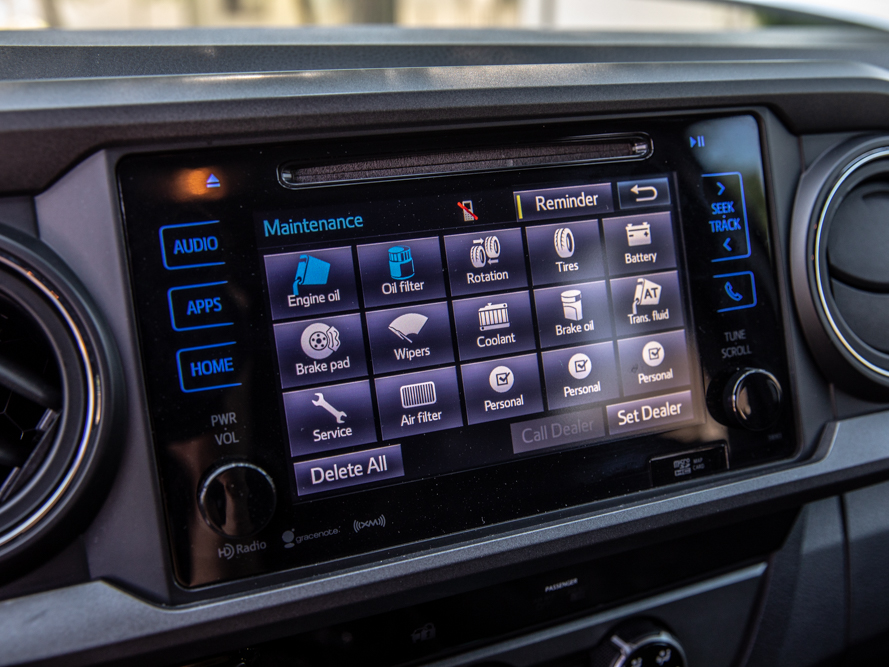
As a final step, you can also go to the Maintenance tab in the vehicle apps and add an additional reminder.
That about wraps it up. If you follow the step-by-step instructions you shouldn’t have any issues. You’ll learn a new skill and save yourself some time and money.
Remember, synthetic oil is superior to conventional oil and regular oil changes are the key to making sure you have miles and miles left in the life of the motor!

If you take apart the oil filter housing it’s done. That’s the pressure bypass valve. Gotta buy a new one.
The design of the oil filter housing and its position on the engine allows for filling the oil filter housing with oil prior to reinstalling it on the engine. This is good practice and recommended by the Oil Guy website. I know some people say that you shouldn’t do it but the Oil Guy seems to be very knowledgeable. I do it when possible depending on the vehicle.
Interesting… I have not heard this before. Ever or anywhere really, lol. I’ll have to look into it some more. After I add my first 5 quarts, I usually run the motor for like 30 seconds (to circulate it a little bit, it always drops the reading down a touch) and then top it off. Maybe it primes the filter or something?
You said torque oil filter housing to 18ft lbs!
Is the oil filter housing drain cover torqued to 18 ft lbs as well?
Do NOT torque the filter housing to 18 foot pounds. I just did it to my 2020 Tacoma sr5 3.5 liter and the two little flat plates on the housing sheared right off trying to take it back off at next oil change. So now I am stuck buying a replacement oil filter housing around 100 bucks from the dealer. The master mechanic at the dealership said just snug it tight and stop. 18 foot lbs will be too much. *** yes I know it says on the web everywhere that’s what to do*** but I am telling from first… Read more »
Hello. My 2018 sr tacoma has no housing
Sounds like you might have the 4-cylinder. This was for the V6.
Oh, and I am not sure if other model years are the same as my 2018, but I have to let the truck sit, usually overnight, before I can get an accurate reading on my dipstick. Otherwise, the oil is literally all over the stick and an accurate reading is impossible.
On my 2023 it is the same.. Changed my oil today and kept thinking somehow I over filled it which I didn’t but it sure looked that way.
My 2018 needs a 12mm for the skid plate bolts, and a 14mm for the oil pan bolt…..but I should have foreseen that!
Yep same
HI! Do you have to grease the drive shaft and how many, is it difficult or you have to take it to the shop?
I wouldn’t chance using a Fumoto valve. I know a lot of people swear by them, but the OEM screw-in plug is fail-safe unless it isn’t tightened correctly. The Fumoto valve can fail or something catch on valve lever and open the valve. I’d rather be safe than sorry; a little mess using OEM plug is better than the Fumoto.
Not if you have the CBI after market skid plate. It’s covered an must be removed first to get to the Fumoto valve.
I’ve driven millions of miles on countless cars with a Fumoto valve. Never lost a drop of oil. Never had the lever mysteriously move out of its closed position, never had an issue draining the entire pan. You’re correct that if you don’t over torque the stock drain bolt you most likely won’t have an issue. That said you still have a chance that you could over torque it if your torque wrench hasn’t been calibrated appropriately or has fallen out of specs. Even then, over time threads on any fastener have the chance for expanding. To me, the Fumoto… Read more »
Well said, Andrew. I couldn’t agree more. I trust my Fumoto valves for sure!
I use Fumoto valves on every car I own and they are much better than a screw-in plug which can get stripped, frozen or cross-threaded. You don’t have to replace a crush washer with every oil change. Fumoto valves have a lever clip that is an additional lock in addition to the spring-loaded lever that prevents it from accidentally opening. Fumoto valves also have a nipple to attach a hose to for a clean drain every time. Anything can fail, but a Fumoto valve is over-engineered not to. Been using them for years because of a Honda I had that… Read more »
The other question I have about Fumoto valves is how do you know the threads that screw into the oil pan are flush with inside of the pan and don’t extend into the pan. If they extend into the pan you don’t get a complete drain and the worst of the used oil remains in the pan. Another reason for me to stay with an OEM type drain plug.
Fumoto valves are safe and easy to use. They save you time and money in the long run. They make different size lengths and the stubby one will tuck up behind a skid plate out of harms way. I have one on my truck and love it. And to answer your last question BHB, the threads are the same length. No potential for anything to go wrong
Did my first oil change yesterday. When I went to loosen the oil filter drain plug it twisted off the whole filter. Is this a case of the drain plug being righty loosey and lefty tighty? Or am I missing something completely.
Apparently your filter housing wasn’t torqued correctly. If I had noticed the housing starting to turn while trying to loosen the filter drain plug I would have held onto the filter housing until I got the plug out to avoid the mess. After reinstalling the housing with the new filter I’d ensure it was torqued to 18 ft lbs. I’ve never had a problem with the housing vibrating loose.
When installing the newly oil coated o-rings, make sure they are straight (not twisted). Also suggest when tightening the housing, tighten, back it off 1/4 turn, then tighten to the final 18 ft/lbs. Doing this will straighten out any potential wrinkles in the o-ring. Doing these things may prevent leaks some are experiencing.
So I just did my first oil change and I have a pretty large leak from the oil filter housing, as it appears. I noticed when I removed my OF housing it was super tight. I had to use an impact to remove it. What I don’t understand is that the torque spec calls for 18 ft lbs? The amount of force I had to use for removal and installation was so different. I’m convinced the OF housing needs more than 18 ft lbs? Have you torqued it to 18 ft lbs before? Any leaks?
The torque spec is actually written on the housing. 25Nm is correct.
Considering that the housing is plastic, someone may have done damage by previously overtightening. I would check the threads and all contact surfaces. Of course, making sure to replace all the oil seals. I do not actually torque my housing to spec. I just do it by feel. I wait until it’s fairly tight and then give it an additional eighth turn, or so. Never had any leaking issues. Toyota does make a metal housing to replace the plastic one. Something to consider as well.
FYI I have a 2020 Tacoma Off-road, and the oem skid-plate bolts are 12mm. May save someone a trip to the toolbox 🙂
Wish I had read your comment an hour ago! However I stayed under my Off-Road and nicely asked my wife to go to the barn and bring the pouch of metric sockets. (10 mm too small)!?
Oh man, I wished I read this comment first. I have the 2020 OR also, and I had to make a few trips to the toolbox. Although, if this is the worst thing that goes wrong during the procedure, you’re not doing too badly.
Great tutorial, only thing I would change is leaving the plug for the engine oil in, it slows the flow down a little bit so there is less splashing, once the flow has slowed down, then it is a good time to take that plug off
Good call, Paul! I will add that. Thank you!