

Air down. Air up. Air down again. Air up again.
If you’re going to off-road/overland, you’ll soon see that this process will repeat over and over every time you leave a paved road to go explore. Airing down your tires before hitting a dirt trail or backcountry road, can drastically improve your ride quality. If you’re new to traveling off-pavement, check out our guide to recommended tire pressures when off-road. The more time you spend on the trail the more you’ll become familiar with how tedious and time consuming this task can become.
Going on trips should be a fun experience for everyone involved. Driving off-road shouldn’t feel like a chore. When it comes to deflating your tires, it can feel like a chore at times. Finding the right air compressor can make a world of difference. Several different companies sell all kinds. Choosing the right one can sometimes feel overwhelming. Well, it doesn’t have to be, and I’m here to help guide you.
Most off-road or overland rigs utilize some type of air compressor. There are a variety out there from vehicle-mounted options to portable plug and play. If you want to learn more about a portable system, check out our article on the ARB Portable Twin Air Compressor. The various options range in prices as well, and you get what you pay for.
The ARB High Output On-Board Air Compressor, however, is in another class. Its functionality, durability, and performance set it aside from the others on the market. For such a small unit it packs a punch! ARB designed it to be used for air lockers as well as inflating and deflating your tires. It will drastically decrease the time it takes you to air down and air back up at the end of your overlanding treks. That’s what everyone truly wants. Less time airing down and airing up, and more time exploring!
Find It Online
- ARB High Output On-Board Air Compressor: Check Price
Table Of Contents
Installation
The installation process is fairly simple and quick. There is some minor wiring, but don’t let it overwhelm you.
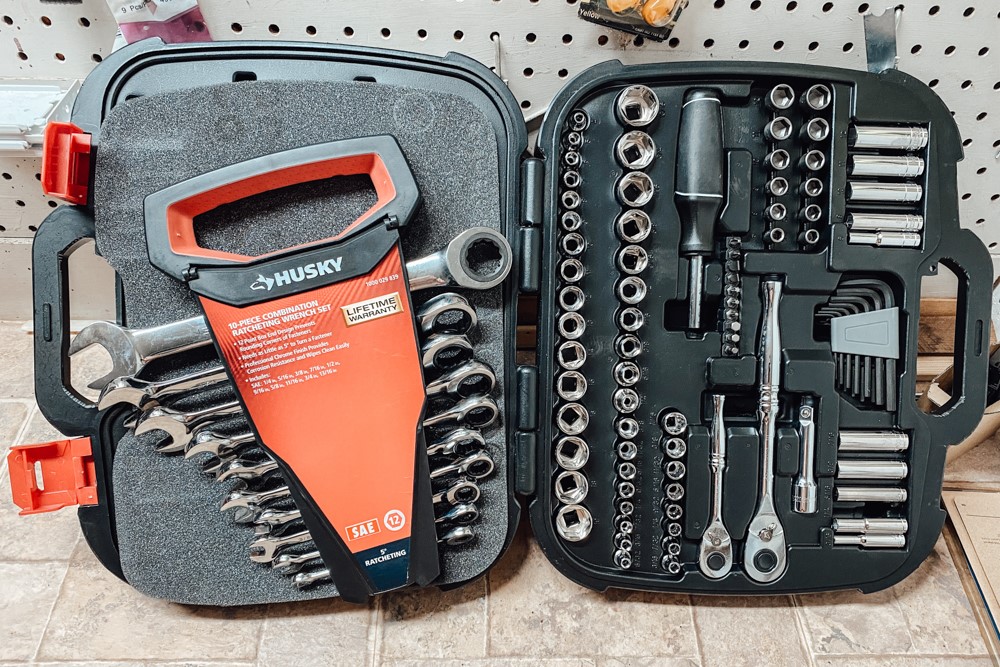
The wiring process is essentially plug and play, and ARB provides an excellent diagram for beginners. The rest of the installation process is tightening bolts and nuts. All you will need is a decent socket wrench set, ratchet wrench set, and some Allen wrenches.
I chose to use a mounting bracket from Rago Fabrications to mount my air compressor in my engine bay. Rago Fabrications makes a custom mounting bracket designed to specifically fit over the fuse box in the engine bay. You can mount yours in a different location, but I chose to mount mine in the engine bay using the Rago Fabrication mount for a clean, professional look.
Step 1. Assemble Bracket

The Rago Fabrications mounting bracket is custom cut to fit right on top of the fuse box in the engine bay.
If you plan on going with the Rago mount for your 3rd Gen Tacoma then you will need to make sure to get the brake booster cut out for the mount (if your Tacoma has this option). All the parts are as shown above. The mount, the arm, and the bolts.

Simply take the bolts out of the arm using an Allen wrench, and tighten it to the base mounting bracket.
Your fully assembled mount should resemble the image above.
Step 2. Adjust Compressor

The compressor will look as such out of the box.
The manifold is located in an upright position. Due to this default position, you will not be able to mount it under your hood on top of the fuse box as is. Don’t fret, because they made the manifold tube adjustable, and you can rotate it to make it flat.

To adjust the position, use your Allen wrench to loosen the two bolts located in the picture above.
Once they are both loose enough, you will be able to rotate the manifold down making it parallel with the motor.

When you have adjusted it to the specific height you want simply tighten the bolts back to firmly hold it in place.
The air compressor will then resemble the image below.
Step 3. Mount To Bracket

Place the air compressor on top of the mounting bracket. Several predrilled holes allow you to mount it in any position.
The Rago Fabrication Mounting Bracket was specifically designed to accommodate the ARB Twin but will hold the Single as well. Because of this, it will not align perfectly with the pre-drilled holes.
It will align with three of the four holes on the compressor, which will still hold it just as firmly as it would with all four legs bolted down. If you’re really worried, you can always mark and drill another hole into the mount.

Slide three of the provided bolts through the legs, till they are protruding from the bottom of the mounting bracket.
Then place a washer, and tighten the bolts down fully.
Step 4. Connect Wires

ARB provides an excellent diagram in the manual.
The diagram above will help you follow along as I show you the step-by-step process for wiring.
Step 5. Motor Power

First, plug in the motor power cord from the compressor to the wiring that goes directly to the battery.
The power cord will be the black and red wire conjoined by a housing connector. Plug that into the red/white and black/white wire as shown above.
Step 6. Relay

Plug in the relay to the relay adapter coming from the same set of wires as seen in the step above. You will later mount the relay to the engine bay in your desired location.
Step 7. Switch

The unit can be utilized for air lockers as well as inflating and deflating your tires. The wires provided will be taped together in three bundles. Each bundle will be labeled for its specific purpose. The labels for each bundle will read as such: Switch 1, Switch 2, and Isolation Switch.
It seems like a jumble of wires, but you will only be using one of them. If you do not have air lockers and will be using the it solely for inflating and deflating tires, then you can disregard the wires labeled Switch 1 and Switch 2. The only set of wires you need are the ones labeled Isolation Switch. These wires will power the switch to turn it on and off.
Step 8. Isolation Switch

To power the switch, you will connect the loose wires to the ports on the back of the switch. Each port on the back of the switch is numbered.
You will match the colored wires to the corresponding numbers:
- Red/yellow will connect to Port #2
- Red will connect to Port #3
- Blue-White will connect to Port #6
- Black will connect to Port #7 and Port #8
Once completed your switch should resemble the image above.
Step 9. Motor Power

The motor power cords are the thick red, thick black-white, and thin black wires. They will be connected directly to your battery.
First, splice the red wire and crimp it to one of the yellow eye terminals, which will later be connected to the positive terminal of the engine battery. Then splice the black/white wire and crimp it to the other yellow eye terminal, this will later be connected to the negative terminal of the engine battery. Lastly, splice the solid black wire and crimp it to the blue eye terminal, which will later be connected to the negative terminal of the engine battery.
Since the black/white wire and solid black wire will both be connected to the negative terminal of the battery you can crimp them both together in the same yellow eye terminal. I chose to crimp them separately using both the yellow and blue eye terminals. They should now resemble the image above unless you chose to crimp the black/white and black wires together.
Step 10. Connect Isolation Switch

Much like connecting the wires to the isolation switch, you will connect the opposite end in a similar fashion.
At the opposite end of the switch are four spade connectors. You will insert those four spade connectors into the supplied plastic connector housing so that each wire color matches up with the same color on the matching connector housing.
The wires will be matched by color. Connect like colors. Once this is done, you can now plug the connectors together.
Step 11. Run Wires To Cab
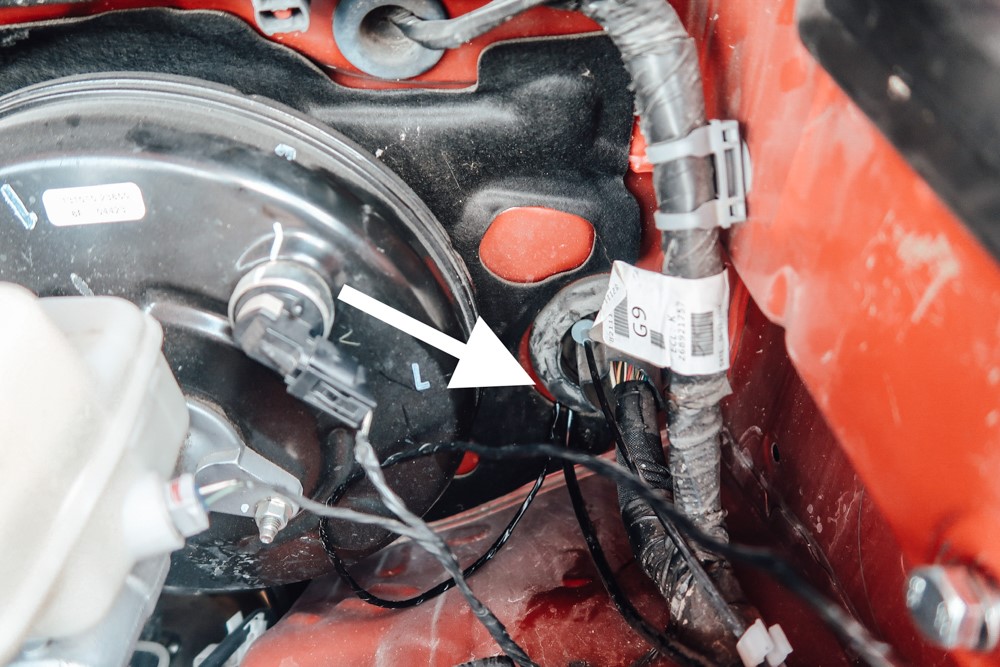
Now that all the wires are connected, you can run the wires through the firewall into the cabin of the vehicle.
Just beside the brake booster in your engine bay is a large plug used for routing wiring through the firewall. You can feed the isolation switch wires through the same hole to gain access to the cabin.

Feed the wires through the hole, and they will emerge below the dash on the driver’s side of the vehicle.
Along with the wires that power the isolation switch, a red/yellow and blue/white wire will be attached and hanging loose.
Step 12. Connect To Fuse Panel

The loose red/yellow wire and blue/white wire are the diodes that connect directly to the pressure switch. These two wires will connect to the fuse panel located under the steering column inside the cabin.
Remove the fuse panel cover, and the corresponding fuses to connect the two wires. The blue/white wire will be connected to the fuse labeled 5A Panel, which is wired to the dash illumination. This will illuminate the light on the isolation switch when you turn the compressor on. The red/yellow wire will be connected to the fuse labeled 10A IG1 No. 2, which is wired to the ignition. This will control it so that it only draws power from the battery when the ignition is on.
Step 13. Mount Switch

Now that all the wires are inside the cabin it’s time to find a place for the switch.
I chose to mount mine in between the steering column and the dashboard. It fits perfectly and doesn’t require any extra drilling. If you have a mounting bracket for switches you can mount the switch there, but I don’t have one – nor do I have enough switches to fill one up.
It fits firmly in between the steering column and dashboard, and I haven’t had any issues with it moving or sliding around. The excess wiring that’s left on the floorboard can be secured and stashed up under the steering column for a clean professional look.
Step 13. Mount Bracket In Engine Bay

Take the two larger bolts and washers that came with the Rago Fabrication Mount, and place them in the predrilled and threaded slots to the right of the fuse box.
Screw them in about 25% of the way, because you will be resting the mounting bracket on top of them before tightening them down fully.

Next loosen and remove this bolt located just below the fuse box.
This is where you will be connecting the arm to the mounting bracket. Place the mounting bracket with the air compressor on top of the fuse box, and the arm will line up with the bolt shown above. Tighten it down completely.

Finally rest the two open slots onto the two bolts.
Now you can tighten down those two bolts to firmly secure the mount.
Step 14. Connect Pressure Switch

If you ordered a hose along with the compressor then connect the valve to the manifold tube. Connect the pressure switch to the outside of the valve, and connect the hose attachment to the top of the valve.
If you did not order a hose along with the compressor then you will just connect the pressure switch directly to the manifold tube. Once it resembles the image above you will now connect the two diodes to the pressure switch. The diodes are the same ones that are connected to the fuse panel inside the cabin.
Step 15. Connect Battery

The last step in powering up your air compressor is connecting it all to the main power source.
Connect the red wire to the positive terminal of the battery. Connect the two black wires to the negative terminal of the battery. Then mount your relay in a desired location in the engine bay. I chose to mount mine in the same location I have my other relay which powers my lightbar.
You can secure and hide the excess wiring in any fashion you choose for a cleaner, more professional look.
Review

My first air compressor was a cheap $50 one that I found at Walmart. It was convenient to have when I was out exploring with no other means to inflate or deflate my tires. I found myself using it less and less though due to the amount of time it took me to air back up after a trip. The second downfall is how large and cumbersome it was. It was a large tank, with an even larger motor mounted on top. Not to mention, I also had to remember to pack it on board before hitting the road since it wasn’t mounted in my Tacoma.
When I hit the trails, I tend to run between 15 – 20psi on my tires. When I’m on a paved road though I like to run 45psi in my tires. I like the higher pressure on the road because it gives me a more comfortable ride. Using the basic cheap one, it took me upwards of 30 minutes just to air my tires up from 20psi to 45psi. It became a tedious task that I dreaded doing each overland trip I went on.
After a few trips, I knew I had to find a better solution for airing up my tires after an overland or off-road excursion. That’s when I came across the ARB High Output On-Board Air Compressor. The ARB truly is in a league of its own. Just holding it in my hands I could tell it was built to last. This thing packs a whole lot of power in such a small package.
No more aching knees, or a sore back from being crouched down for long periods. I have put it to the test, and all I can say is wow! From 20psi it only took me two minutes flat to air my tire back up to 45psi. In under 10 minutes, you will be off the trail, and back on the road heading to your next destination.
The amount of time saved was a huge game changer! Also, since the it is mounted in your vehicle you never have to worry about tire pressure again. If you hit a nail or lose some air in your tires you don’t have to search for the nearest gas station to air back up. You can simply pull over to the side of the road, and do it right then and there.
Final Thoughts
This compressor is the complete package, and you will not be disappointed. My previous one has since been collecting dust in my garage. I may one day build a glass case for it to be displayed as a relic from the past… Because that’s where it will stay thanks to my new, in the past. My life has been simplified thanks to my ARB. I can’t imagine life without it, nor do I want to!

Hello I was wondering if you have had any problems with your battery draining. I tapped into the fuse under the dash in the correct places you said to.
Never had an issue with my battery draining. You could have a bad cell in your battery. Also, I only run the compressor when the vehicle is fully on and the engine is running. Don’t run the compressor just with the battery and the ignition off.
Oh ok thanks for the reply. I installed and wired it up last week and then my battery died. It was a little over three years old so that was probably the culprit , but just weird timing kinda freaked me out a bit. Yeah I can’t run the compressor with the ignition off. Hopefully that was all it was. Great write up by the way super easy to follow.
Thank you! Yeah more than likely that’s what it was. I bought my truck brand new, and my OEM battery gave out within 2 years. Unfortunately it’s an imperfect world. I replaced it with an AGM, and haven’t had a problem since.
Thanks for the write up James! One criticism I have heard of the ARB Single is the thermal switch tripping before all tires getting inflated. Have you had any issues with this? How big of tires are you running and how long does it take to inflate? Thanks!
Hey James,
I have never experienced that issue personally. My compressor has performed exceptionally in the hottest conditions! The only thing that comes to mind that might cause that issue is possibly a dirty filter. The filters are easily accessible, and easy to clean.
I’m currently running 285/75r16 and it takes me 2 minutes flat to air up my tire from 20psi up to 45psi. Total of 8 minutes to inflate all 4!