
So you have done the research on what bed setup is best for your Tacoma and decided on a bed rack. Now it’s time to decide on the best bed rack setup for you. I was in this same position a few weeks back, and I decided to go with the BodyArmor4x4 Overland Rack.
BodyArmor4x4 is a well-known brand in the aftermarket Jeep parts industry that has slowly branched out to make products for other makes and models. They started out simply making Jeep bumpers and have expanded to now make a wide range of aftermarket products including racks, tents, trail accessories, and much more.
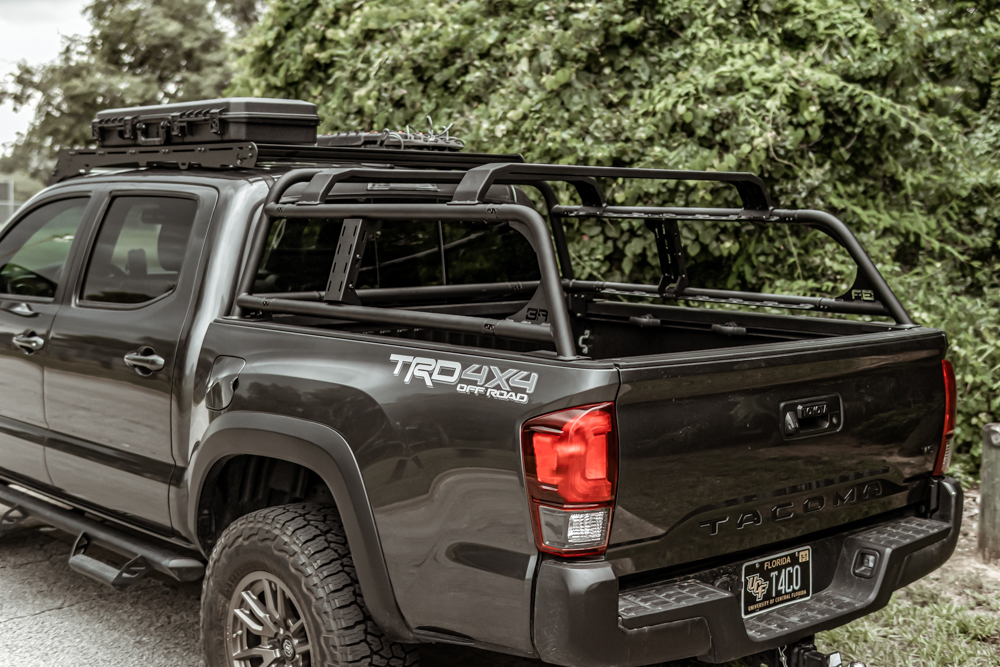
I went with the BodyArmor4x4 Overland Bed Rack because I think it is one of the best-looking bed racks on the market, and I feel that it will suit my needs well.
In this article, I will be doing a step-by-step installation as well as a brief, initial impression review at the end.
Find It Online
- Body Armor 4X4 Bed Rack
- Full Size Overland Bed Rack: Check Price
- Mid Size (NEW) Overland Bed Rack: Check Price
Table Of Contents
Tools List

This install is pretty straightforward and does not require many tools to complete. I would, however, strongly recommend using an impact driver to complete the install. Carefully using an impact rather than a typical socket wrench will probably cut your install time in half.
Tools & Materials:
- Impact Driver or Socket Wrench
- T30 bit or Torx bit set
- Metric Socket set
- 10mm Socket
- 13mm Socket and Wrench
- Optional: Loctite Removable
- Included Allen Keys or their socket bit equivalent
I also suggest laying out or separating the hardware for the install. It all comes in one bag so there was a point in the install where I used the wrong bolts and had to backtrack to switch them out.
Step 1. Add Mounting Brackets

The instructions state that it is possible to either assemble the rack fully and then install it all at once, or install it step-by-step directly onto the truck.
Because I was doing the install alone, I decided to install it directly onto the truck. I ended up fully assembling the front of the rack and then installing it onto the truck, but everything else was installed onto the truck one piece at a time.
To assemble the front of the rack, first, attach the mounting bracket to the front rack corners using the 20mm button head bolts and 8mm nylon locking nuts. For most of this install, it is best to make the bolts snug but not fully tightened. You can go back at the end to tighten everything down. This will allow for maximum adjustment once all the pieces are bolted together.
Once these are installed, you can either bolt the rack corners to the bed or continue assembling the front rack off of the truck. If you decide to bolt the rack corners first, skip to step 3 and then come back to this step.

The front of the rack is relatively large and heavy, so you should do the latter if you are not comfortable lifting a bit of weight.
I initially decided to install the corners to the bed but decided to install it on the floor because I didn’t think I could fit a wrench between the rack and the truck’s cab. However, this is unnecessary as the nuts used fit snugly into a slot which prevents them from spinning as you tighten down the bolts.
Step 2. Assemble Front Rack

Next, you can bolt the bottom rear cross member onto both of the corner supports. To do this, you will use the 40mm socket head cap screws with the 2-hole washers on either side and 8mm nylon locking nuts (pattern pictured).
The washers and 8mm nuts will fit perfectly into the slots on either side of the support, which will allow you to tighten the 40mm bolts without having to keep the nuts from spinning. I think this was designed really well and made the installation a lot simpler.
Once you have the bottom rear cross member installed, you can go ahead and do the top which installs the same as the bottom.
Step 3. Mount Front Portion

At this point, you should have fully assembled the front of the rack. Now, it is time to install it on the bed of the truck.
To do this, you will first need to remove two T30 bolts. Remove the T30 bolts on the front of the bed nearest the corners of the bed. You will also need to remove the bolts in the bed rail closest to the bed corners.

Now you are ready to install the front of the rack on the truck. For this, you will need to reuse two of the factory T30 bolts as well as the silver 40mm hex bolt and their respective silver washers provided with the rack.
Place the front portion of the rack on the front bed rail of the truck and line up the mounting bracket holes with the holes where you removed the T30 bolts.

Then use the factory T30 bolts to attach the mounting bracket to the front of the bed on both sides.
Finally, bolt the mounting bracket to the hole in the bed rail using the 40mm hex bolts.
Step 4. Attach Side Supports

At this point, you should have the entire front part of the rack securely mounted to the truck bed. Now it’s time to attach the lower side supports.
Using the same hardware pattern you used to assemble the front rack supports, attach the bottom side support to the front of the rack on each side.
Step 5. Mount Rear Rack Corners

Now that you have the bottom side supports attached, you are ready to mount the rear rack corners to the bed.
Before doing that, you will need to install the mounting brackets on the corner supports. For this, you will need the shortest bolts provided, which are a 16mm button head bolt.
The instructions say to use nylon locking nuts on the button head bolts, but the bracket has nuts welded onto it already and there isn’t room between the bracket and bedside for another nut.

Once your brackets are mounted to the rear corner supports, you can rest the corner on the bedside and bolt the side support to it.
Finally, you will need to use the 10mm socket to remove the stock bolt near the bracket on the bedside. You can then bolt the rack down to the bedside using the stock 10mm bolt on the mounting bracket.
Step 6. Attach Upper Supports

Now that you have a solid base to the rack mounted to the bed, you can attach the upper support bars.
To do this, simply follow the same instructions from Step 4. The top side supports are installed in the same manner and the bottom ones.
Step 7. Attach Top Supports

At this point, you should have the shell of the rack completely assembled. The next step is to attach the top supports.
For this step, there is a bit of adjustability for where you can mount the top supports. Depending on what you are putting on top of the rack, you may need them closer or further apart.
I followed the instructions and used the three rear-most slots to mount the rear top beam. To bolt it down, use six (three on each side) of the 20mm bolts, washers, and 8mm locking nuts. Because there is no slot holding the nuts from spinning, you will need to use a 13mm socket or wrench to hold them while you tighten the bolts.

Repeat the same process for the front top beam. I used the front 3 slots for this beam, for now.
The position of the top beams can be changed pretty easily later on if needed.
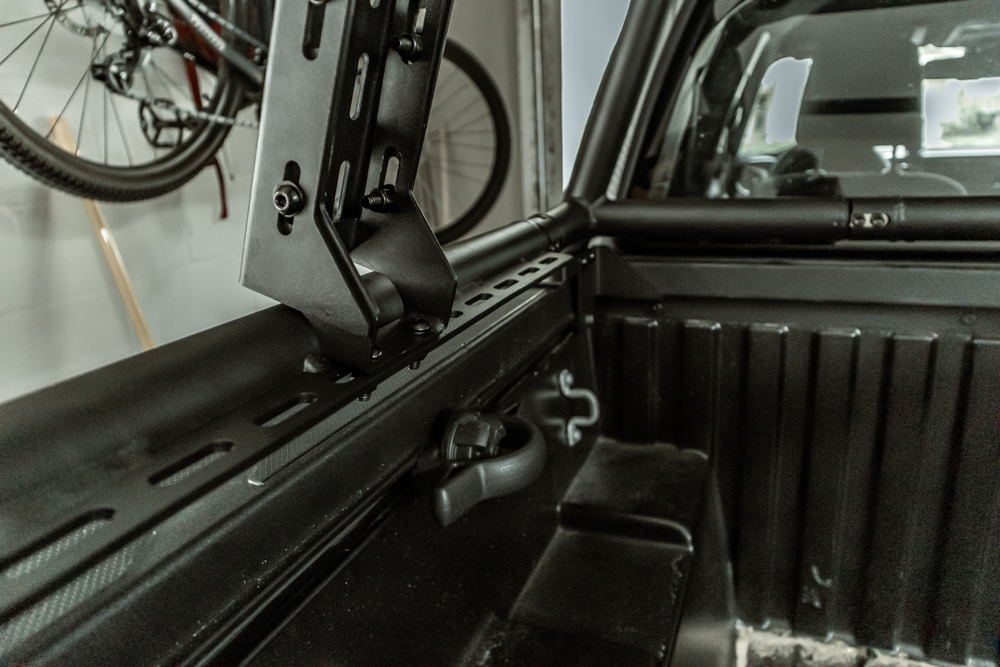
Step 8. Attach Accessory Mounts

Next, you need to assemble and attach the accessory mounts to the side of the rack. Even if you aren’t planning on mounting any accessories to the side, I would still suggest attaching one mount to each side to act as a support.
To assemble the mounts, simply slide the lower part of the mount into the top and then bolt them together using 4 of the 15mm button head bolts, washers, and locking nuts. Don’t tighten them down fully as you will likely need to adjust them slightly to fit on the rack.
Once they’re loosely assembled, you can bolt the top and bottom of the accessory mount into the top and bottom supports of the rack using 4 more of the same bolts, washers, and locking nuts.
Finally, tighten down the bolts on the sides of the accessory mounts.
Step 9. Tighten Down

This final step is pretty self-explanatory. Go over the whole rack and tighten down all of the nuts and bolts. Double-check that the rack is mounted onto the truck solid and doesn’t shake or wiggle in any way.
Review

Honestly, the BodyArmor4x4 Overland Bed Rack surprised me. I was not expecting a product this solid. The install process is pretty straightforward and could easily be completed within an hour.
The bed rack is very sturdy and after driving around with it on for about a week, I haven’t noticed any extra wind noise or clunking coming from the rear. I think this is one of the best looking cab-height racks on the market. Personally, I would like to see a flat top support option to lower the height of the rack a bit.
I’m not sure if my truck will still fit in the garage once a rooftop tent is mounted, but flat top supports would definitely work.

The welds and coating on the rack are also super clean which is a testament to BodyArmor4x4’s build quality.
Final Thoughts
Overall, I’m very happy with the BodyArmor4x4 Overland Rack because it’s both functional and looks like it belongs on the truck, even without accessories/gear mounted. I’m excited to put it to use soon and I am fully confident that it will hold up to the abuse I plan on putting it through on my off-roading and overlanding adventures.
Does a softtopper for underneath?