

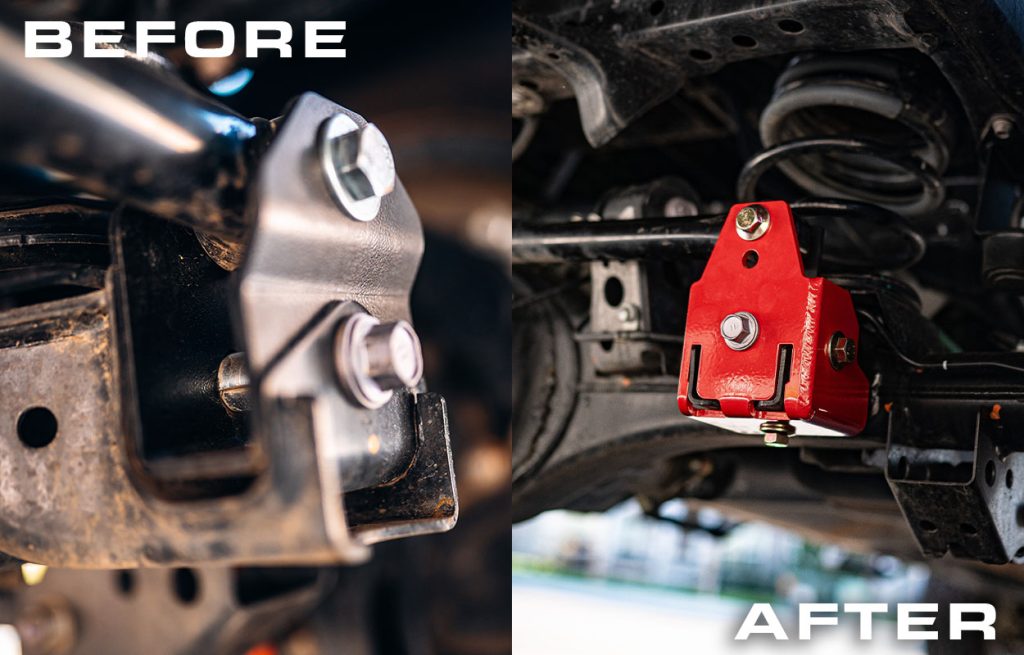
If you’ve lifted your 2024+ (4th Gen) Tacoma, you might have noticed that your rear axle has shifted towards the driver’s side and experienced poor tracking and/or excessive bump steer.
The stock track (aka panhard) bar angle steepens with lift height, because it forces the axle to to shift outside of factory specs. This results in rear axle shift and unwanted steering input when you go over any bumps.
I’m here to let you know that there’s an easy fix from DR. KDSS. Let’s jump in.
Save 5% on yours at TacomaForce.com! Use code – 4gtacopanhard.
Table Of Contents
Why This Upgrade Matters
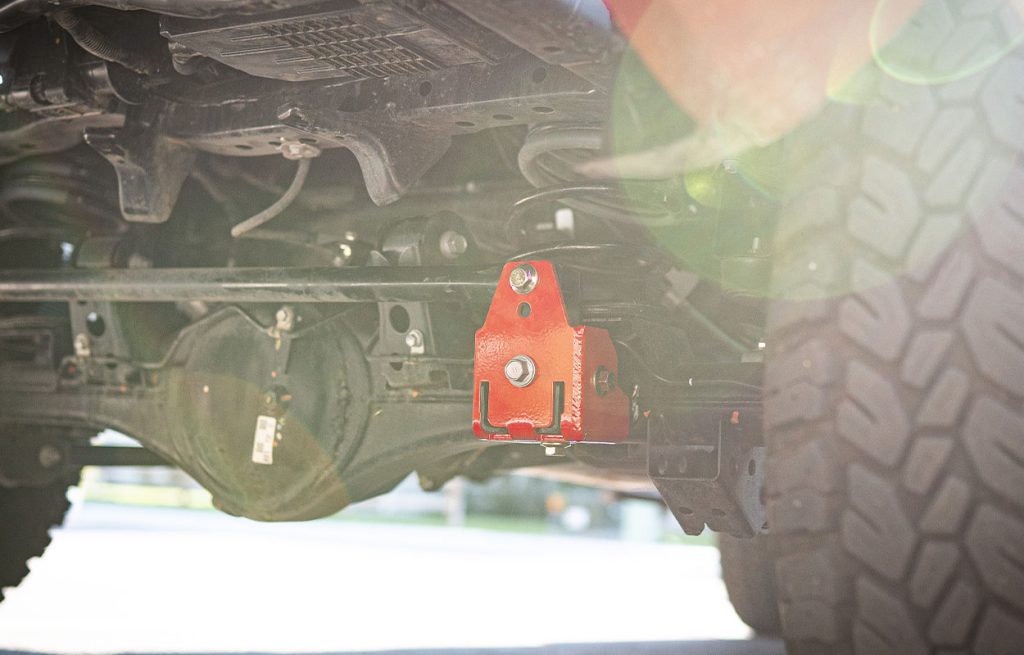
DR. KDSS has a whole lineup of products to solve issues that occur when lifting your truck. One of them, the B.O.T.C.K., solves this issue by raising the axle-side pivot joint, bringing the panhard bar back closer to level. Correcting this misalignment restores more predictable handling and proper axle motion both on and offroad for an overall better and more comfortable ride.
What Sets This Kit Apart
Many relocation brackets bundled in lift kits rely on a single, unsupported bolt. When the track bar is under pressure, those designs can flex and shift, which not only makes the truck feel unstable but also creates a real risk of failure over time.
This track bar correction kit eliminates that weak point with a full coverage design and multiple Grade 8 bolts that lock into the OEM mount from several sides. Instead of flexing under pressure, it spreads the load evenly and stays rock solid, a clear step above the flimsy single-bolt brackets included in most kits.
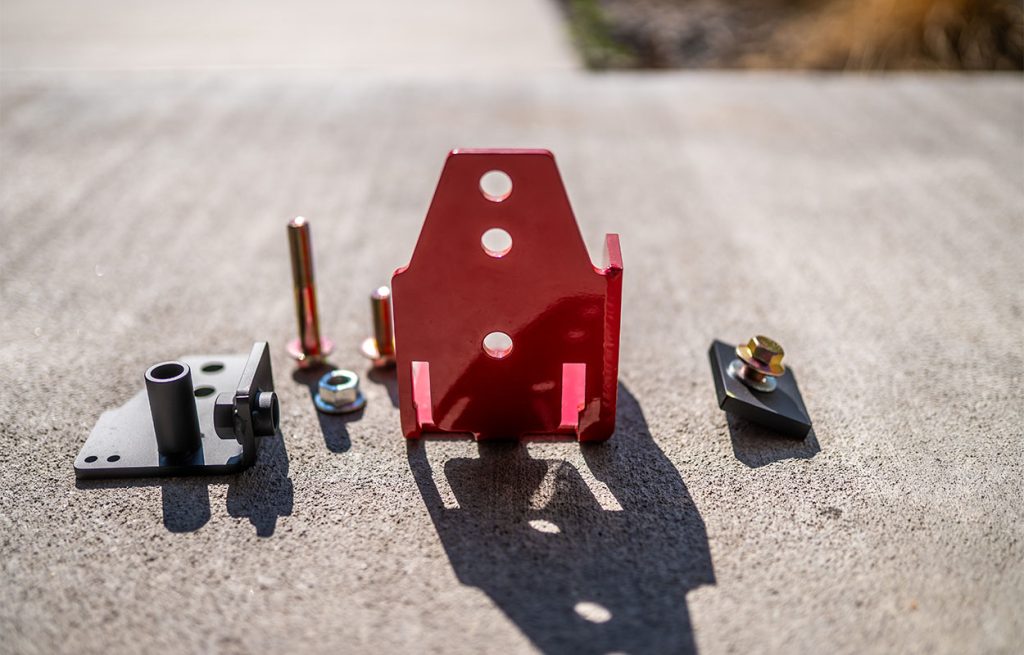
Features
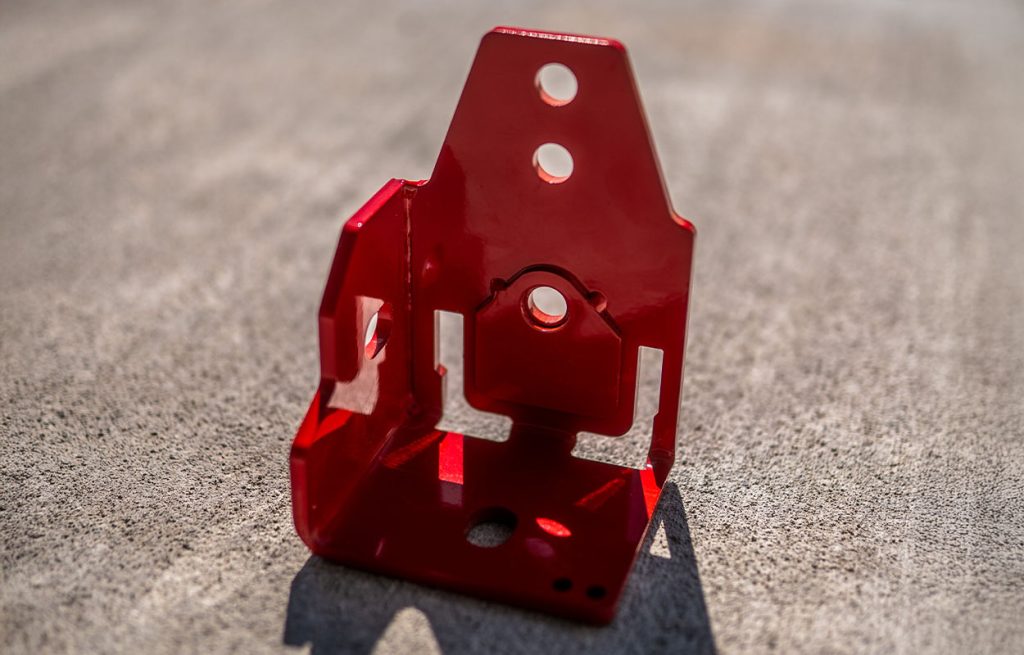
- Full-coverage design: The primary bracket covers the entirety of the OEM mount and uses a double shear adapter to stabilize the joint.
- Load distribution: A custom fit washer plate spreads load across the OEM mount instead of concentrating stress at a single point.
- Hardware & retention: Secured with three Grade 8 bolts plus the OEM track bar hardware; recommended torque for the four bracket fasteners: 120 ft-lbs.
- Serviceability: 100% bolt-on, install took literally 15 minutes.
Fitment/Size & Color Options
- Shorty: Optimized for 1.5″–3″+ rear lift (or run the lower hole on Standard)
- Standard: Best for 3″+ rear lift; features dual mounting holes
- Finishes: Standard Black, Red, “King” Blue
Choosing Version: Shorty Vs. Standard
DR. KDSS provided the following guide to help decide which bracket is best for your lift…
Measuring your existing track bar bolt height from the ground.
- Measure to the center of the frame-side panhard bolt.
- Measure to the center of the axle-side panhard bolt.
- Subtract axle-side from frame-side to get the height difference.
Choosing based on differences.
- If the difference is 1.5″ – 2.99″: choose Shorty (or use the bottom hole on Standard).
- If the difference is ≥ 3″: choose Standard and use the top hole.
Hole Positions
- Shorty and the bottom hole on Standard are 2″ above the OEM hole; the top hole on Standard is ~3″ above the OEM hole.
- If you might increase lift later, buy Standard now and start in the lower position to future proof your setup.
Installation Overview
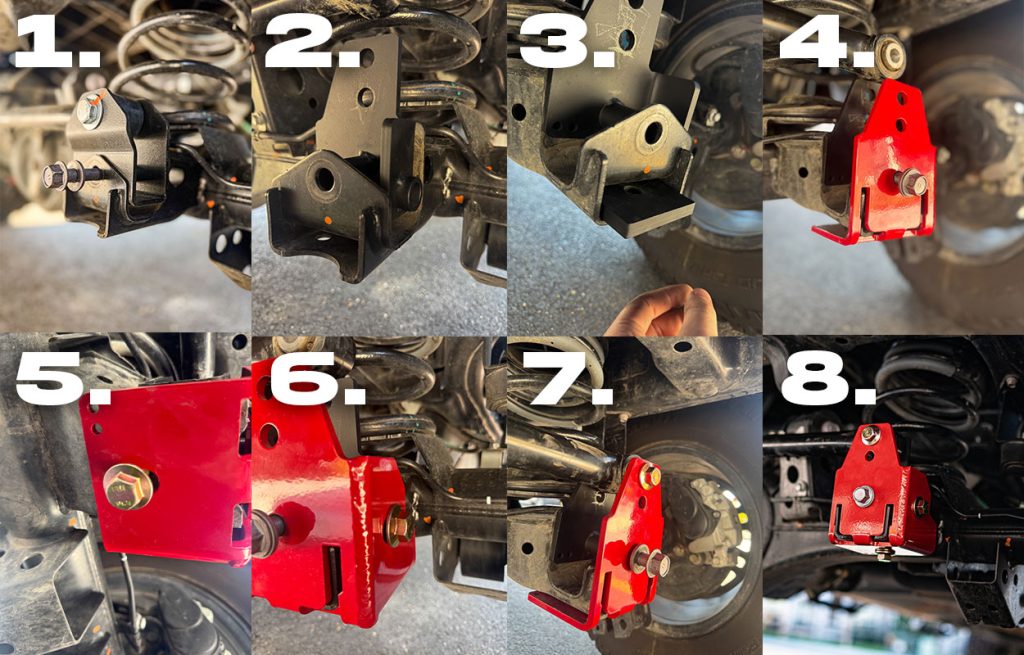
Tools: 19mm, and 22mm sockets, 22mm open-end wrench, 1/2″ socket, rubber mallet. An impact helps, but hand tools work.
Installation was very straightforward, and really gives you an idea of how high quality the product is. Install took less then 15 minutes in my driveway.
- Free the panhard bar: Remove the factory axle-side bolt. Use a mallet to lift the bar out of the pocket.
- Insert adapter: Slide the adapter in with the side bolt facing the passenger side; align the center hole with the OEM threads.
- Install washer-nut plate: Feed the plate through the access opening and align it with the back slot.
- Hang the primary bracket: Loosely start the factory panhard bolt through the main bracket (do not torque yet).
- Start remaining fasteners: Loosely thread the lower bolt into the washer-nut plate and the side bolt into the adapter to lock alignment.
- Set panhard height: Drop the panhard into the chosen hole (Shorty/bottom hole for 1.5″–3″; top hole for 3″+). Install the supplied bolt and nut.
- Tighten to spec: Torque the four bracket fasteners to 120 ft-lbs.
- Bonus points: Paint-mark bolt heads to make pre trail checks fast.
Full installation post found here: https://4gtaco.com/threads/track-bar-relocation-upgrade-by-dr-kdss.1138/
Final Thoughts
The DR KDSS track bar correction kit is a high-confidence fix for rear-end wander and bump steer after lifting your truck. Its full coverage, double-shear design and three-bolt retention directly address the core weakness of single bolt kit brackets, all while remaining fully serviceable and 100% bolt-on.
If you’ve already invested in your rear suspension, this bracket is the piece that protects that investment. By correcting the geometry and eliminating flex at the axle mount, it ensures your lift performs the way it should and your truck continues to stay stable long term.
Yes, the B.O.T.C.K. costs more than the relocation brackets that come bundled with lift kits, but the strength, stability, and peace of mind it delivers make it worth every dollar if you care about your rig. If you do your research, you’ll see that various DR. KDSS products are highly regarded for their quality and customer support. For anyone running a rear lift on a 4th Gen Tacoma, this is a must-have mod to complement your new lift kit and keeping your truck performing optimally.
Would I get one again? Without question. Would I recommend it to anyone lifting their truck? Absolutely. It’s the kind of upgrade you only need to buy once, and it pays off every time you drive your truck.