
The stock speakers in the 2nd and 3rd Gen Toyota Tacomas are seriously lacking when it comes to sound clarity, loudness and bass. When you want to roll around with the windows down blasting some music, you will likely be underwhelmed by their performance.
In my opinion, a speaker upgrade is the single best interior upgrade for a Tacoma. Almost any aftermarket option will be a massive upgrade due to how underwhelming the stock ones are. Seriously, I was actually shocked by how cheap the stock ones felt when I removed them.
It is honestly a necessity in my book, and I’m mad I didn’t do it sooner. If you are looking for a quality setup, read on as I install and review the OEM Audio Plus option.
Find It Online
- OEM Audio Complete Speaker Upgrade: Check Price
Table Of Contents
Overview

Let’s first talk about the Tacoma speaker setup and what the upgrade offers.
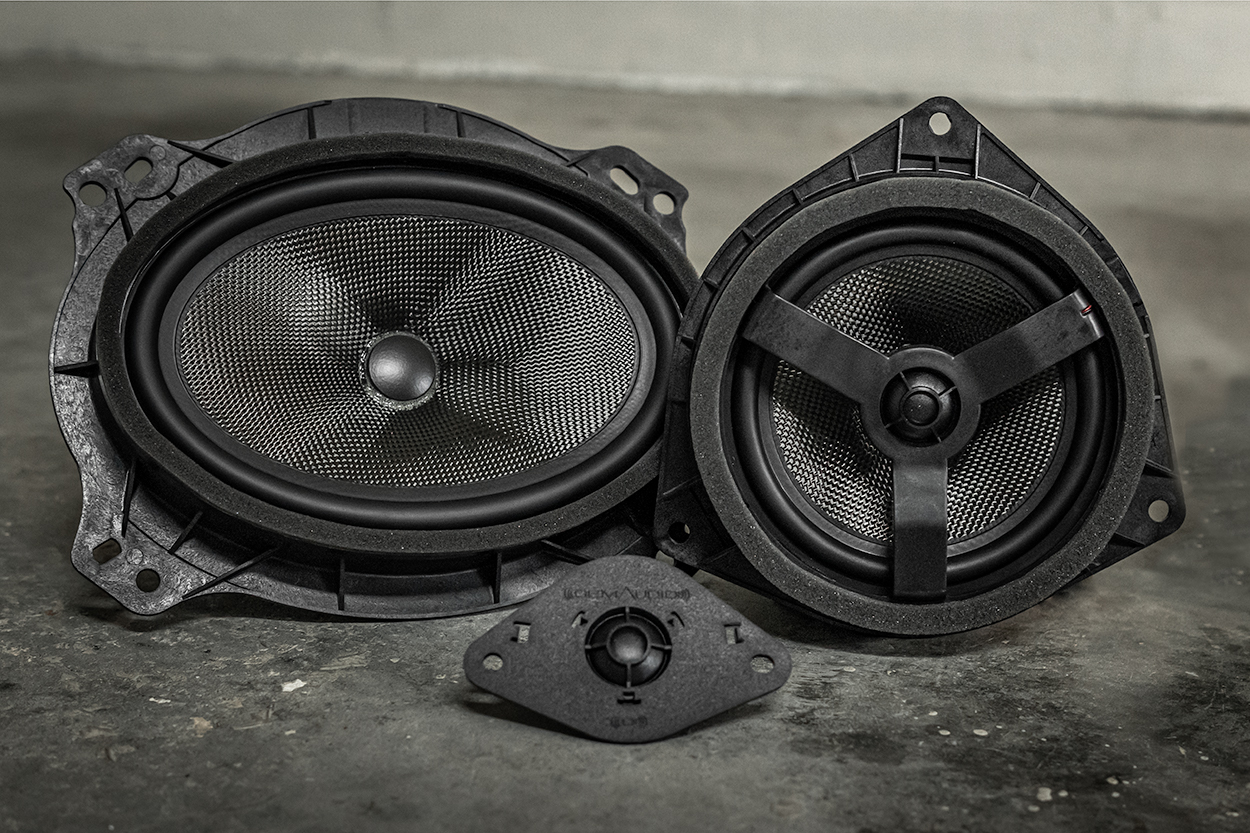
The 2nd and 3rd Gen Toyota Tacomas have 6 speakers in the interior. Starting in the front, there are two tweeters up in the front on the dash near the windshield. The front doors both have a 6″ x 9” speaker and the rear doors each have a 6.5” speaker. Unsurprisingly, the OEM Audio Plus upgrade replaces all of these. These speakers are drop-in replacements and are completely plug-and-play.
The kit includes 1” soft dome tweeters, two 6″ x 9” carbon fiber cone woofers, and two 6.5” 2-way carbon fiber cone coaxial speakers for the rear. The rear coaxial speakers also have a 1” dome tweeter in them.
These look great with their carbon fiber cones, and they feel solid and heavy. Mine came with a note about the magnet size on the 6″ x 9” woofers. It outlines the new updated option that’s equipped with the neodymium magnet.
From OEM Audio Plus:
This upgraded rare earth magnet affords superior magnetic density with higher power saturation limits and performance than the traditional magnet, only lighter and a smaller footprint when it comes to installation. We elected to invest in this superior magnet material to improve the fit and performance of this component.
Installation
Replacing these in the Tacoma is super straight-forward and only took me about 30 minutes total.
Here are the tools you will need:
- 10mm Socket Wrench
- 10mm Flat or Ratchet Wrench
- Plastic Trim Removal Tool: Check Price
- Phillips Head Screwdriver
This simple set of tools should allow you to replace them without a hitch. Now, let’s get into the install.
Step 1. Disconnect Battery

As always, you should unplug the truck’s battery before working on anything electric-related. To do this, simply use the 10mm socket to loosen the bolt on the negative (black) battery lead.
Shimmy the negative lead off of the battery terminal and push it out of the way so it won’t accidentally come into contact with the battery terminal.
Step 2. Install Tweeters

For a detailed install of the tweeters, see my Kicker Tweeter install and review article. These did great in the short term, but this new kit is the business! I will give a high-level view of the installation in this section. There should still be plenty of detail to get you through this part.
First, use a trim removal tool to pop out the SRS Airbag bolt cover on the driver side pillar.

With that bolt undone, you can pull towards yourself and out from the pillar to remove the trim panel.

Next, use the trim removal tool to lift the vented trim piece on the corner of the dash. You can now pull up and towards yourself to remove the trim piece.
Now use your 10mm wrench to remove the two bolts holding the tweeter in place. Unplug the tweeter and install the OEM Audio Plus 1” soft dome tweeter in its place.

Return the trim pieces you removed earlier and secure the bolt on the pillar, returning the bolt cover piece.
For the passenger side, you will need to use a trim removal tool to remove the two bolt covers on the passenger grab handle. After you use the 10mm socket to remove those two bolts, you can pull off the grab handle and the rest of the tweeter installation on the passenger’s side in the same manner.
Now that you have the tweeters installed, it’s time to move on to the front doors.
Step 3. Remove Front Door Panel

To install the front 6″ x 9” woofers, you will need to remove the entire door panel on each side.

To start, use the trim removal tool to pop off the corner trim panel near the A-pillar. When this panel comes off, it will likely leave three white clips in the door.
Remove these clips by pinching together and pulling them out. Return the clips to the trim piece.

Disengage the circular locking tab which is located below the trim piece you just removed.
To do this, push the middle of the tab in to unlock and then pull out the full clip.

Next, use the panel tool to lift the door lock control panel. Pull up from the rear and then the front.
Unplug the two plugs from the control panel.

You may need to use a trim removal tool to unlock the tab on one of the plugs.

Now use the trim removal tool to remove the plastic cover inside of the door handle.
Use a Phillips head screwdriver to remove the screw inside the handle. Do the same for the Phillips head screw in the door handle.

You can now use a panel tool to remove to carefully pry the door panel off of the door.
Start at the bottom and move up the sides, pulling towards yourself.

Once the door panel is loose, you will need to disconnect the lock and door handle cables. I found it was easier to just remove the door handle from the panel and let it hang off the door.
If you decide to remove the cables, remember to reinstall with the green cable on the bottom and the white cable on the top. Repeat for the passenger side door.
Step 4. Install Woofers

With the front doors stripped, you can now install the 6″ x 9” woofers.
First, disconnect the stock speaker by pinching the plug in the top. Next, remove the stock ones by unscrewing the four 10mm bolts. Carefully pull it out of its housing.
Bolt the OEM Audio Plus 6″ x 9” woofer into the door and plug it back in. Return the door panel following the above steps in reverse. Remember to reattach the door handle and lock cables if applicable.
Repeat this process on the other side.
Step 5. Remove Rear Door Panel

Disassembly of the rear doors is essentially the same. Instead of the A-pillar trim panel, you will need to remove the plastic panel towards the rear of the door.
Make sure to return the clips to the panel similar to how you did on the front door.

Next, remove the circular tab, the screw near the door handle, and the screw in the grab handle.

Make sure to unplug and remove the window control panel from the door.
Once those are removed, you can use the trim removal tool to remove the door panel.
Step 6. Install Rear

Same as the front door, unplug the stock one and undo the four bolts holding the it in the door.
Install the OEM Audio+ 6.5” Coaxial speaker in the door, plug it in, and bolt it down. Reassemble the door panel. Repeat on the other side.
Step 7. Testing
This part is pretty self-explanatory.
Reconnect your electrical system and make sure all of them are working correctly. With that, you’re all done. Enjoy your new stereo system.
Final Thoughts

I am no stranger to upgrading the speakers in my vehicles. In fact, I think this upgrade is the best bang for your buck audio upgrade. When removing the stock Tacoma speakers, it became quite evident just how low-quality and cheap they are. Seriously, they are made out of paper, have tiny magnets/drivers, and they weigh next to nothing.
On the flip side, the OEM Audio Plus ones have carbon fiber domes, neodymium magnets, and they simply feel high quality. Also, the 6.5” rear coaxial speakers each have a 1” soft dome tweeter, unlike the stock. So to reiterate, these are an obvious upgrade before you even think about put them in the truck.
After putting them in the truck and listening to a few songs, they exceeded my expectations. They are much louder, clearer, and impactful than the stock speakers. The bass in the OEM Audio Plus speakers completely changes your listening experience and allows you to actually feel the music while still being able to hear it clearly.
Overall, I would 100% recommend this upgrade as they are seriously superior to factory and will completely enhance the audio of your Toyota Tacoma.
Will these speakers be plug n play with the Tacoma JBL system ? And will they be an upgrade from the? Speakers that came with the JDL system. ?
I have placed the door panels back on and now my window makes a noise when it is fully opened right before the bottom? Any help?
Taking the door panel off shouldn’t have affected the window at all. The only thing I could think of is if the door panel isn’t installed properly at the top where the window comes out?