

Rock lights are great for all kinds of situations; anything from the trail to the parking lot. They are used to illuminate the ground below the vehicle, providing increased visibility and making it easier to navigate over rough terrain in low-light conditions. Plus, they just look cool!
I’ve reviewed a couple of Runnin4Tacos’ products in the past and they’ve always been solid. Today, I’ll be reviewing the R4T rock lights, which are no exception. No to mention – a solid price point.
Find It Online
- R4T Rock Lights (White): Check Price
- R4T Rock Lights (RBG): Check Price
Table Of Contents
Overview

Designed to be mounted on the chassis, the rock light comes with flat and curved rubber mounts, along with hardware for installation. These lights are bright and waterproof, making them ideal for use in any weather condition.
The overall build of the light feels strong with an aluminum design. They come with a 1-year warranty, so if they happen to break after the warranty expires they are fairly cheap to replace.
With a low-power draw, you can link plenty of lights together on one switch with a 5amp fuse. I already have one in each wheel well. Now, I’ll be adding eight around the truck with two lights around each wheel.
Note: You may need a bigger fuse than 5 amps if you use more than eight lights on one switch.
Installation

The R4T rock lights use 20 gauge wire, I’ll be using 18 gauge wire. This will ensure that every light receives the necessary power without issue.
Additionally, most switch panels come with built-in fuses and relays, making the wiring process much easier. All we really need to focus on is the splicing of the wires to each light throughout the truck and where to connect each section.
If you don’t have a switch panel system, you will need to wire in a relay, fuse, and control switch. You have the option of using generic pre-made rock light harnesses found on Amazon. However, if you plan on running multiple accessory lights and you’re not exactly a wiring expert, I highly recommend that you invest in a switch panel. It will help you keep the wiring organized and ensure that your accessories are installed safely.
Tools & Materials
- 50ft 18 Gauge Electrical Wire 2 Conductor
- Wire Stripper/Cutter/Crimper
- Zip Tie Mounts
- Electrical Tape
- 22-18 Gauge Waterproof Wire Connectors (Ex: Bullet Connectors)
- 2 Pin Connector
Optional Tools & Materials
- x8 2-pin Waterproof Connectors
- x8 Rago Fab Rock Light Mount Brackets
- Solder and Soldering Iron
- Auxbeam Switch Panel
Step 1. Placement

Before drilling and permanently installing the rock lights, find a good place for each light so you can begin to mock up the wire harness. Make sure the lights don’t interfere with any moving parts or are not mounted on surfaces that generate extreme heat.

I’m using Rago Fab brackets to position the lights along the truck’s frame and sliders near the front and back of each wheel. While these mounts can be pricey, you can make your own using metal L brackets from any hardware store and drilling a few holes.
I decided to just buy the pre-made brackets because the cost savings weren’t worth the time and effort. You can also mount the lights directly to a surface by drilling holes.
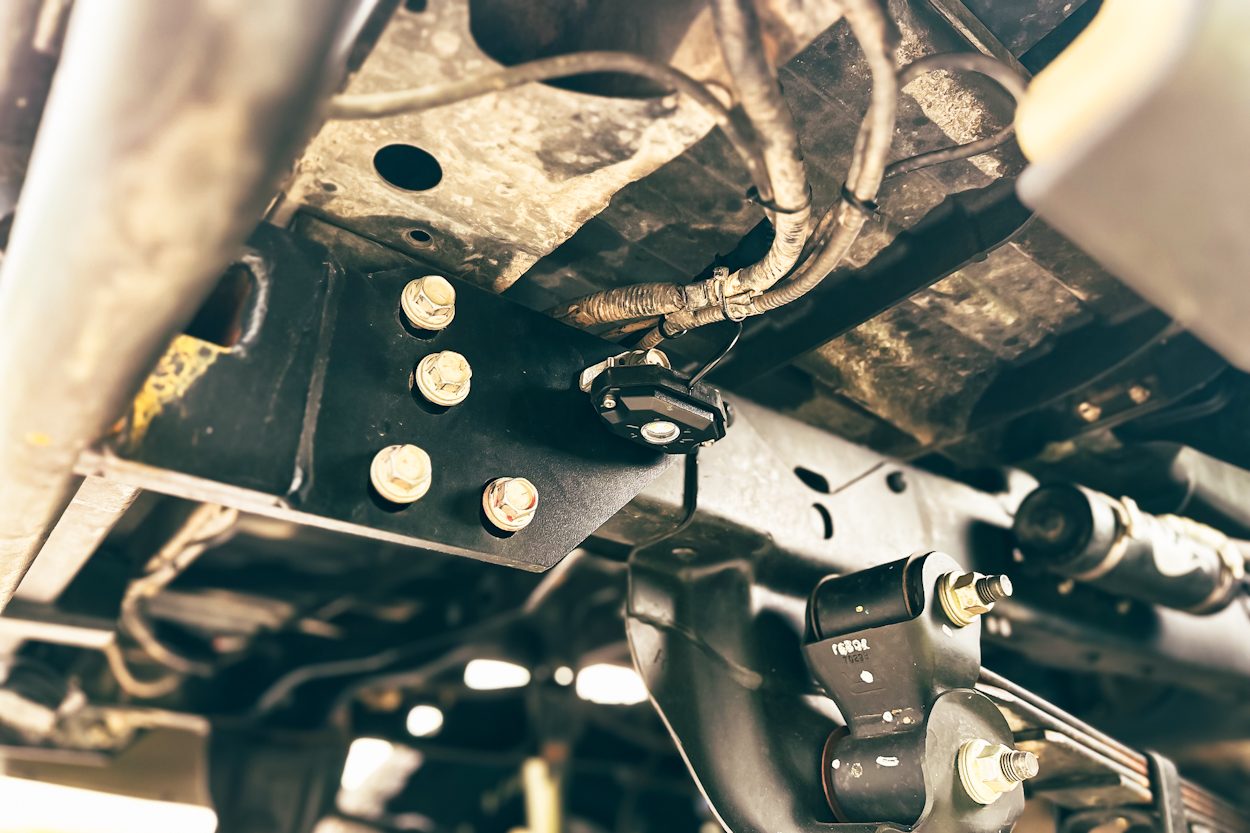
For example, the lights mounted by the rear bumper needed their mount bracket holes bored out just a tiny bit in order to fit the rear bumper bolts, more on this later.
Step 2. Prep Wire Harness

Note: I chose 18 gauge wire that was already insulated with positive and negative wiring inside. This makes the wire management a lot easier but requires an extra step by removing the insulation before splicing.
After identifying the ideal location for each, the next step is to determine the amount of wire needed for installation. To do this, it’s important to measure the distance between each light and the switch. This will be the most time-consuming part of the process.
The wire harness will consist of three main areas:
- The left and right sides of the truck are where the lights will be daisy-chained together
- A connecting wire across the engine bay just below the wiper cowl
Then, a smaller fourth connection will go to the control box from the connecting wire. All four lines will be spliced and soldered together and slightly resemble the shape of an uppercase letter “H.”
On your truck, mark the light placements and measure the distance between each light starting from the farthest rear light on the passenger side. Work your way forward up to the front of the truck until you have all measurements. I used the spool of wire as my measuring tape and ran it along the frame close to where it would be installed. I also marked and labeled each spot on the wire with tape when splitting off to each light.
The rock lights have about a foot of wire before the connector, so the wire harness does not need to come all the way up to each light. This gives a little wiggle room for adjusting the light position too.
Once both sides are measured, marked, and pre-cut, mock up the wire placement in the engine bay to determine the amount of wire needed to connect both sides. Finally, determine the distance to the control box. This should leave enough wire to make connections for each light and accommodate for any small mistakes when cutting and splicing.
Step 3. Male Connector

I used 2-pin waterproof automotive connectors to be able to easily replace a light or adjust the wire harness during other maintenance in the future.

The next thing to keep in mind is the orientation of the wires going into the connector. The connectors only attach one way, so it is important to keep the black and red wire connections consistent. You don’t want to cross wires and cause a short.

Attach a 2-pin wire connector to each rock light, ensuring that either male or female connectors are used consistently for all the lights so that any light can be connected to any part of the harness. I used male connectors.
Crimp the tubular pins to each wire and insert them through the rubber holes and into the connector. Ensure the pins are pushed all the way in and snap into the connector, then insert the plastic lock. Repeat this for all eight lights.
Step 4. Wire Harness Female Connector

Start with the two long lines that will daisy chain the lights. Then, add a female connector to either end of each line. The female connectors are very similar to the male counterparts for assembly with a couple of slight variations.

Crimp the needle-shaped pins to each wire and insert them into the connector. Make sure the wires correspond to the wires in the male connectors. Ensure the pins are pushed all the way in and snap into the connector.

Then, insert the plastic lock with tweezers.
Cut four sections of 4-6” inch wire for the lights and attach female connectors. They will be spliced into the daisy chain in the next step.
Step 5. Wire Harness Assembly

The three marked areas on each daisy chain line will be spliced with two lights and a section for the connecting wire. The wire will be cut open, spliced, soldered, wrapped individually in electric tape, and then wrapped together.
To begin, take an X-acto knife or sharp blade and carefully cut into the insulation of the wire, revealing the two red and black wires. Leave a margin of space on either end and cut both wires open to reveal the copper.

Next, strip the ends of the wires for the daisy chain lights. Then, wrap the copper around the exposed wires and solder them together.

With the wires soldered together, wrap the red and black wires individually with electric tape.

Then, wrap both of them together with electrical tape.

After every connector is attached, test the wire harness and each of the lights for power.
Step 6. Mount Lights & Install Harness

Use the provided flat rubber spacers between the light and mounting bracket. Then, route the wire through the side exit of each spacer and mount them to the brackets. Mount each light bracket on the predetermined mounting areas.

For the Rago brackets mounted on the rear bumper frame bolts, bore out the main hole in the bracket with a 5/8th drill bit to fit the larger bolts.

The lights mounted in front of the wheels at the front of the truck were a bit of a hack job. I was thinking about drilling and tapping holes in the frame below the external reservoirs but I wasn’t sure if that was the best place for the lights and I didn’t want to put more holes in the frame.

I ended up using some random nuts and bolts I found in the garage and mounted the lights in a less permanent area in a pre-made hole on the core support below the headlights. This is just a temporary spot until I eventually get a front bumper.
Drop the wire harness down along the frame from the engine bay and connect all eight lights. Then, crawl under the truck with zip ties and work the wire harness along the frame following the existing factory wire harness, connecting lights as you go. Coil any excess wire and secure it with zip ties.
Connect the leads on the fourth wire to the switch control box to complete the installation and test your lights again.
Final Thoughts

The installation was relatively easy once the wire harnesses were made. A little time-consuming, but nothing too hard, especially if you have a switch system. Not having to wire in a fuse, switch, or relay, cut a lot of work out and simplified the harness assembly.
The lights look very similar to the generic rock lights you find on Amazon but with an R4T logo. At the least, you’ll get MUCH better support and support a US company.

There’s only one color option (white), although I wasn’t interested in having a rainbow of colors lit under my truck anyway. The white balance is perfect at around 4000-5000K. The lights are bright and allow me to easily see critical components on the truck and the terrain around my wheels in the dark.
Previously, I had a set of Bajas that I paid $300 for and were only half as bright. These lights are much more affordable and are backed by a brand specifically for Toyota rigs. Overall, I’m very happy with the way these look on the truck and while they’re not necessary at all, they add some style points!

You always crush the installs! Nice work.
That is a very nice job. I’m big on a clean wiring job and placement on what is being installed .