
One of the easiest, and most popular modifications to start with on the 3rd Gen Tacoma, is upgrading the front grille. The TRD Pro model Tacomas come with a retro-style Toyota logo and a much more aggressive design.
Some mods can cost an arm and a leg, and this is definitely not one of them. OEM Trd Pro grilles cost around $400. That is a lot of money to shell out for some plastic. The replica grilles, which get the job done just as well, can be found for under $150.
Not only can you give your truck the TRD Pro look, but with the Raptor light kit, you can add a set of sleek LED marker lights. We be covered the installation process here.
This article will serve as a detailed guide to swapping in your TRD Pro Grille, or really any for that matter. The general process will be the same.
When I first got my Tacoma, I did find one thing confusing. When I saw that everyone was running a Pro grille, I thought you had to purchase the entire grille. This is not the case. The Pro grille is an insert that is a direct swap for the OEM version. Just wanted to clear that up.
Certain 2018+ models have Toyota Safety Sense. This system has a sensor in the front. If you have the sensor, you’ll have to purchase a new garnish. This will help to relocate your TSS sensor.
Find It Online
- 3rd Gen
- (2016-2023) Pro Grille: Check Price
- 3rd Gen Raptor Lights: Check Price
- 2nd Gen
- (2012-2015) Pro Grille: Check Price
- (2005-2011) Pro Grille: Check Price
Getting Started

To begin, you’ll have to make sure you have the proper tools.
Tools Needed
- Phillip’s Head Screwdriver
- 10 mm Socket/Wrench
- Cutting Pliers (for TSS sensor install)
Let’s get started!
Installation
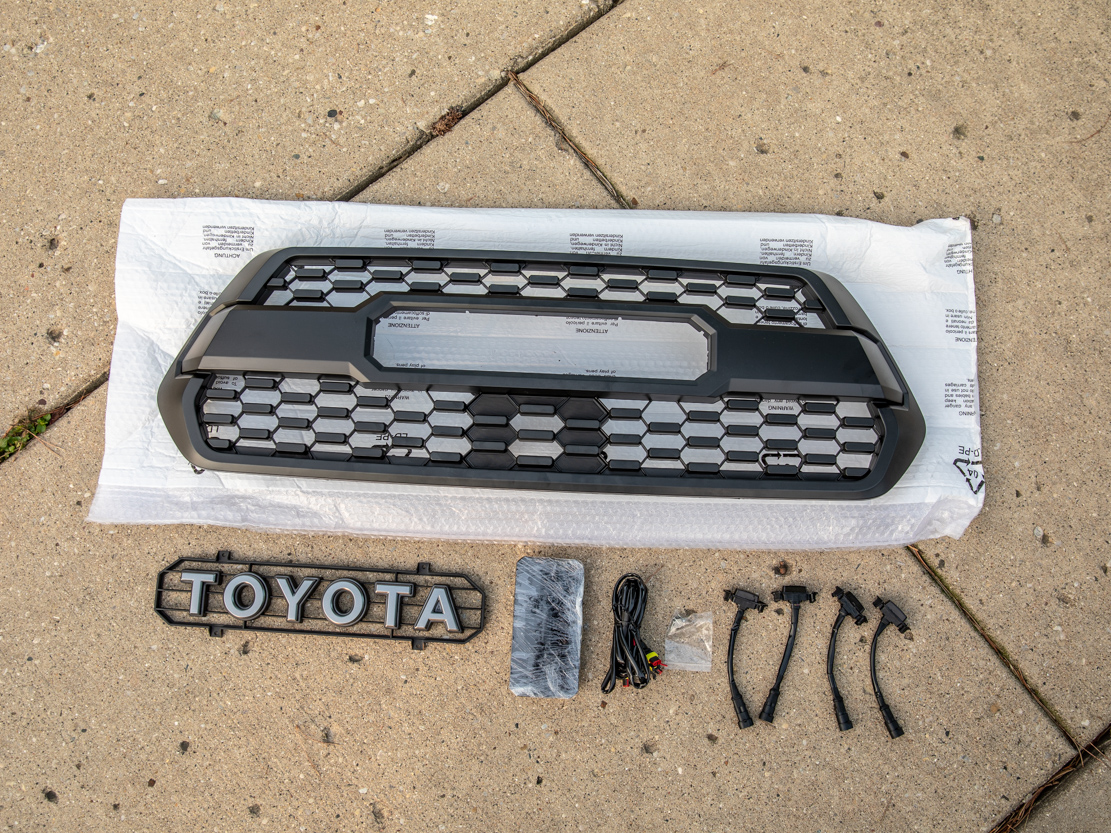
As far as installs go, the it is relatively easy, even for a beginner. It only requires basic tools.
When I say basic, I mean it. You can get away with doing the entire install with one Phillips head and one flathead screwdriver. Certain newer models may require a 10mm socket and rachet, but again, that’s all you’ll need.
This particular install was done on a 2020 Tacoma Off-Road with Toyota Safety Sense (TSS), but the process is essentially the same for all other trims, minus relocating the OEM TSS sensor. This portion is mainly for 2018+ Tacomas.
Above, you can see the kit along with the Raptor lights.
Contents
- TRD Pro Grille
- Gray Toyota Letter Plate (w/ screws)
- OEM Style TSS Sensor Garnish (w/ metal retaining clips)
Step 1. Assembly

If your Toyota lettering plaque does not already come installed in the grille, you’ll have to assemble it. This part is very simple, the letter place sits within a designated slot.
4 small, silver screws hold it in the insert. You can see them at the perimeter of the letter plate. Place the letter plate in its proper orientation, and screw it down. Don’t overtighten, these screws are tapped into plastic and can easily strip the plastic threads in the insert.
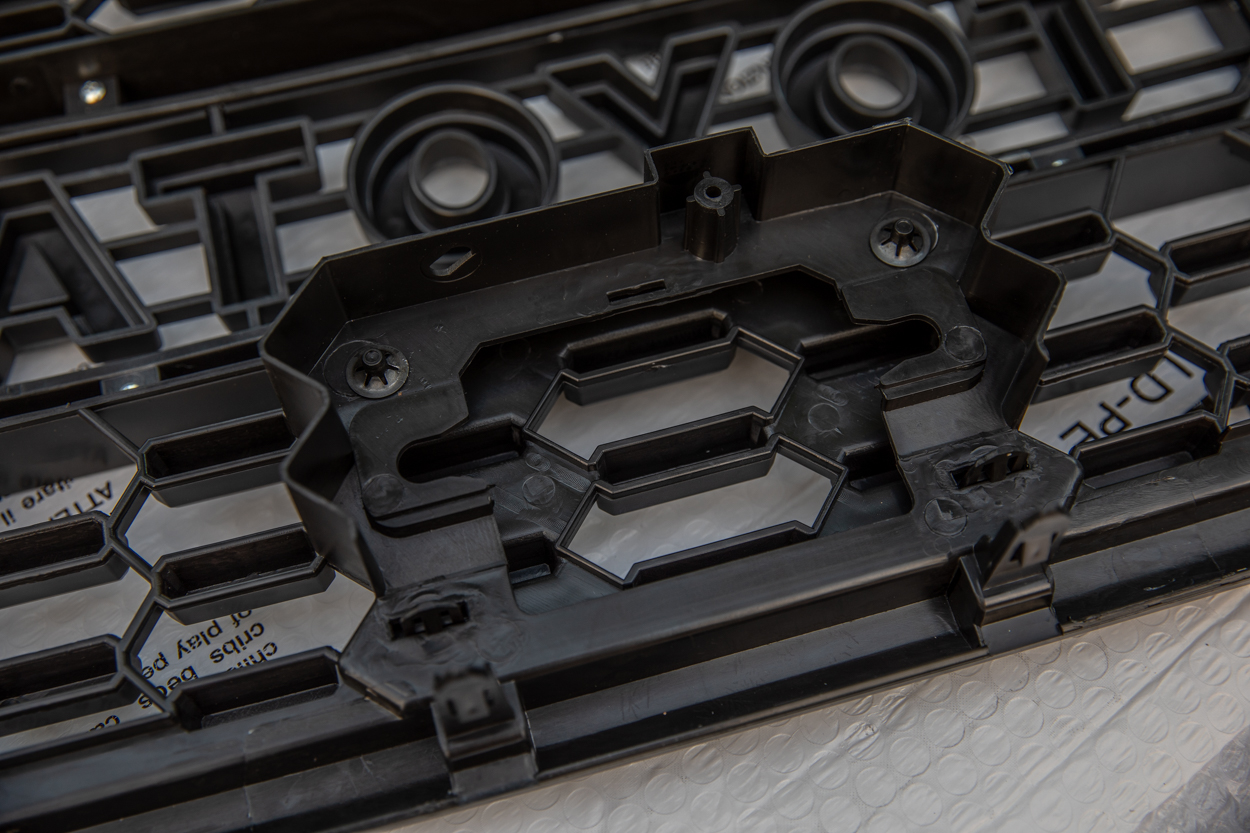
If you don’t have TSS, you don’t need to worry about this step.
If you do, you’ll need to remove the filler piece that comes with the grille. It is held in by 2 tabs and 2 metal fittings with teeth that grab onto the garnish and help to hold it in place.
These metal fitting are tough to remove, so I used a small set of cutting pliers to remove them. The garnish came right out, and I replaced it with the OEM style TSS garnish. The garnish comes with two new metal fittings to help hold in in place the same way the filler piece sat.
If you noticed, between the tabs and metal fittings, there are two U-shaped channels. These channels receive the circular nuts from your original one if you’re transplanting your TSS sensor. More on that soon.

From the front, the new installed garnish will look like it does above.
Keep the protective plastic on until the grille is completely installed, to avoid unnecessary scratches. It is now ready for install.
Step 2. Remove OEM

The grille on the 3rd Gen Tacoma is held in place with two bolts and two clips. That’s it! Well, there are some pressure fittings at the bottom, but those are easy to pry apart. More on that portion soon.
All 4 of these bolts and clips are located along the top. The two bolts connect the grille to the body cross-member and the two clips in the far corners, closer to the grille itself.

If you have a 2019+ there is a chance that the bolts might not have a Phillip’s head. When I installed this grille on my 2017, I was able to do so without a 10mm socket. In this case, on a 2020, We had to remove the bolts with a rachet and 10mm socket.
Above, you can see the holes where the bolt and clip on the right side of the grille were removed.
If you have TSS, there is a sensor. Before you continue removing everything, undo all of the plastic connectors that keep the TSS sensor harness from flying around. You can actually see two of the brown and white connectors in the image above. You’ll disconnect the actual sensor from the harness after you pop the grille off, it’s much easier that way.

Once you’ve removed the TSS connectors, you can pry out the whole grille.
As I mentioned, it is only mounted to the truck with two bolts and two clips. The rest, on the bottom, is held in with pressure fittings, which are easy to pop out with a light pull.
Grab the corner and pry it from one corner at a time. With a little bit of force, it will pop right out. Do this on both sides and the grill should be free.
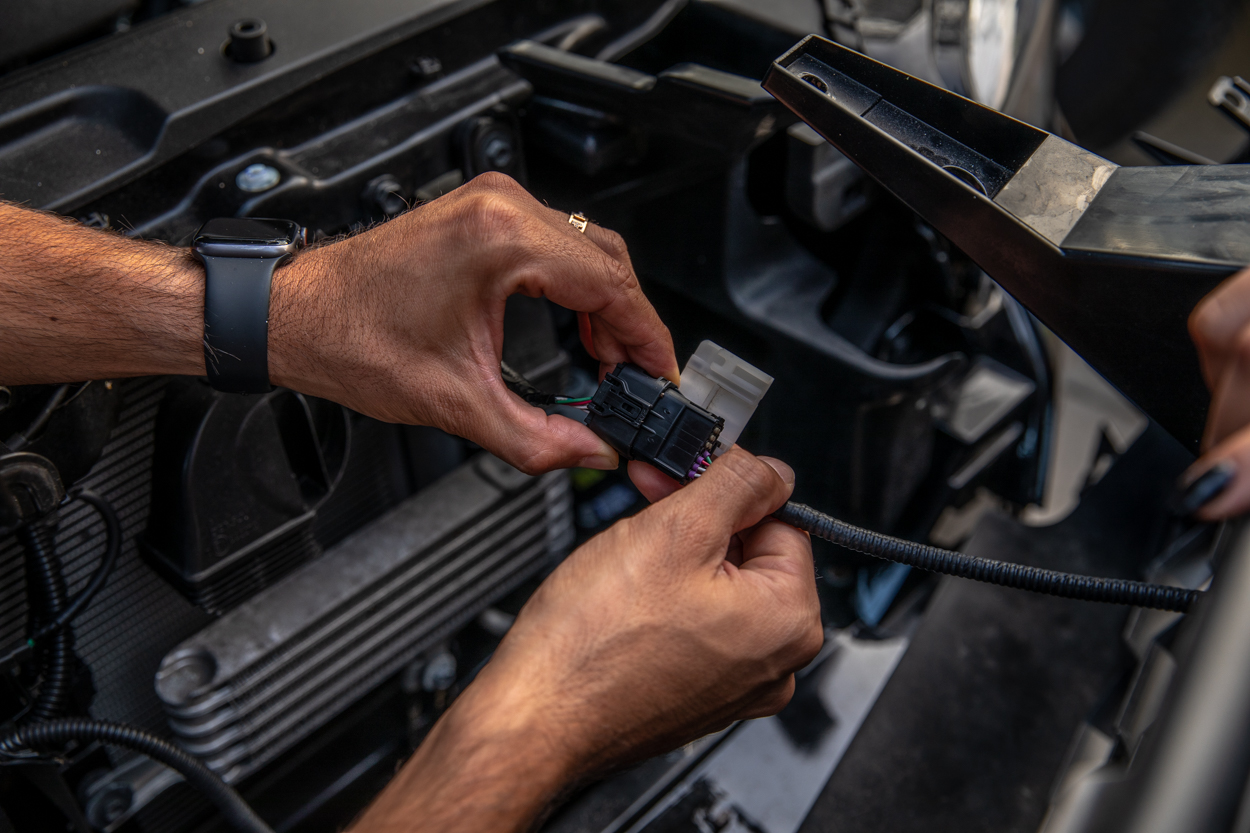
If you have TSS, be careful. You still need to unhook the sensor before you can remove it completely.
Grab the two harnesses and disconnect them. It is now ready to be removed.
Step 3. Remove TSS Sensor
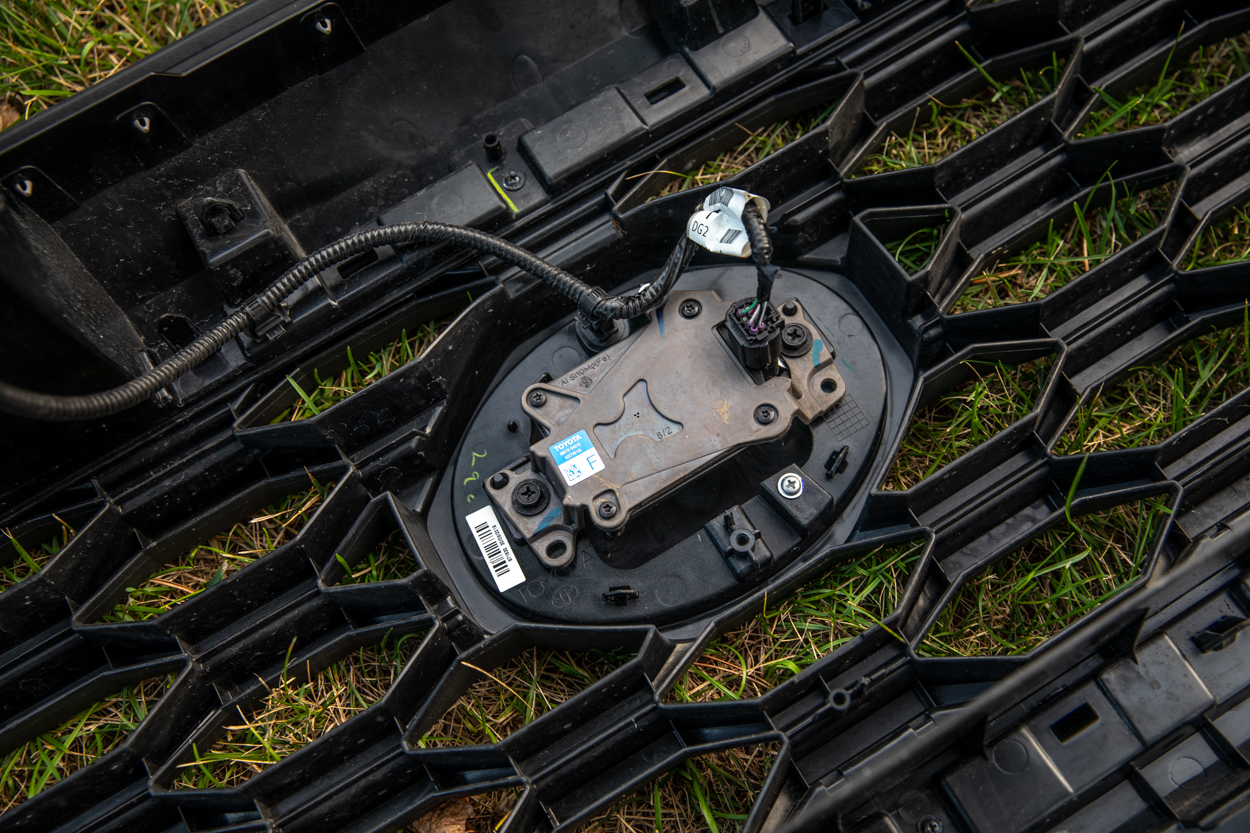
If you don’t have a TSS sensor, you can skip to Step 5.
Once you have the grille out of the truck, it’s best to lay it on a soft surface like a blanket, so you don’t damage it. I placed this one on the grass.
You can see how the TSS sensor sits inside. This may slightly vary between various models, some are mounted behind the Toyota logo, some below. But they all mount in the same manner.
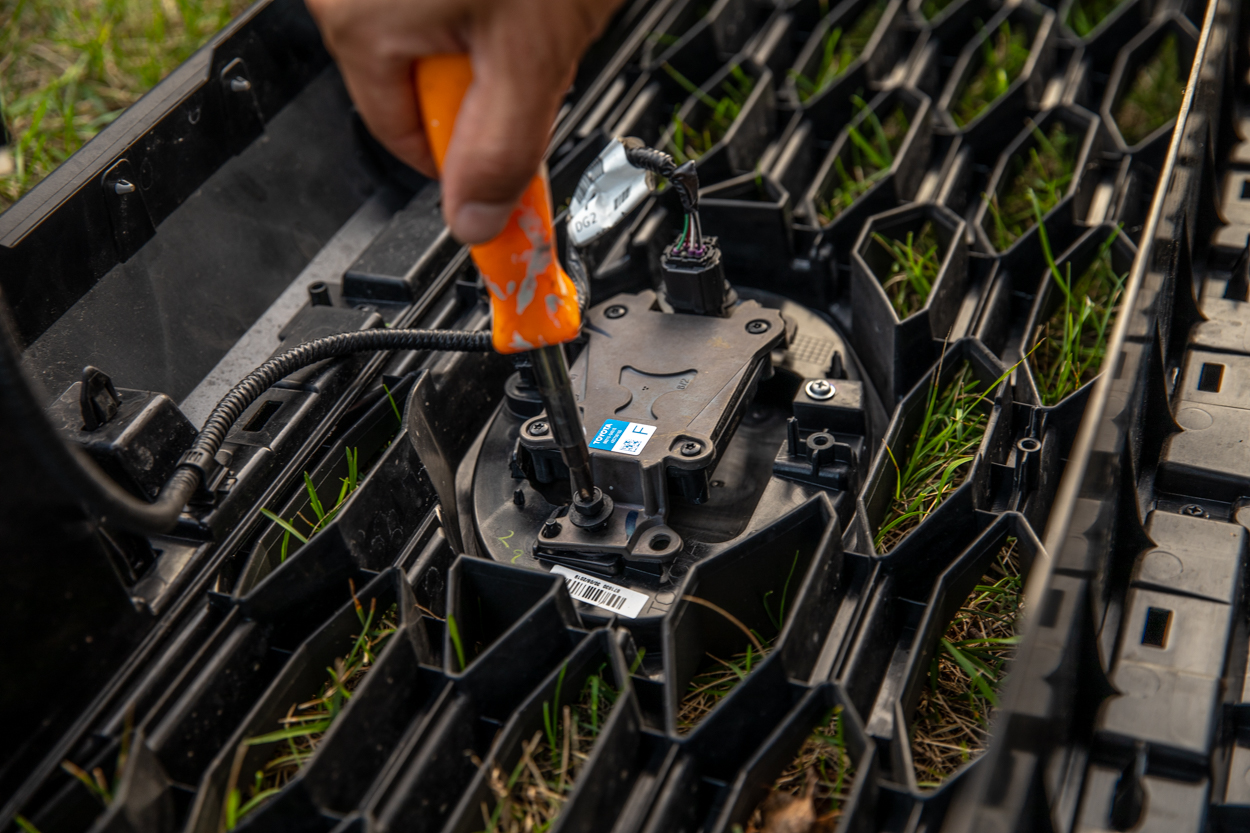
Grab your Phillips screwdriver and unscrew the two outermost screws.
The sensor can be removed once that is done. If you haven’t finished removing the wiring harness from the remainder of the grille, do so now. You can see one of these connectors directly off of the sensor wiring in the image above.

Here, you can see the removed sensor. The bolts that were unscrewed with the screwdriver sit in a circular nut you see above. These nuts, along with the screws, need to be reused in your new grille.
Above, you can see one of those nuts removed, and the other one still in the sensor housing.
Step 4. Transplant Sensor

Install the circular nuts you removed in the last step. There is an identical channel in the garnish you prepped earlier.
Place the TSS in the orientation seen above, and tighten down the 2 bolts that attach it.
Step 5. Remove Insert
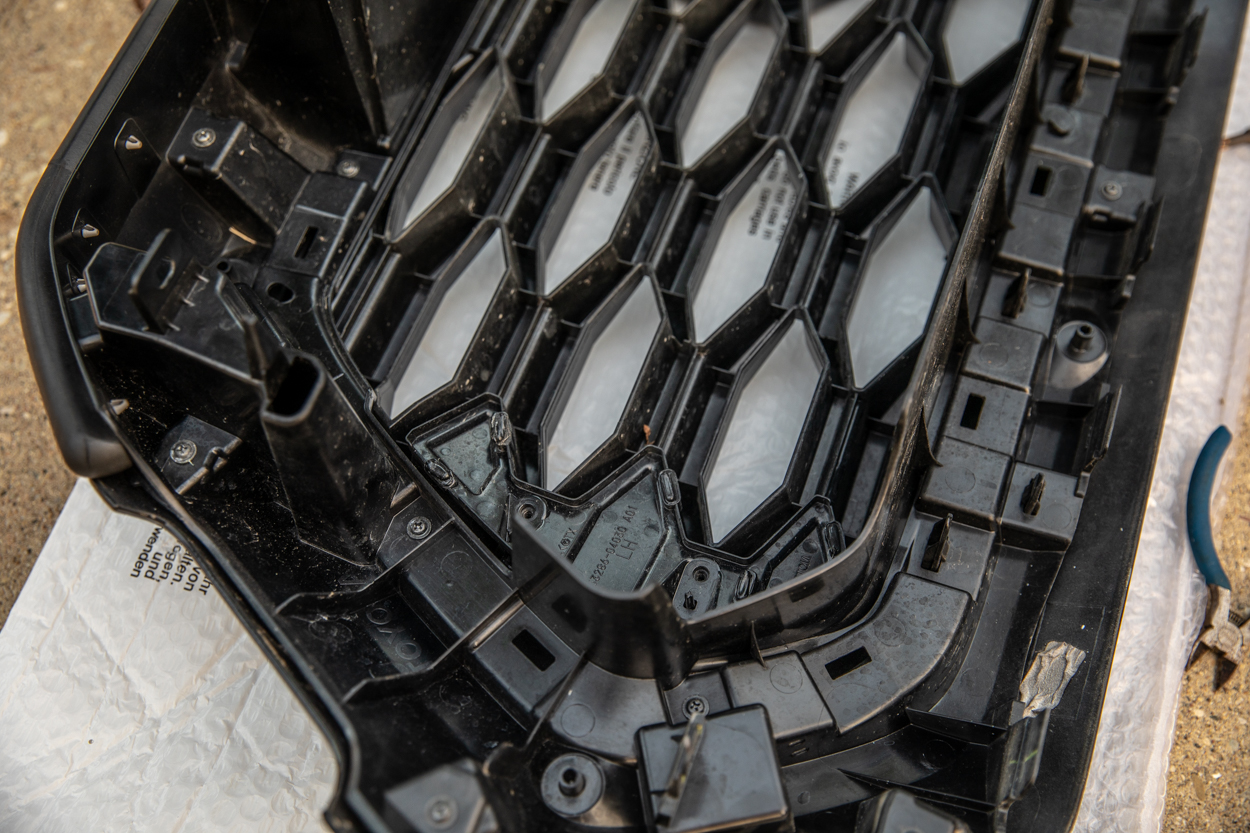
The stock grille insert is held in with a bunch of screws and tabs. Originally, I didn’t see the screws and tried to remove the insert without unscrewing the small black screws. I couldn’t figure out why the insert wouldn’t separate until I noticed this.
Above, you can see some of the black screws that help hold the grille in place. You will need to unscrew and remove all of them before you attempt to remove the tabs and the entire insert itself.
I made the mistake of unscrewing all of the little black screws. If you look carefully, only the innermost screws hold the grill insert in. You won’t need to hold onto these. You won’t reuse them. The grille is only mounted with pressure tabs.

In the image above, you can see the tabs I was referencing.
You will have to pop the locking tab inward and prevent it from popping back in with light pressure.

Once you can do so with a few tabs, they will stop trying to pop back in, and eventually, you’ll get the insert out.
You’ll be left with only the grille surround, this is where you’ll clip in your new replica.
Step 6. Install New Insert
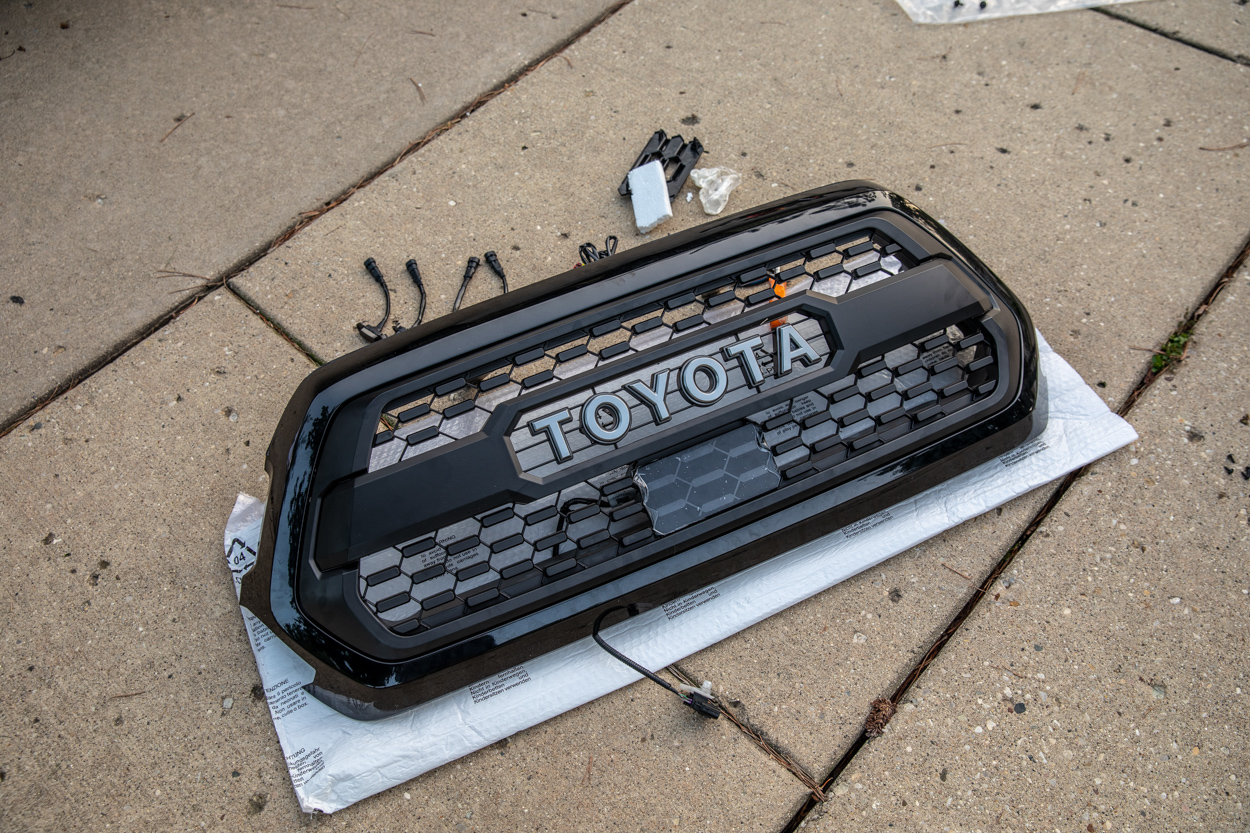
The insert is seated in much the same way the stock insert was.
Again, the only difference is, there are no screws to replace. The grille is only held in place with the tabs on the backside. This is technically a weakness in the design, but I have had zero issues, and I’ve never heard of any ever falling out. Push the it in until you hear and see all of the tabs click into place. Give it a light push from the back to see if any of these tabs are still loose.
You can see the harness on the bottom for the TSS sensor.
Step 7. Reinstall Grille
No picture is needed. Simply do the removal steps in reverse.
A little bit of pressure will help to seat the fittings on the bottom.
Final Thoughts

How easy was that? Pretty much anyone can knock this install out in their driveway with very basic tools.
The finished product really changes the front end of your Tacoma and is sure to turn heads. There is a reason that this particular modification is so popular.


Excellent overview and instructions. I’m definitely interested, but have one important question. What about installing the front grill camera incorporated in the grill from a 2020 Tacoma off-road premium edition?
Thank you in advance
Todd oliver
How would I install this with a 2022 tacoma with the front camera?
Does this replace the chrome bezel that comes on the 2018 TRD Off Road?
This replaces the entire grille assembly outside of the exterior portion, the TRD Pro grille is one piece, whereas yours is two. It’s still a direct swap. I had the same one on my white Tacoma.
Just chiming in here, I got the Toyota Pro Shop TRD Pro Grill as per above, along with the TSS Garnish as I have that plus the camera. I got the TacoVinyl camera bracket, and honestly, relocating the camera was fine and worked well. (I had to epoxy the camera bracket on as the holes didn’t line up). But I’m confirming everyone else’s accounts, my TSS sensor/adaptive cruise/collision warning doesn’t work now. I was incredibly careful and followed every instruction it just doesn’t work through the garnish (says “Clean Sensor” as the error). Super bummer and waste of money I… Read more »
Update: In the interests of full transparency I wanted to update folks on here if it’s helpful. I DID eventually get my TSS sensor working again. There are some videos out there that suggest the replica pro grills don’t aim the TSS sensor in the right direction. Through trial and error (basically adding one washer at a time) I added washers behind the top silver screw to progressively point the TSS sensor more up (I think the issue was it was pointed at the road). I tried to attach a pic. There is a 1/8″ thick rubber washer then I… Read more »
Adam, Thank you for clearing that up for everyone and explaining in great detail how to solve the TSS issues. From all of our testing, we have seen that every Tacoma is different. Some TSS systems will work perfectly fine without modification and some will need to add a washer or two behind the sensor in order for it to sit completely level with the ground. It’s a very easy and quick remedy and we hope that this doesn’t deter people away from swapping over to our Pro Grille. We stand behind every single one of our products and if… Read more »
I’d got ur pro grilled but now my sensor is all mess up my cruise control won’t work and parking sensors won’t work and Toyota won’t fixed because I’d got an after market grilled ?? Need ur help
Hey man. Did you get this resolved? The other comments in here might help.
Have you had any issues with the TSS sensor light coming on? I see some do and some don’t, seems like a washer behind the top bolt fixes that. Thoughts?
I haven’t heard of anyone having any issues. Not sure what could be causing the problem. I would ask the guys at Toyota Pro Shop.
I just installed this Tacoma TRD Pro Grill following the instructions above but when I drive I am getting the yellow TSS malfunction light on my dash.. One of the four screws which secure the lettering plate to the grille broke in half while screwing it in so now the other broken half is stuck in the hole.. Very low quality product from ToyotaProShop DO NOT buy this garbage!
Have you tried reaching out to them? They’re generally very good about warranty and customer service, they took care of me when I got a slightly blemished product – like immediately and carefully. I get it, it can be frustrating, but I would speak with them before we outright call all their products garbage.
Yes I’ve spoken with them, they won’t replace the defective unit and told me the screws are supposed to be hand tightened which is what I did.. the cheap screws separated like plastic once it was half way into the cheap plastic grille. Since the screw is so small (about 1mm) if I use a screw extractor I run the risk of cracking the screw housing and then no screw will be able to thread in so now the Toyota lettering plate sits crooked. They sent me a YouTube video on how to fix the TSS issue which I tried… Read more »
William,
I’m sorry to hear about what happened to your grille and how we weren’t willing to replace it for you. If you still want it a new one I will have it shipped out immediately at no cost. If you email sales@yotaverse.com I will get this taken care of for you and make things right.
I appreciate the honest comment on this. From other information I’m reading in this and other sites, it’s clear this grille messes with TSS, doesn’t have a plan for front camera relocation, and is not that well made.
Is there any alignment required for the TSS unit in the new grille? The unit is mounted lower in the replica grill so it seem that would have an effect on the unit alignment.
Hey Russ, not sure exactly what you’re referring to by alignment, but swapping the new grille in along with the TSS doesn’t require any special fitting outside of swapping the parts as directed. Let me know if that answers your question!
Supports?? Rav 4 2020
Peter, I know that there are other companies that do something similar to this grille option. I would just hit Google and find a trusted site.
I have a 21 Sport. Is there a mount for the front camera? Is it included or is it on your site?
As far as I know, the camera will fit on this insert. We don’t actually sell this product, it’s from ToyotaProShop. But yes, should work as is! That is what the TPS website outlines. Links towards the beginning of the article. I would consider messaging them directly with specific questions.
Had anyone done the camera swap? I’m waiting for mine to get here and haven’t found anyone who’s done the camera part.