

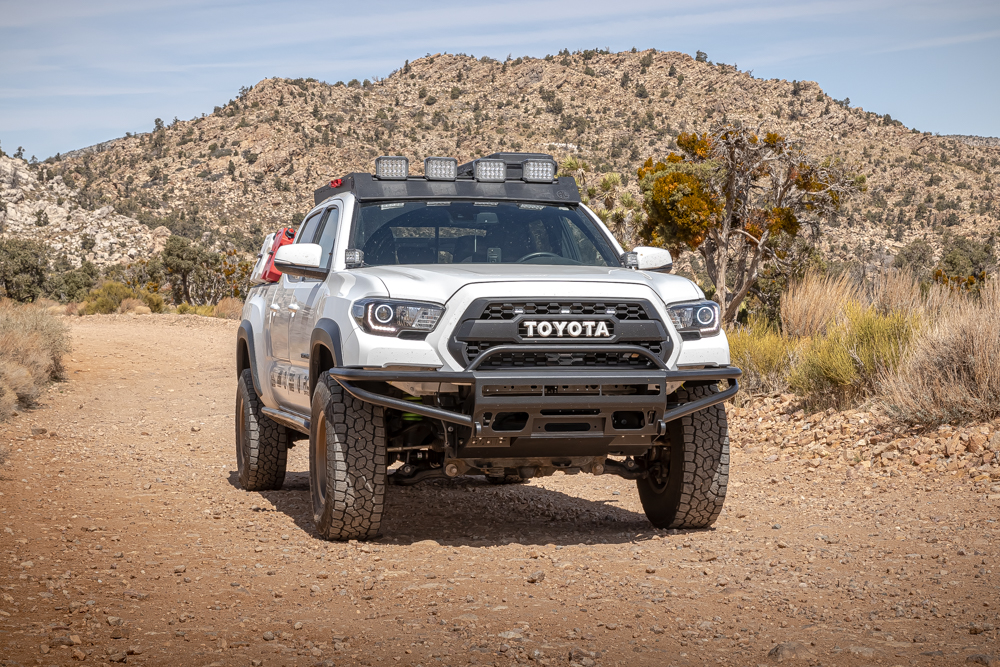
If you do any off-road driving in your Tacoma, chances are you’ve thought about replacing the factory front bumper. After all, it allows you to mount more lights, gives you the ability to use a winch, significantly increases clearance, protects your front end, and most importantly (insert sarcasm) – it dramatically improves the look of your truck.
If you’re looking to add all of this functionality without also adding a ton of weight, a hybrid-style front bumper is your best bet. These bumpers are built with a solid winch cradle, recovery points, and usually some sort of skid plate; all while saving weight with tube “wings” that extend to the sides. This tubing still provides an excellent mounting location for lights and valuable protection off-road while also saving a significant amount of weight.
Not all hybrid style bumpers are built equally though, and there are some important features to look out for. First of all, the bumper should be able to withstand the abuse, so steel plating and DOM tubing are essential. Mounting a winch upfront is a game-changer, and will allow you to self-recover or get out of sticky situations, so a solid winch cradle with plenty of access to the winch for operation and maintenance is also important.
Additionally, space for auxiliary lighting, a light bar cutout, and a durable powder coat are also things to watch out for.
Find It Online
- 2016-2023 BAMF Tacoma Hybrid Front Bumper: Check Price
Table Of Contents
Overview

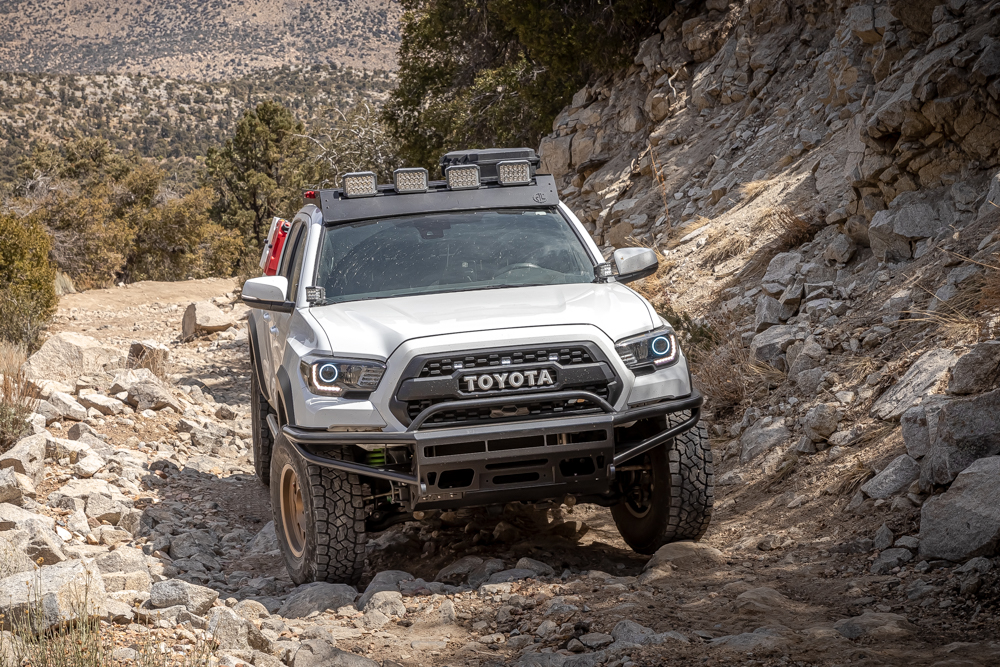
Thankfully, Bay Area Metal Fabrication (BAMF) has you covered, their bumpers come standard with all of the previously mentioned features and even a few extras. BAMF bumpers are designed and built in-house to the highest of standards and out of premium materials.
The winch cradle is made fully out of .250” HRPO steel, giving you a reliable and durable framework for the rest of the bumper. 1.75”x.120″ wall DOM tubing is used for the wings of the bumper, gusseted with 11 gauge HRPO steel for added strength. The same 11 gauge steel is used for the auxiliary light mounting brackets and wing cap areas. The two shackle mounts are 3/4” thick steel mounts completely welded to the frame of the bumper for maximum strength.

The entire bumper is expertly welded together, and the main welds are blended and palm sanded for a perfect finish.
While BAMF does not typically offer installations at their shop, Jerry and his team were able to fit me in while I was on a trip and install this bumper on my truck (thanks, Jerry!). Jerry started his fabrication shop building parts for the Toyota Tacoma, so who better to design, create, and install a bumper than him!
Features
- Option for low and high center hoops
- Optional for durable, fixable, powder coat
- Fog light cutouts
- 30″ light bar cutout
- Winch cradle
- Additional side supports
- Power steering cooler relocation brackets included
- Different removable bash plate options
- TSS compatible
Specs
- ~100-135lbs
- 3/4″ thick shackle mounts
- 1.75″ x.120 wall DOM wings
- .250″ HRPO A36 steel winch cradle
- 11 gauge wing caps
Features
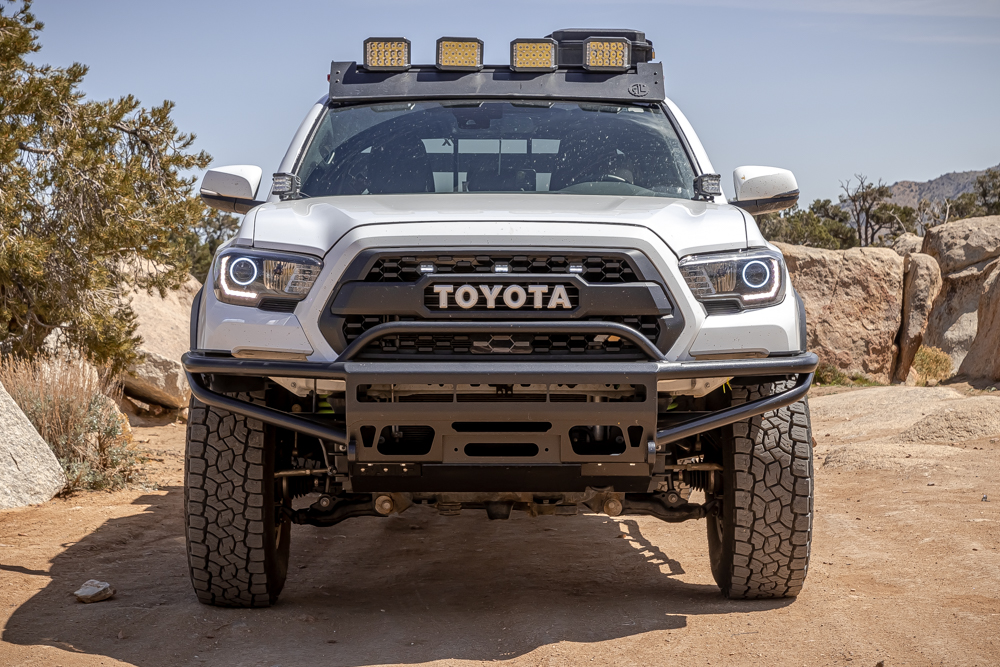
BAMF’s hybrid style front bumper is designed to truly be the end-all-be-all in hybrid front bumpers. Some bumpers on the market make you choose between running a winch or a light bar in the front or only give you space for one set of pod lights in the fog light space. That’s not the case here; this bumper can accommodate two sets of pod lights or more depending on size, a 30” light bar, and up to a 12,000 lb winch with ease.
BAMF also employs an ingenious removable skid plate solution that no other company offers. Instead of welding on a skid plate beneath the winch cradle, customers have their choice of two side plates or a full plate, made out of either aluminum or steel. Not only does this give you the option to save weight and customize your bumper, but it also means these plates are replaceable if they become too damaged. The plates are also removable for easy access to the winch cradle.
Bumper Weight
In terms of weight, this bumper manages to still be one of the lightest steel hybrid bumpers on the market.
With all brackets and hardware included, the bumper comes in at 100 lbs with no hoop, 115 lbs with the low center hoop, and 125 lbs for the tall center hoop. Adding two aluminum or steel side plates adds 3 lbs and 9 lbs respectively, and adding a full aluminum or steel plate adds 7lbs and 20lbs respectively. The bumper I received features the low center hoop and a full steel plate, weighing in at a respectable 135 lbs.
Thermoplastic Powder Coating

I have to mention the powder coating finish on this bumper—the textured appearance matches everything else I have on my truck and feels like a premium coating. I have no doubts that this coating will last as long as I own the truck, and the ability to repair it if something does go wrong is unheard of in this industry.
In-House Process
The powder coat finish on this bumper is one of the most impressive features. BAMF not only designs and constructs this bumper entirely in-house but they also prep and powder coat all of their parts themselves. None of their products are outsourced for construction, preparation, or powder coating, which is truly unique in this industry.
Premium Durability
The powder coating BAMF uses gives the bumper a premium flat black textured appearance, but isn’t grainy or rough. This powder coating is extremely tough and will hold up better than most other coatings to abuse and the elements. If you do manage to damage this coating, however, BAMF is prepared. Unlike other powder-coated products, which are effectively ruined when the bare metal starts to show and needs to be completely stripped and re-coated, BAMF’s products are all completely repairable at home!
Seamless Blending
This unique powder coat can be applied dry to any damaged or bare spot on your bumper and can be melted seamlessly into the existing powder coat with a propane torch. This feature has the potential to save you hundreds, if not thousands, of dollars in repairs, and the frustration and time that come with getting your parts re-coated. BAMF truly went above and beyond with this coating. While at the shop, Jerry was able to demonstrate this process on an area of the bumper where the coating was thin, and within 10 minutes, the coating was completely set.
Installation Overview

Many people refuse to cut their factory bumper to accommodate an aftermarket solution because they think it’s too complicated and easy to mess up. However, with the proper tools and preparation, it’s actually quite simple.
It should be noted that some companies are coming out with replacement front bumper caps that are compatible with just about every aftermarket bumper, meaning you won’t have to cut the OEM bumper and can keep it or resell it. No companies I found offered these products yet, but they’re something to watch for in the future!
The installation process can be broken up into two parts. The first step would be to remove the bottom half of the front bumper by cutting it off. The second part is the actual install process of the BAMF hybrid bumper.
Tools & Materials
- Metric Socket Set
- Flat Head Screwdriver
- Oscillating Multitool
- Sander Head
- Plunge Cut Head 4″
- Circular Blade
- Needle Nose Pliers
- Tape Measure
- Masking Tape
- Dry Erase Marker
- Zip Ties
- Heat Gun (optional)
- Edge Trim (optional)
- 1/2″ Drive Ratchet
- 5/32 Allen Key
- Dead Blow Mallet
- Small Pry Bar
- 1/2″ Impact Gun w/ Swivel Attachment (optional)
- Tall Floor Jack (optional)
Step 1. Trim Inner Fender
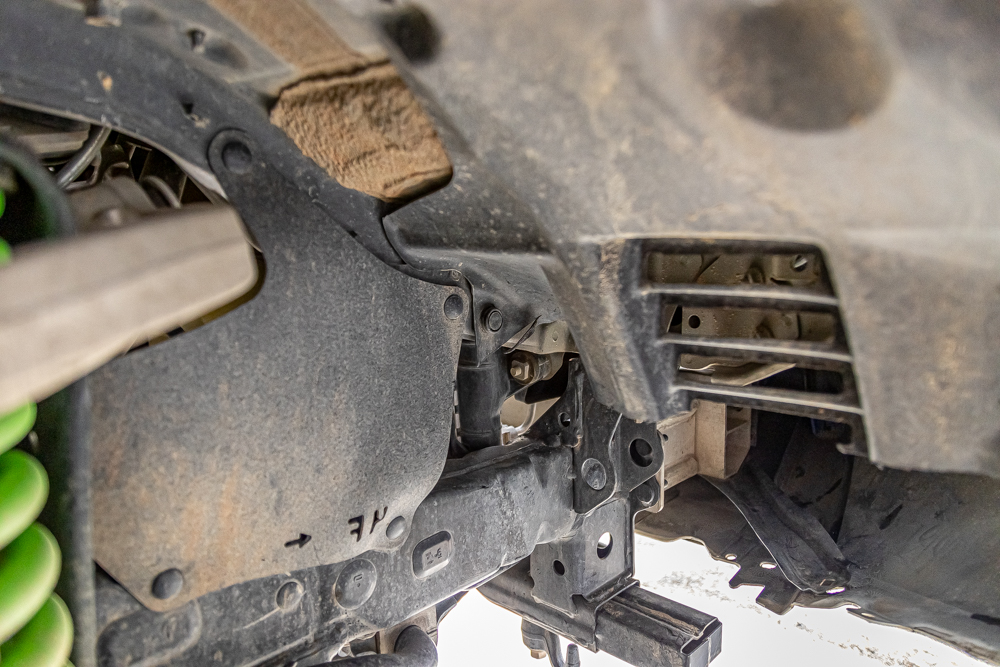
To prepare your bumper for the cut, first, you’ll need to trim your plastic wheel well guards to the correct length.
Inside the wheel well, remove all 4 of the lower 10mm bolts using a 10mm socket that secure the inner plastic liner to the front bumper. Some clips can be disconnected with a flat head screwdriver. These bolts and clips should be very easy to remove.
I would recommend preserving this clip location seen in the middle of the image, as it’s more secure than a zip tie and lines up nicely with the cut.
Once removed, this plastic fender can be cut and/or shaped with a heat gun to your liking. Many people choose to cut a minimal amount and use a heat gun or torch to shape the fender liner up towards the engine compartment to preserve some functionality. However, I found it easier to just cut away the excess and secure the fender liner in place with zip ties.
If cutting, the best tool to use by far is an oscillating multitool, such as the one linked previously. Dremels can also be used, but having used both, I’d highly recommend investing in an oscillating multitool. We will be using the same tool and 4” circular blade to cut the bumper in the future, as well as the sanding tool to clean up the cut and the plunge cut blade for cutting through the plastic clips.
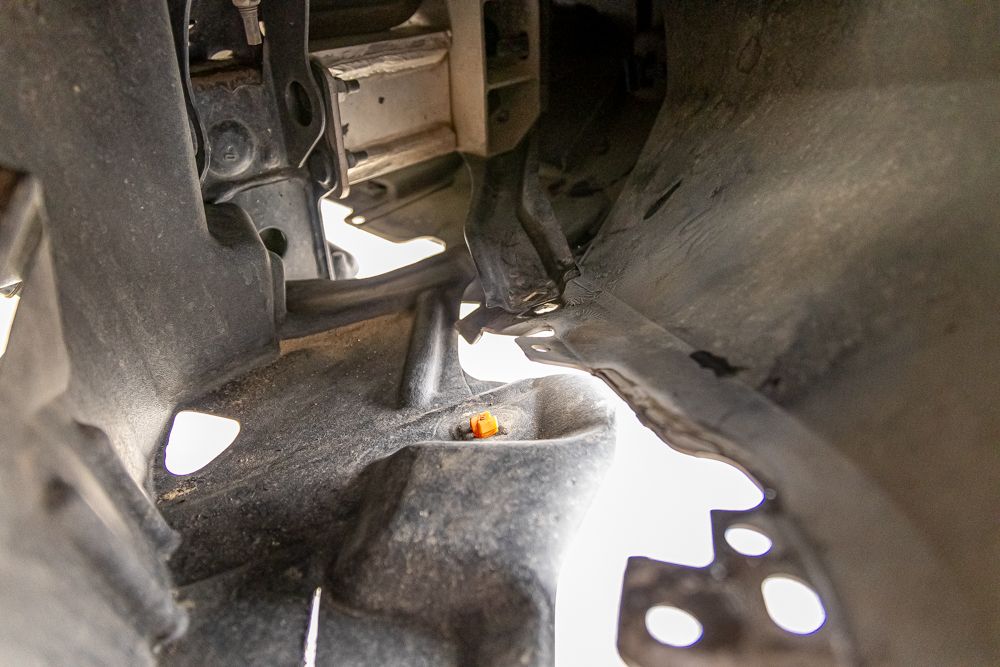
I found that cutting the fender liner just above the fourth fender liner bolt left enough excess to secure, but not enough to hang down behind the bumper. I previously cut the fender liner further down to accommodate my tires. Cut in a straight line from this bolt location to the factory clip location on the frame.
After this fender liner is cut, remove the excess and throw it away. Repeat on the other side of the vehicle. Multiple cuts can be done if needed to clean up the fender well.
Step 2. Remove Fog Lights

Now that the previous step is taken care of, we will have an easy time accessing the fog lights. Using a Phillips head screwdriver, remove the single screw on the top closest corner that holds the fog light in place. Once removed, pull the closest side towards you and slide the light out of the clip locations.
After unplugging the factory harness, this light can be completely removed. Repeat on the other side of the vehicle.
Step 3. Remove Fog Bezel

Next, we will be removing the plastic fog light bezel. This bezel is held in place by six tabs; two are located on the top corners, one is located on the outer side, two are located on the bottom corners, and one is located on the inside side of the bezel.
The inside tab will require you to pinch the plastic tab to slide it through the slot, which can be done with needle-nose pliers. The other five tabs can be removed with a flat head screwdriver from the outside, or with pliers on the inside. These plastic tabs are fairly breakable, so be careful if you plan to salvage these. Once removed, repeat on the other side of the vehicle.
Step 4. Mark Cutting Line
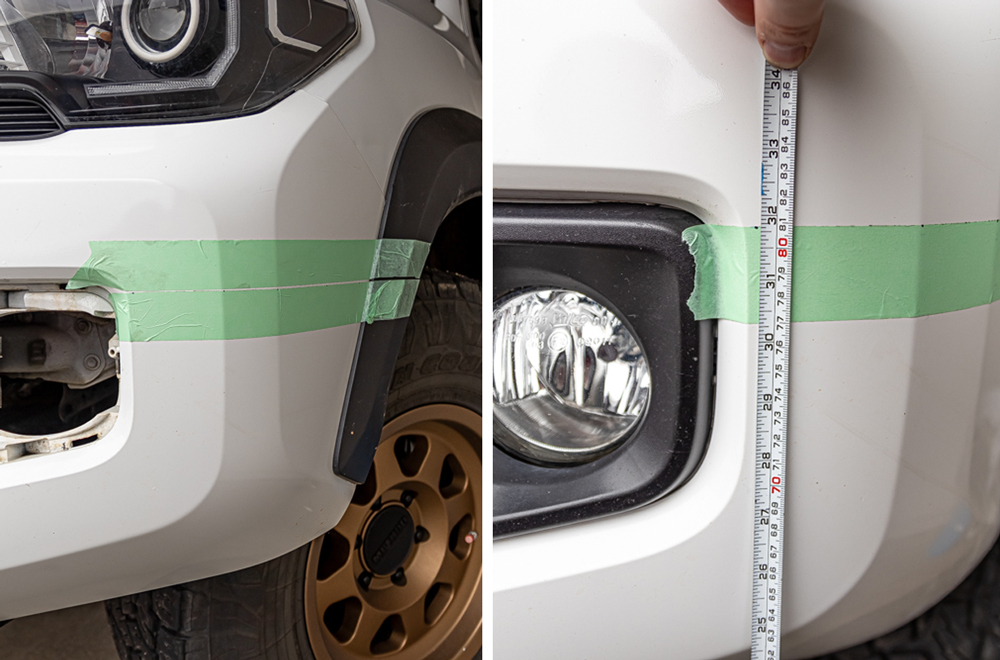
All that is left to do is to measure and tape off the cut line. Because everyone’s truck sits at a different height, there is no exact height off the ground to use. After looking at multiple other trucks with a variety of bumpers, and taking a look at the BAMF website, I chose to cut my bumper about 1/2” below the flat line of the fog light location.
This amount seemed to leave a small gap between where the bumper will sit, and looked good to my eye. Most bumpers on the market will follow this line. As you’ll see later, the BAMF bumper can be adjusted slightly higher or lower to fit whatever line you cut.

Once I determined where I wanted the line, I measured up from the ground to this location and marked it with a dry erase marker. I then made a series of marks at this height from the fog light location all the way to my wheel well. Be sure to park your truck on a level surface, like inside a garage, to keep these measurements accurate. After I had my marks in place, I used some thick masking tape above and below these marks to serve as my line. It was much easier to place a long strip of tape than to draw a straight line, and it made cutting the bumper a breeze.
I did not remove my fender flares for this cut, as the 4” blade was large enough to cut through both the fender flare and the bumper underneath. I’d recommend going this route to avoid cutting the bumper and fender flare at different heights on accident. If you’d prefer to cut both individually, the fender flare can just be pulled straight off of the bumper and snapped back into place once cut.
The lines I chose ended up going through the center of the fourth bolt location inside the wheel well. To line up with this bumper, preserving this bolt location wasn’t possible, so I was fine cutting straight through this plastic piece.
Many tutorials will advocate cutting one side of the bumper before measuring out the other side. I was not able to find a good reason for this except saving the time it takes to re-measure and re-tape off the line to match the first side if you happen to be off a bit. I chose to measure and tape off both sides to make things easier.
Step 5. Cut Bumper
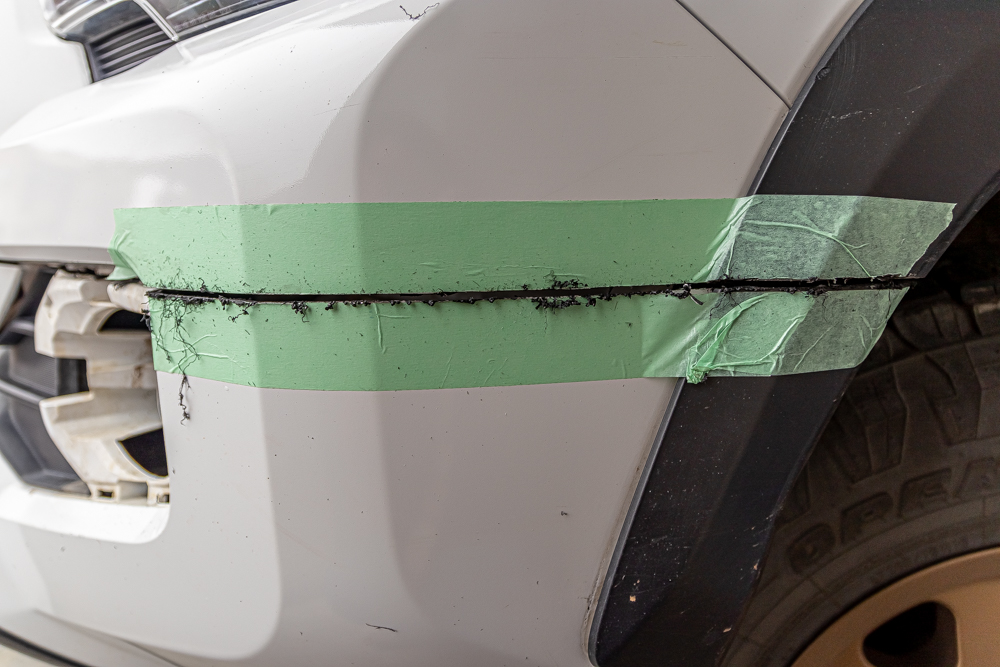
Now that the bumper is completely prepped, the cut can be performed with the bumper still on the truck. This will ensure the line is straight and is easier than cutting a bumper lying on the floor.
Safety glasses, gloves, a long-sleeve shirt, and long pants are recommended for this cutting process to protect yourself from flying hot plastic debris. Since this is not a rotating blade, you’ll experience minimal shrapnel – another huge advantage of using a multi-tool.
Holding the blade level, turn the tool on to a medium to high speed. Slowly make a plunge cut into the front of the bumper, and carefully make your way around the bumper towards the wheel well. Since this is such a large blade, I found it incredibly easy to keep between my two tape lines. I occasionally pulled the blade out and re-plunged the cut to ensure the blade was level. I also found it beneficial to keep my eyes level with the cut – at a safe distance of course!
Once I got to the fender flare, I was able to continue the cut straight into the flare and out the back. I kept consistent pressure when cutting through the flare to make sure I cut the bumper underneath the flare in a straight line as well.
Once the main portion of the bumper was cut off, I went back to the fog light location and cleaned up this area with the same blade. I cut straight into the plastic to remove the tabs and cut as much excess off in the rounded corner as possible without cutting into the front of the bumper.
After this section is cut to your liking, you can use a plunge cut blade to cut directly through the clip in the wheel well. The 4” round blade was not large enough to make it all the way through.
Repeat these steps on the other side of the bumper!
Step 6. Remove Bumper

After both sides of the bumper are cut, it is almost ready to be removed. First, the hanging bumper can be detached from the top by pressing inwards on the black plastic air inlet. The clips should give way relatively easily.
After this top piece is free, detach the fog light wiring harness clips on the inside of the bumper using a pair of pliers. Now, just two 10mm bolts located on the bottom of the bumper are left holding it in place. Remove these two bolts, and the cut bumper and leftover hardware can be discarded.
I then used zip ties to secure the factory fog light wiring harnesses up into the engine bay. This will prevent them from getting dirty or damaged.
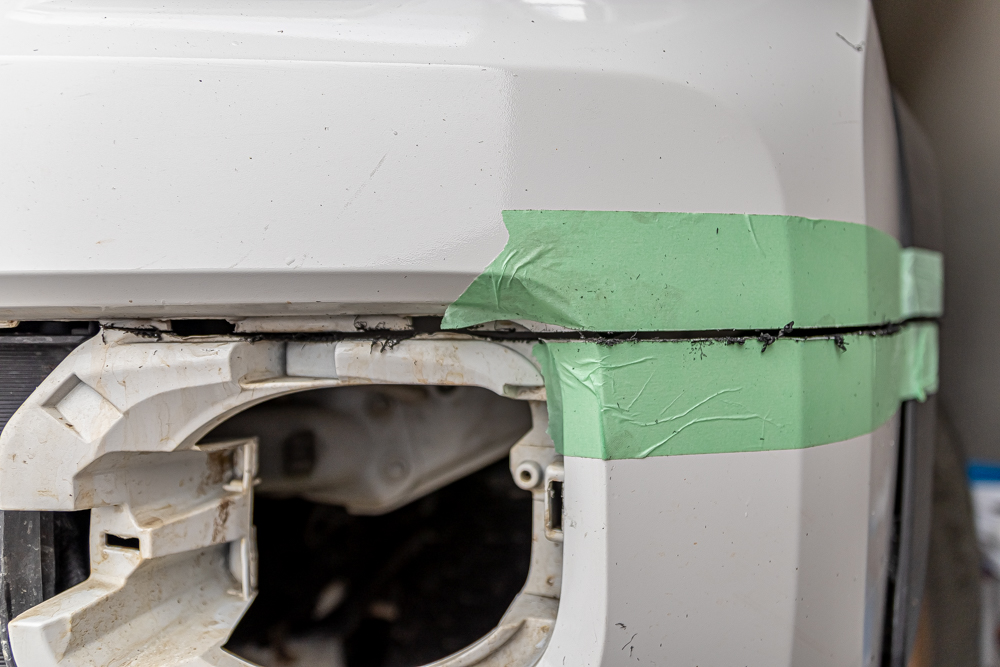
Step 7. Clean Up Cut

With the bumper removed, the cut can be inspected and cleaned up. These oscillating multitools have a variety of attachments, which is also another huge benefit of using this tool. A large sanding pad can be used to straighten up the bumper cut and remove any remaining plastic. I also used this sanding pad to clean up the clip excess in the front fog light location. If you have any excess too large to sand off, go back and cut it with the 4” blade.
Once this cut has been cleaned up to your standards, you can leave it be, or you can install some black edge trim to the cut to clean it up even more. This self-adhering trim was fairly easy to install – just push it firmly onto the portions of the cut you’d like to cover. I chose to use this for the entire cut and onto the fender flares. I made some small relief cuts in the edge trim to make it easier to mount on the bumper and to make the transition between the bumper and the fender flare. However, I found it hard to work with and may end up removing it in the future. A heat gun can be used to melt the adhesive if you need to make any adjustments.
Step 8. Remove Crash Bar
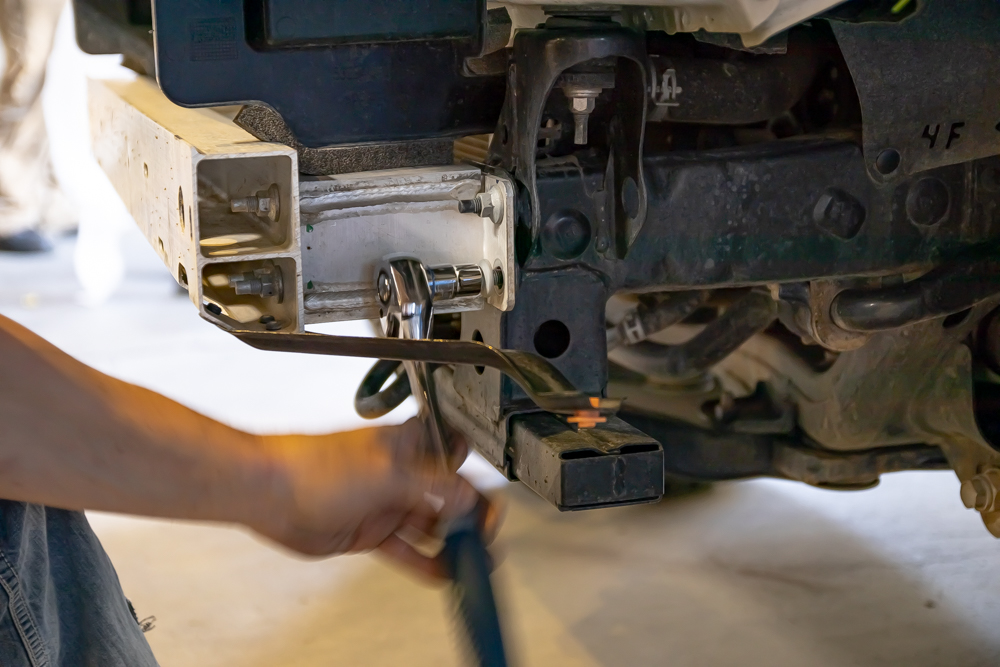
Before the bumper can be installed, there are a few more things to take care of. First, the black plastic piece can be removed from the front crash bar by simply pulling it off at the tab locations. Once removed, the crash bar can also be removed.
It’s secured to the frame with six 14mm nuts, which are somewhat difficult to remove. Using a 1/2″ ratchet, remove these 6 nuts. A dead blow hammer and a pry bar can be used to break this bar free to remove the crash bar.
Step 9. Modify Skid Plate

Next, you need to make some room for the bumper to fit snugly against the front of the frame. If you’re running the OEM skid plates on a TRD Off-road, this skid plate will need to be cut or bent where it sticks past the frame. Modifying the skid plate will not affect the usability or integrity of the skid plate, so it will still be completely usable offroad.
If you do not have a skid plate or are running the TRD Pro OEM skid plate, no modifications will be needed! This should also be the case for most aftermarket skid plates, but I can not guarantee every aftermarket skid will fit without modification.
At the time of installation, I did not have a skid plate installed, and had also removed the front skid plate brackets to prepare for a new full set of steel skid plates in the future.
Step 10. Tow Hook & End Caps

Next, you will also need to remove the OEM tow hook on the passenger side of the truck, and both frame end caps.
Each end cap is attached by one 17mm bolt, and the tow hook is attached with two 17mm bolts. The driver’s side tow point will not need to be removed to fit this bumper.
Step 11. Remove Frame Caps

Using a flat head screwdriver or thin pry bar, remove the plastic covers on the frame. There is one round plastic piece on the outside, and a rectangular piece on the inside. The inside piece can simply be pushed out from the outside with a screwdriver or pry bar.
Step 12. Relocate Power Steering Cooler

Next, the front power steering cooler lines must be relocated to accommodate the bumper. BAMF makes three relocation brackets for these lines, making this relocation step a breeze. We will remove the bolts securing these lines to the frame in all three locations before reinstalling anything to avoid bending or damaging the lines.
On the truck’s passenger side, behind the fabric mudguard, remove the 12mm bolt holding the power steering lines to the frame.

After this, at the passenger side front of the truck, remove the 12mm bolt securing the two halves of the bracket around the two power steering lines.

Then, remove the 12mm bolt securing this bracket to the frame. This OEM bracket will be reused and installed in reverse orientation, so do not discard it.

At the driver’s side front of the truck, remove the 12mm bolt securing the bottom line to the frame, as well as the 12mm bolt that runs through the line to the bracket.
After all three locations are no longer attached, we will reuse the passenger’s side front bracket.

Swap the two halves of the bracket around so that it is reversed, and attach these two halves with the 12mm factory bolt.

Once attached, gently push the lines towards the truck. You’ll then install the longer BAMF bracket with the threaded bolt facing upwards into the factory 12mm bolt location, reusing the factory 12mm bolt. The OEM bracket will now be secured to this threaded bolt with the provided 12mm nut from BAMF.

You can then install the smaller BAMF bracket with the threaded bolt facing upwards into the factory bracket location behind the fabric mudguard, reusing the factory 12mm bolt.
The OEM bracket can then be installed to the threaded bolt on the BAMF bracket with the provided 12mm nut.

Lastly, install the bent BAMF bracket into the frame in the driver’s side front factory mounting location with the factory 12mm bolt. You can then secure the line to the BAMF bracket with the factory 12mm bolt that runs through the line.
You’ll need to use a 12mm open wrench in this location because of clearance issues.
Step 13. Install Bumper

This hybrid bumper will first be test-fitted by placing it on the three crash bar bolts on each side. Carefully lift the bumper, preferably with a second person, onto the studs in this location.
Once on, install the three 17mm bolts on each side to prevent the bumper from falling off these bolts, but leave them loose enough to allow for some adjustment.
Step 14. Adjust Bumper Height

Once secure, you can lift the front of the bumper into place, using a spacer to ensure the bumper lines up with the bumper cut and sits level.
If you’re on your own, a tall jack may be cautiously used to perfectly line up the bumper.
Step 15. Install Support Brackets
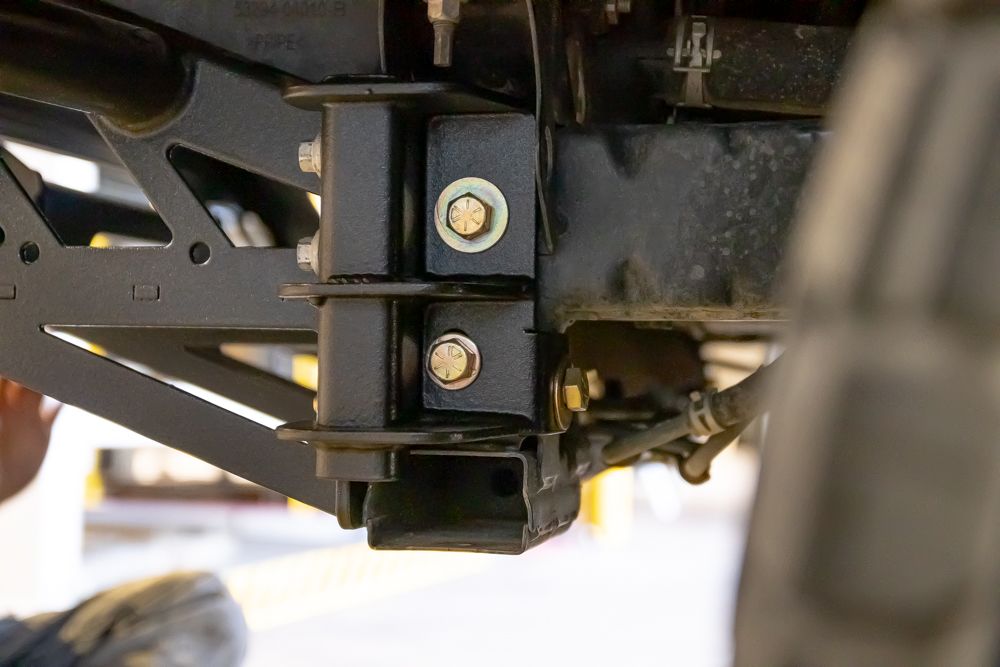
With the bumper sitting level, tighten the inside 17mm nut on the inside of the truck to secure the bumper in place. With the bumper still supported, we can now remove the two outside 17mm nuts on both frame plates and install the BAMF support brackets to each side of the bumper over the two 17mm bolt locations.
These brackets serve two purposes; they will synch the bumper as tightly as possible to the frame of the vehicle to prevent any horizontal movement during winching, and they will provide even more support for the weight of the bumper to prevent any sagging or drooping.
With these brackets in place, first, tighten the two 17mm nuts onto the front face of the brackets to keep them in place. Next, install the two 4” long 1/2″ Grade 8 bolts into the side of the bracket. The top bolt will use a large washer, and the bottom bolt will use a smaller washer. Tighten the 1/2” nuts onto the bolts securely. Lastly, install the 5” grade 8 bolts and large washer into the back of the bracket, and tighten the 1/2″ nut onto the bolt.
Step 16. Install Bash Plate
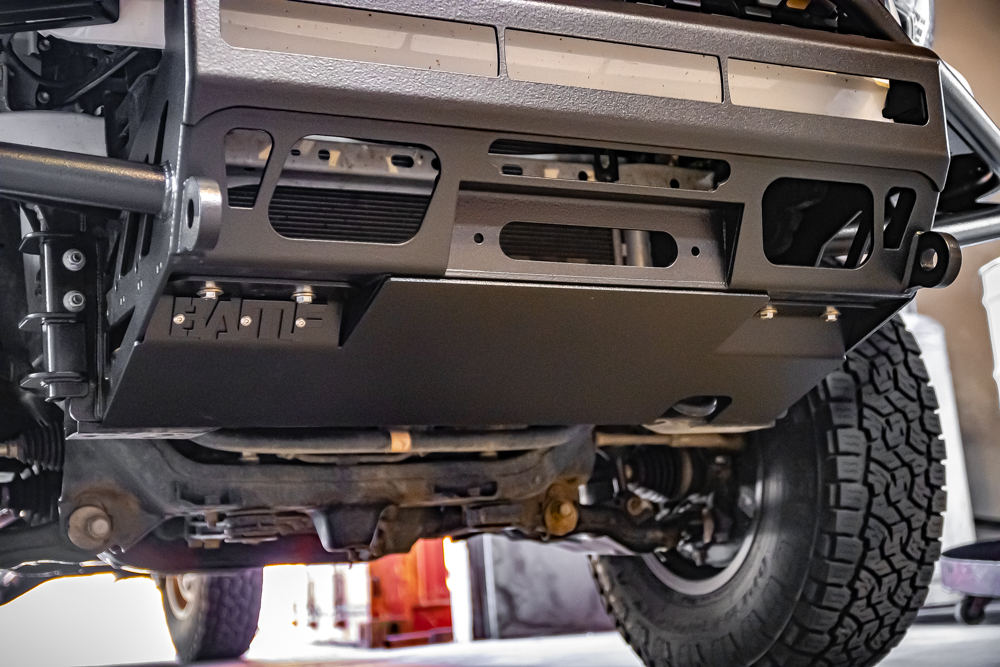
If you opted to include a bash plate in your order, you can now install it on your bumper. With your full or partial bash plate held in place, install the two 14mm bolts up into the winch cradle area on each side of the vehicle, and tighten the 14mm nuts inside the winch cradle. BAMF makes accessing these bolts inside the winch cradle easy; you should be able to reach all the nuts inside the winch cradle from the front access holes.
The ability to choose which variant and material bash plate to use is an overlooked feature. Since these plates are removable and replaceable, you can choose to save some weight upfront by using an aluminum partial or full skid and replace it if it becomes damaged—something no other front bumper on the market allows you to do. It also means that if this area takes excessive damage, you won’t have to replace the entire bumper!
Step 17. Install Logo
Installing the BAMF logo is the finishing touch.
If this logo is not already installed, it can easily be fitted to the front passenger side of the bumper with three 5/32” Allen bolts.
First Impressions
I am extremely impressed with not only the quality of this bumper but the customer service from Bay Area Metal Fab.
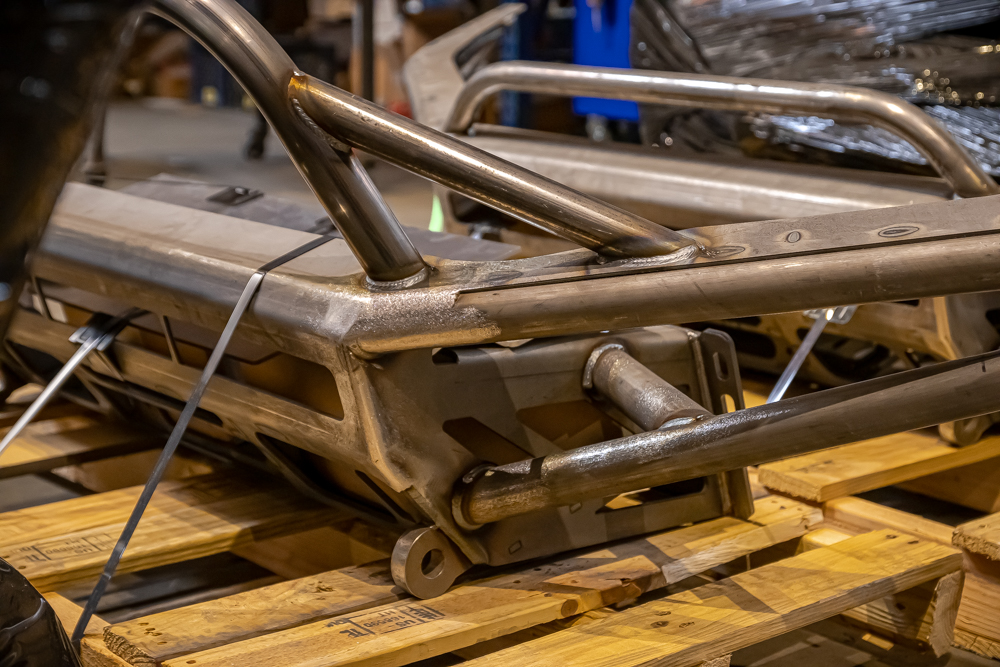
While at the shop, I had the chance to see these bumpers in a raw state before finishing and powder coating. The unfinished bumpers were expertly welded together and were already cleaned and sanded. I was absolutely blown away by the skill displayed by the metal workers in this shop – they know what they’re doing.
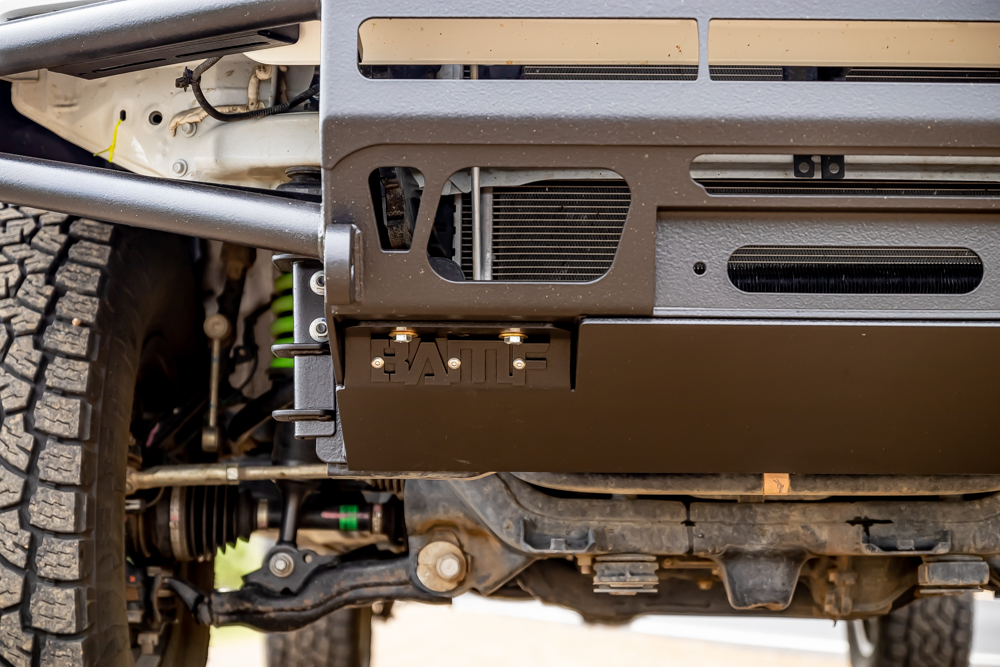
Winch Cradle

The winch cradle is absolutely solid as well, and access from the front, sides and bottom (without a full bash plate installed) is excellent.
I do not doubt that when the time comes to mount a light bar, pod lights, and operate a winch, this bumper will make life a breeze.
Recovery Points

The story is much the same with the reinforced tow points – there’s just no way you could ever damage these points without exceeding the ratings of your recovery equipment. I have total faith in these recovery points, and they’re a significant upgrade from the bolted-on OEM hooks.
The bracketry, both to relocate the radiator piping and to secure the bumper, was also very impressive. Everything lined up exactly as specified and went on smoothly, which is a true testament to the designing, rigorous testing, and expert machining happening at BAMF. As Jerry puts it, “the whole front of your truck will come off at the frame before this bumper detaches,” and I have no doubt he’s right.
Trail Tested
Immediately after the install, I immediately found a chance to go wheeling and test out how the truck handled the added weight.
Not only did the truck feel excellent, but no amount of hard off-roading could shake this bumper loose. Large rocks, harsh off-camber sections, washboard backroads, and even a 45 mph jump could not dislodge this bumper! While I haven’t really bashed the bumper around yet, I’m sure it can take a beating.
Before & After

I was also surprised by how well my Ironman suspension held up to the added weight of the bumper. Coming in at 135 lbs, I was afraid it would be too much for the front suspension to handle, but I had no issues with clearance while off-roading or on the 800 miles of highway I would drive in the coming days, which is a testament to this suspension kit.
As shown above, I lost minimal height with the added weight, but I fully expect it to settle more in the future. If you plan to replace your OEM bumper, be sure to consider the weight and adjust your suspension setup accordingly.
Final Thoughts
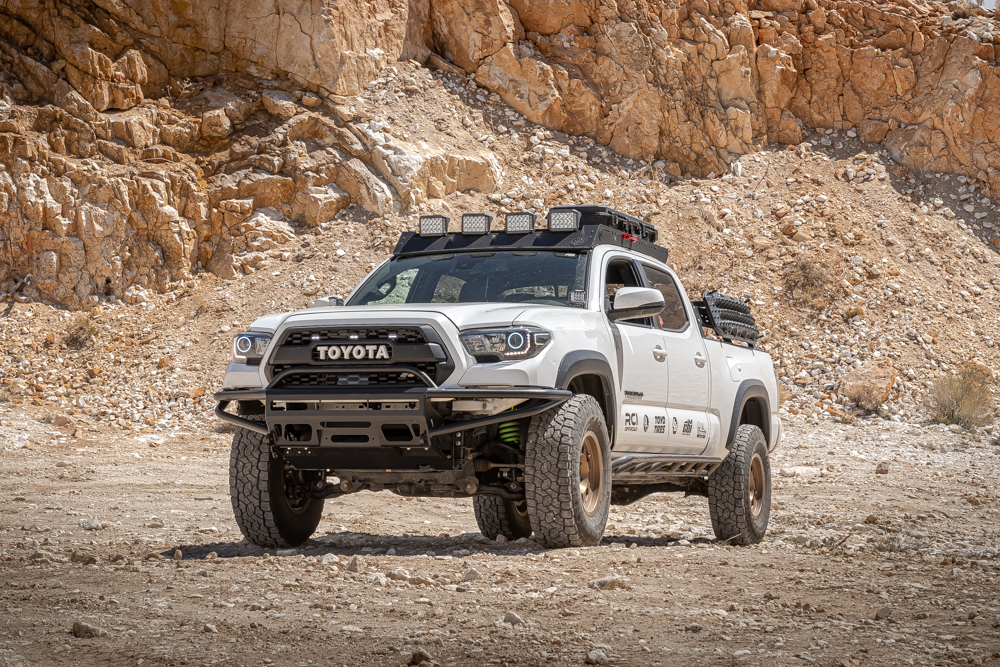
The finished bumper looks fantastic on my truck as well. The curves on the wings of the bumper fit the body lines of the Tacoma excellently, and the line of the bumper cut matched up with the bumper nicely as well. The end caps of the wing come right to the edge of the wheel well, leaving no awkward gaps.
All in all, I couldn’t be happier with this hybrid-style front bumper. Dealing with Jerry at BAMF is always a positive experience—all my emails and messages are always quickly addressed and he answered every question I had about the installation process and specifications of his bumper. The team members at the shop were knowledgeable and helpful as well, and I really have no complaints about the entire process from start to finish. BAMF’s high standards, overall quality control, and attention to detail put this bumper far ahead of the competition.
Need front bumper for 1998 Tacos prerrunner
Have you experienced any TSS issues with the low hoop? The high hoop looks like it clears the sensor, but the low hoop looks perfect.
When you say you took a jump at 45 mph are we talking a speed bump or a full slam? How much re adjustment was needed after?
John, The “jump” I did was off of a gradual slope on a dirt road in the CA desert. The entire truck was airborne and landed flat some 10-15 feet away from the crest. I’ve got a video of it in the reels section of my Instagram profile that is linked to my Trail Tacoma writers profile if you’d like to see it! I’m happy to report that this bumper didn’t move at all – it’s properly secured to the frame of the vehicle with high quality hardware. It remained perfectly lined up with my bumper cut lines, and didn’t… Read more »
Great write up! The edge trim in the link doesn’t mention adhesive, do you think it will still stick?
Jarrod,
Thanks for the compliment! The edge trim linked here looks to have little plastic tabs running inside the trim that grip the surface. The edge trim I ended up going with in my installation was generic edge trim you can find at any auto parts store. This trim has adhesive on the inside but may leave a film behind if you decide to remove it. Cheers!
Awesome, thank you!
Thank you for this Adam! Great timing for me as I just installed my bumper last week, this helped a ton.
Glad I could help! Hopefully it went on smoothly, enjoy the awesome bumper!