
With so many lighting options on the market, it’s difficult to tell which company truly makes the best product at a budget-friendly price point.
For over six months, I ran two Baja Designs Squadron Pros for my ditch lights and was mostly happy. However, when I received the 3” universal pod lights from Ironman 4X4, my eyes were opened to what auxiliary lighting really had the potential to be. These bad boys are bright – and I mean stupid bright. Not to mention, they are much less expensive.
In this article, I’ll cover the basic installation and give you a solid review and overview of this great LED lighting option from Ironman.
Find it Online
- Ironman 4×4 3″ Universal LED Light Kit w/ Side Shooters: Check Price
- Cali Raised Ditch Light Brackets: Check Price
Table Of Contents
Specifications & Features

- 6000K white light (mimics natural light)
- 140-degree beam spread
- Shockproof Polycarbonate Lens
- Output: 30W high lux
- IP67 rated (can withstand submersion and high water pressure)
- Operating voltage: 10-30V DC
- Lumens: 2850 raw
- Lux/10m: 88lx
- Current: 1.69A@12V / 0.84A@24V
- LED Chips: 9x2W / 5x2W
- Waterproof Deutsch Plugs
These 3” universal pod lights look similar to many of the competitions’ lights, but the specs tell a different story. Ironman 4X4 managed to pack 2850 raw lumens into each of these lights, which is impressive for a 10-30V draw.
These lights project those lumens in a 140-degree beam spread with the built-in side shooters and maintain a 6000K color temperature to imitate daylight. Combine those specs with a die-cast body, impressive corrosion resistance, great optical clarity lenses, and a waterproof design and you’ve got a light that truly outperforms the rest.
Installation Overview

These lights have the ability to be mounted almost anywhere. They’re perfect for any auxiliary lighting application, but because of their wide beam spread, they’re best put to use as ditch lights or fog lights. I chose to mount these on my Cali-Raised low-profile ditch light brackets.
Tools & Materials
- Mechanic’s Tool Set
- Socket wrench
- 16mm wrench
- 16mm socket
- 10mm socket
- Klien Terminal Crimper
- Klien Wire Stripper
- Waterproof Crimp Terminal Connectors
- Waterproof Crimp Buttsplice Connectors
- Wagner Heat Gun
- Cali-Raised Switch Panel
- OEM Style Switch
- Self-Tapping Screws (optional)
- Screwdriver
- Zip Ties
Step 1. Mount Brackets

Once the bracket is removed, you can use the included 16mm hardware to attach the light bracket to the ditch light bracket. Since the light bracket has a built-in mechanism for preventing the bolt head from spinning, you will no longer need to secure the head of the bolt once the bottom nut becomes tight enough. This is a great feature that ensures your lights stay secure, and makes your install easier.
In my case, the included hardware was too large to fit through the holes in the ditch light brackets I had. Instead of drilling out the holes to make them larger, I chose to reuse the 14mm bolts from my previous ditch lights. I was still able to keep a wrench on the head of the bolt while tightening the nut from below. It was nice that these raised slots did not interfere with my ability to tighten the hardware.
I did not leave this nut loose, but I made a conscious effort not to over-tighten it. This will allow you to still adjust the lights side-to-side for optimal beam spread.
Step 2. Mount Lights

Once the brackets are installed, the lights themselves can be installed on the bracket. When reinstalling the hardware, be sure that the lock washer is included. Using a 5mm Allen key, tighten the bolts into place.
As before, I made a conscious effort not to over-tighten these bolts. I tightened them until the light was secure under light pressure but could be moved with some force. This will allow you to adjust the light up and down.
Step 3. Wiring Lights

Now that the lights are installed, you can connect the included wiring harness to the lights via the plug on the end of the light. This wiring harness was very high quality but has the potential to be complicated to install.
Each plug splits into a white power wire and a black ground wire, so you will have two sets of these wires leading from the lights into the rest of the harness. These wires attach to a relay, which will handle the electrical load of the lights and protect them as well as the switch. The wiring harness comes standard with in-line fuses on the red power wire that connects to the power source and on the yellow power wire for the switch, which is an excellent extra safety measure to protect your gear.
Once you connect the lights to the wiring harness, run the wire bundles into the engine bay directly by removing the plastic clip on the plastic guard and routing the entire harness into the space between the two pieces. This will keep your wiring protected in the engine bay and prevent any rubbing or wear from your hood.
Step 4. Install Relay
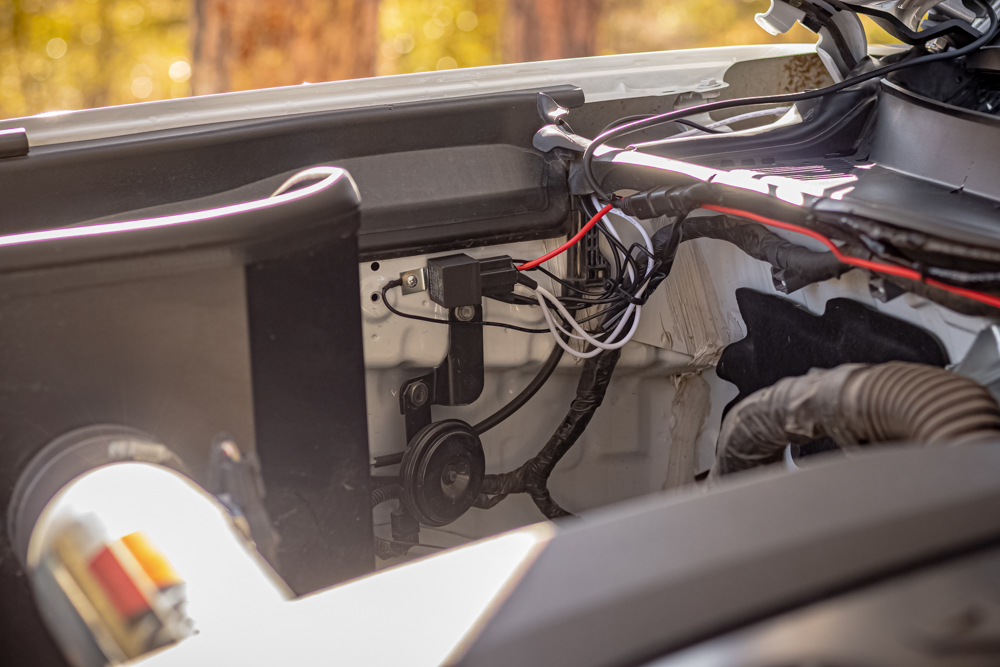
Next, I installed my relay inside my engine bay. There are plenty of OEM mounting locations that you can use, but I chose to drill my own hole in the engine bay to mount this relay exactly where I wanted it.
At this location, I grounded the relay itself via the small black wire, as well as the lights via the two connected thick black wires. The only wires we have left to worry about are the small bundle of switch wires, and the red power wire.

I then took some time to route these wires across the engine bay towards the driver’s side of the vehicle. Using zip ties, I secured the wires along the top of the engine bay along with the rubber guard/seal.
Because there is so much length, if you choose to mount this relay on the driver’s side of the vehicle, you can cut all of these wires to the appropriate length to avoid messy bundling. I set the red power wire aside for later and began work on the small bundle of switch wires.
Step 5. Wiring Switch
After the relay is mounted and the wiring harness is organized, you can route the wires for the switch inside the cab. Cut the switch off of the wires at the base of the switch. If you have enough slack, these wires can be cut to length, just be sure not to cut them too short!
Once cut, tape these wires to an object like a long screwdriver or a metal coat hanger using electrical tape. Poke a hole in the rubber grommet that leads to the driver’s side footwell inside the cab. Push your wires through the hole in the grommet, taking care not to damage any other wires running through the grommet. Once pushed through, you can remove your wires inside the cab and run them up to your switch.
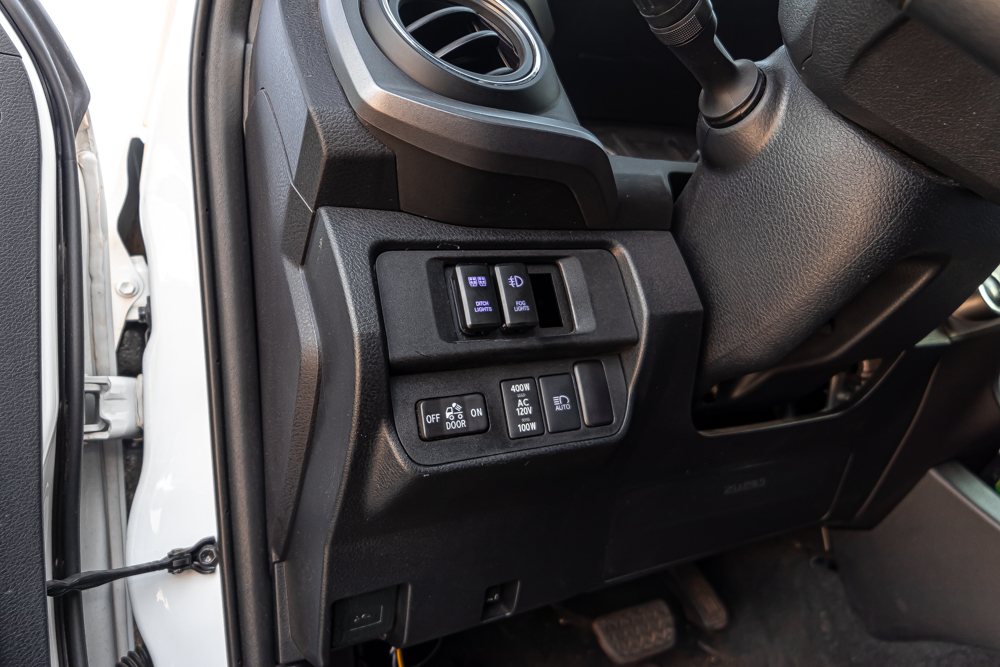
Different Switch Options
Ironman provides a great switch you can reuse, but I chose to use an OEM-style switch instead.
If you’re looking to re-use your switch, it is as easy as connecting the wires back to the same colored wires using a butt splice. Strip the wires about a centimeter back, twist the copper wires together, and insert both ends into the butt splice and crimp them securely. If you’re using connectors with heat shrink, you can use a heat gun or carefully use a lighter to shrink this connection together for maximum security. The included yellow wire can then be powered by any 12V source either inside the cab or in the engine bay.
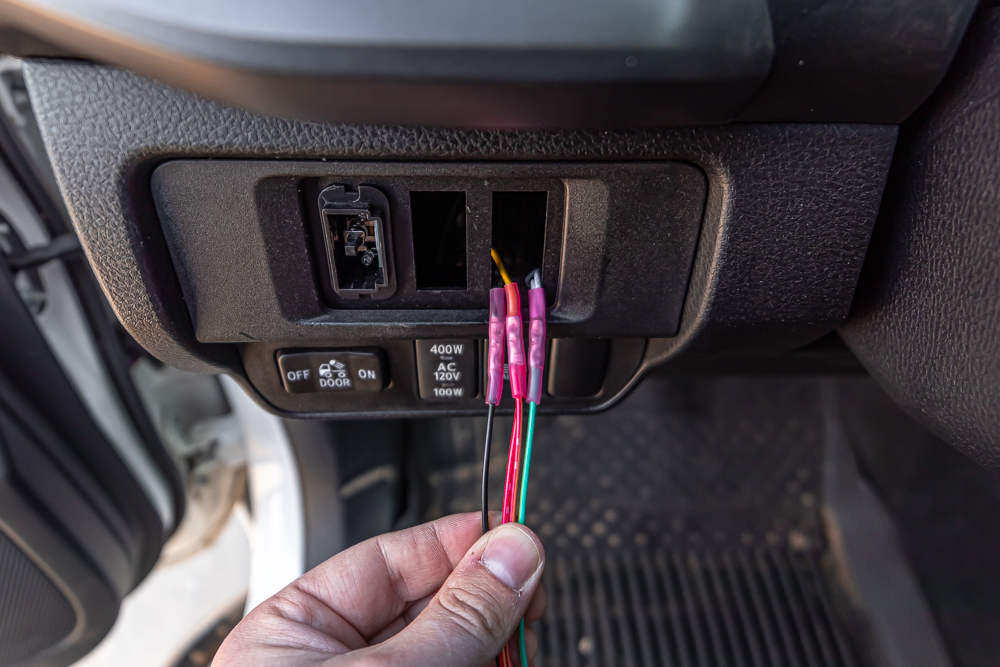
If you’re looking to wire this to a new switch, the process is much the same.
You’ll connect the white wire on the harness to the power out (green in my case) wire on the switch, the black wire on the harness to the ground (usually black) wire on the switch, and the yellow wire on the harness to the power in wire (I have two in my case, one for the switch power and one for the backlighting, both red) on the switch. Be sure these connections are secure.
Step 6. Supplying Power To Switch

Once these wires are connected to your switch, you can connect the yellow wire to a power source to power your switch. This can be done directly at the battery, or by splicing into a 12V wire inside the cab. I opted to power my switch directly from my Blue Sea fuse block on an Overland Equipped Tray. I connected a ring connector to the end of the yellow wire in the engine bay and connected it to the fuse block to keep my wiring as clean and simple as possible.
Finally, after everything is properly connected and grounded, you can connect the red power wire to the positive terminal of your battery to power your lights. Test the lights and inspect your wiring to ensure everything is working correctly. The in-line fuse will protect your lights in case of an electrical shortage, but in my case, I opted to power the lights directly from my Blue Sea fuse block, just like the yellow power wire. This is to keep all of my wiring as clean as possible and to have a central location for all my fuses. I used the fuse that came directly out of the inline fuse from the wiring harness.
6-Month Review

After running these lights for 6 months in a wide variety of weather conditions, I can say I’ve been thoroughly impressed with the quality and durability.
These lights are made from die-cast steel and are powder-coated grey, so they’re heavier and much sturdier than other lights. The heat-shrink design not only looks amazing, but it also keeps these lights cool to the touch even after hours of use. I was worried about the lenses getting scuffed or chipped, but after a few thousand miles on and off-road, there is no visible damage anywhere on these pod lights. The lenses haven’t fogged under any conditions, and are still clear as day.
Light Output
The most important aspect of good auxiliary light is the output. Head to head with my previous Baja Designs Squadron Pros, they performed excellently. While the Baja’s were brighter in the center, the beam pattern was very restrictive even with the combo lens.
The Ironman lights were visually almost as bright in the center of the beam but had a drastically larger spread. This ultimately meant much more usable light, especially on tight or narrow trails. While I don’t have any photos of this comparison, here is the difference between running just a high beam and using the pods alongside the high beam:
LED High Beams

As you can see, without the lights, almost no light is present past 45-50 degrees from the center on either side of the vehicle, making the area of usable light a narrow 90 degrees.
This is ignoring the light splayed directly in front of my truck, I believe it’s caused by the removal of my fender liners. Most Tacomas won’t spread light in this area.
LED High Beams & Ironman Lights

With the lights on, the driver has over 180 degrees of usable light.
These pods are every bit as bright, and even brighter than my aftermarket LED headlights and match the color temperature nicely. The center of the beam is bright and clear, and the side shooters spread usable light everywhere I could physically look while in the driver’s seat.
LED High Beams
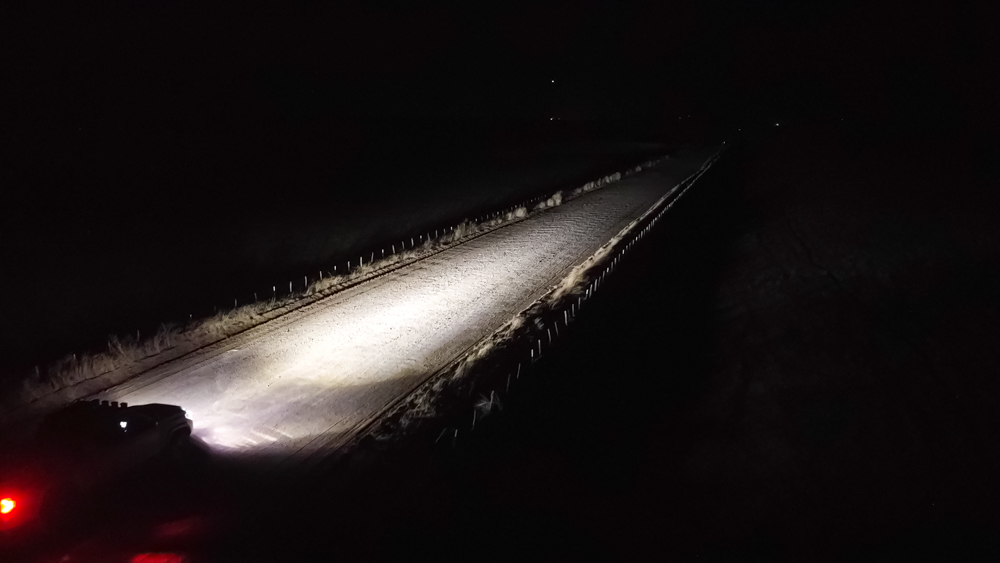
Looking from the side, we can see the same difference.
Again, the high beam itself does a great job of illuminating only what is directly in front of the truck. The field of view is narrow, as the headlights don’t spread the light to the sides very effectively.
LED High Beams & Ironman Lights

With the ditch lights on, the details in the bushes, ditch, fence, and beyond become visible to the driver. The ditch lights provide a great spread of light to supplement your other front lighting and illuminate the details you otherwise wouldn’t see in the dead of night. These photos were edited very minimally for color; I left the exposure of the camera untouched in processing.
When seen in person, the lights seemed slightly brighter than in these photos too. I was able to see a good distance into the field, especially in the center of the beam of the lights. The camera also seemed to exaggerate the reflection of the lights off of the hood – adjusted properly, these lights do not produce any sort of overwhelming glare on the hood of the truck and don’t inhibit visibility in any way.
Final Thoughts
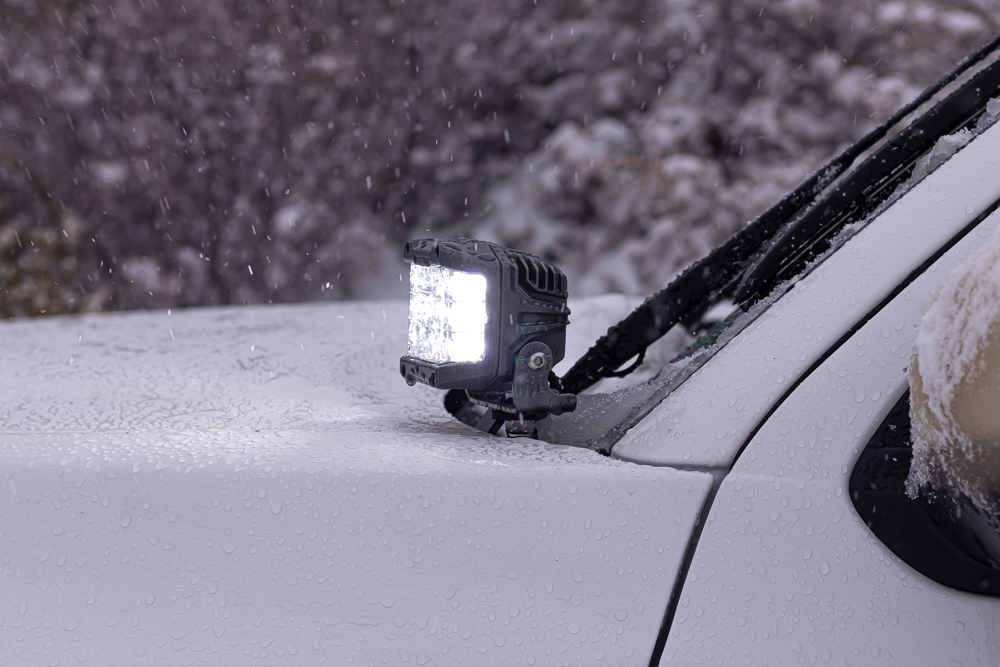
Throughout these six months, I’ve seen temperatures as high as 95 degrees and as low as -10 degrees. I’ve seen rain, heavy snow, direct sunlight, high winds, and even a small hail storm. I’ve been through plenty of dust and rocks, hit my fair share of tree branches and bushes, and plowed through loose volcanic rock.
I even froze both of my ditch lights in solid blocks of ice in a record-breaking snowstorm. These lights are utterly unfazed and continue to look and perform like they’re brand new. I could not be happier with the durability, output, and usability of these universal pod lights.

Any recommendations on where to splice into a 12 V precisely? The auxiliary kits are sold out.