
Anyone who is into offroading, overlanding, or just adding electronic accessories to their Tacoma is probably familiar with switch controllers. If you’re not, upgrading to one is generally recommended if you have three or more lights or electrical accessories.
Switch controllers help organize and manage all of your aftermarket electronic accessories in a central location, all while providing better overall protection to the rest of your vehicle’s electrical system. Before these became popular, people would add individual rocker switches for every single accessory.
There are multiple options out there but BantamX system by sPOD stands out by being simple yet extremely customizable. This system was designed with safety in mind by utilizing a solid-state switch control system and a low voltage cutoff that shuts off your accessory power to prevent damage to your vehicle’s battery. It can supply a continuous flow of up to 100 amps to eight circuits that can handle up to 30 amps each.
Table Of Contents
Which Model Is For You?
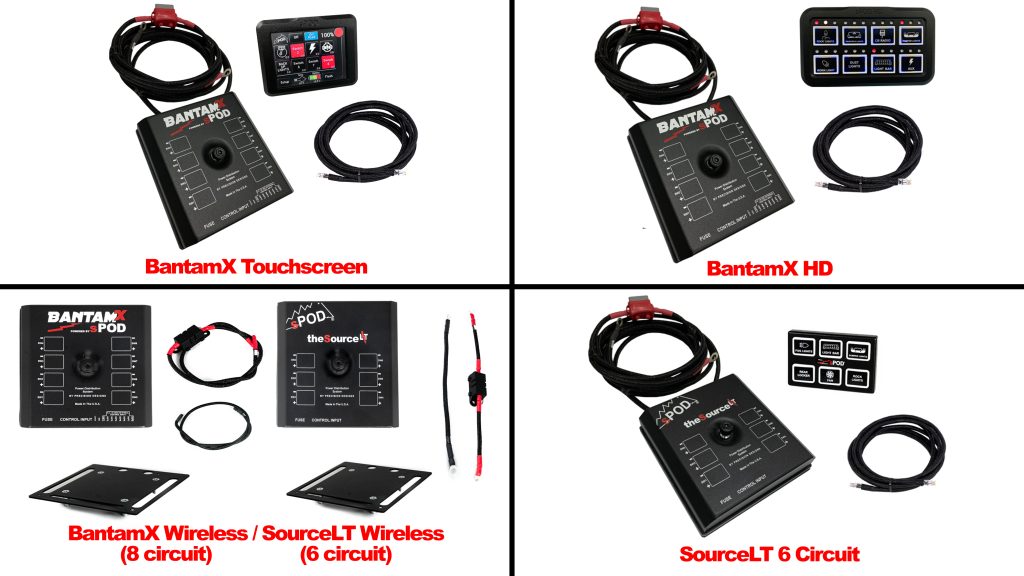
sPOD offers four different configurations for their switch controller system to suit all budget and build needs.
- BantamX Touchscreen – Comes with a small touchscreen display.
- BantamX 8 HD – A classic style switch controller with 8-click type switches.
- BantamX Wireless – A wireless option that uses your cell phone with an app or a tablet as the switch controller.
- SourceLT – A 6-circuit switch controller that has 6-click type switches.
The touchscreen option is a great choice for you if you plan on adding more than eight accessories to your setup. It allows you to add up to three more BantamX units to your rig for a total of up to 32 switches from one controller.
The wireless models utilize your cell phone or tablet as the controller and come in either an 8-circuit or a 6-circuit system. One benefit of the wireless setup is that you don’t have to mount a physical switch panel in your truck or run any wires through your firewall.
For anyone on a budget, either of the standard click-type button options still offers great protection and flexibility.
In this article, I will be installing the BantamX Touchscreen system on my 3G Tacoma.
Installation
The installation process is fairly similar to that of other switch controllers and should take you anywhere from 1-3 hours depending on your skill level with wiring.
Tools Required
- Power drill
- 3/16″ drill bit
- Center punch
- 1/2″ ratchet
- 10mm & 12mm sockets
- Phillips screwdriver
- Coat hanger
- electrical tape
Step 1. Determine Mounting Location
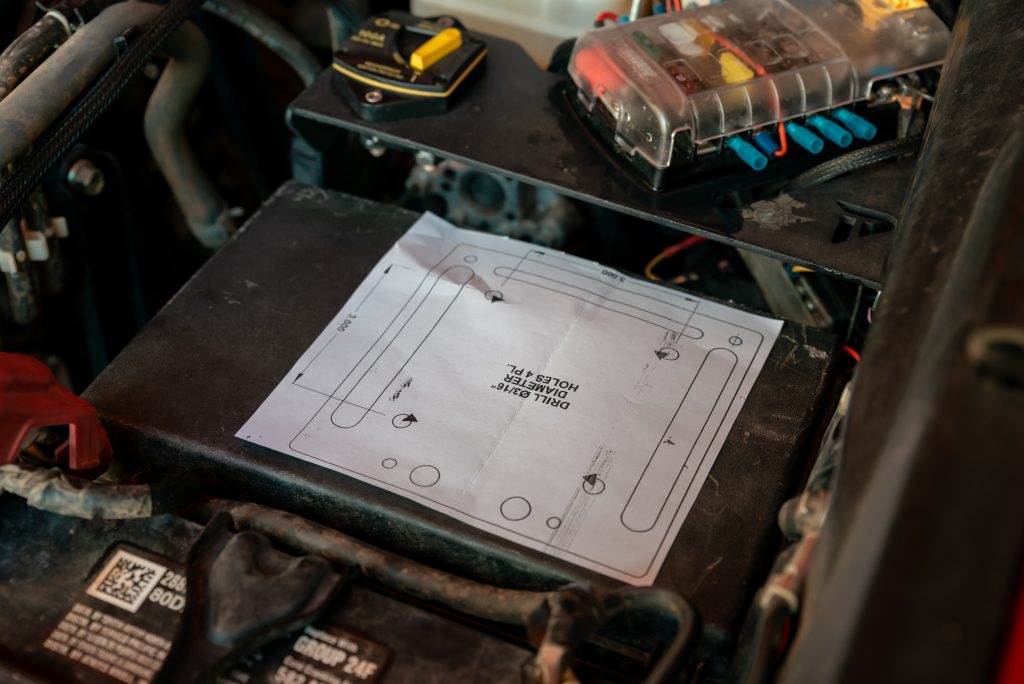
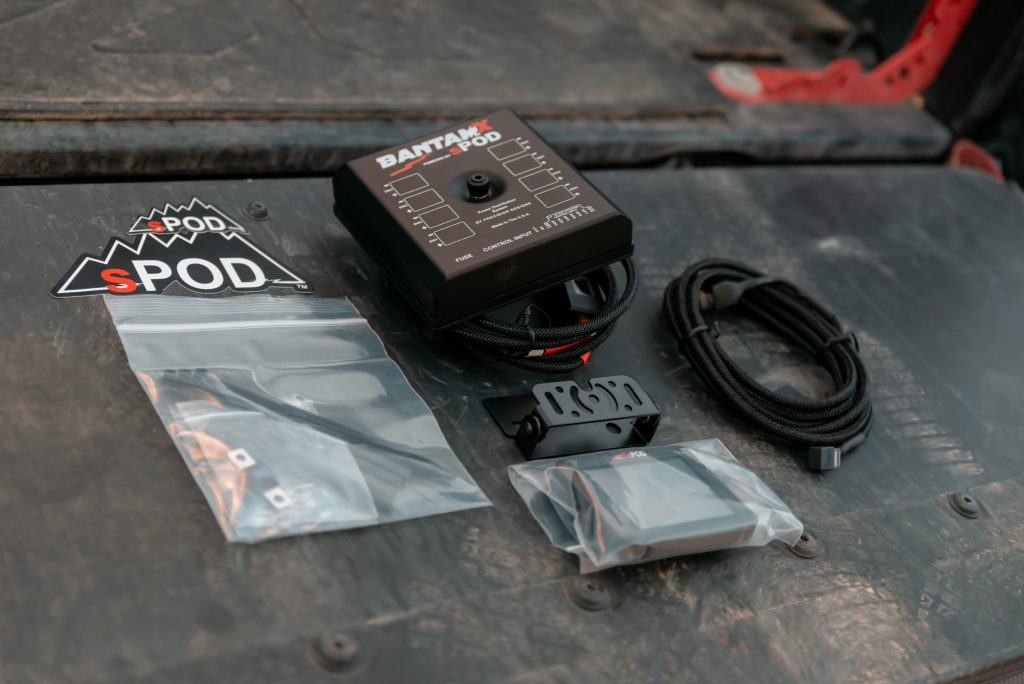
Included with your system is a paper template to help you drill the mounting location for your unit. I opted to mount it to the lid of my fuse box because it’s close to the battery which worked best for my setup.
PowerTrays also makes a mounting tray that goes just above the fuse box. You can see another variation of their tray in the photo above that I have previously installed.
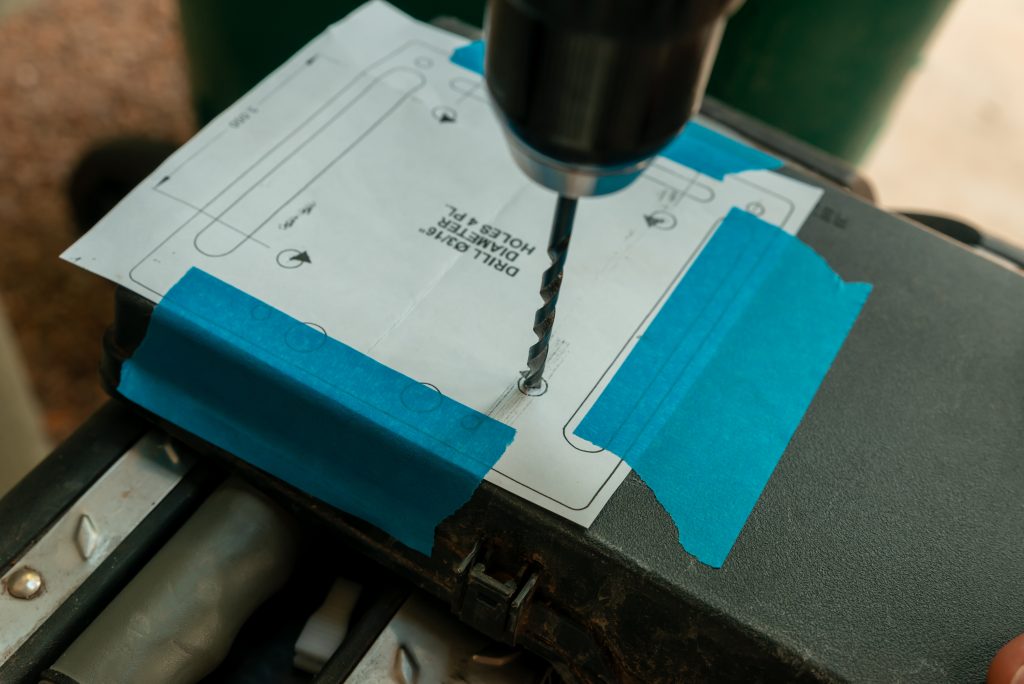
I used tape to hold the template down for drilling into the fuse box cover. Before drilling, I used a center punch to mark the center of these four holes on the template. The center punch helps to keep the drill bit centered. Next, use a 3/16″ bit to drill your holes.
Step 2. Mount Unit
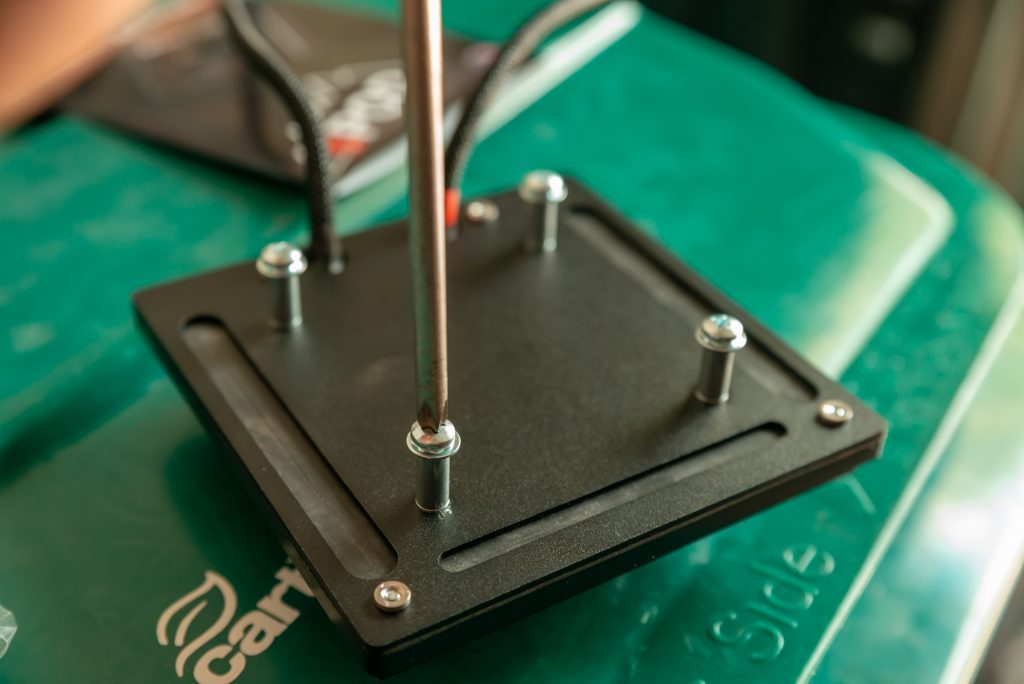
On the bottom of the main unit, you will see four ends that have a spacer, a screw and washer. Use a Phillips screwdriver to remove all four screws and the washers to prepare the unit for mounting.
With the screws removed, line the unit up with the four holes you just drilled in the fuse box cover.

Reinstall the screws to the spacers through the fuse box cover into the BantamX. The bottom of your fuse box cover should look something like mine once complete.
Step 3. Route Touchscreen Cable
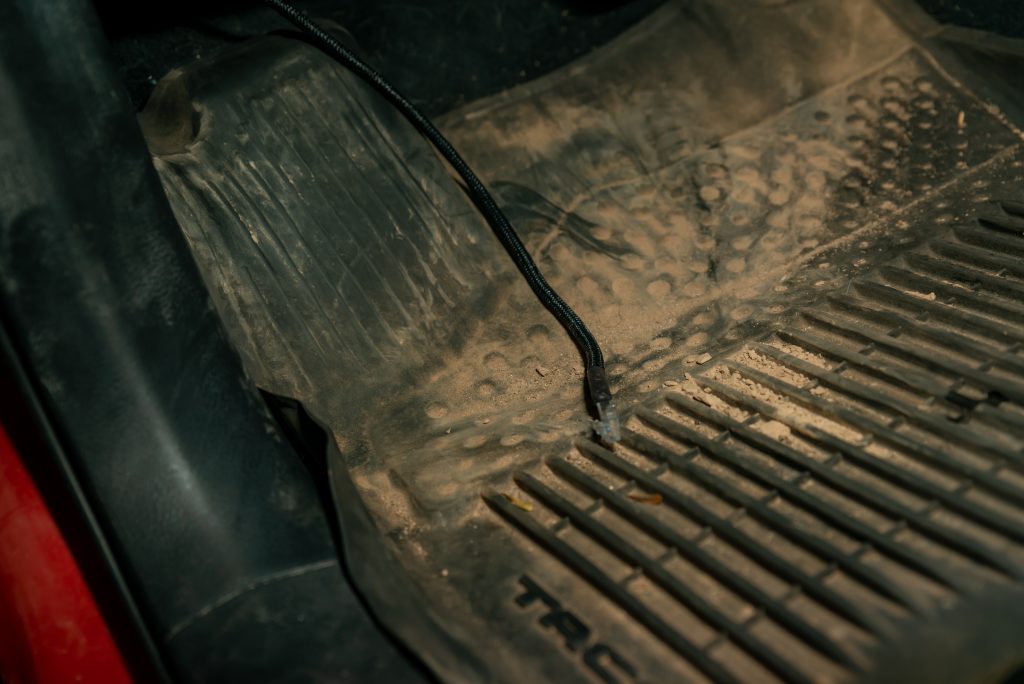
For the sPOD system, you will only have to route one wire through the firewall. The BantamX unit comes with a CAT5 data cable that will connect it to the touchscreen. I ended up using the pass-through shown above that I have used to run other wires through. An alternative pass-through is located just below this opening in the form of a larger rubber grommet.
To get my CAT5 wire through the firewall, I used an old wire hanger and electrical tape. It might take a little work to get the end of the cable through the small rubber grommet.
After you get the wire hanger through the firewall, grab it from inside the cab under your dash. Pull it through gently until the CAT5 cable has come through the firewall and into the cab.
Step 4. Mount Touchscreen Controller
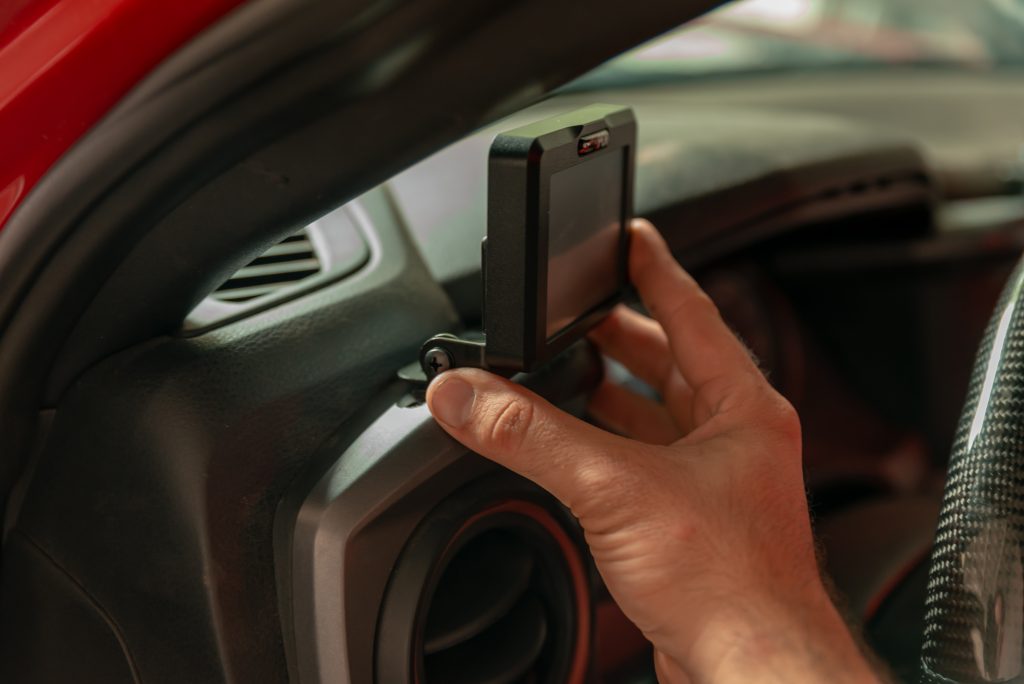
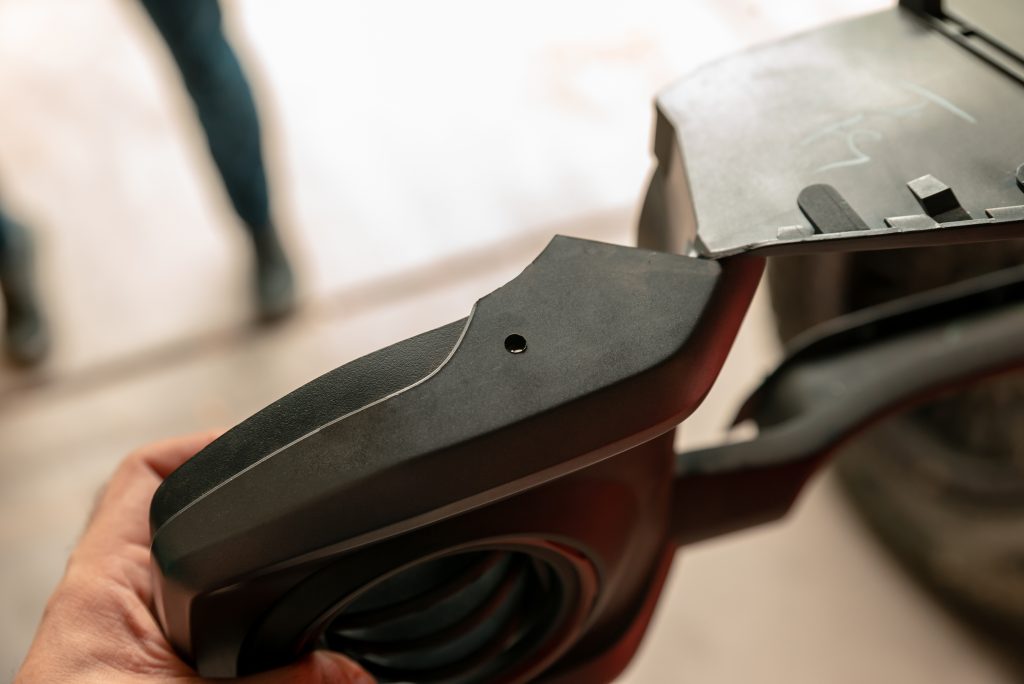
You can pretty much mount the controller anywhere in your cab, but I chose the left side of the steering wheel just above the left driver-side air vent. You will need to drill a few small holes to attach the mounting bracket.
Note: It’s a good idea to mark the location where you would like to drill a hole before you remove this trim piece from the truck.
The trim piece that is on the left side of the steering wheel can easily be removed by just pulling back on the trim that goes around the left driver-side air vent. With this trim out of the truck, you can drill the holes.
Use a 3/16″ bit to drill the mounting hole. Next, attach the touchscreen bracket with the supplied hardware.
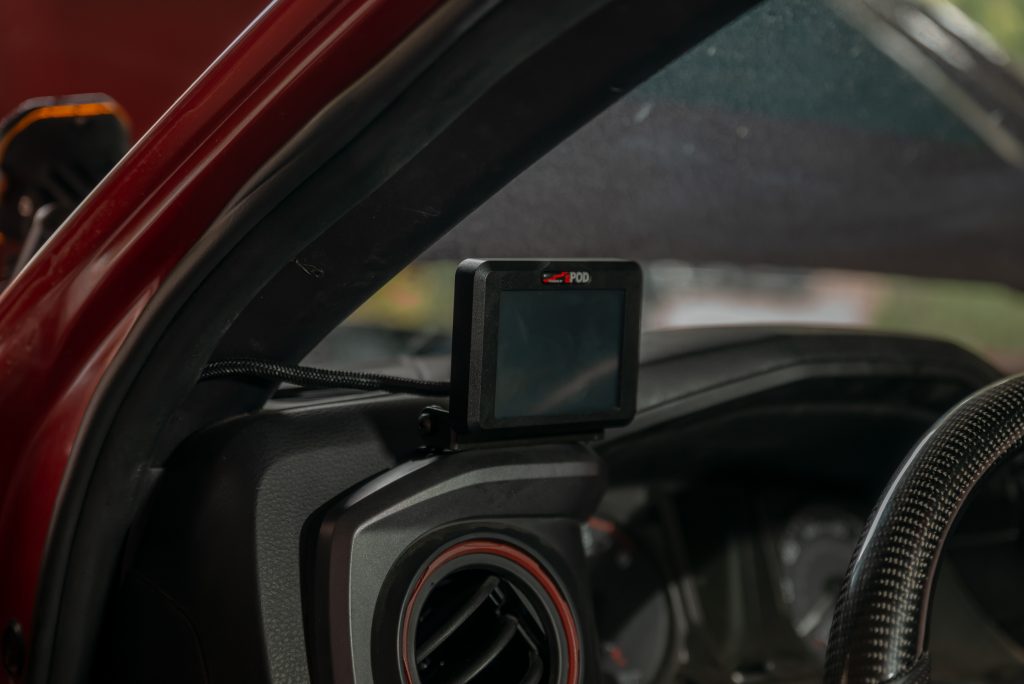
After you have the bracket attached to your trim piece, reinstall it back into the truck. Then, secure the controller to the bracket with the supplied hardware.
After the touchscreen is installed, it’s time to find a location to route your CAT5 cable. I ran it through a groove in the driver’s door weather strip from the lower end where it came through the firewall up to the top of the dash.
Step 5. Connect Power
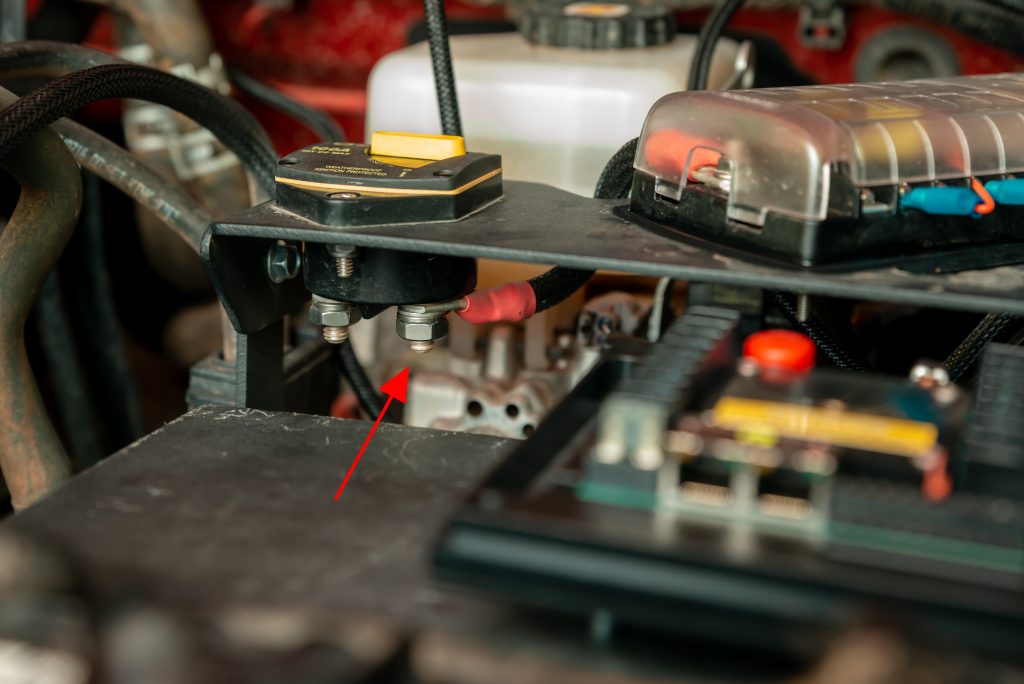
Your BantamX unit can be connected directly to the positive terminal on your battery for power. However, I had a secondary location on my truck from a previous wiring setup.
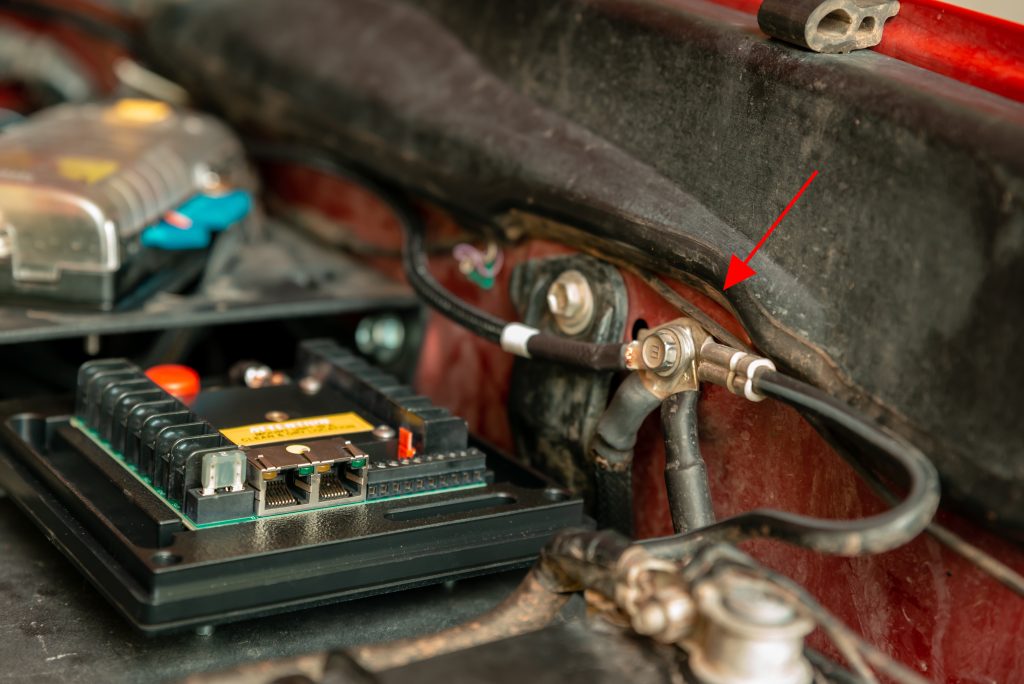
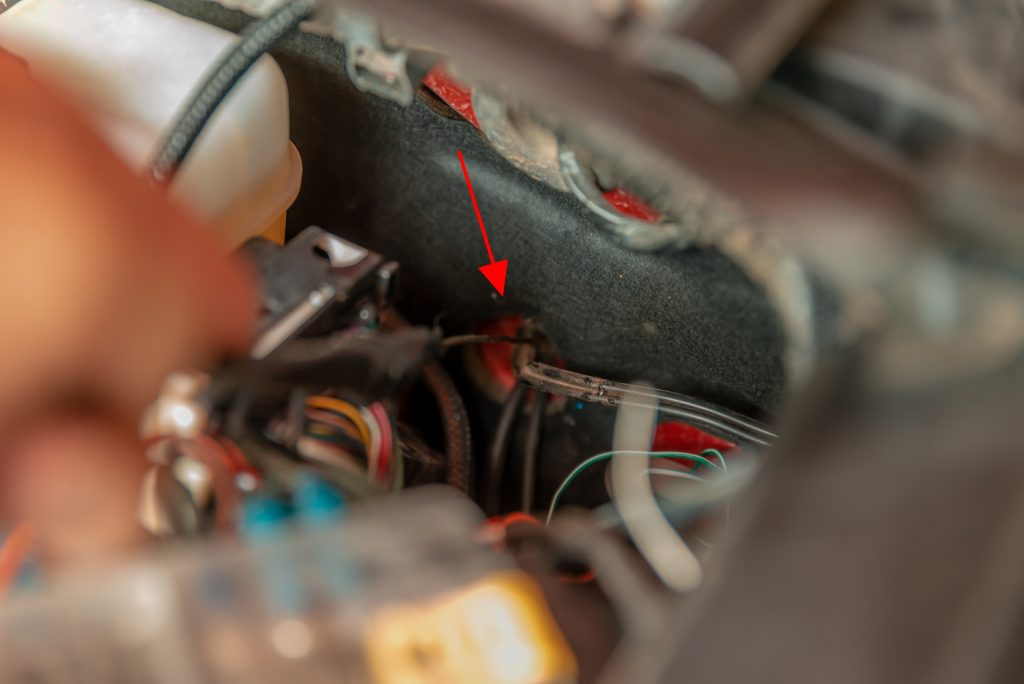
The negative (grounding) location pictured above is a spot that everyone can and should use. This bolt on the driver-side fender is the factory negative body mount for the battery. I attached the black cable to this body ground mount of the truck to complete the wiring.
Step 6. Powering System On
To power the system up for the first time, you will need to start up your truck. The BantamX has a built-in setting that puts it into a deep sleep after it has been off for over 6 hours. It can be powered on from deep sleep by sending over 13V of power to it, which just so happens to be the case when you turn over your engine.
If you don’t like the deep sleep setting, you can also disable it.
How To Use
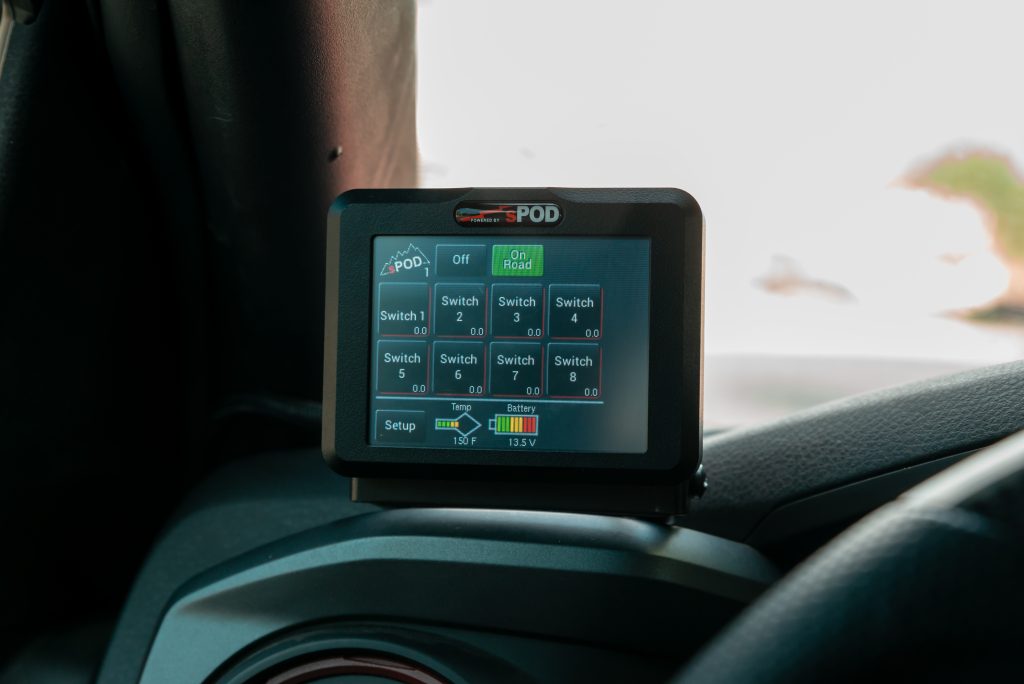
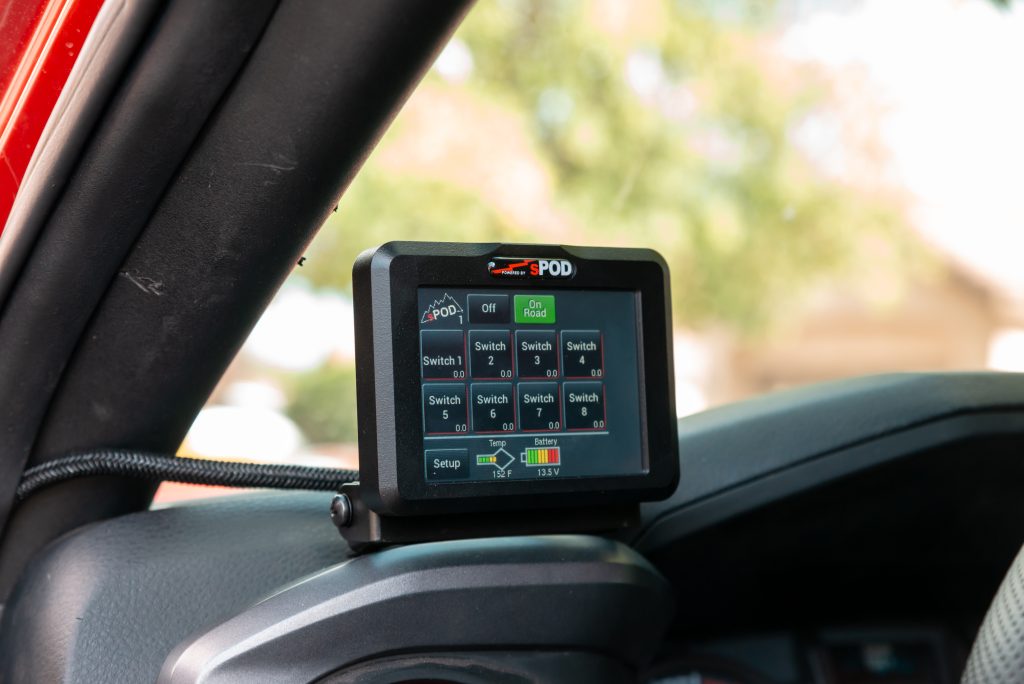
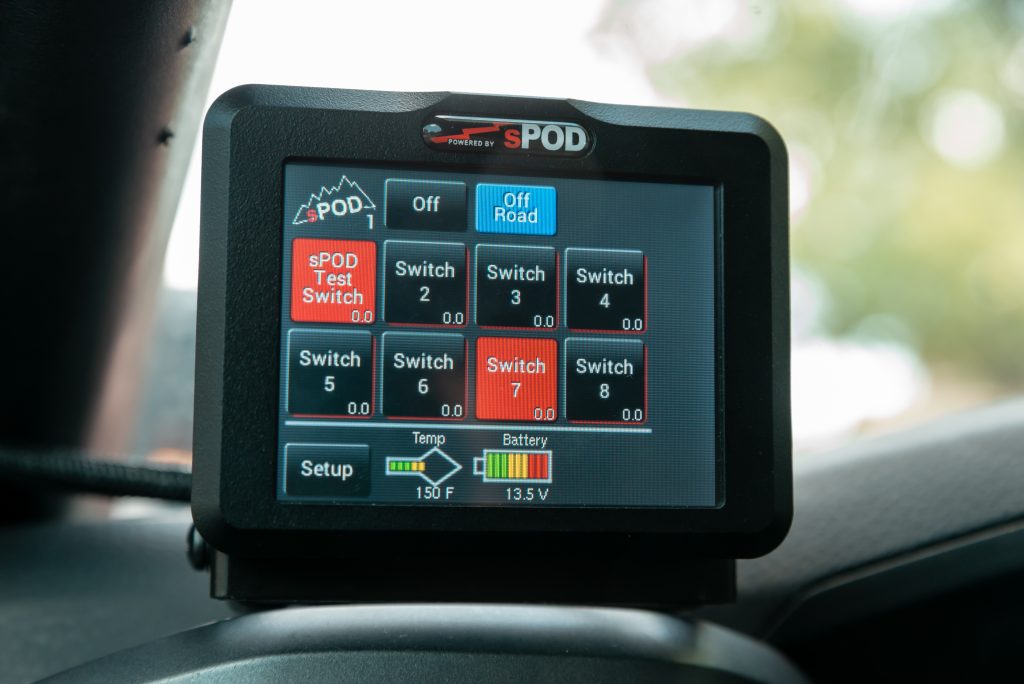
After you get your touchscreen up and running, you will see your eight switches. The touchscreen is a resistive touchscreen, which means you’ll have to press on it a little harder than your phone or tablet.
A single press on each “button” will turn your accessories on or off. With the setup button in the bottom left corner of the screen, you can customize to fit your build.
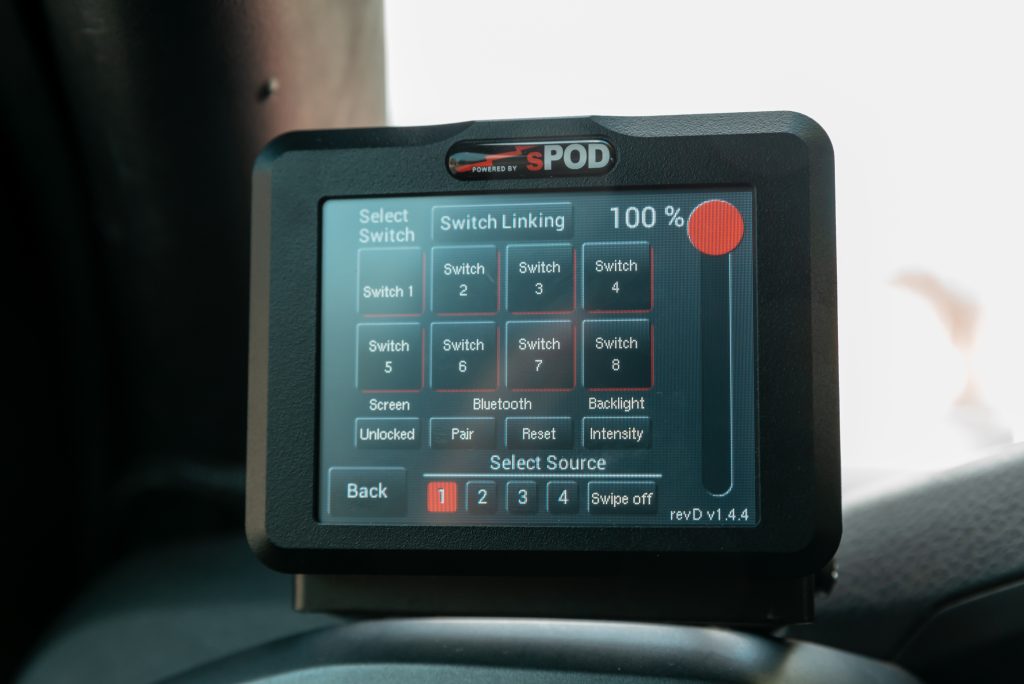
Once you get into the setup screen, you can customize the labels on your switches, link multiple switches, and add modes like light dimming, strobe, flash, or momentary.
To change the switch label, tap on the desired switch and you have the option to add three separate lines of text. Then, hit the Back button to get back to the main setup screen.
Switch linking is a great feature if you want to control multiple accessories with a single press. For example, if you want your rear chase lights and front-facing lightbar to turn on or off together.
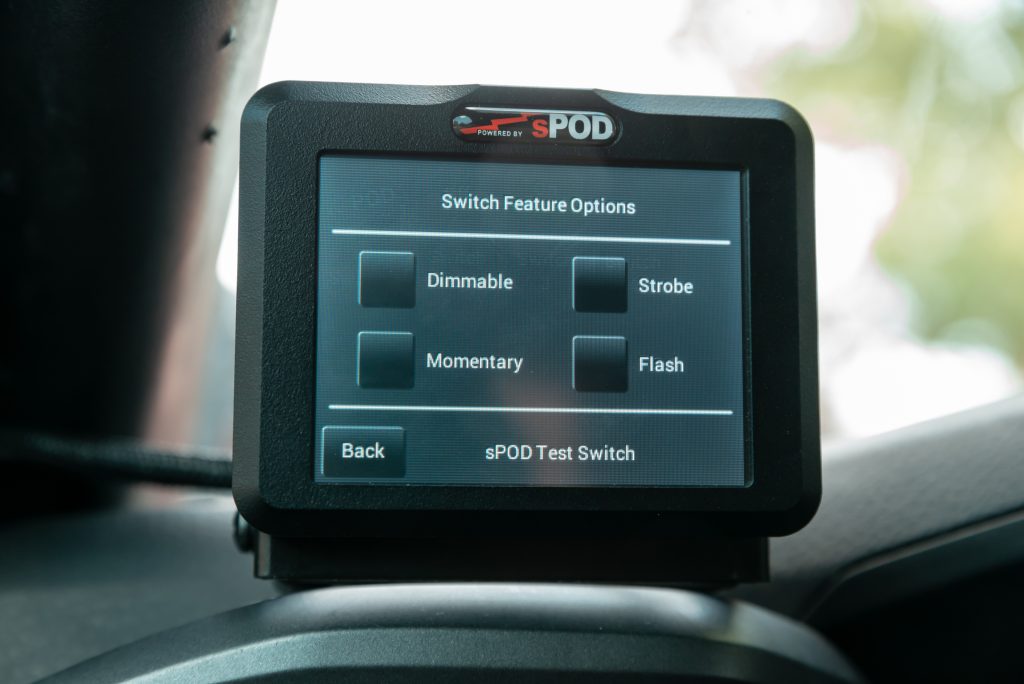
Switch Features allows you to set one of the four lighting modes.
If your lights are compatible, the dimmable feature can be handy for camp or scene lighting. The flash and strobe features are used most often when people are trying to use lights on their rig for safety such as a rear-facing chase light. The momentary feature could be used for something like an air horn, where the switch will only activate while your finger is pressing it.
Most of these switch features will only work in the sPOD’s “Off-Road” mode. On your switch controller, you will see a green button at the top center that says “On Road”. To enable these additional lighting modes, you will need to press it to switch modes.
Connecting Your Phone
With the BantamX, you also have the ability to connect your smartphone to act as a second wireless controller.
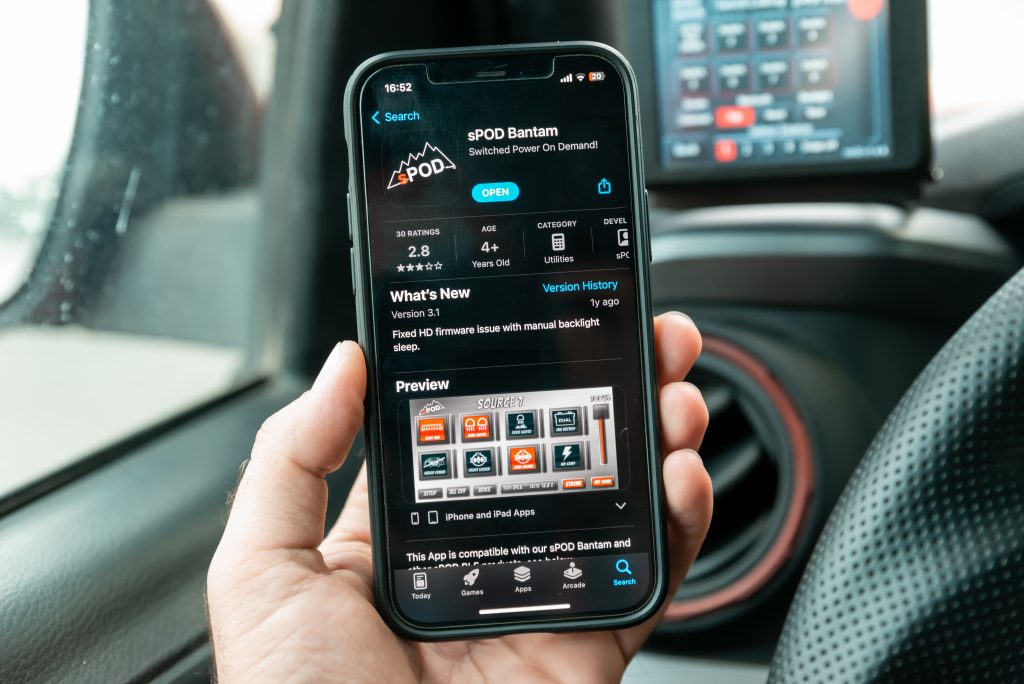
You’ll first need to download the app onto your smartphone.
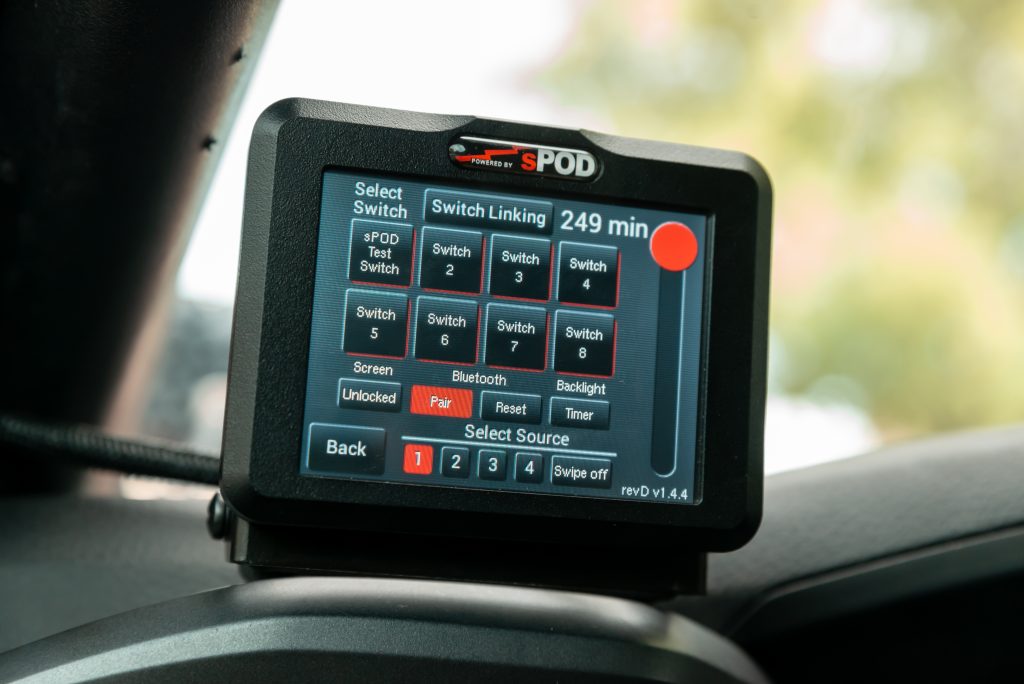
From the main screen, tap on “Setup”. Down near the bottom, it says Bluetooth with a “Pair” button and a “Reset” button just below it. Tap the former and it will highlight in red light as pictured above.
With your system in pairing mode, launch the app and it should immediately prompt you with a message asking for permission to use Bluetooth. Select “Yes”.
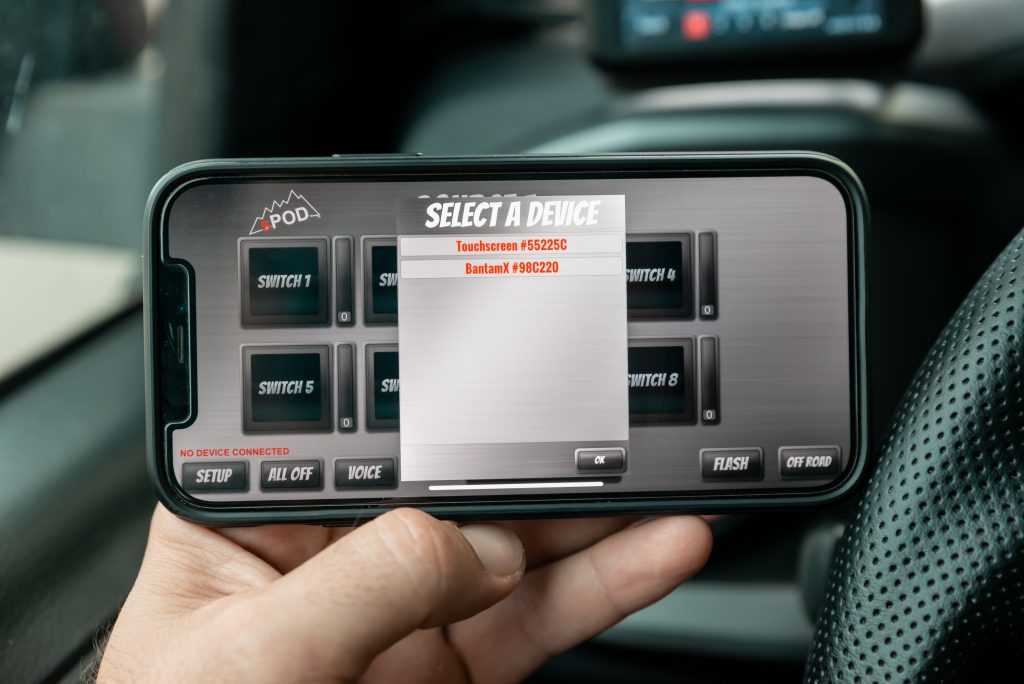
The app should automatically start searching for Bluetooth devices. As you can see in the photo above, mine found both my BantamX brain under my hood and the touchscreen controller. Tap on the touchscreen from the device list and it will start to load. This is the part where I got a little caught up and confused but just follow my steps and you will get through it quicker than I was able to the first time.
Next, you will get a prompt on your phone for a pairing request and asking you to enter the code. To generate a code you will need to tap on cancel on this prompt. The app will load for a second and then you should see a code generated on your app.
On the top of your app screen, you will see “Source 1”. Once your code has been generated, it will pop up just to the left of this. The prompt for a pairing request will pop up again asking for a code. Enter the code displayed and select “Pair”.
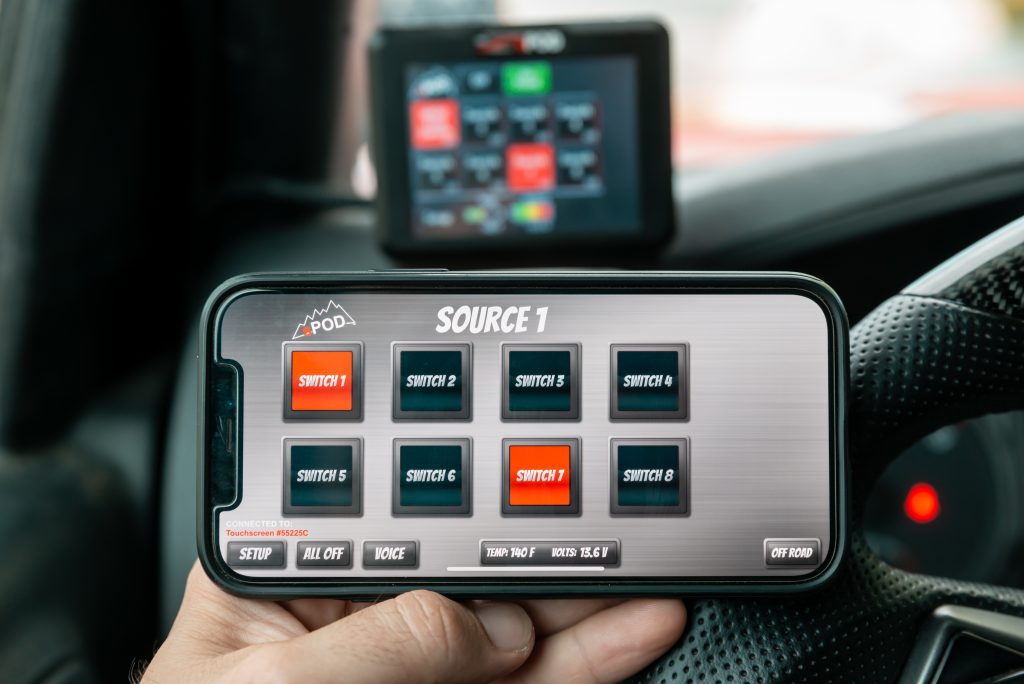
Once you have successfully connected your phone to the BantamX system, you will see a “Setup” button down in the bottom left corner along with your touchscreen model. As you can see above, the switch states are synced between the touchscreen controller and my phone.
Your phone can do anything the sPOD controller does and will work as long as you are within Bluetooth range of your truck.
Final Thoughts
The installation was pretty straightforward and made for a very clean-looking setup. I love the amount of customization it has and the different configurations offered for various budgets and needs make this system unique among competitors.
The touchscreen is ideal for the off-roader or overlander who plans to grow their system beyond eight switches. The ability to centrally control up to 32 accessory switches is crazy but awesome. It’s also great to see the unit temperature and battery voltage!
When I first installed this, I only wired up a set of ditch lights. However, I have since done a lot more wiring and installation to do to get this whole system fully set up. I’m already really happy with how simple and smooth it operates.
If you have any interest in another article going over wiring up accessories and operating them, let me know in the comments below!
Killer coverage as always! I remember seeing these when they were first getting started. Always liked the touchscreen. The potential to add up to 32 switches is absurd… in a good way haha.