

One thing I love about building Tacomas is the ability to customize your truck. There truly are no two rigs that are the same. Although there are common themes with large mods, it’s the small, subtle ones that can really make a truck stand out. In addition, they can add a layer of comfort and practicality.
A prime example of this is the VLEDS dual output footwell light kit. It gives the interior of your 3rd Gen Tacoma a modern feel without breaking the bank. By no means is the Tacoma a luxury vehicle (I don’t even have power seats). This kit is a small mod that makes my Tacoma feel a little classier.
I have found this kit to be rather practical as well. Unlike the 2nd Gen Tacoma, every 3rd Gen interior has dark carpets and trim. Combined with weak halogen interior lights, it’s nearly impossible to see at night, especially around your feet.
This OEM-style footwell kit ties in directly to your overhead light switch and headlights. It only takes a few minutes to install and drastically improves your interior.
Find It Online
- VLEDS Footwell Light Kit (2016-2023): Check Price
Table Of Contents
Overview

This VLEDS dual output footwell lighting kit has a ton of great features that make it a superior option. Firstly, this kit is available in six different color options:
- 5000k Natural White
- 5500k Pure White
- 6000k Cool White
- Aqua
- Blue
- Red
While they are not RBG (meaning you cannot switch between colors), you can still get a customized look. I opted for the 5500k pure white option.
One thing that really sets this kit apart from others is the included wiring harness and PWM dimmer. The wiring harness is an OEM-style breakout harness by Redside Electric that allows you to tie in directly to the OEM wiring. It is completely hidden behind the A-pillar and headliner so that no wiring is exposed. Everything is plug-and-play for an easy installation.
Key Features

- Plug & Play, No-Drill Installation
- 400-lumen Light Output
- Durable CNC Aluminum Body
- 5 Color Options
- Included Wiring Harness
- Dual Output PWM Dimmer
- Adhesive Mounting
Now you may be thinking “I can do all of this with cheap LED strips”. However, I can assure you that LED strips are no comparison to this kit. For one, LED strips would likely mean exposed wiring and having to tap a fuse or use a 12V outlet.
This also means that you cannot tie them to the dome and headlight switches, and must be turned on with an external controller. LED strips are also pretty long, and it’s hard to hide them for an OEM look. Furthermore, LED strips have a much lower light output. The small hidden LEDs in the VLEDS kit produce 400 lumens – 5X brighter than LED strips.
Just by looking at the box, you can tell that this kit is high quality. When you see the actual components, the attention to detail and superior materials are evident. I immediately noticed the weight of the LEDs. For example, the housing is made of CNC aluminum with a black anodized finish, unlike cheap LEDs with plastic housings. I trust that these will hold up for years under my repeated abuse.
Installation

The PWM (pulse-width modulation) dimmer allows you to dim/brighten the lights to your personal preference. It also allows for two different output modes: Courtesy and Night Mode.
Courtesy mode acts similarly to your “door ajar” dome light setting. In this mode, they automatically come on at full brightness when the door is opened.
Night mode, on the other hand, works in conjunction with your headlights. In this mode, they turn on when driving at night.
The dimmer allows you to adjust the brightness in night mode to your liking. That helps prevent blinding you while driving at night while having soft ambient lighting.
The wiring harness is 100% plug-and-play and makes the electrical work easy; installation only took me a few minutes. The lights are mounted with 3M double-sided tape, and the wiring harness, dimmer, and lights all plug in securely.
While you do have to remove the A-pillar and overhead panel trim, the only additional tool required for the installation is a 10mm socket/ratchet. Everything else needed for installation is included, including zip ties, adhesive strips, and the screwdriver used to adjust the dimmer. VLEDS even includes a little plastic pry tool for the A-pillar.

For installation, you only need a few things:
- 10mm Socket & Ratchet
- Rubbing Alcohol
- Microfiber Cloth
- Trim Tools / Plastic Pry Tools (recommended, but not necessary)
- Stiff, Thick Wire (recommended, but not necessary)
Overall, this installation should only take about 15-30 minutes. Since this installation requires the removal of several trim panels to tie into the dome light switch, it may seem daunting. However, if you follow my process outlined below, it’s actually quite a simple install. Having all wires tucked away for an OEM look makes the installation process well worth it.
Step 1. Negative Terminal

To start off this installation, remove the negative battery terminal from the battery using a 10mm socket.
While this is an important safety for any electrical installation, it is especially important for this installation as you will be working near an area where an airbag is located. Not only could accidentally triggering an airbag seriously injure you, but it can cost upwards of $1,000 to replace. This simple step can save you a lot of potential headaches down the road.
Step 2. Remove Panel & Disconnect

Using your fingers or a trim tool, carefully pry down the overhead dome light panel. There are four plastic plugs that will disconnect with just a little bit of pressure. Be gentle so that you do not break anything, you should not have to pull too hard.

Once the panel is disconnected from the ceiling, you will see a single plug. Disconnect this factory wiring harness and set the overhead panel aside.
This factory harness is where the included footwell wiring harness will tap into.
Step 3. Feed Wiring From Panel To Headliner

Grab the wiring harness included in the kit. On one end, there will be both a male and female 24-pin connector that will tie into the factory harness. Do not connect this to the factory harness quite yet. On the other end, there will be two plugs that will run down and connect to the lights.
To run them down under the dash, feed the two plugs into the front left corner of where you took out the overhead dome light panel. Feed them straight toward the front of the headliner. I found that taping the two plugs to a stiff wire helps feed them inside the headliner.
Once the two plugs are near the front of the headliner, gently pry the headliner down and pull the two plugs out. Pull out the slack so that the 24-pin connectors sit right by the factory harness without any slack in the line. You should have several feet of wire to pull through the headliner.
Once the slack is pulled out, push the two plugs towards the driver’s side A-pillar and tuck the line back under the front lip of the headliner.
Step 4. Remove A-Pillar Trim

Double-check that you have disconnected the negative terminal at this point.
Use the black plastic triangle tool included with the kit to pry the SRS airbag cover piece off. Insert the tip of the tool into the gap around the oval and gently pry up. You should be able to pull off the oval piece with little effort.

Next, you should see a 10mm bolt that needs to be removed.

Begin to remove the A-pillar trim by gently pulling it off starting at the top. There is a plastic snap in the middle but it should come off fairly easily. Then, make your way down to the bottom of the trim piece until it is fully removed.
You should not have to force anything. Pulling it off too hard may break the trim and damage the airbag or wiring inside.
Step 5. Feed Wiring Harness Down A-Pillar
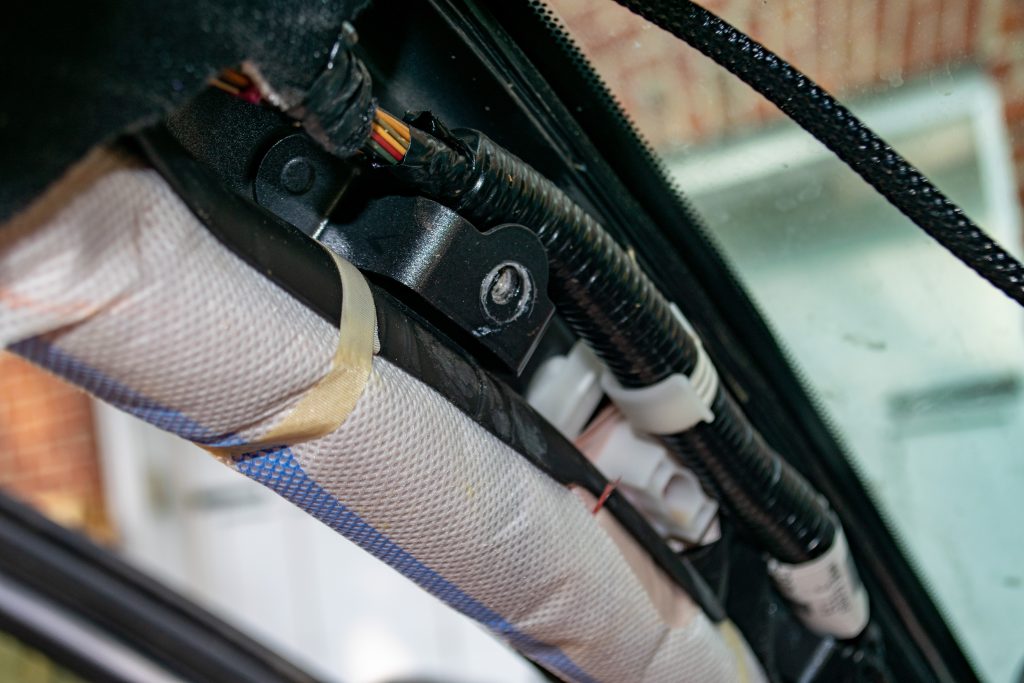
Take the two plugs sticking out of your headliner and run them beside the factory wiring on the inside of the A-pillar. Make sure that all the slack is removed and that the wire is tucked under the headliner all the way across to the A-pillar. This will ensure that when the A-pillar trim is reinstalled, the wires are completely hidden.

Included in the kit are several small zip ties. Use these to tie the wire you just fed down the A-pillar away from the airbag so that it does not interfere with it. I fed and zip-tied mine above and behind the factory wiring. Do not tighten it down too much or you risk damaging the factory wiring.
VLEDs recommends you zip-tie it away from the factory wiring, but I figured running it above and behind the factory wiring would ensure that it would not interfere with the airbag.
Step 6. Feed Wiring Harness Below Dash

At the bottom of the A-pillar, just beside the air vent and speaker, you should see a hole where the factory wiring goes below the dash. Feed the two plugs through this hole underneath the dash on the driver’s side.
After pushing the wires about halfway through, you should be able to reach up from underneath and pull them all the way through. They should come out right around where the driver’s side interior fuse box is.
I found it easier to tape the plugs to a stiff piece of wire and feed them through. You can also feed the stiff wire from up underneath and pull it through.
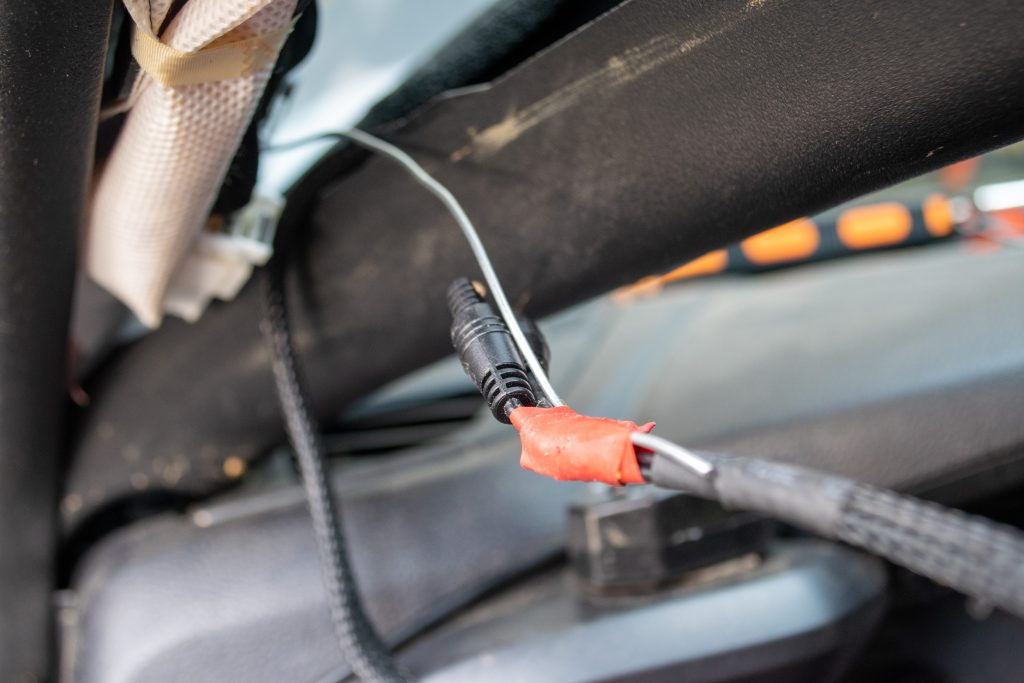
Step 7. Mount Dimmer

Next, plug the PWM dimmer into the two plugs you fed down the ceiling/A-pillar.

The two wires are labeled “High” and “Low”, respectively. Plug these wires into their corresponding connectors on the PWM dimmer.

Included in the kit are (X3) 3M double-sided adhesive strips. Set the two identical smaller ones aside for lights, and grab the larger rectangular one. Clean the back of the PWM dimmer with your isopropyl alcohol and microfiber cloth. Peel the yellow backing off and attach the adhesive strip to the dimmer.
Next, you will need to find a mounting point for the PWM dimmer. You should mount it in an area where you can easily adjust the dimmer. A mounting location too far from the A-pillar will put a strain on the writing harness.

I chose the metal box right above my brake pedal. This is well hidden yet still easily accessible for brightness adjustments. If you choose to mount it where I did, make sure to zip-tie the cable well up out of the way of the pedals.
Step 8. Connect Wiring Harness

Going back to the wire harness for the overhead panel, Attach the VLEDS wire harness to the factory harness.
Step 9. Reinstall Parts

Start with reinstalling the overhead panel. Tuck the ends where the wiring harness tapped into the factory harness and push the overhead panel back into the headliner. Start at the front and ensure the front two plastic plugs snap into place. Then, move to the back of the overhead panel and do the same.

To reinstall the A-pillar trim, insert the bottom of the trim where the air vent and speaker are. Snap it into the weather seal on both sides and press into the center plug until you hear it snap into place.
Next, move to the top of the trim piece and seat it into the weather stripping. Ensure it’s flush with the headliner and that the wire you ran is hidden above the headliner and inside the A-pillar trim.
Finally, reinstall the 10mm bolt and cover.
Step 10. Mount Driver’s Module

The hard part is over, and now it’s time to mount the lights and link them to the module.
Take one for the driver’s side and attach the female plug directly to the male plug output on the PWM dimmer. Take one of the two remaining double-sided 3M strips and stick it on the back of the LED module.
Next, take your rubbing alcohol and mix fiber cloth and clean the area underneath the dash in the middle where it will be mounted. Ensure the light is not mounted too far back as it won’t shine fully on the footwell. Once the mounting location is determined and cleaned, remove the red 3M backing and install.
Step 11. Connect & Feed Extension

You have likely noticed that the lights have two ends by now. This is to connect them together with the 4’ extension wire. Take the extension wire and connect it to the male end of the driver’s side light that is already mounted.
Then, locate the hole on the right side of the driver’s footwell. Feed the wire through the transmission tunnel and out the hole on the passenger’s side.
Step 12. Mount Passenger’s Module

Take the male end of the extension and connect it to the female passenger’s side light.
Repeat the same process in Step 10 to mount the other side.
With both mounted, roll up and zip-tie the slack in the extension wire and tuck it into the transmission tunnel on both sides so that the wire is tight (but not strained) and hidden.
Step 13. Reconnect Battery & Test

Now it is safe to reconnect the battery and test everything out. If the dome light switch is set to activate when the doors are open, the footwell lights should light up. This is the “Courtesy Mode”.
To test “Night Mode”, turn your headlights on and the footwell lights should light up.
Step 14. Adjust Brightness

Courtesy Mode will always operate at the brightest setting, while Night Mode can be dimmed to your personal preference. I believe night mode is set on the lowest setting right out of the box.
To adjust the brightness, hold the door switch on the inside of the door panel down until the dome and footwell lights turn off. On the PWM dimmer, there is a small white dial with a “+” and “-“.
Review

I think this is a great kit for anyone looking for an easy way to upgrade their 3rd Gen Tacoma’s interior. Honestly, I didn’t know how much of a difference footwell lights could make until installing this kit.
I love how they are seamlessly integrated with the OEM switches. The wires, lights, and dimmer module are hidden well, and everything is very discreet. They are even better than OEM because they’re adjustable and much brighter.
The only drawback to this kit is that with the footwell lights on, you realize just how bad the factory Tacoma dome lights are! I will soon have to install the VLEDs Tacoma interior kit as well to match.
Final Thoughts

The VLEDS dual output footwell lighting kit is not only an aesthetic upgrade but a practical one as well.
To my knowledge, all 3rd Gen Tacomas have black carpet, door panels, and trim.
Personally, I love my black interior. It gets filthy in my line of work and when overlanding, and the black interior hides much of this dirt. However, the downside to having all-black carpets, floor liners, and trim is that it’s nearly impossible to see anything inside the cab at night. That can cause a major distraction while driving.
Overall, this kit looks great, is easy to install, and integrates well with the OEM wiring. It adds a modern touch to your interior and has proven to be a practical upgrade for driving at night.
